CUET Job portal - Documentation
- Item Name : CUET Job portal
- Created: 22 December 2024
- Author : TheTork
- Support Mail: Support Mail
This documentation is designed to assist you with each step of customization. Please read it carefully to understand how this module is structured and how to edit it effectively.
System Requirements
To use CUET, make sure your hosting provider is running the following software:
- Backend: Laravel 10
- Frontend: Next.js 14
- Server: Apache, nginx, or another compatible web server
- Database: MySQL Database server
- PHP Version: PHP 8 or higher
- Node.js Version: Node.js 18 or higher
- Memory: Minimum 4GB RAM (8GB recommended)
- Storage: Minimum 20GB disk space
Required PHP Extensions
- PDO PHP extension
- OpenSSL PHP extension
- mbstring PHP extension
- exif PHP extension
- fileinfo PHP extension
- xml PHP extension
- Ctype PHP extension
- JSON PHP extension
- Tokenizer PHP extension
- cURL PHP extension
- zip PHP extension
- iconv PHP extension
- Ensure the
mod_rewriteApache module is enabled
Recommended PHP Limits
Many issues that you may run into such as: white screen, demo content fails when importing, empty page content and other similar issues are all related to low PHP configuration limits. The solution is to increase the PHP limits. You can do this on your own, or contact your web host and ask them to increase those limits to a minimum as follows:
max_execution_time 300memory_limit 256Mpost_max_size 64Mupload_max_filesize 32Mmax_input_time = 60max_input_vars = 3000
On this project, we're using the Laravel 10.x. Please go to Laravel documentation page for more information. Also consider upgrading your PHP version to the latest stable.
Installation Process
Laravel 10 Installation
- Ensure you have Composer installed. If not, download it from Composer's official website.
- Run the following command to create a new Laravel project:
composer create-project laravel/laravel project-name - Navigate to the project directory:
cd project-name - Set the application key:
php artisan key:generate - Configure your environment variables in the
.envfile for database and other settings. - Run the Laravel development server:
php artisan serve - Access the application at http://localhost:8000.
Next.js 14 Installation
- Ensure you have Node.js installed. Download it from Node.js official website.
- Run the following command to create a new Next.js project:
npx create-next-app@latest project-name - Navigate to the project directory:
cd project-name - Start the development server:
npm run dev - Access the application at http://localhost:3000.
Additional Notes
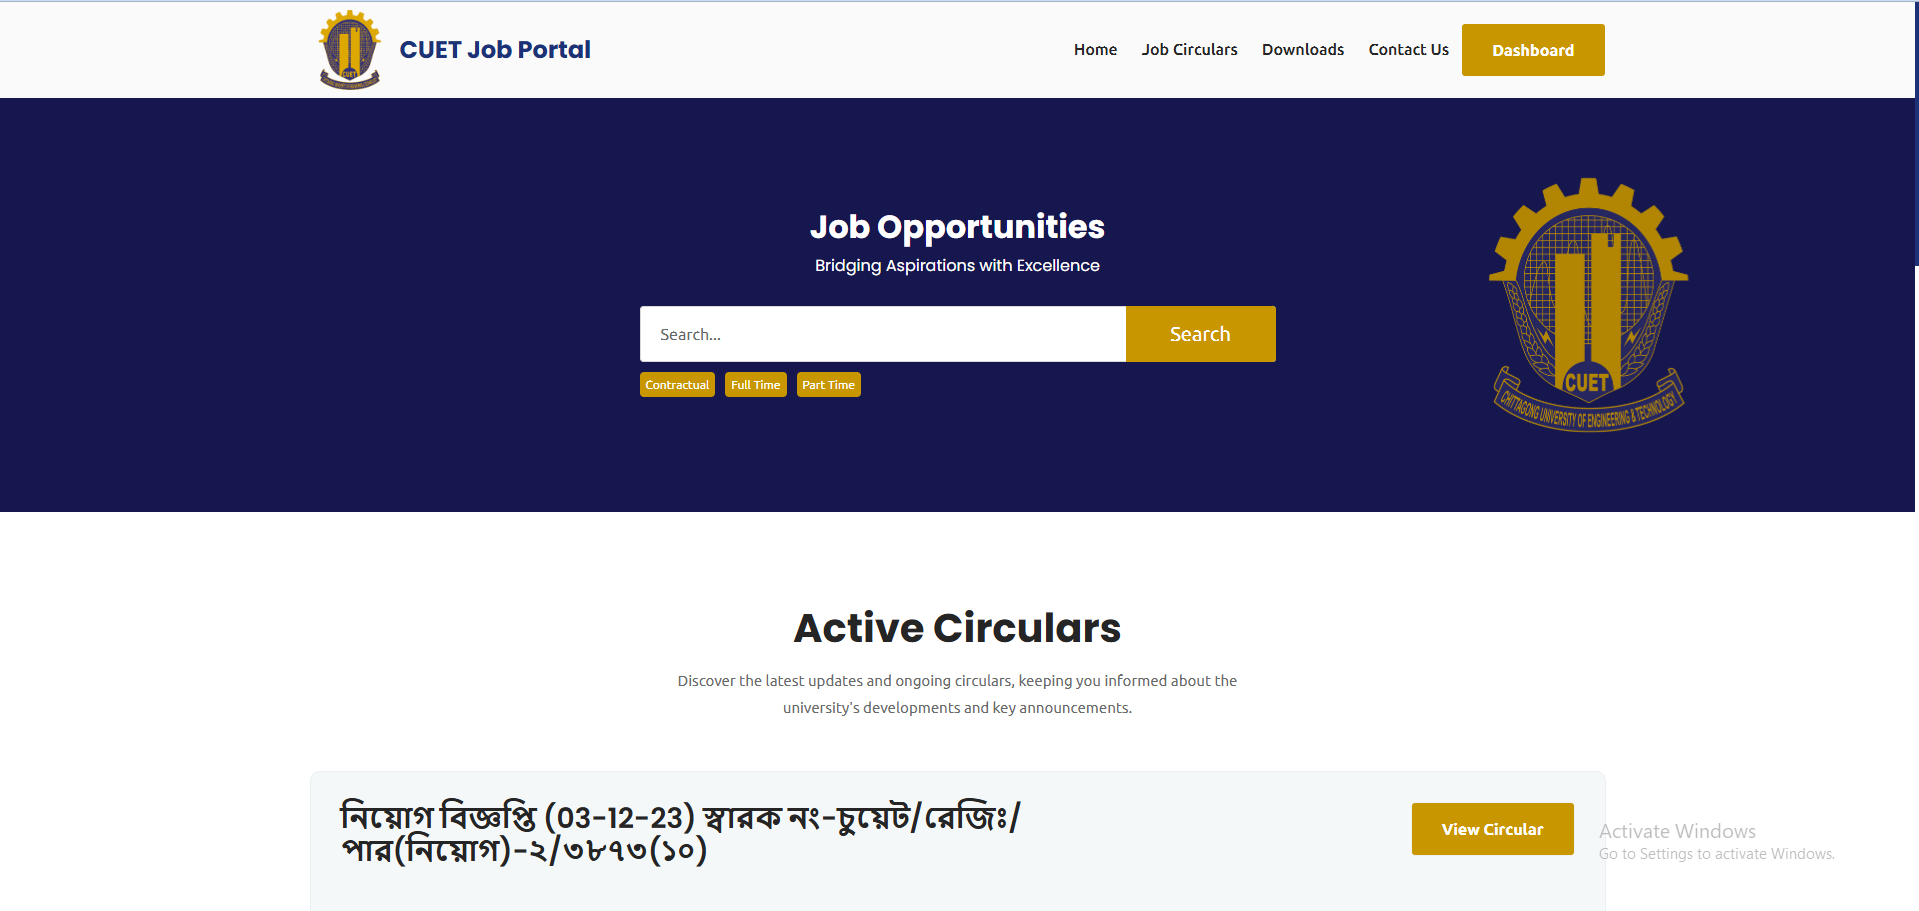
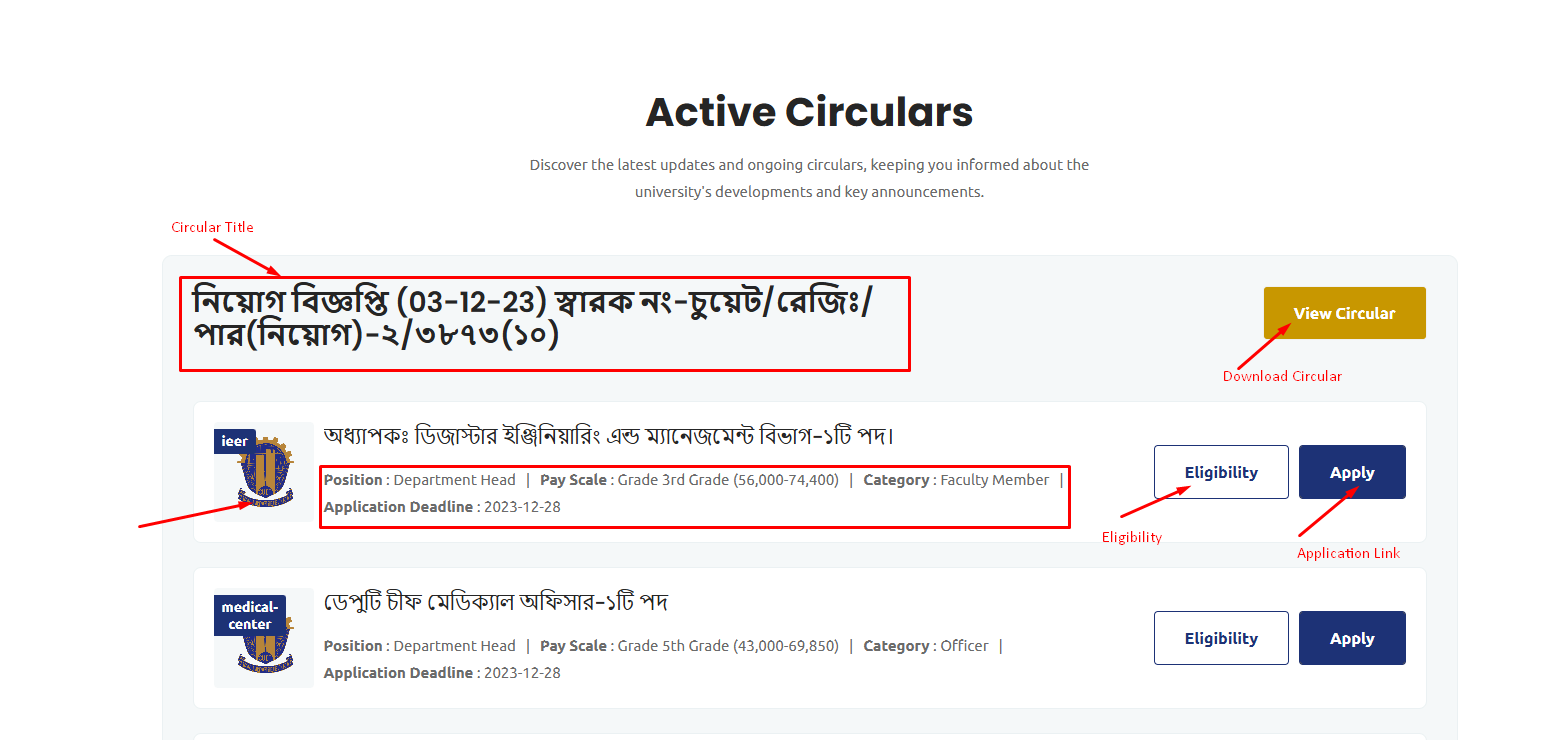
Home Page
This section displays a job circular announcement with detailed information for each available position, including the title, pay scale, category, application deadline, and action buttons for viewing eligibility criteria or submitting an application.
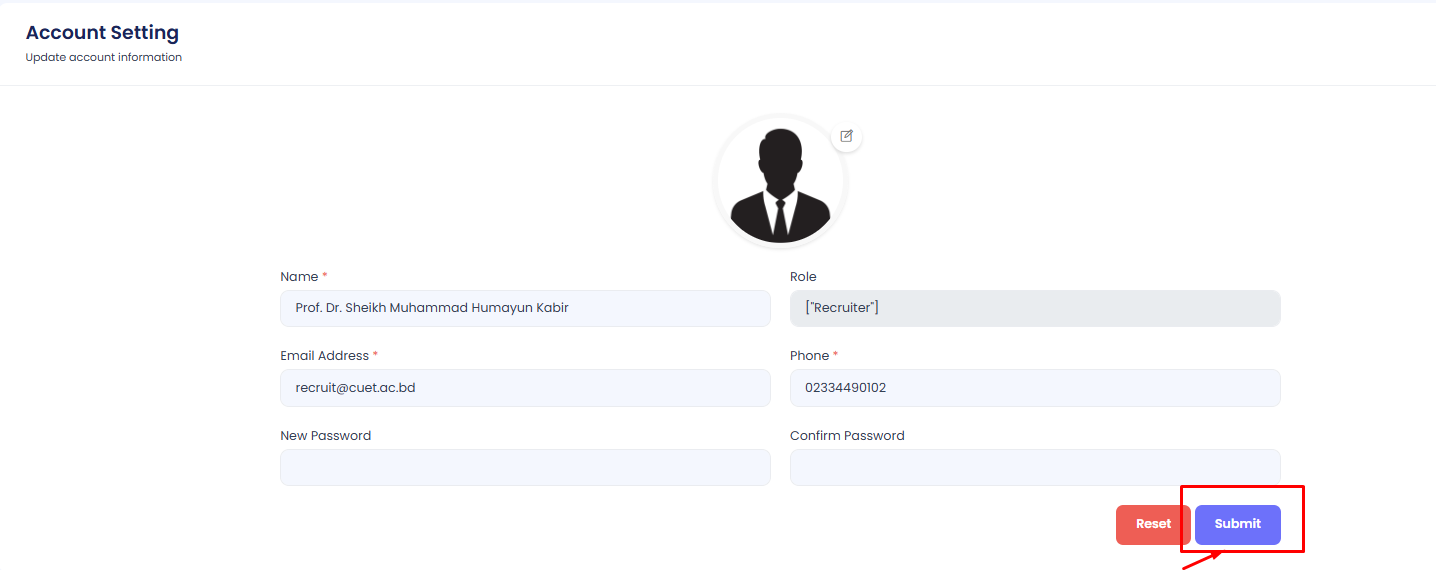
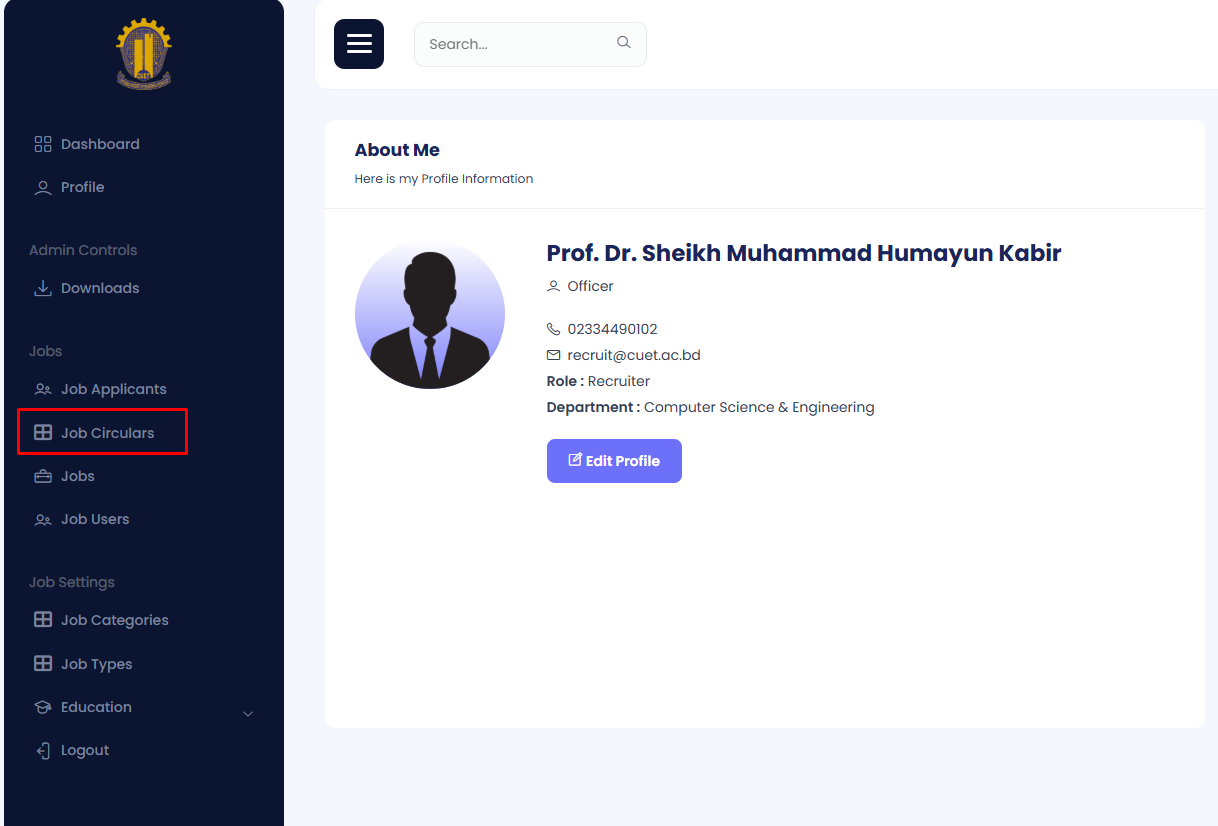
Profile
In this section you can update your profile
Step 1: Navigate to Profile in your admin sidebar and click.
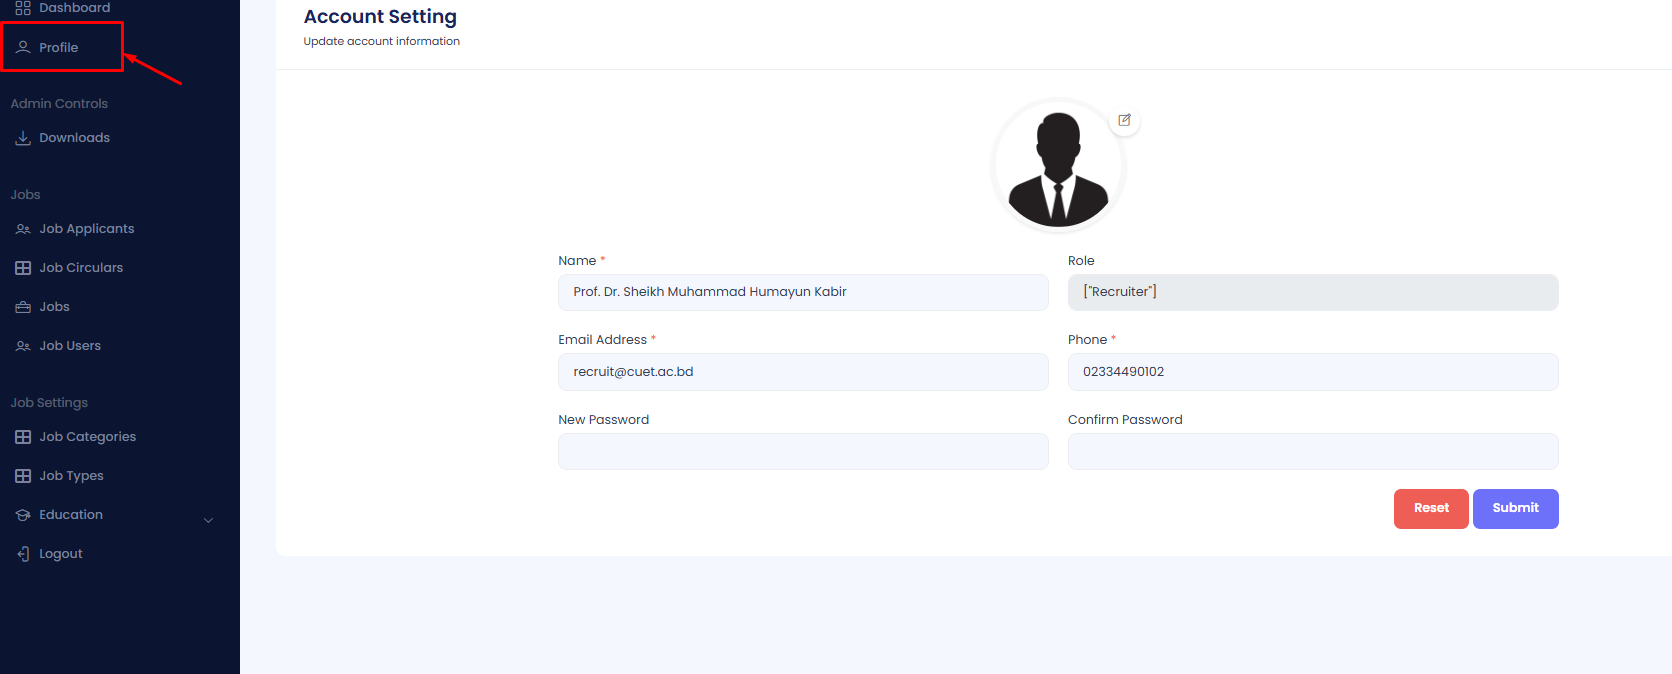
Step 2: Change the name, email or phone number, etc. Then hit submit button.
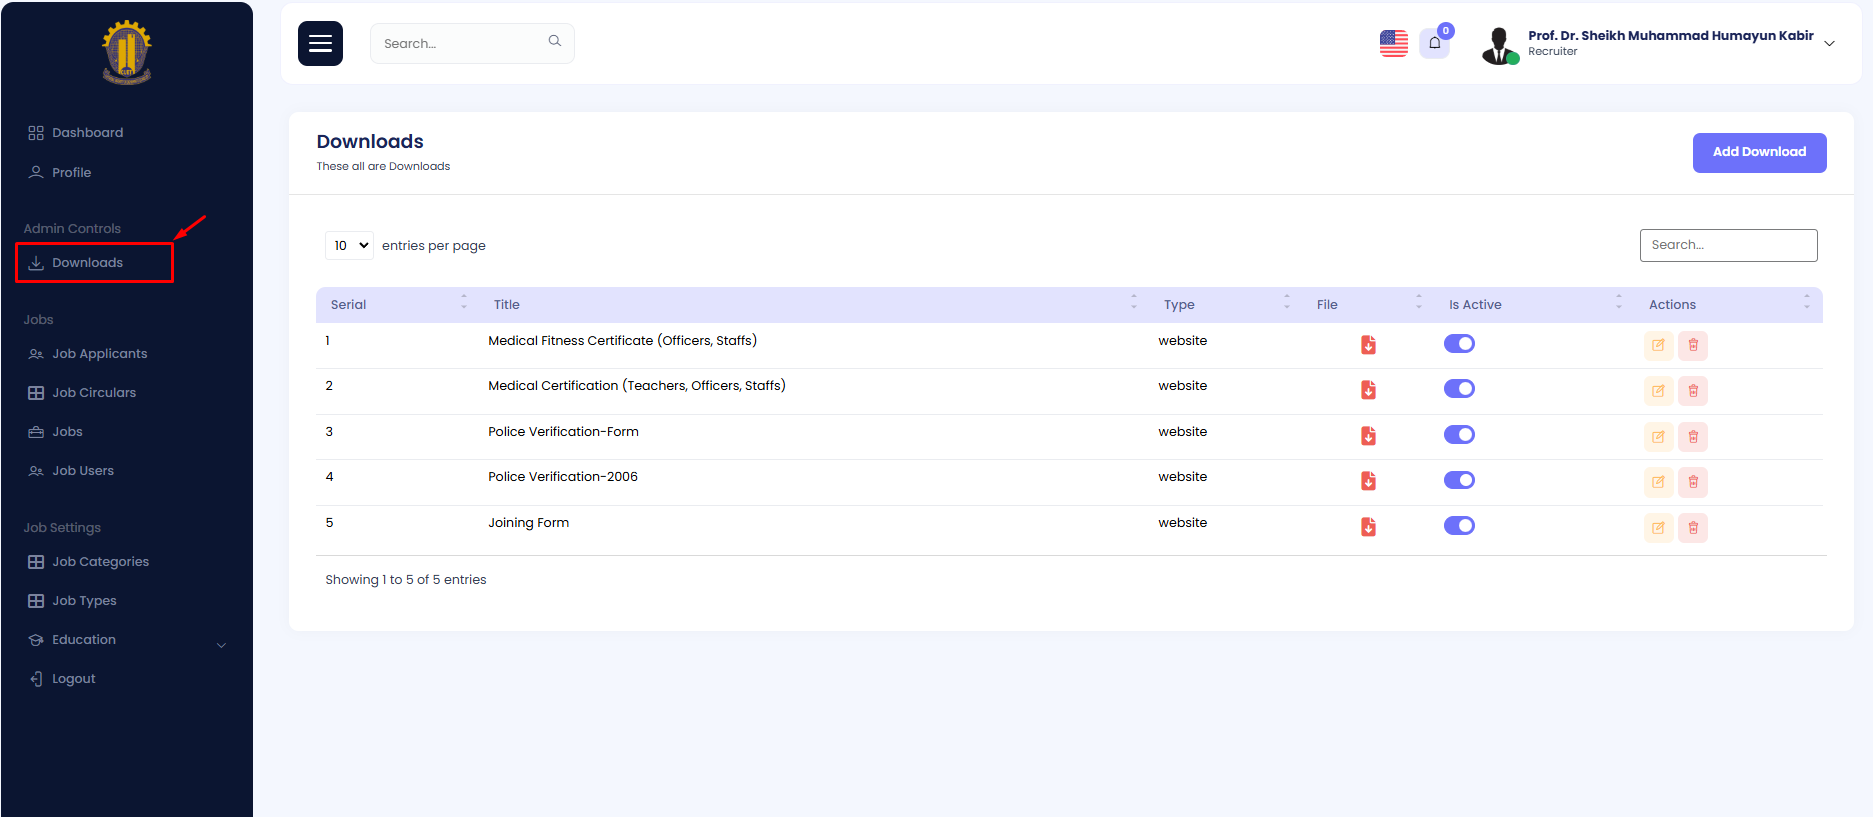
Downloads
In this section, the admin can add important files for users to download.
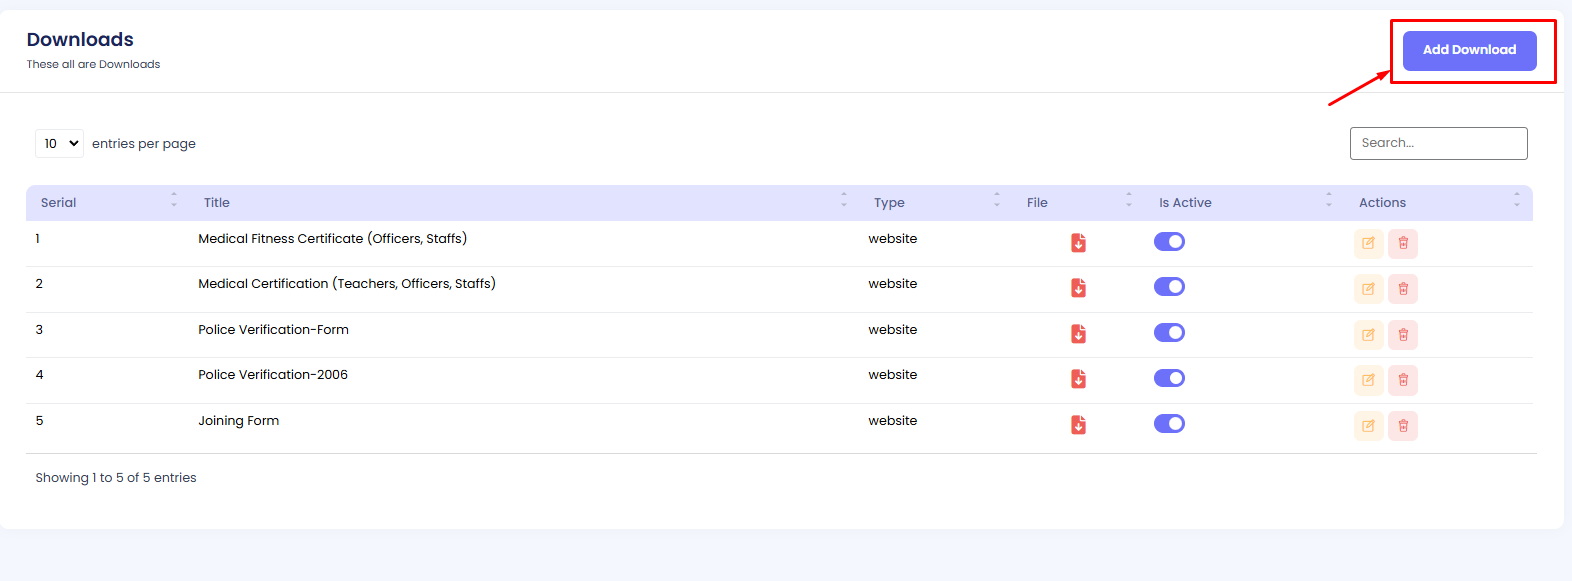
Add Downloads
Step 1: Navigate to Downloads in your admin sidebar and click. Here you will see a list of dowloads entries.
Step 2: Click on Add Job Downloads
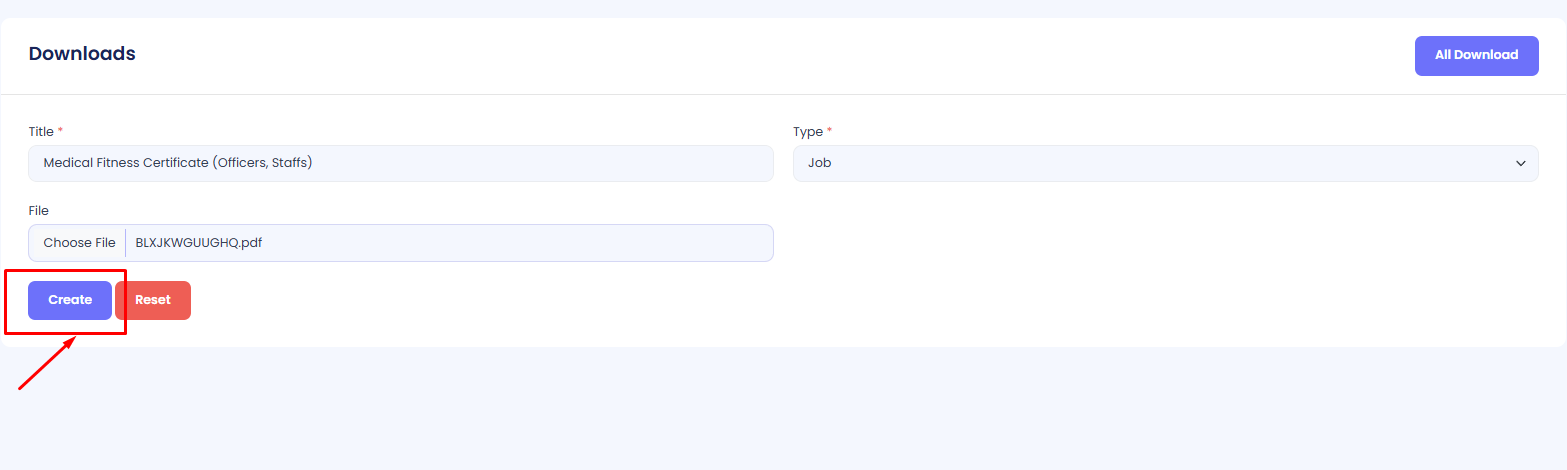
Step 3:Fillup the form with correct title, attach file and hit create button.
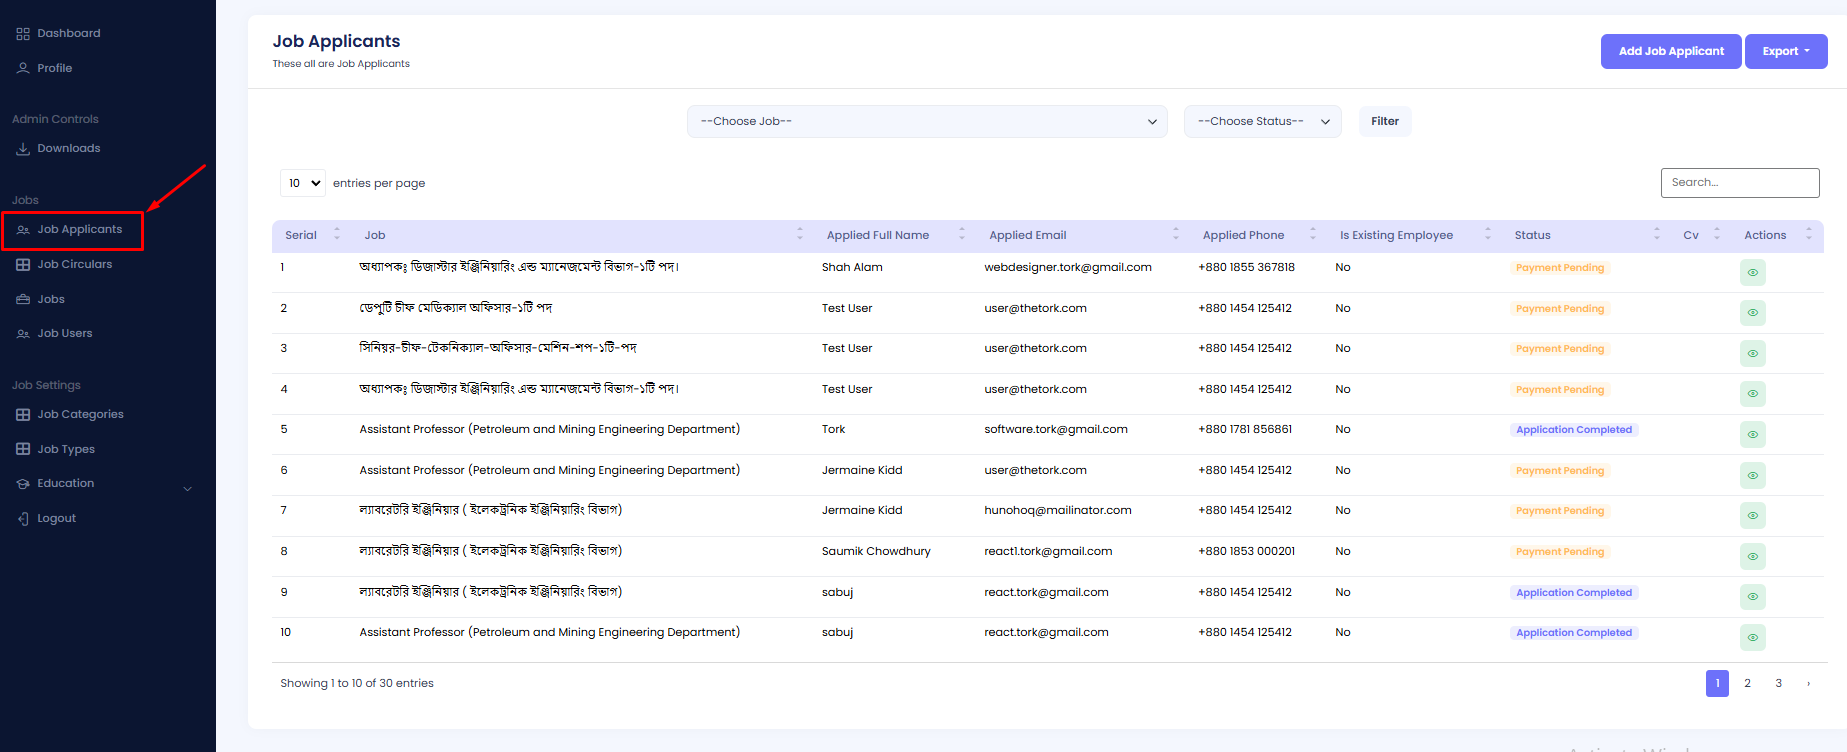
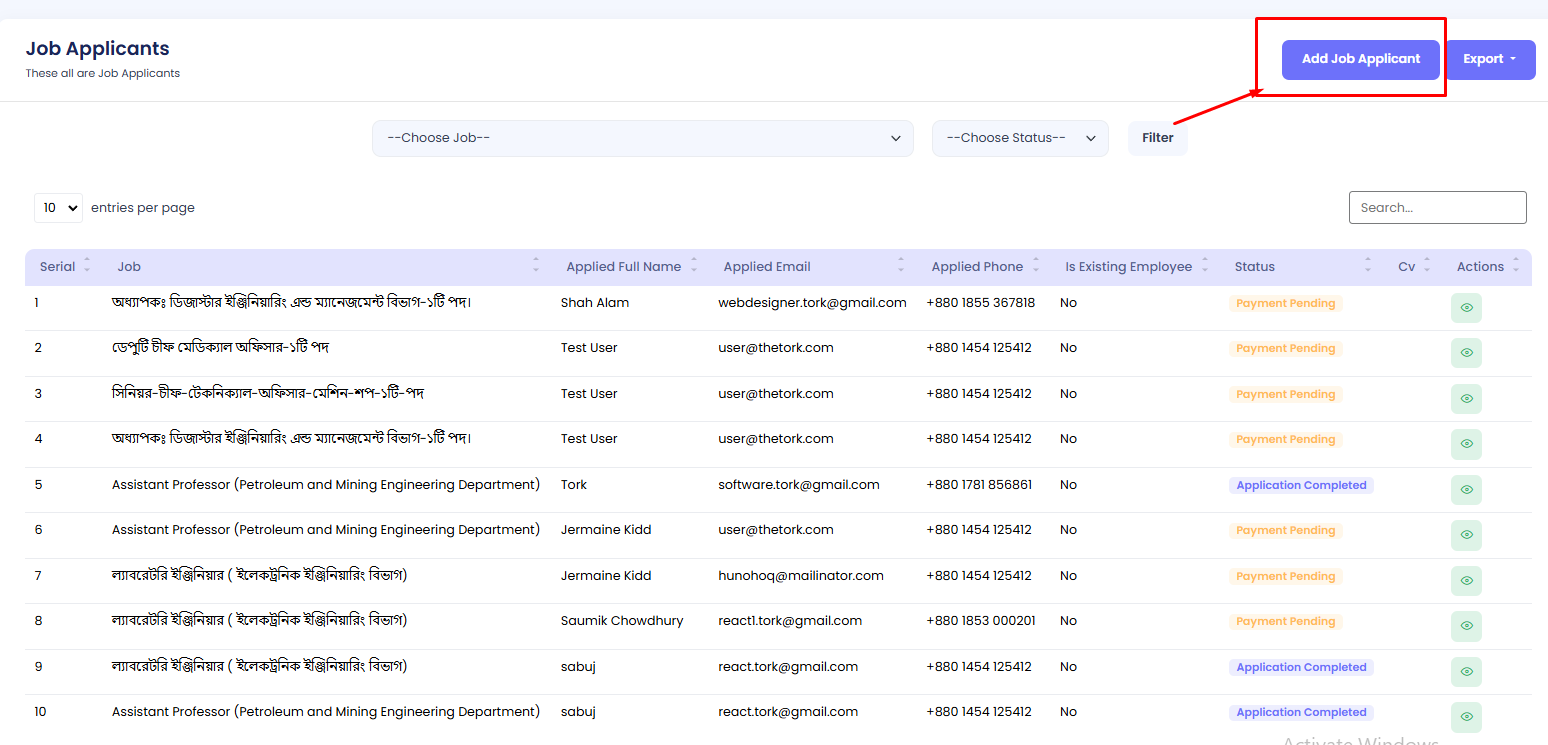
Job Applicants
In this section you'll view who have applied on different position of a job circular.
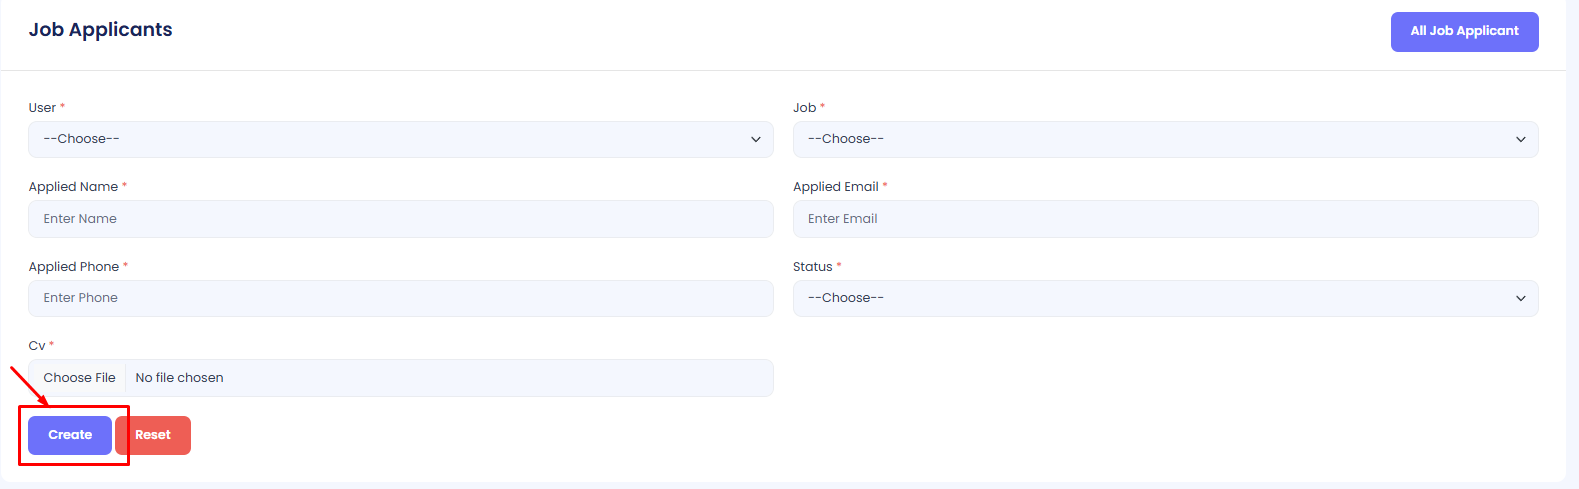
Add Job Applicants
Step 1: Navigate to Job Apllicants in your admin sidebar and click.
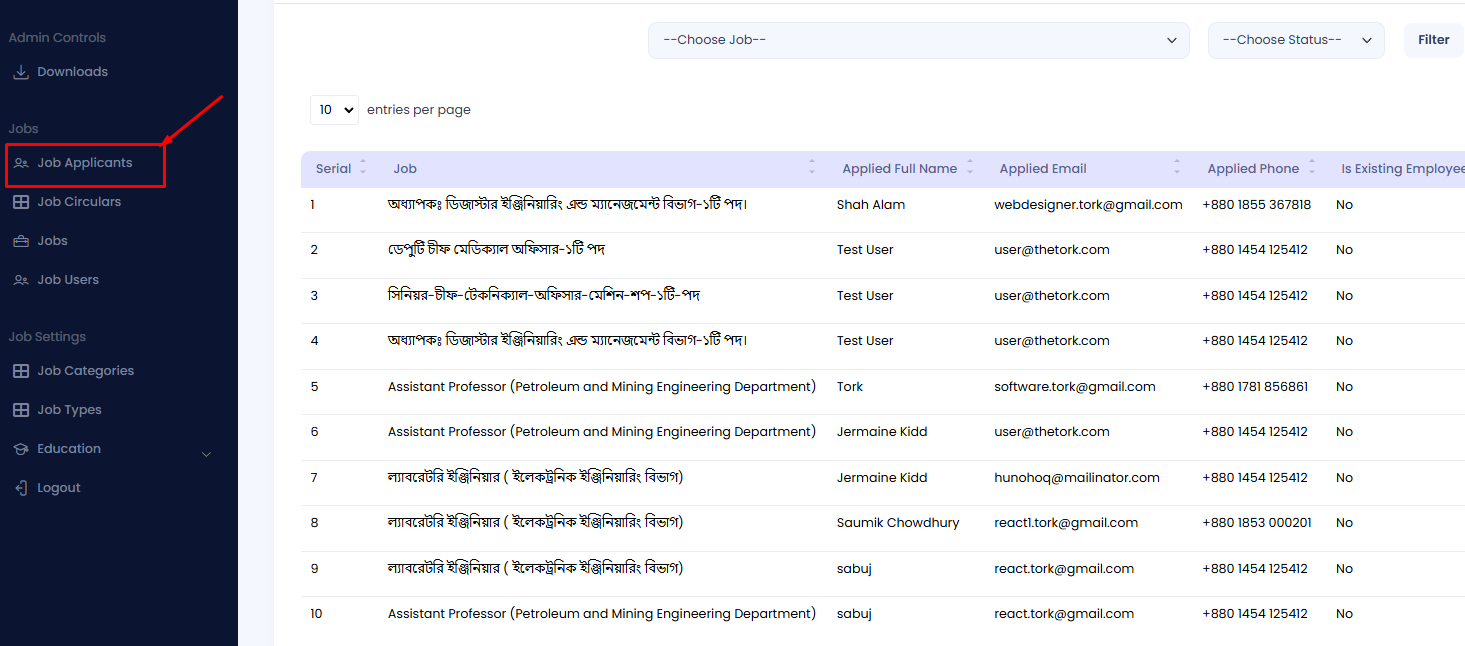
Step 2: Click on Add Job Apllicants
Step 3:Fillup the form with correct information and hit create button.
Job Applicants Status
There are two status. One is Payment Pending: this applicants complete his application but didn't pay the fees. application Complete: this user complete his application along with his application fees.

Export
An admin can export all the application in an excel or pdf file.
Step 1: Navigate to Job Apllicants in your admin sidebar and click.
Step 2: Click on Export
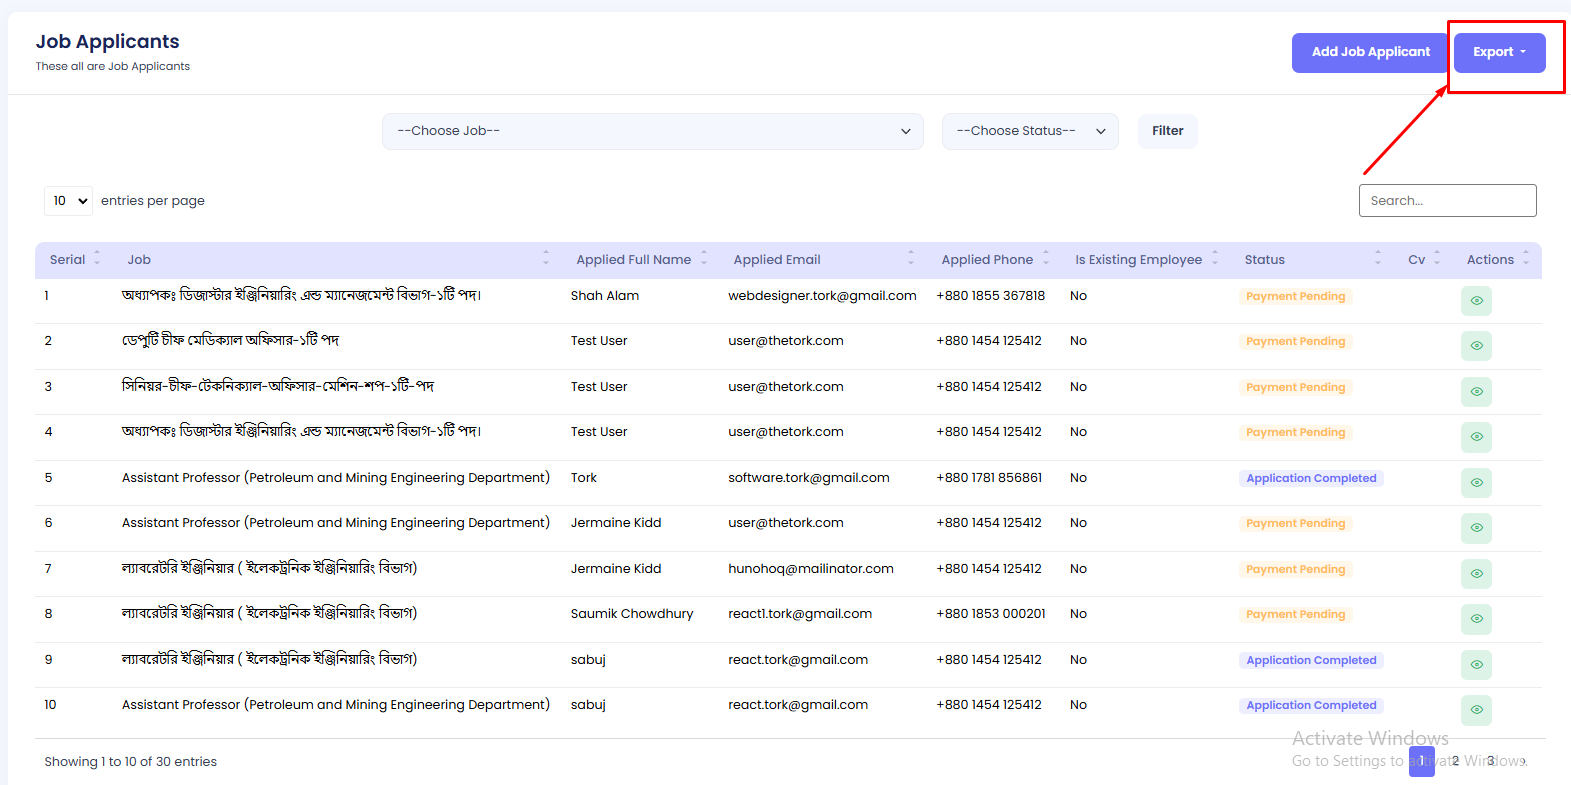
Step 3: Select excel/pdf
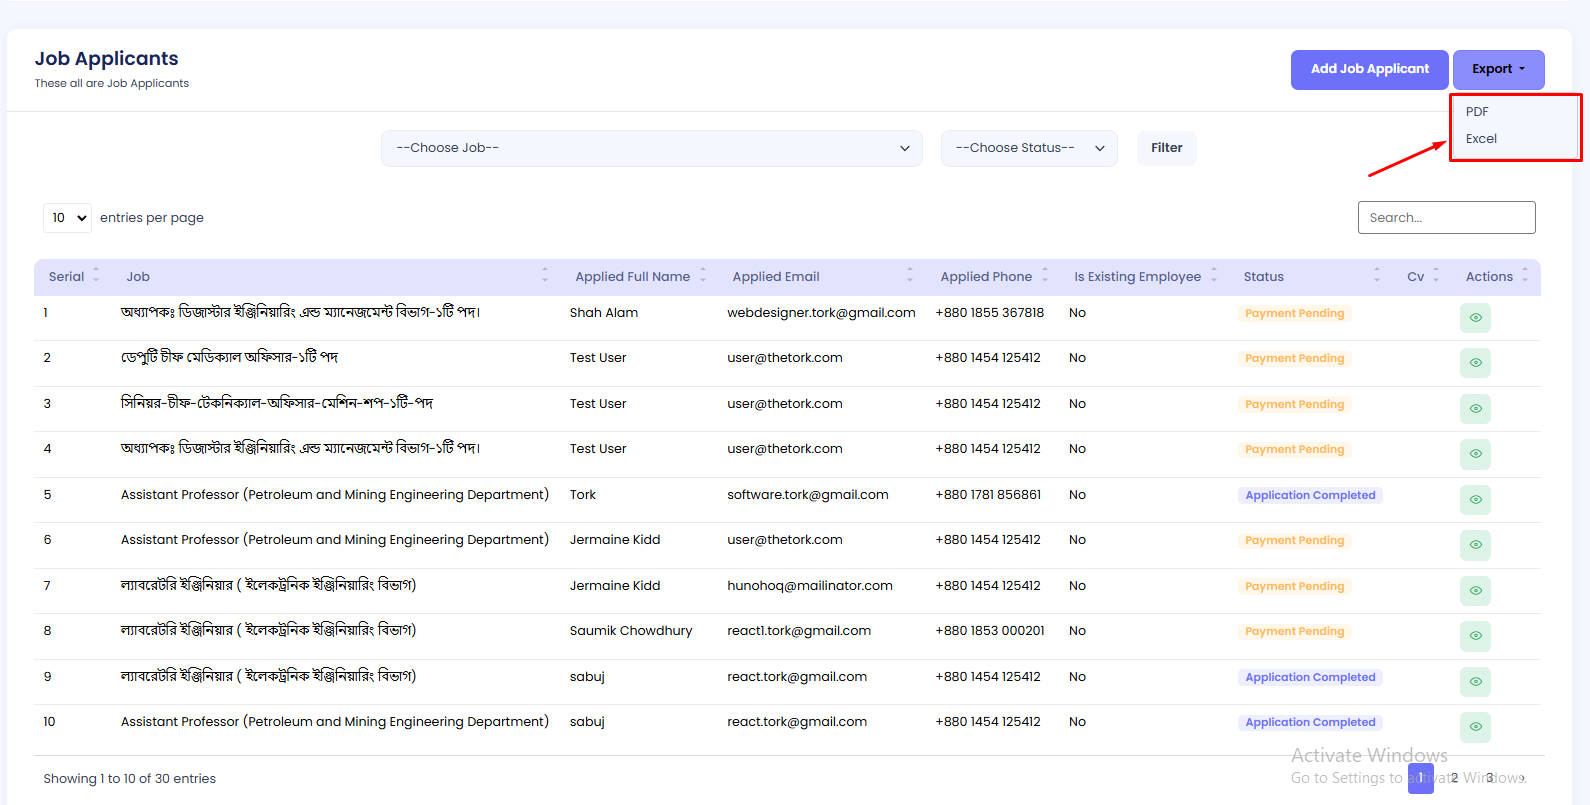
The file has already been successfully downloaded.
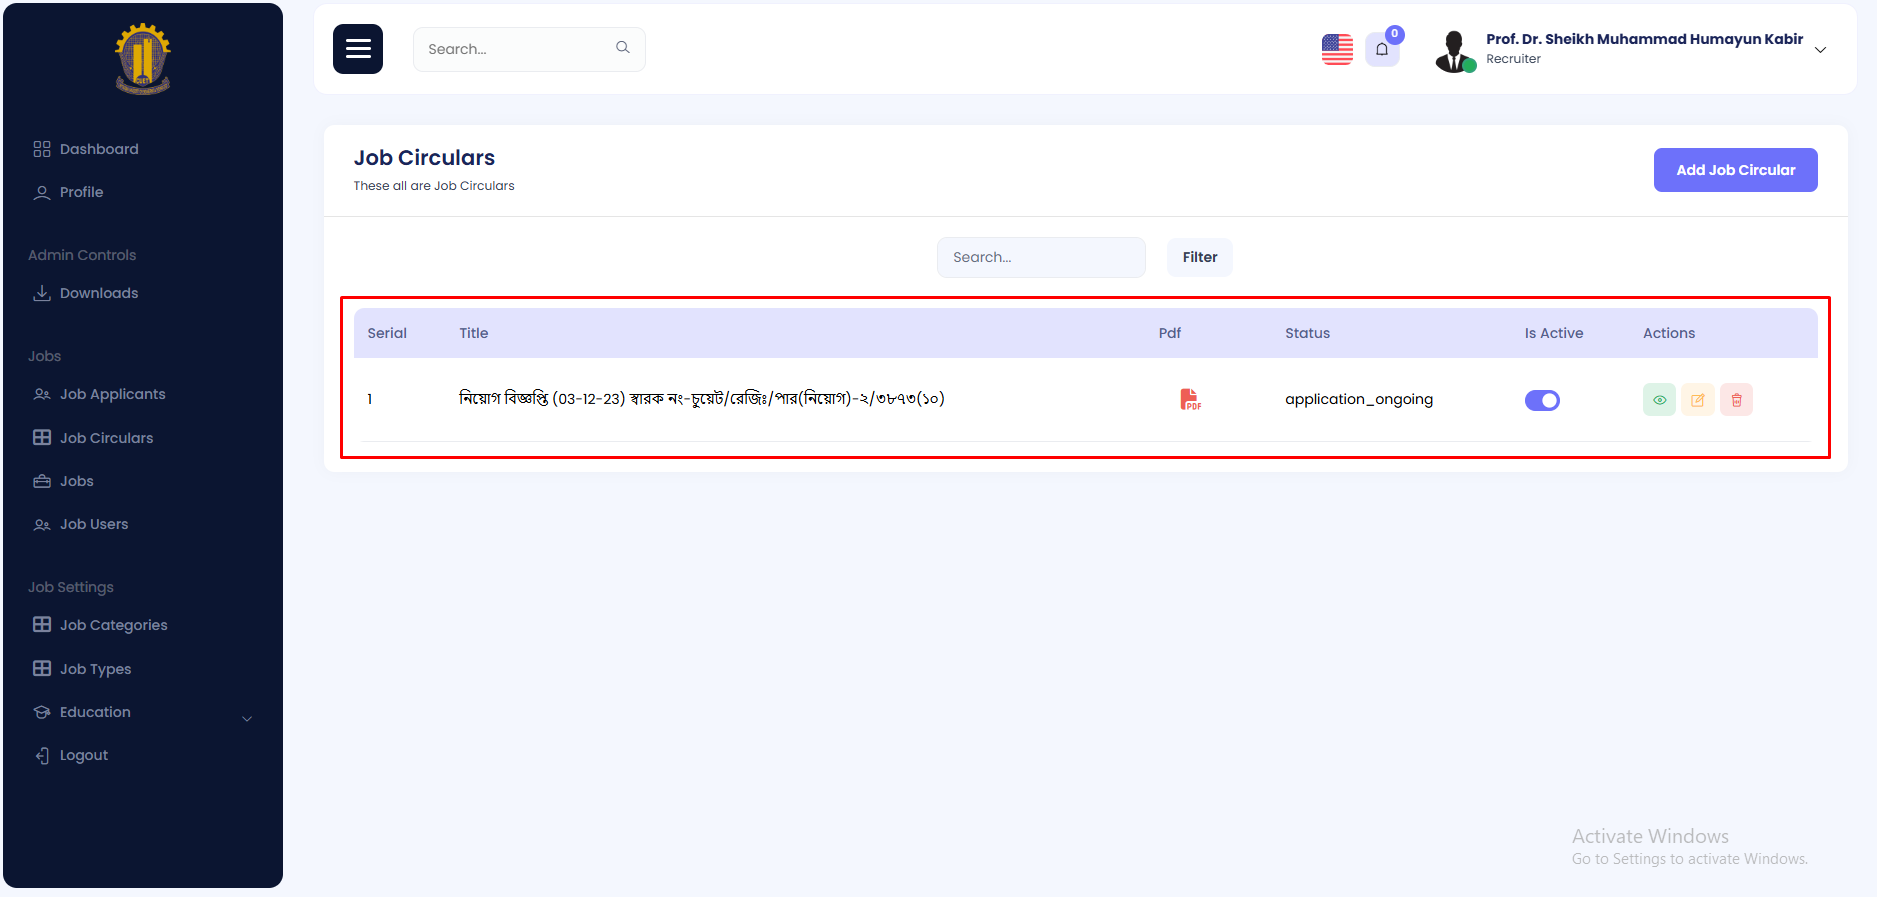
Job Circular
All available job circulars can be viewed in this section.
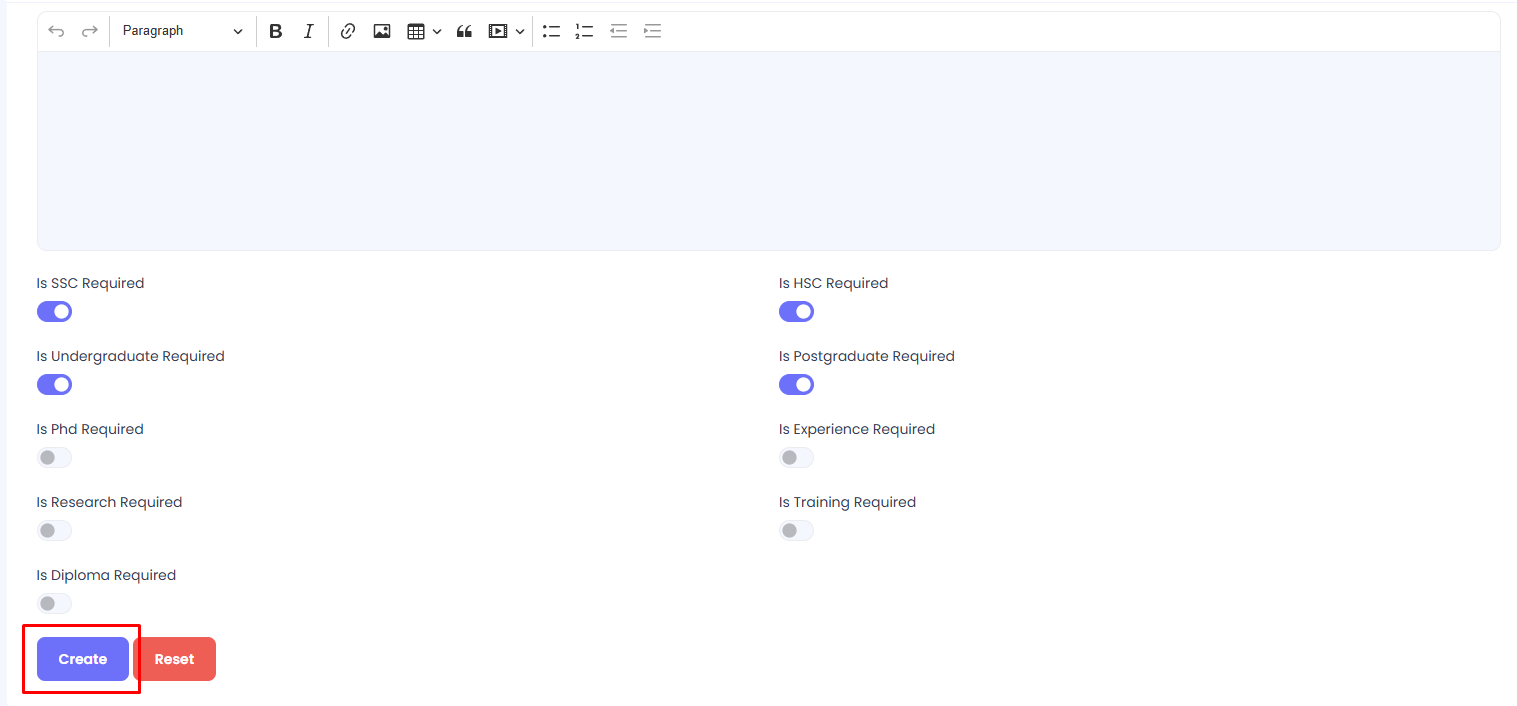
Create a Job Circular
Step 1: Navigate to Job Circulars in your admin sidebar and click.
Step 2: Click on Add Job Circular
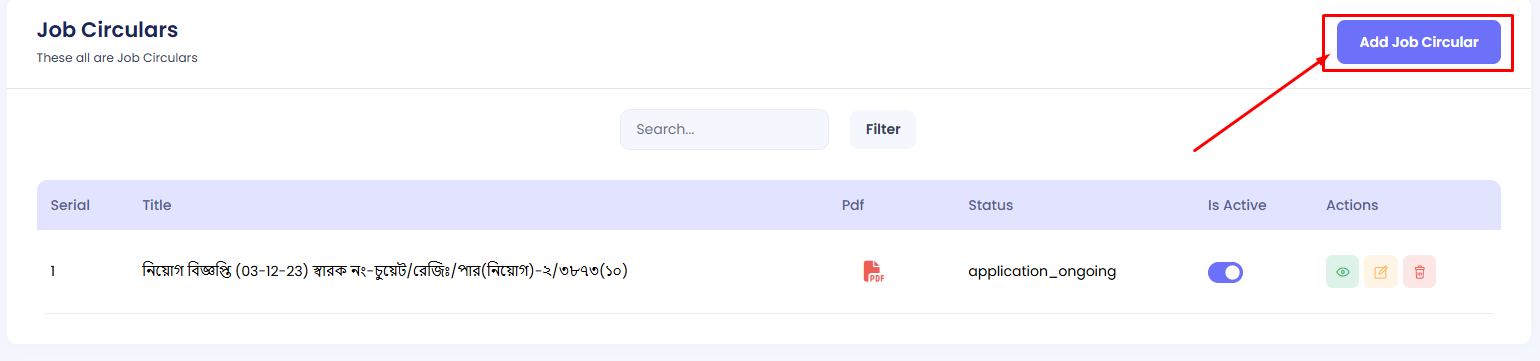
Step 3: Enter the title, pdf of circular, status and save it. Now your Job circular is ready to view.

Job active/deactive
Step 1: Navigate to Job Circulars in your admin sidebar and click.
Step 2: Find your target Job from the list.
Step 3: Press the toggle button under the title is_active and active/deactive the job.
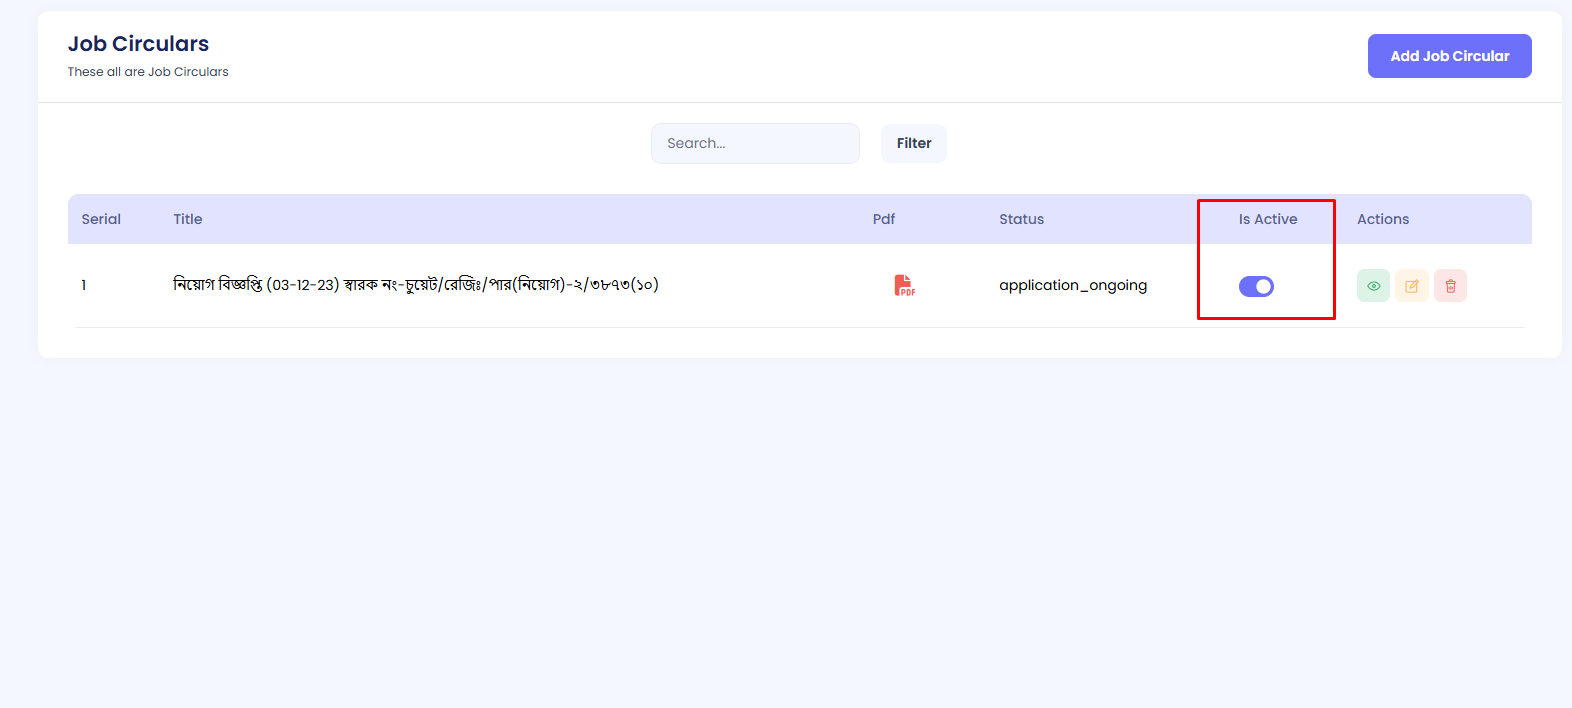
Result of active/deactive
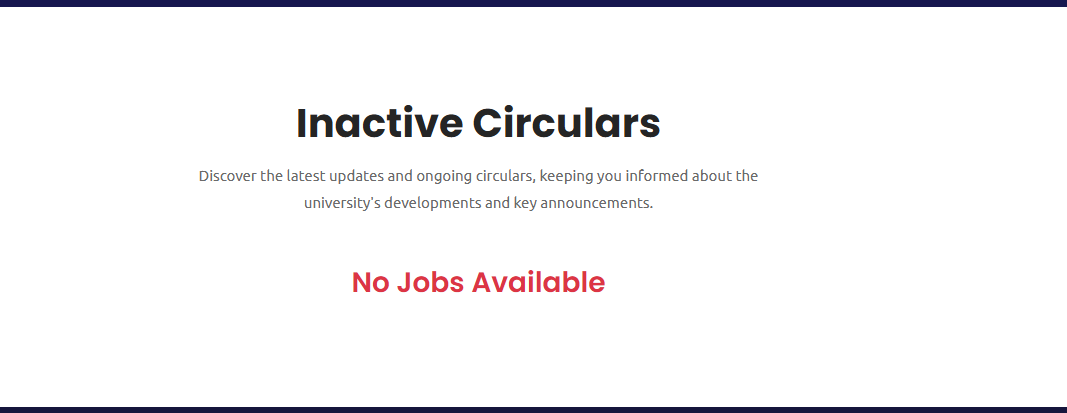
Deactive jobs will not visible in the job portal.

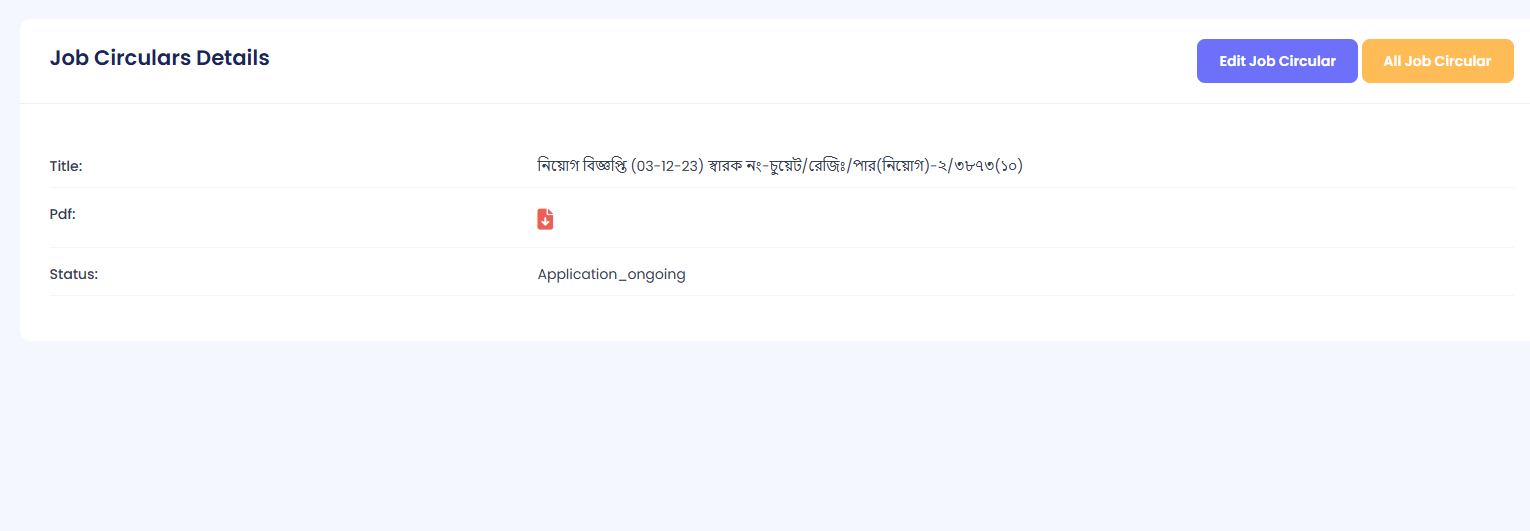
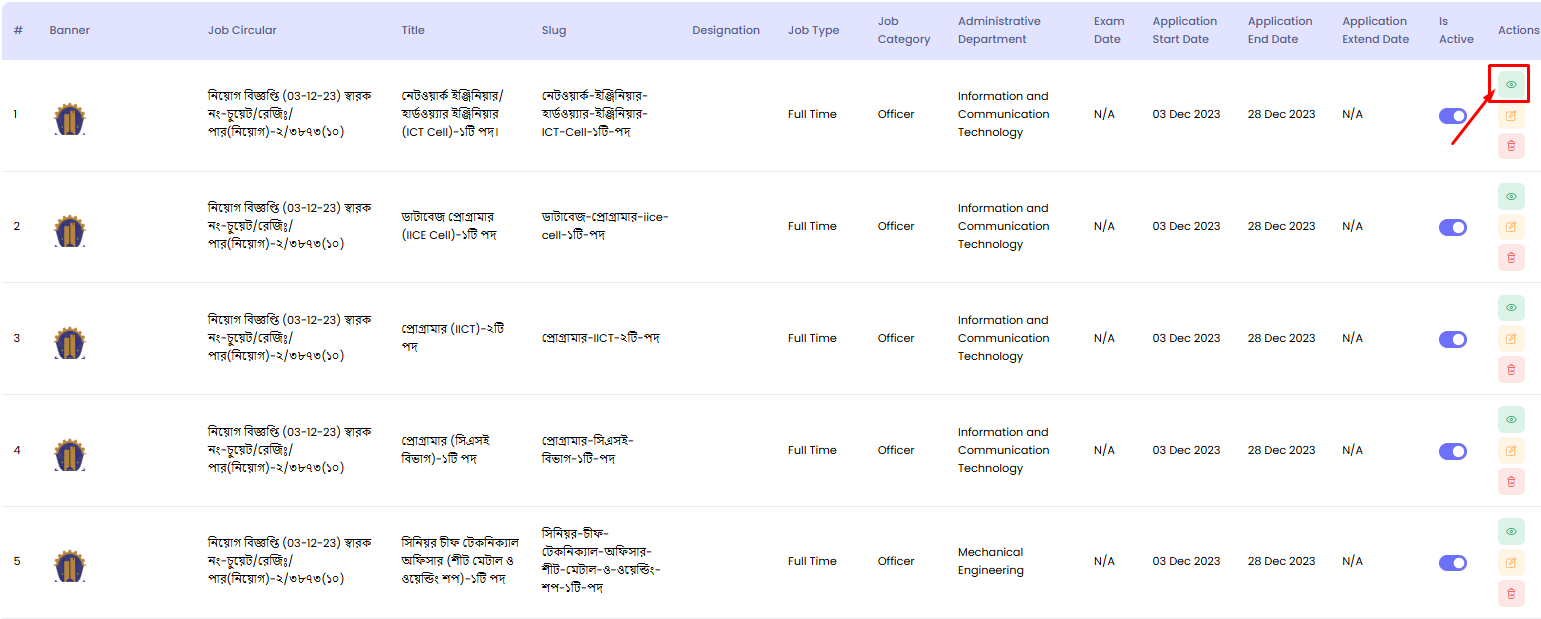
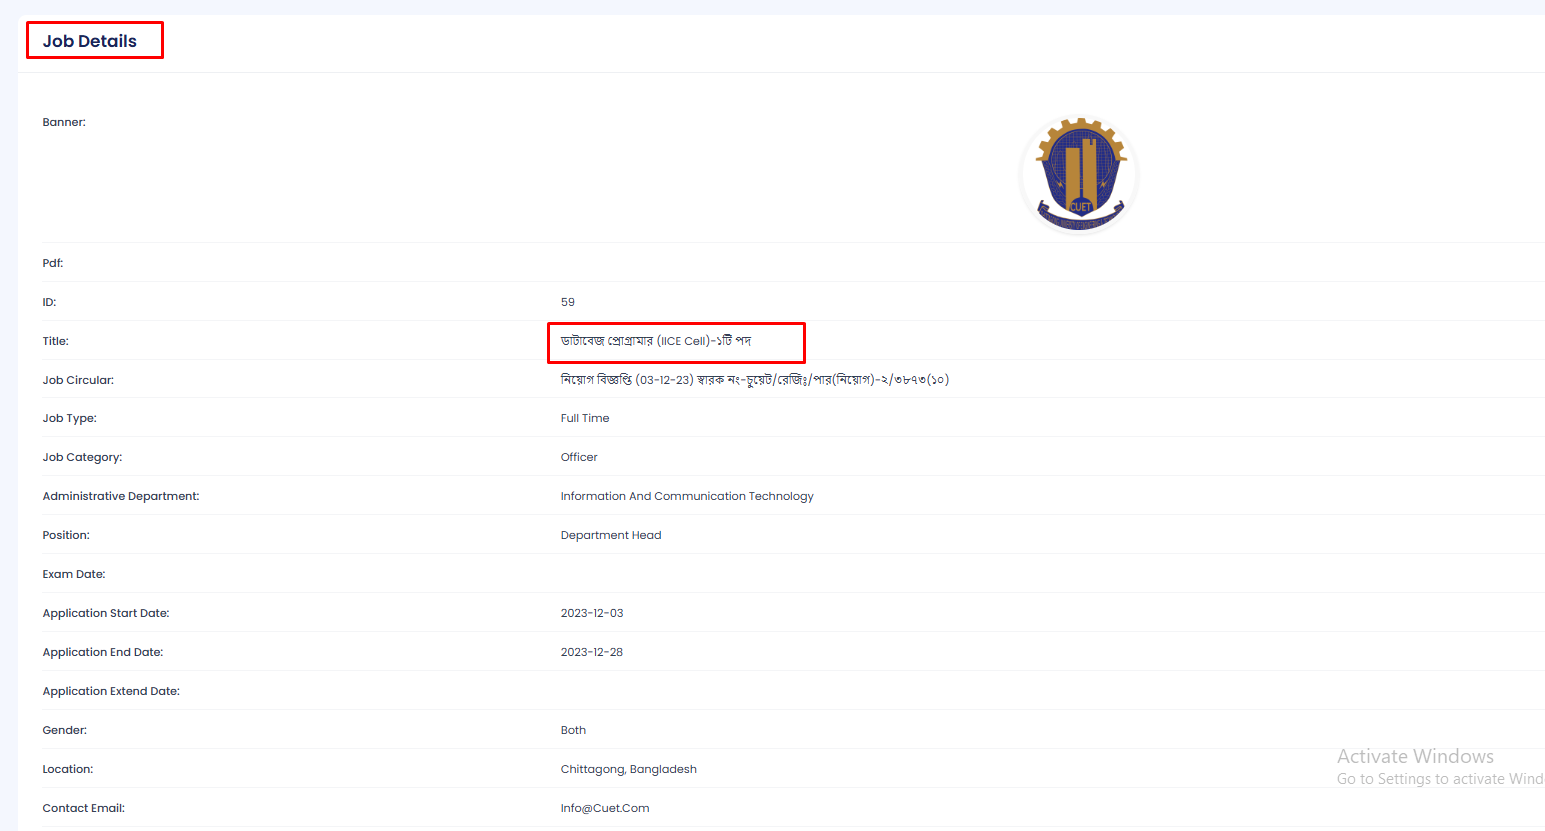
View
You can View a job from admin portal.
Step 1: Navigate to Job Circulars in your admin sidebar and click.
Step 2: Press view button to view job.

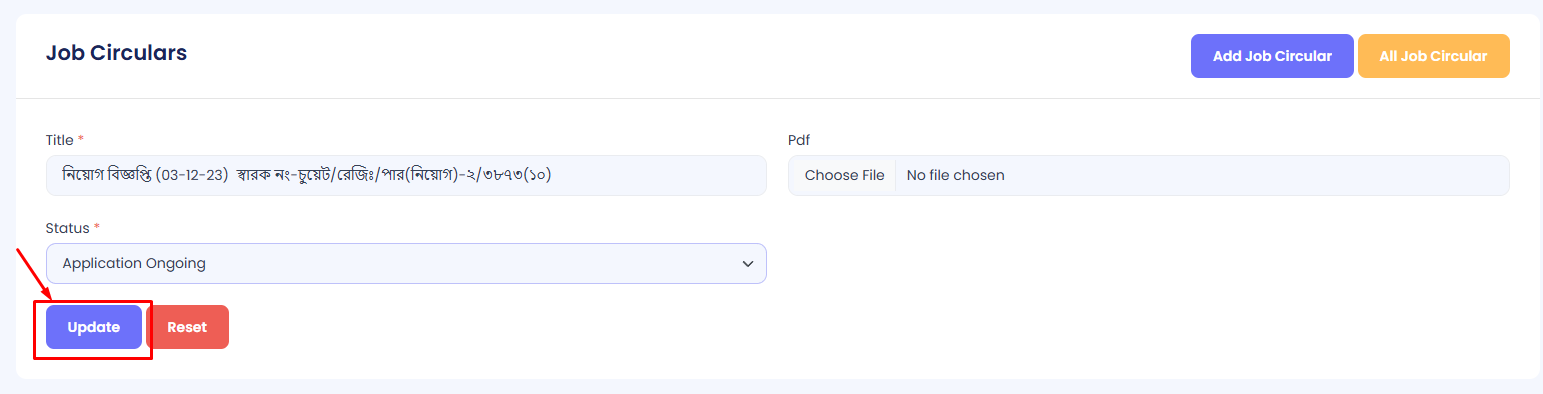
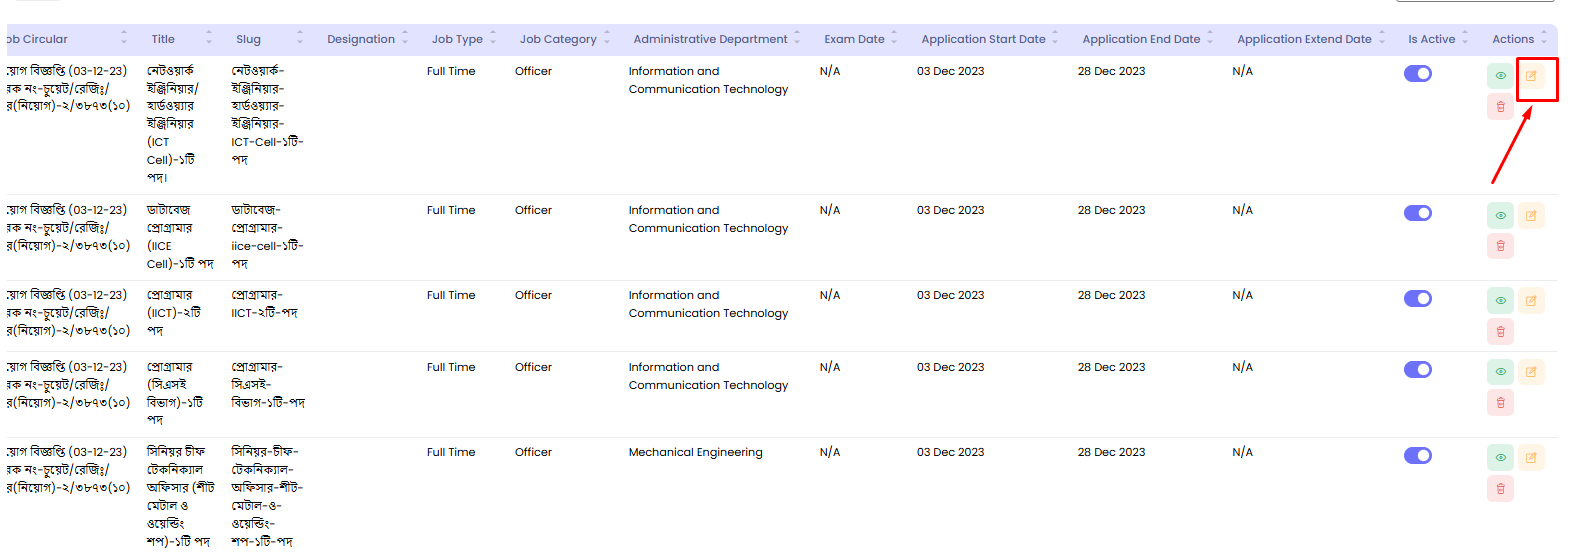
Edit
You can Edit a job from admin portal.
Step 1: Navigate to Job Circulars in your admin sidebar and click.
Step 2: Press edit button to edit job.
Edit the data as needed. Then press on update button
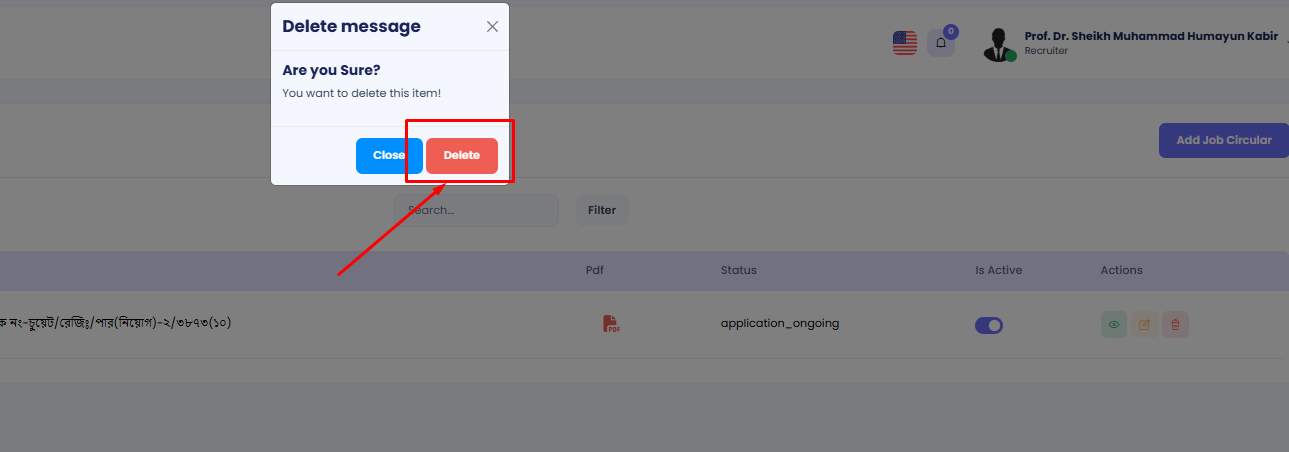
Delete Job Circular
Step 1: Navigate to Job Circulars in your admin sidebar and click.
Step 2: Press delete button to delete job.
To confirm deletion, press the delete button again on the confirmation modal.
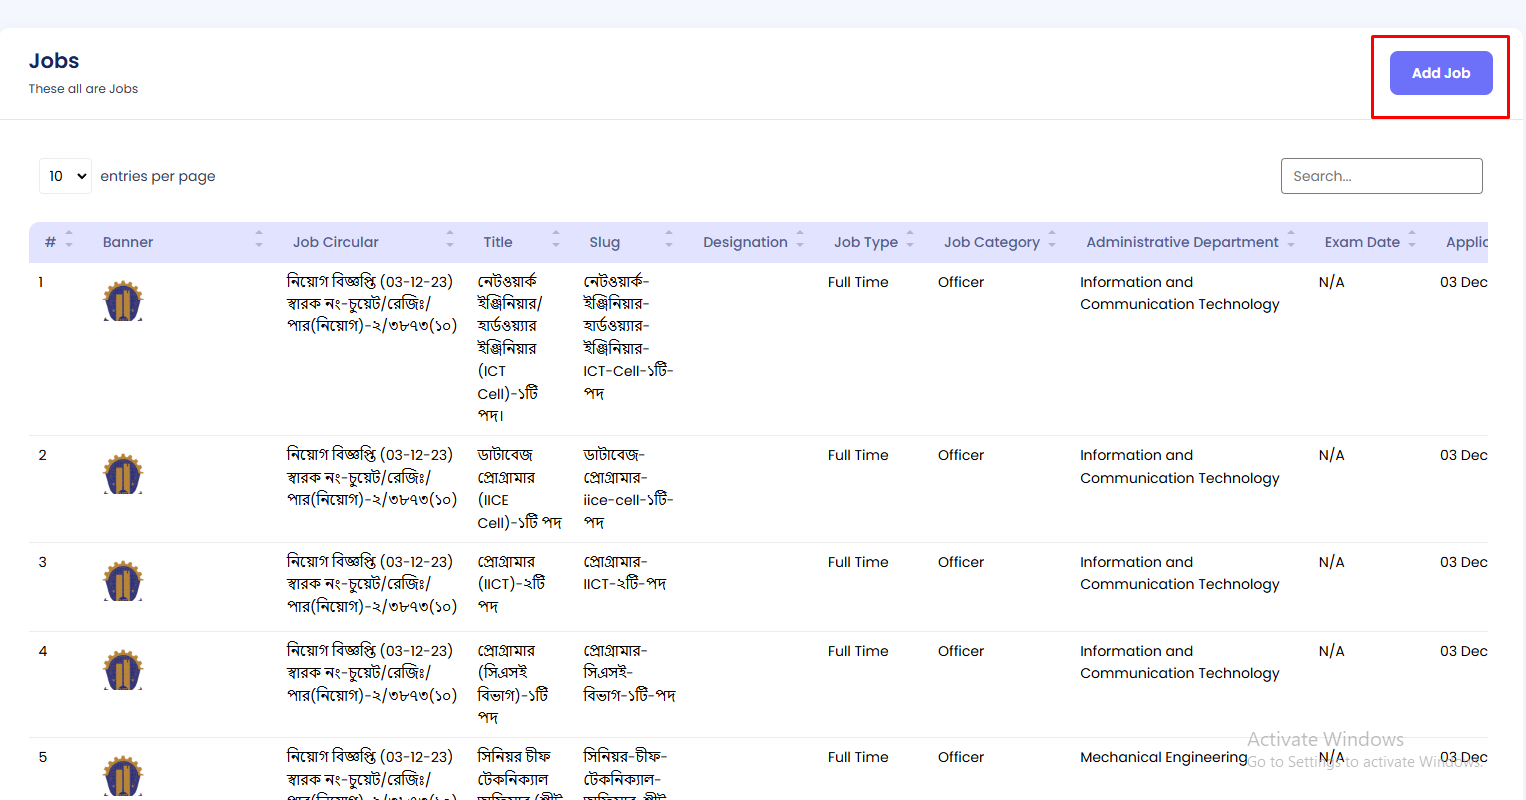
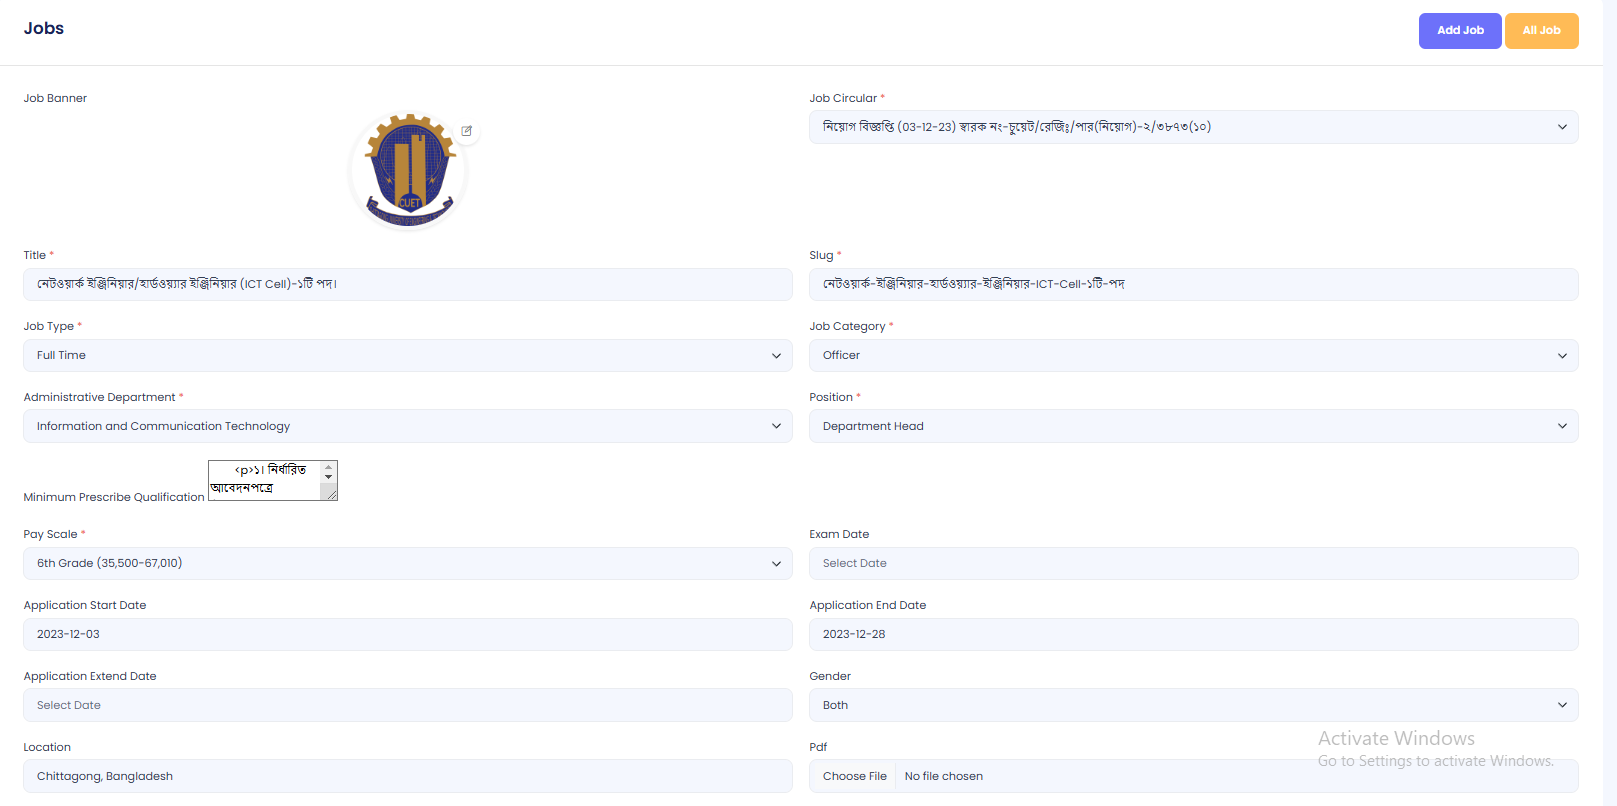
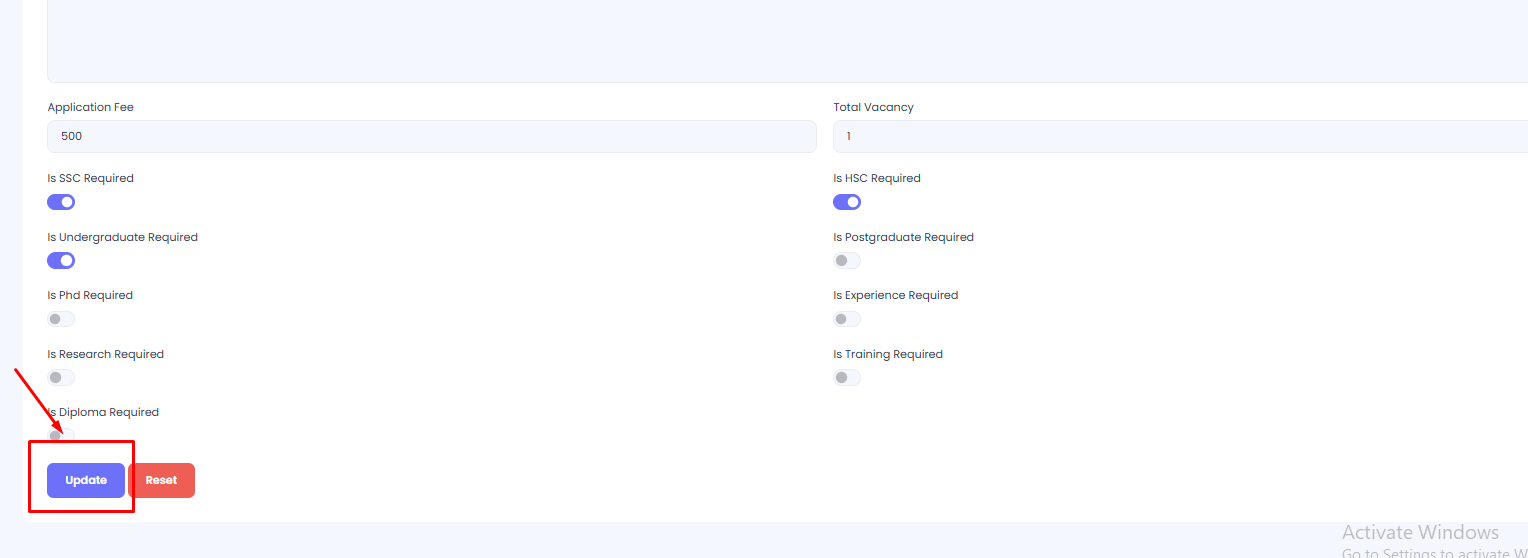
Jobs
Different job positions are assigned to a circular. This section assigns different positions to a particular job circular. All the job position can be view here.

Create a position
Step 1: Navigate to Jobs in your admin sidebar and click.
Step 2: Click on Add Job
Step 3: Write the title, qualifications and other details. The job circular on which this position created will be assigned here.
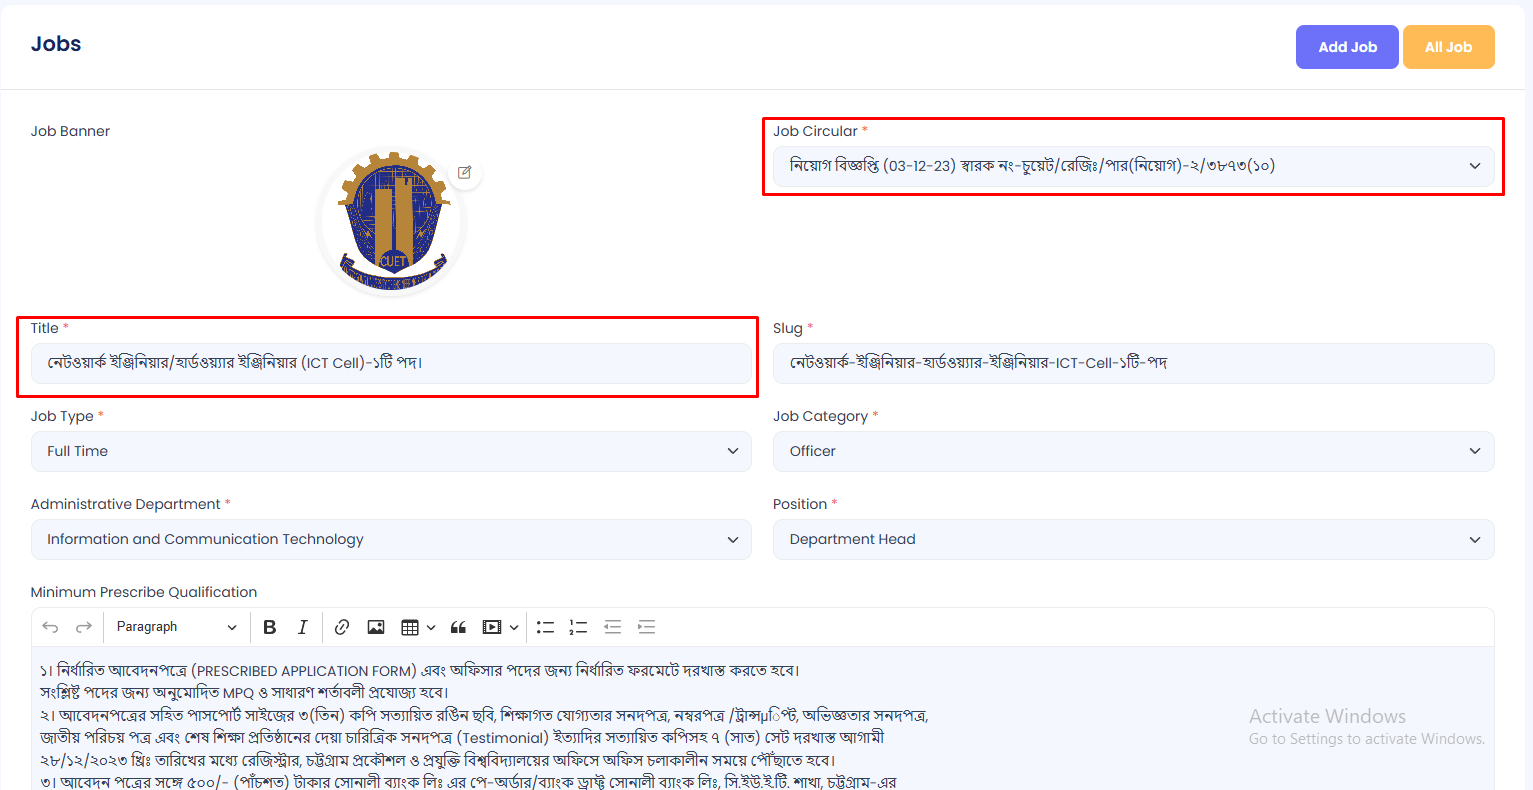
Select the job circular on which this position belongs to.
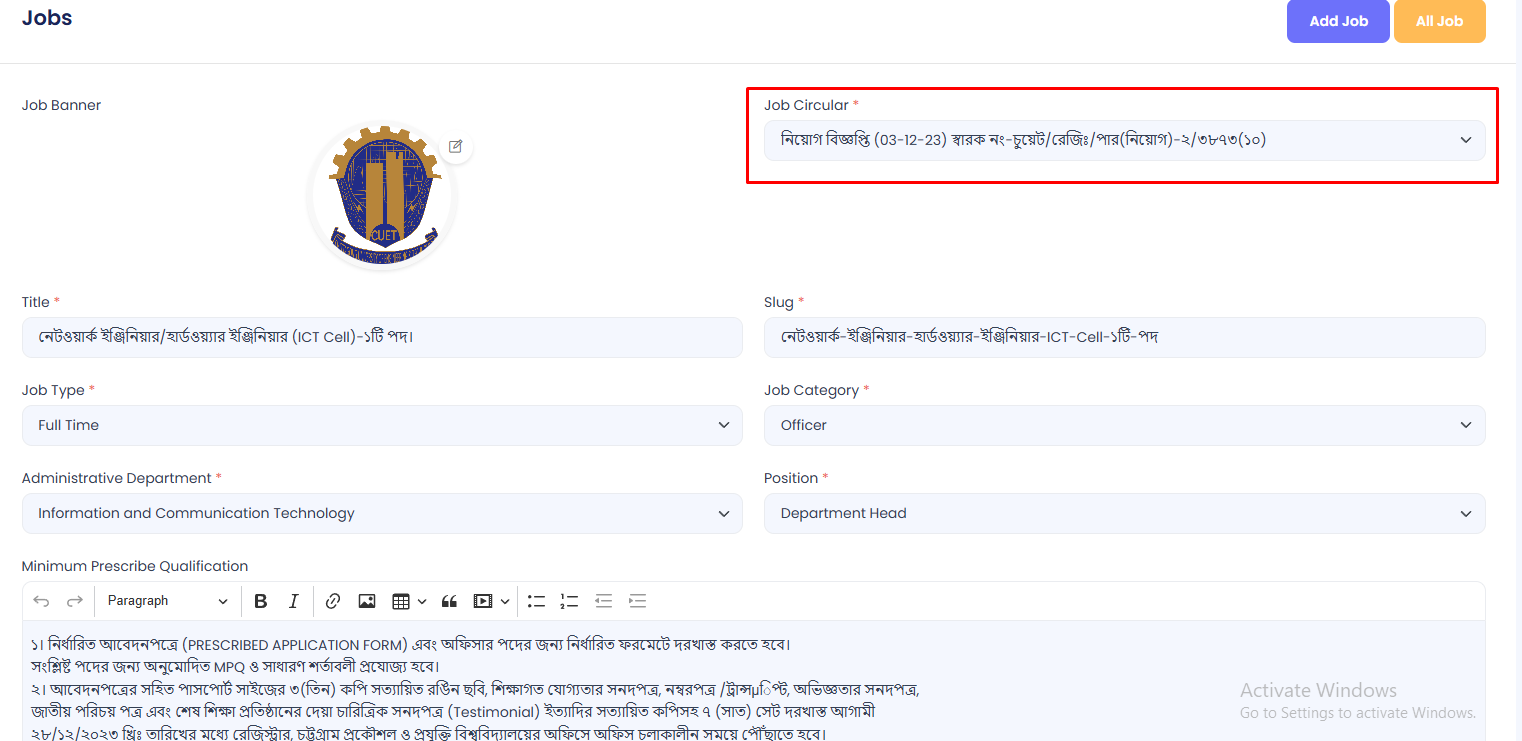
Step 4: Finally, press the create button and the position under a job circular is ready.
View
You can View a job from admin portal.
Step 1: Navigate to Job in your admin sidebar and click.
Step 2: Press view button to view job.
Edit
Step 1: Navigate to Job Circulars in your admin sidebar and click.
Step 2: Press edit button to edit job.
Edit the data as needed. Then press on update button
Delete Job Circular
Step 1: Navigate to Job Circulars in your admin sidebar and click.
Step 2: Press delete button to delete job.
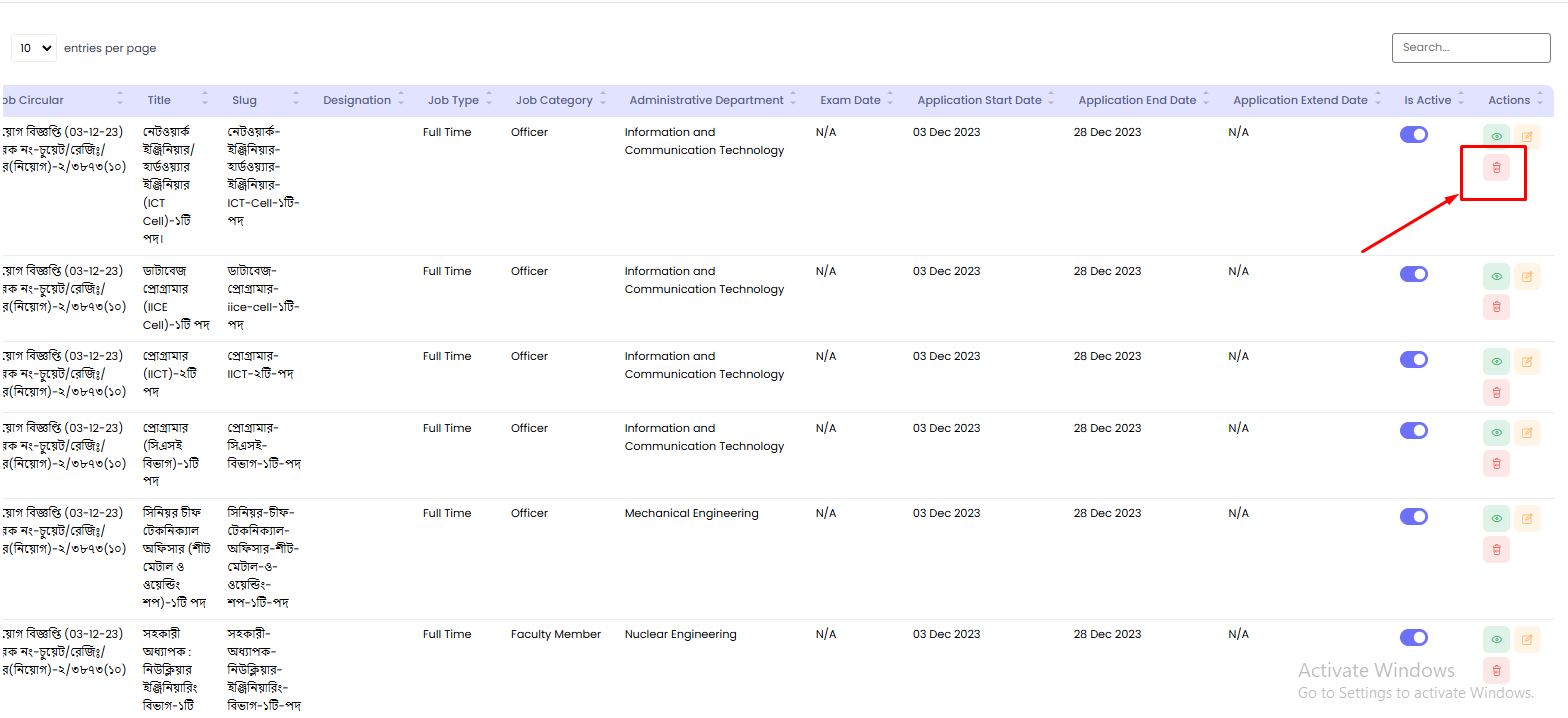
To confirm deletion, press the delete button again on the confirmation modal.
Job Users
In this section admin can get an overview of the user of Job platform.
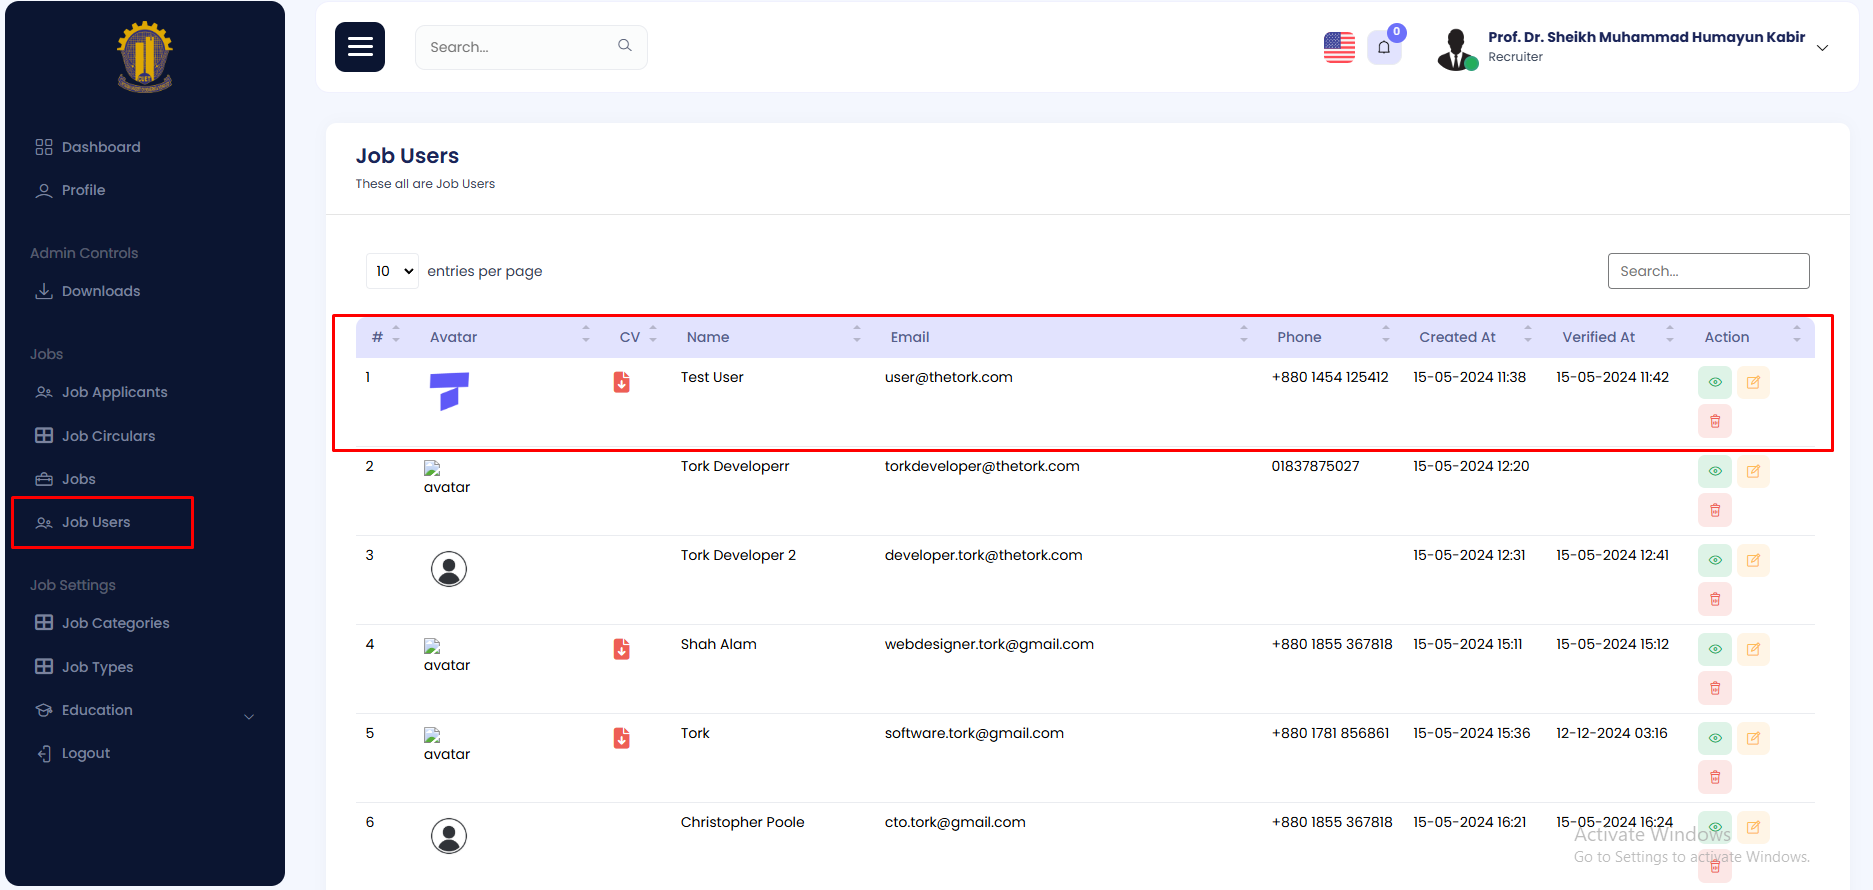
Admin can edit/view/remove a user here.
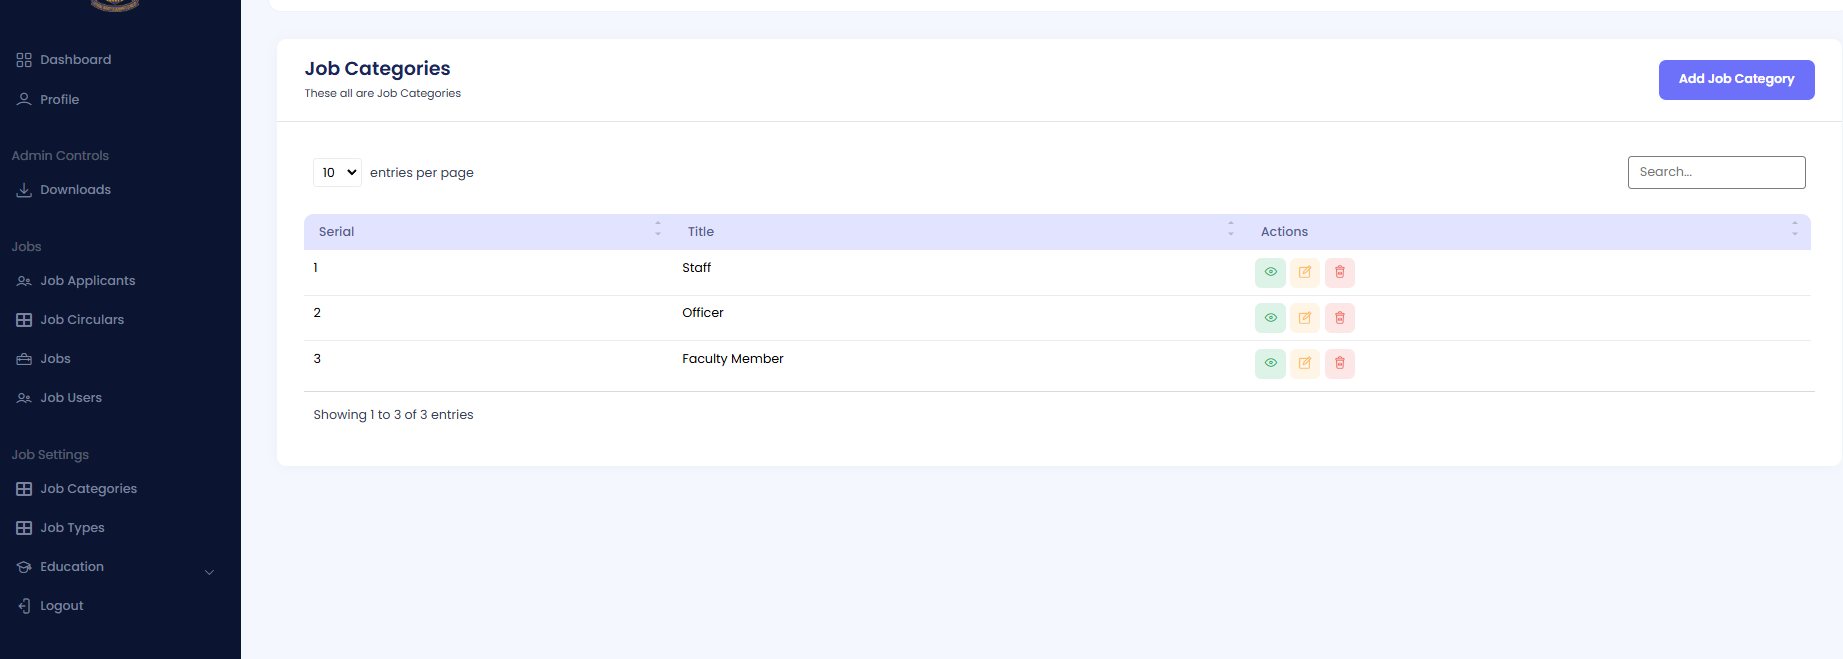
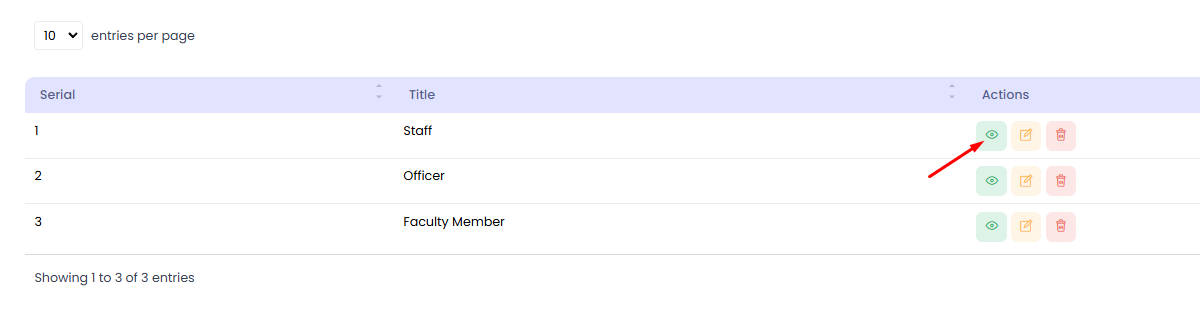
Job Categories
In this section, the admin can view the list of available job categories.
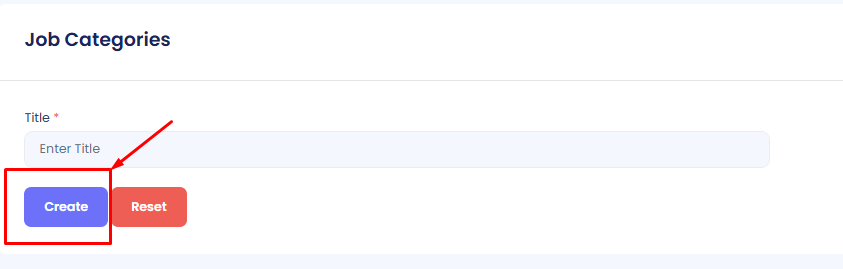
Create a Job Category
Step 1: Navigate to Job Categories in your admin sidebar and click.
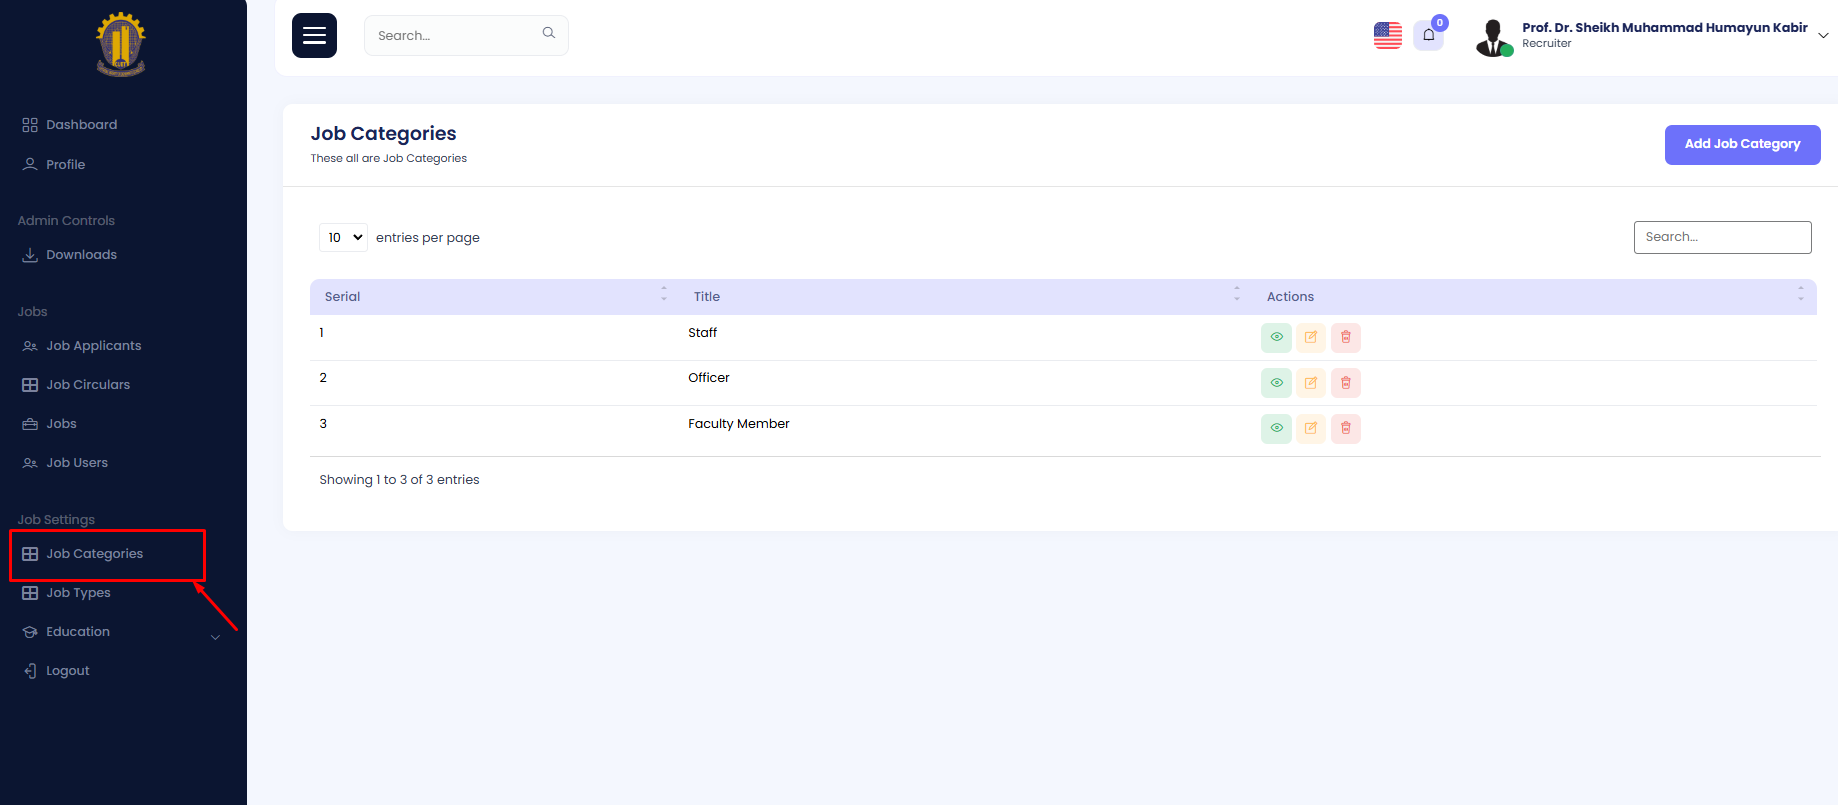
Step 2: Click on Add Job Circular
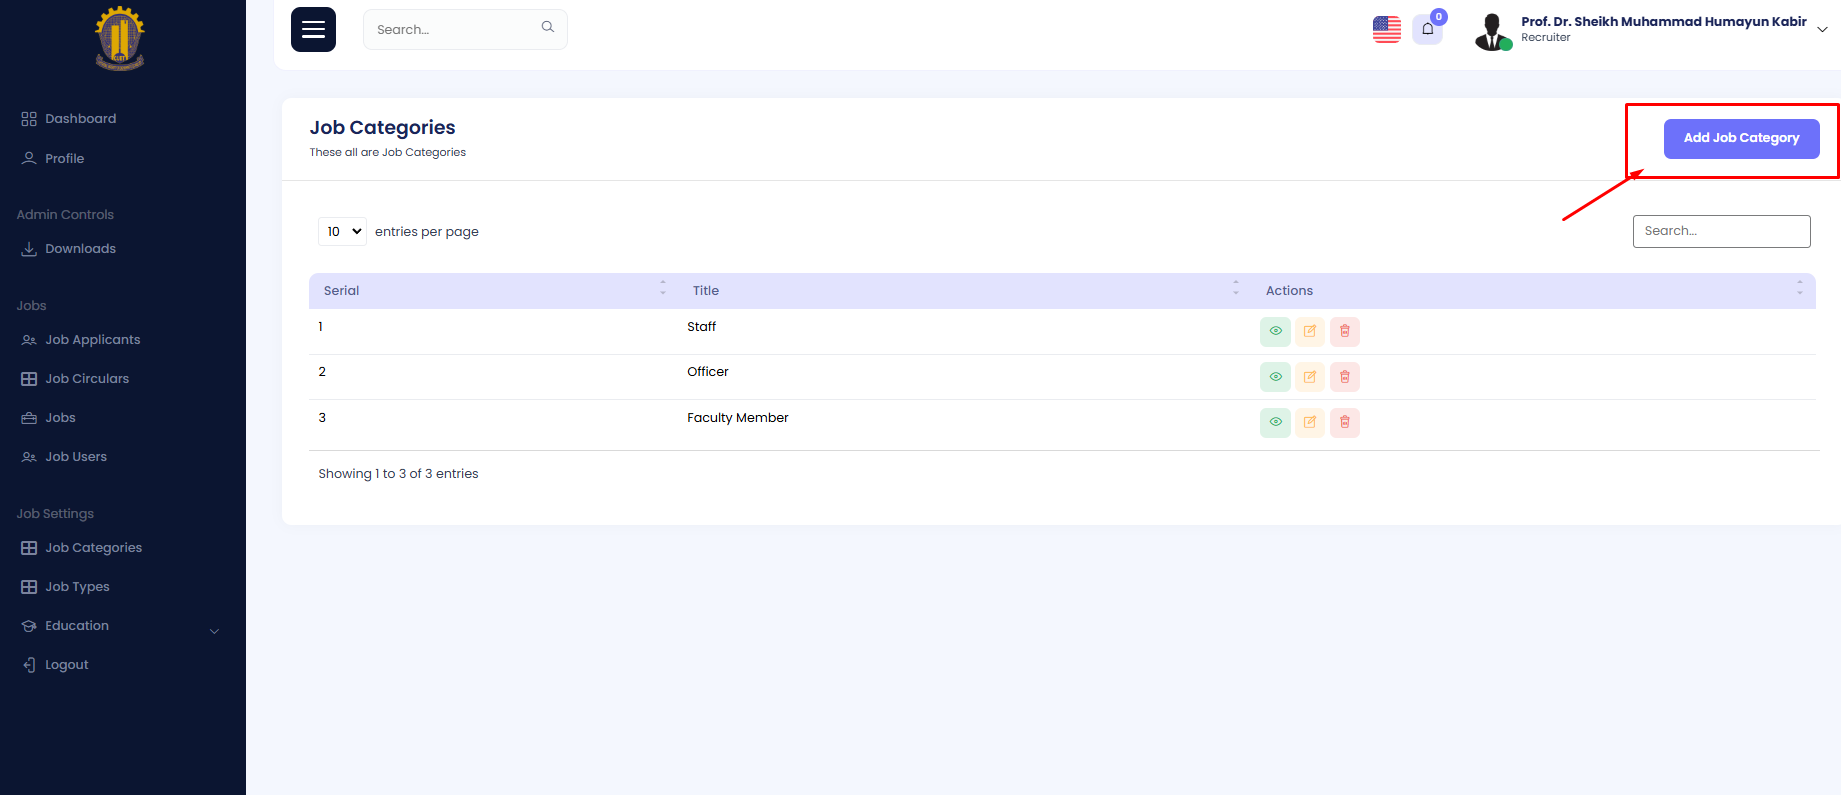
Step 3: Enter the title in the form and hit create button.
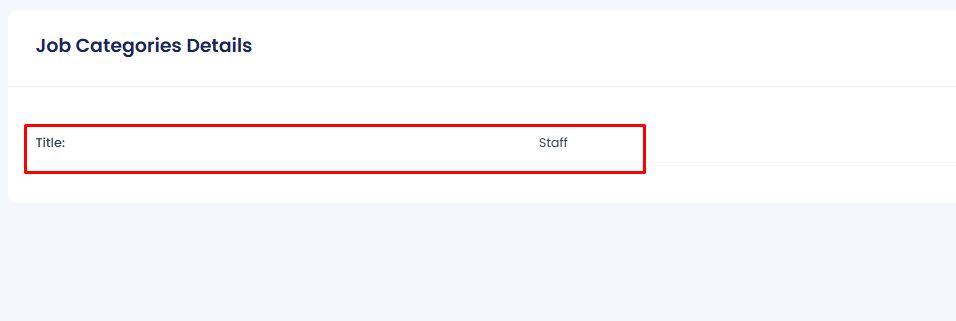
View
You can View a job category admin portal.
Step 1: Navigate to Job Categories in your admin sidebar and click.
Step 2: Press view button to view job.
Edit
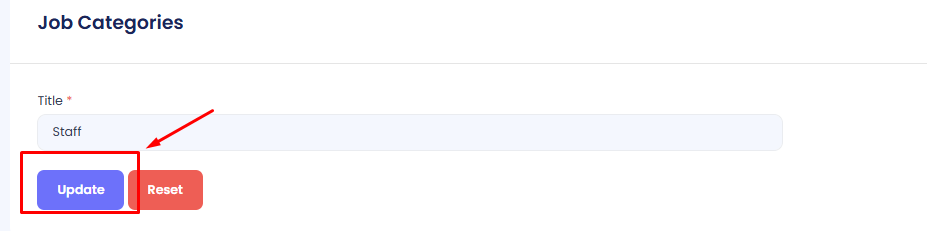
You can Edit a job from admin portal.
Step 1: Navigate to Job Categories in your admin sidebar and click.
Step 2: Press edit button to edit job.
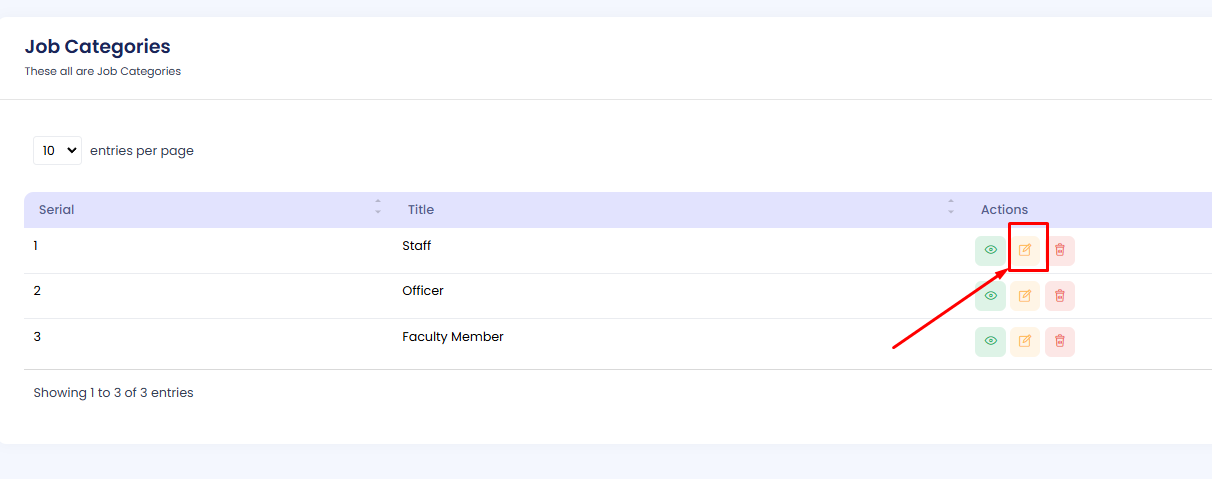
Edit the data as needed. Then press on update button
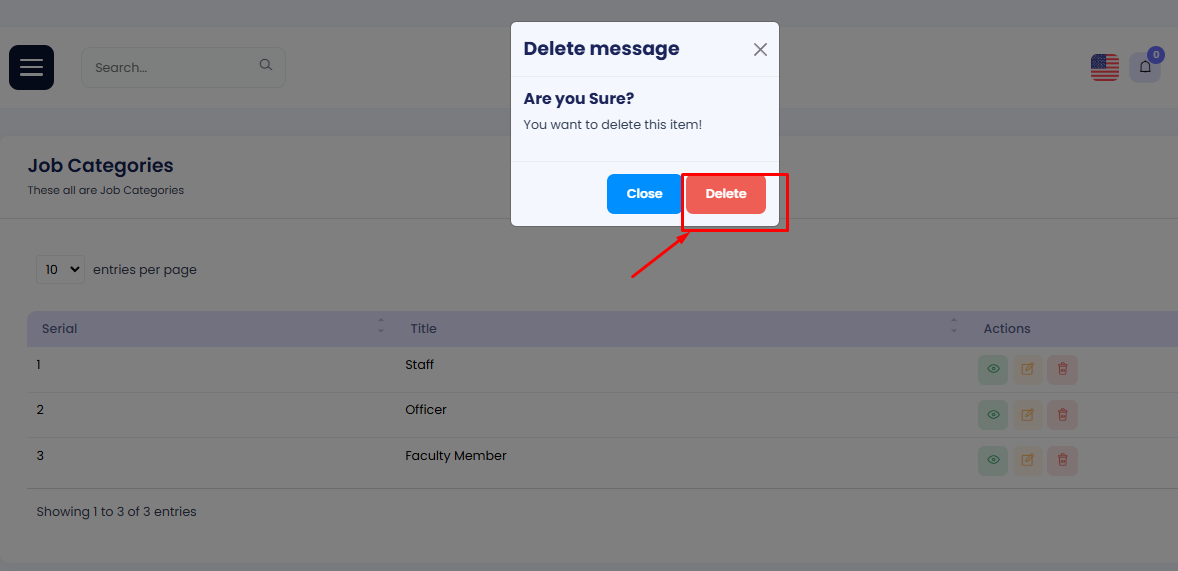
Delete
Step 1: Navigate to Job Categories in your admin sidebar and click.
Step 2: Press delete button to delete job.
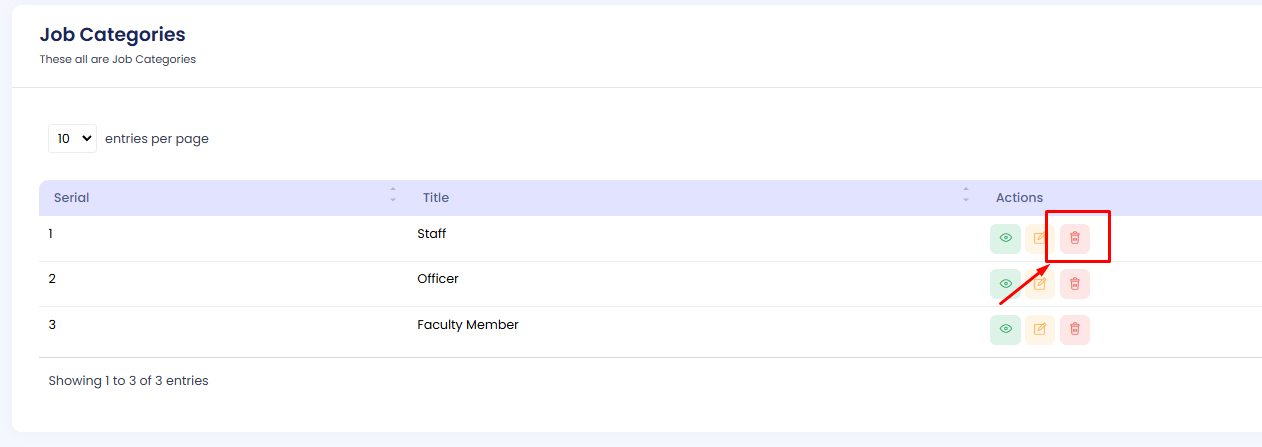
To confirm deletion, press the delete button again on the confirmation modal.
Job Types
In this section, the admin can view the list of available types of job.
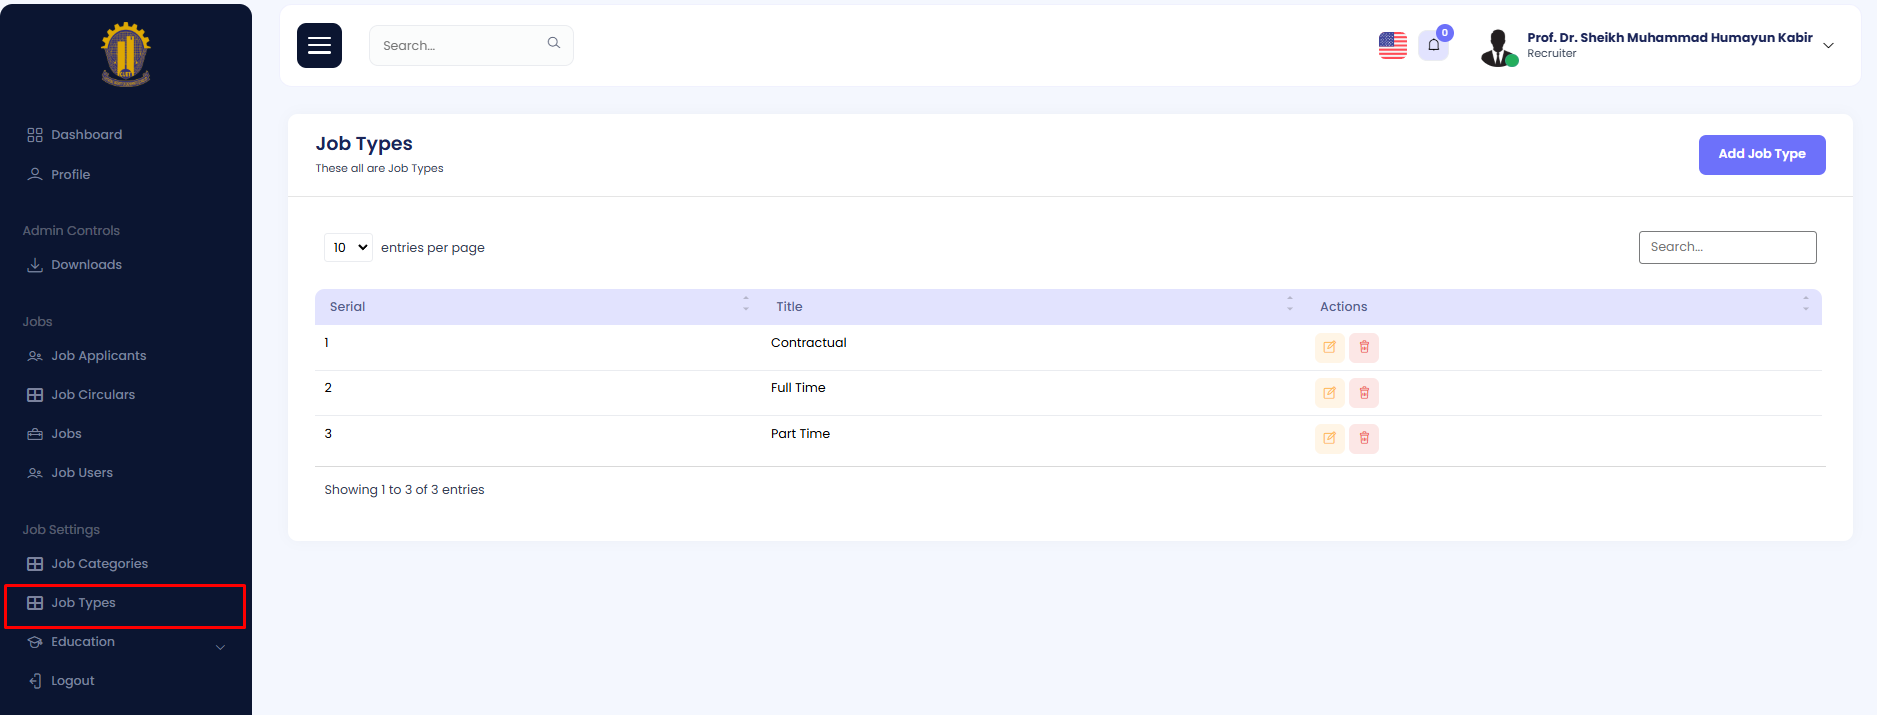
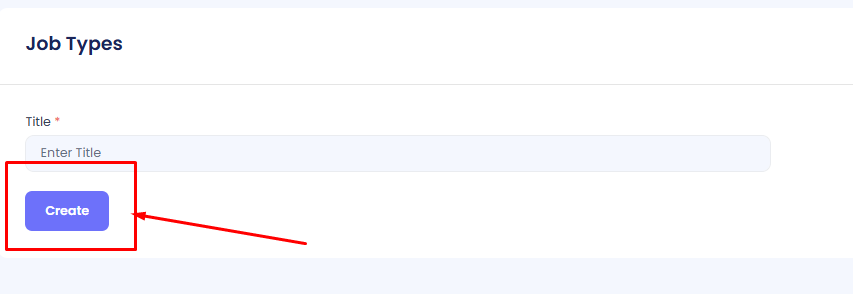
Create a Job Types
Step 1: Navigate to Job Types in your admin sidebar and click.
Step 2: Click on Add Job Type
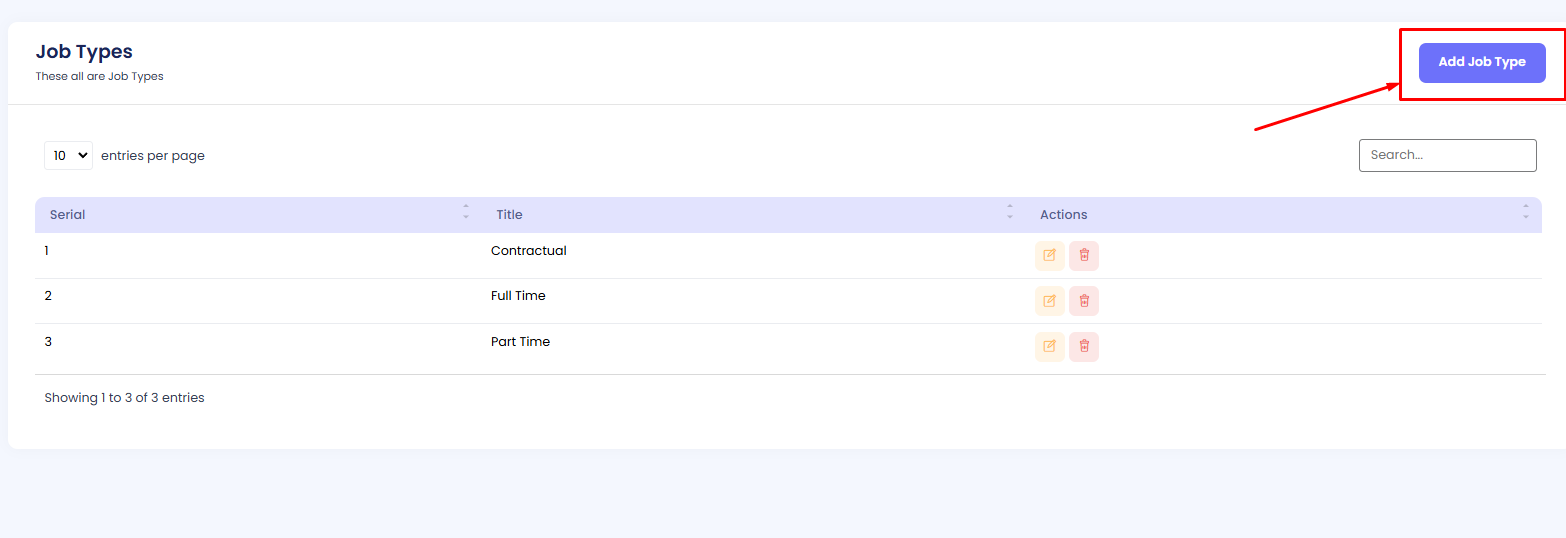
Step 3: Enter the title in the form and hit create button.
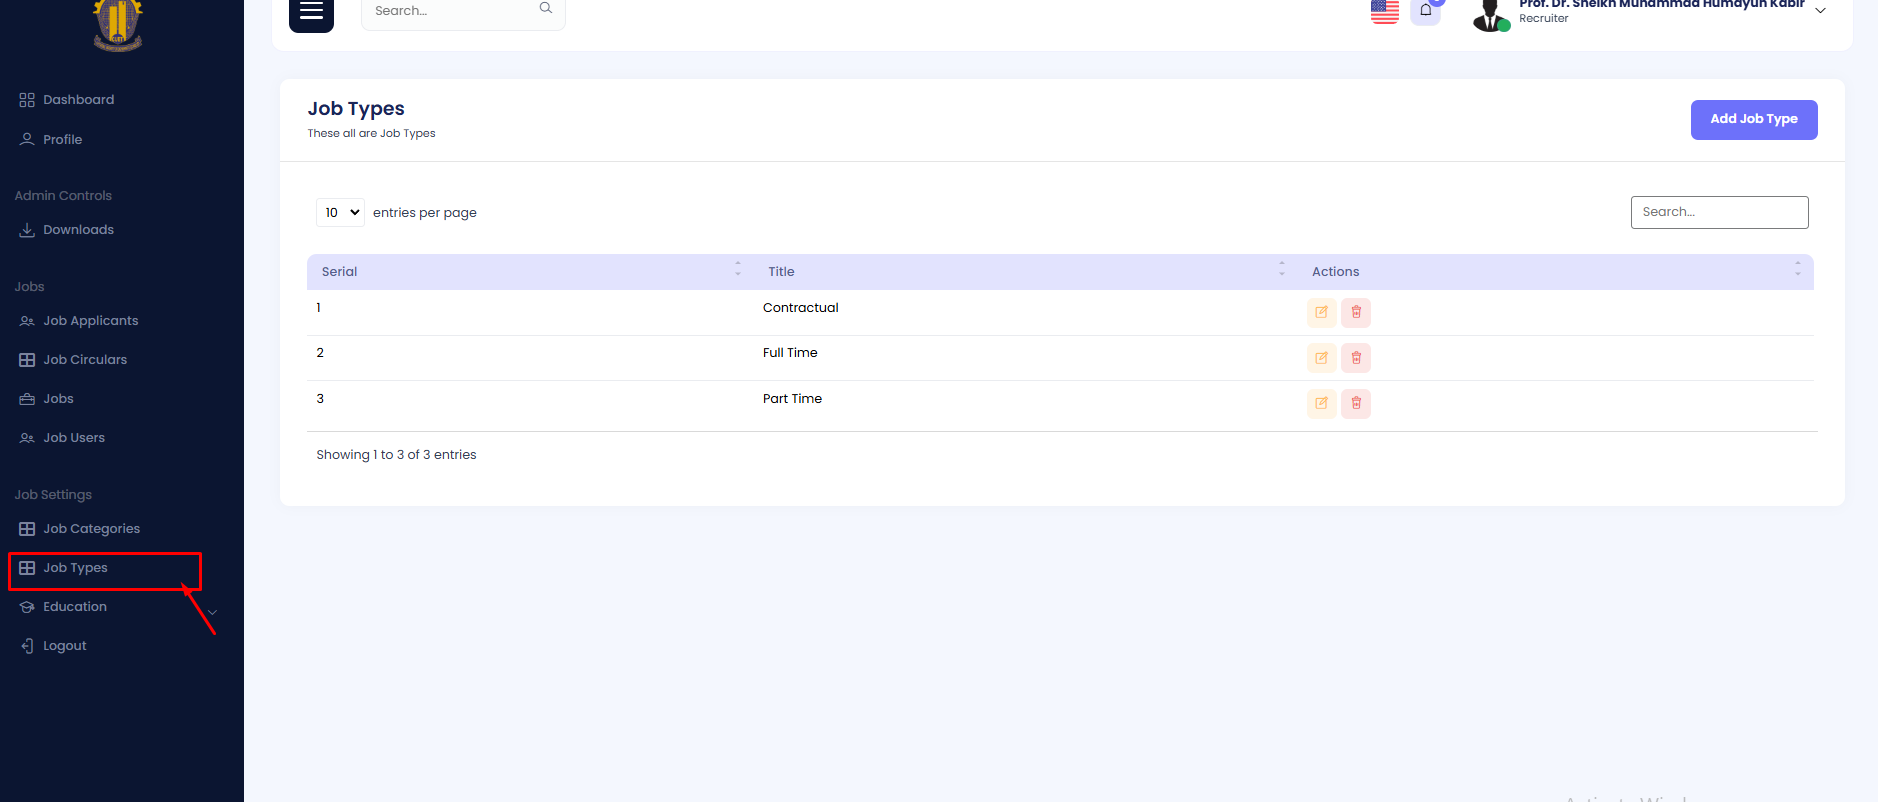
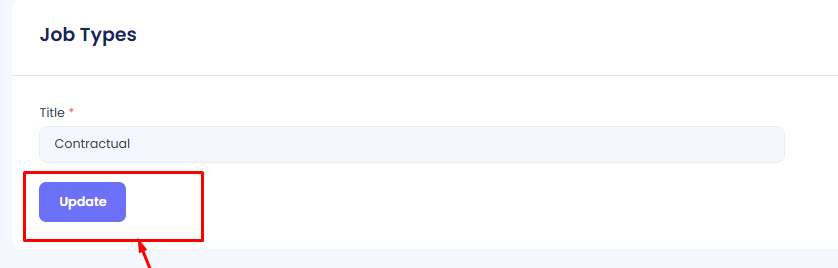
Edit
You can Edit a job type from admin portal.
Step 1: Navigate to Job Types in your admin sidebar and click.
Step 2: Press edit button to edit job.
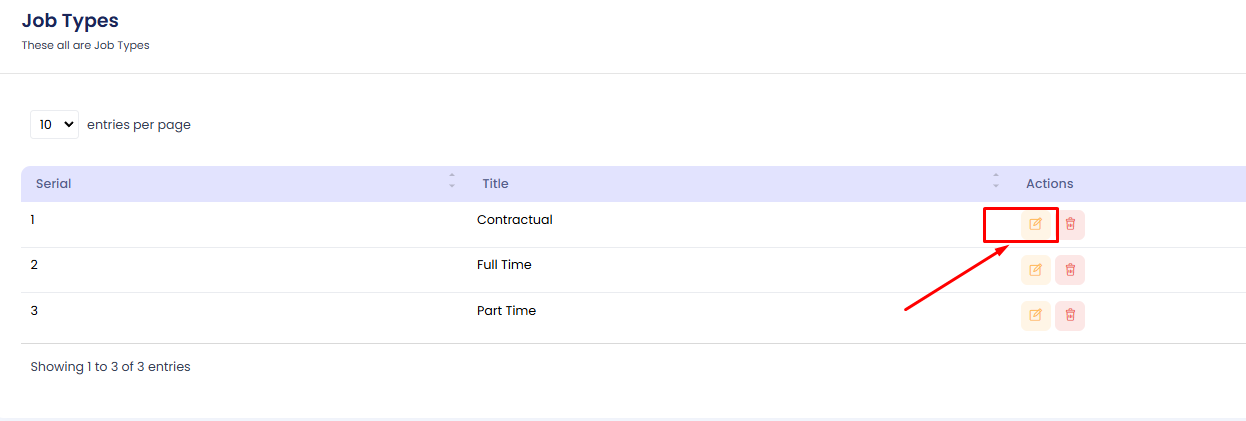
Edit the data as needed. Then press on update button
Delete
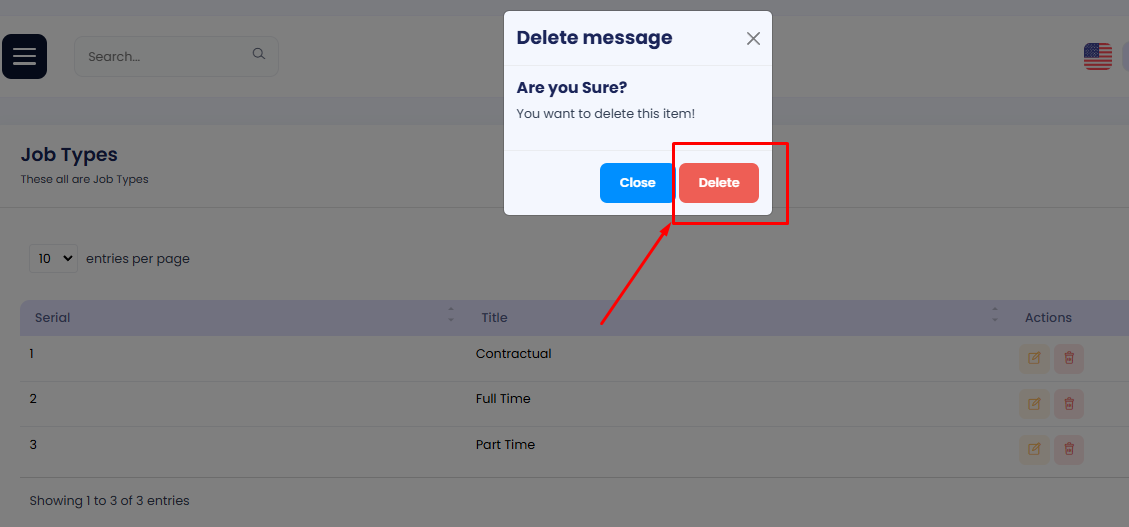
Step 1: Navigate to Job Types in your admin sidebar and click.
Step 2: Press delete button to delete job.
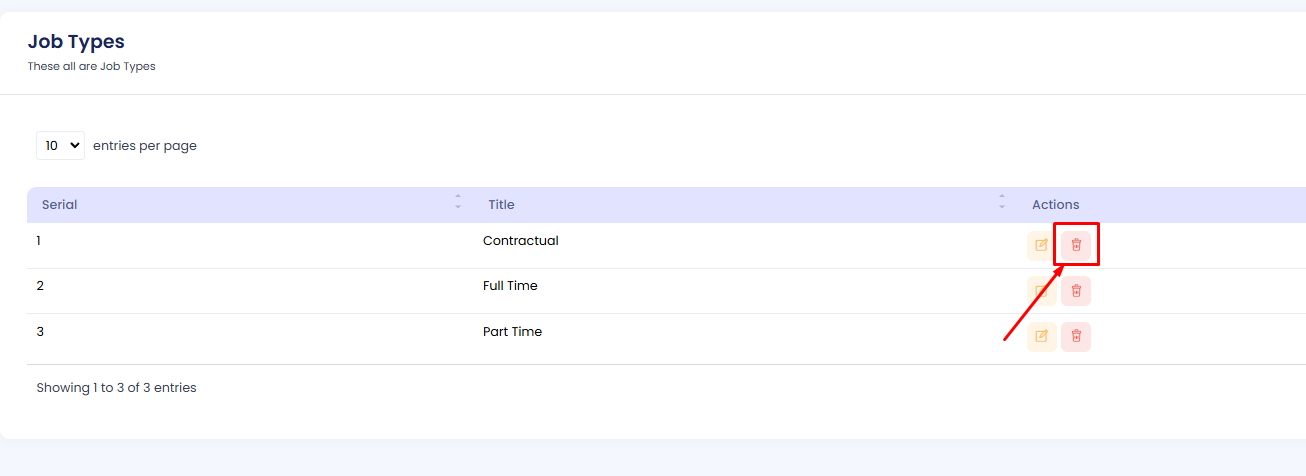
To confirm deletion, press the delete button again on the confirmation modal.
Thank You
Thank you for reviewing this documentation. We hope it serves as a helpful guide for understanding and utilizing the delivered modules effectively. Should you require any further assistance or clarification, please feel free to reach out. We appreciate your continued cooperation and support.
CUET Website - Documentation
- Item Name : CUET Website
- Created: 22 December 2024
- Author : TheTork
- Support Mail: Support Mail
This documentation is designed to assist you with each step of customization. Please read it carefully to understand how this module is structured and how to edit it effectively.

System Requirements
To use CUET, make sure your hosting provider is running the following software:
- Backend: Laravel 10
- Frontend: Next.js 14
- Server: Apache, nginx, or another compatible web server
- Database: MySQL Database server
- PHP Version: PHP 8 or higher
- Node.js Version: Node.js 18 or higher
- Memory: Minimum 4GB RAM (8GB recommended)
- Storage: Minimum 20GB disk space
Required PHP Extensions
- PDO PHP extension
- OpenSSL PHP extension
- mbstring PHP extension
- exif PHP extension
- fileinfo PHP extension
- xml PHP extension
- Ctype PHP extension
- JSON PHP extension
- Tokenizer PHP extension
- cURL PHP extension
- zip PHP extension
- iconv PHP extension
- Ensure the
mod_rewriteApache module is enabled
Recommended PHP Limits
Many issues that you may run into such as: white screen, demo content fails when importing, empty page content and other similar issues are all related to low PHP configuration limits. The solution is to increase the PHP limits. You can do this on your own, or contact your web host and ask them to increase those limits to a minimum as follows:
max_execution_time 300memory_limit 256Mpost_max_size 64Mupload_max_filesize 32Mmax_input_time = 60max_input_vars = 3000
On this project, we're using the Laravel 10.x. Please go to Laravel documentation page for more information. Also consider upgrading your PHP version to the latest stable.
Installation Process
Laravel 10 Installation
- Ensure you have Composer installed. If not, download it from Composer's official website.
- Run the following command to create a new Laravel project:
composer create-project laravel/laravel project-name - Navigate to the project directory:
cd project-name - Set the application key:
php artisan key:generate - Configure your environment variables in the
.envfile for database and other settings. - Run the Laravel development server:
php artisan serve - Access the application at http://localhost:8000.
Next.js 14 Installation
- Ensure you have Node.js installed. Download it from Node.js official website.
- Run the following command to create a new Next.js project:
npx create-next-app@latest project-name - Navigate to the project directory:
cd project-name - Start the development server:
npm run dev - Access the application at http://localhost:3000.
Additional Notes
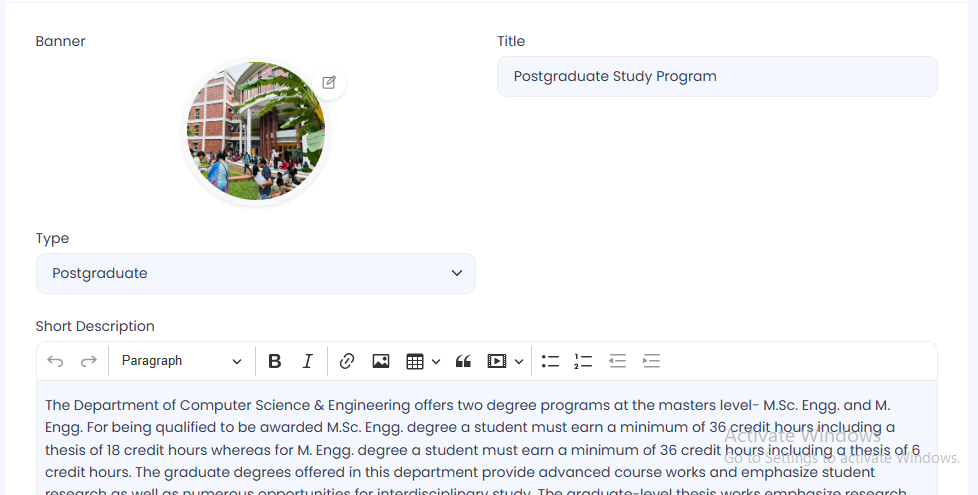
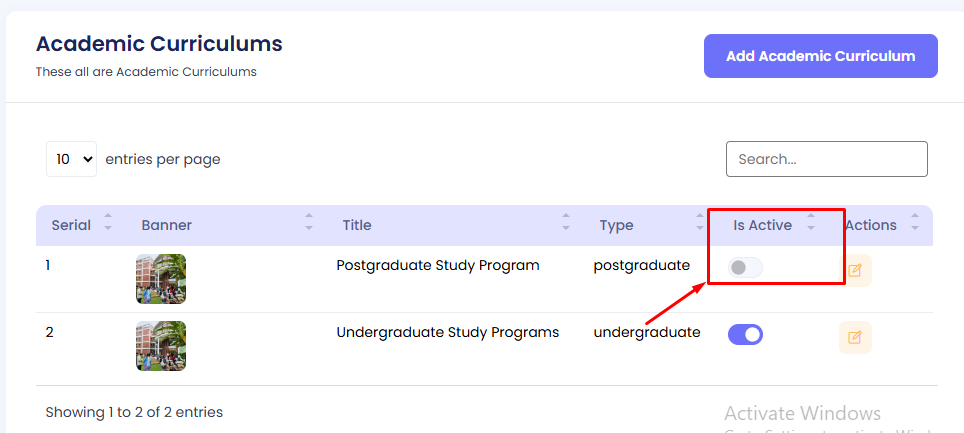
Academic Curriculam
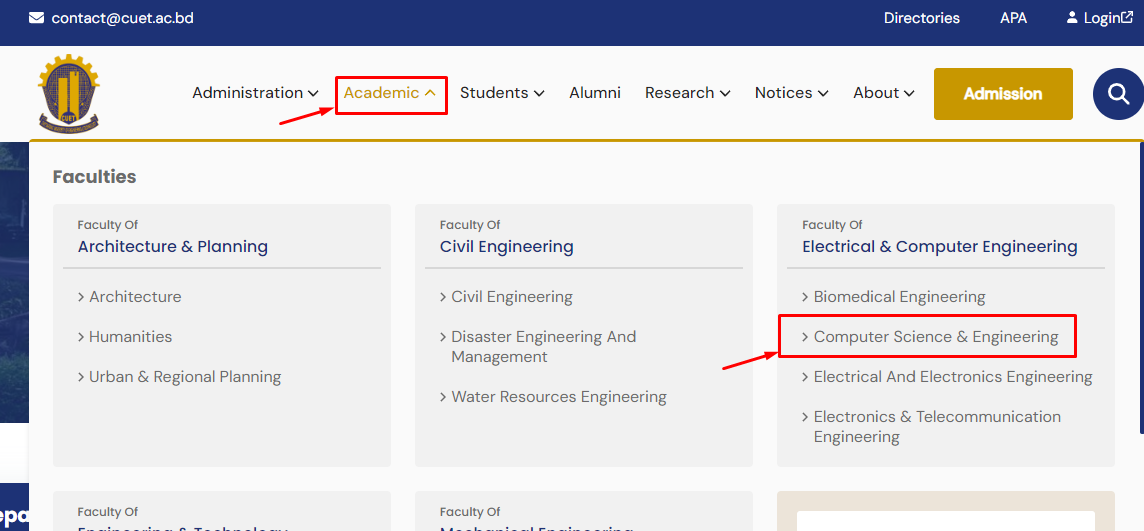
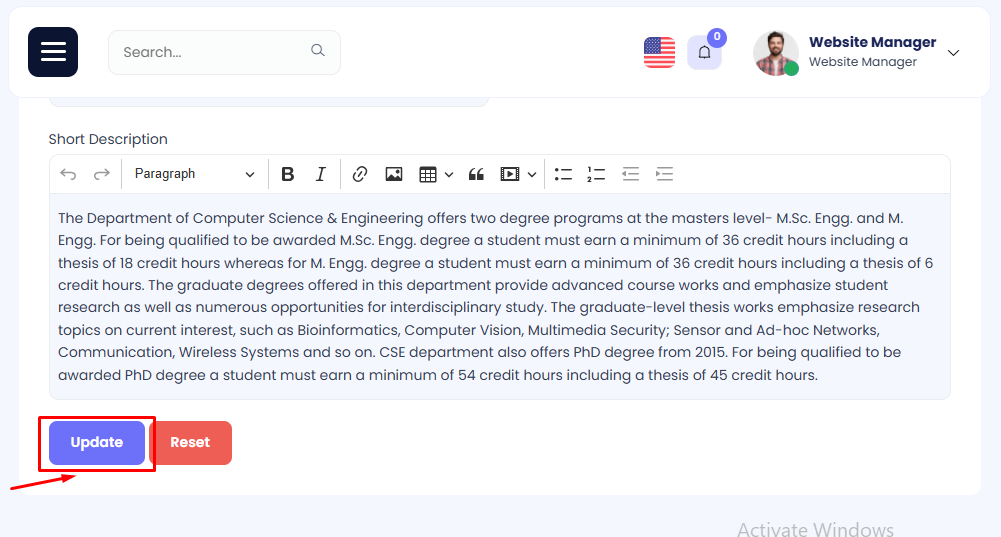
The degree offered by a department are added in this section. In example we are breifing about computer science & engineering department.

This title and description are coming from the admin panel of web manager.
Add a Academice Curriculam
Step 1: Navigate to Academice Curriculam in your admin sidebar and click.
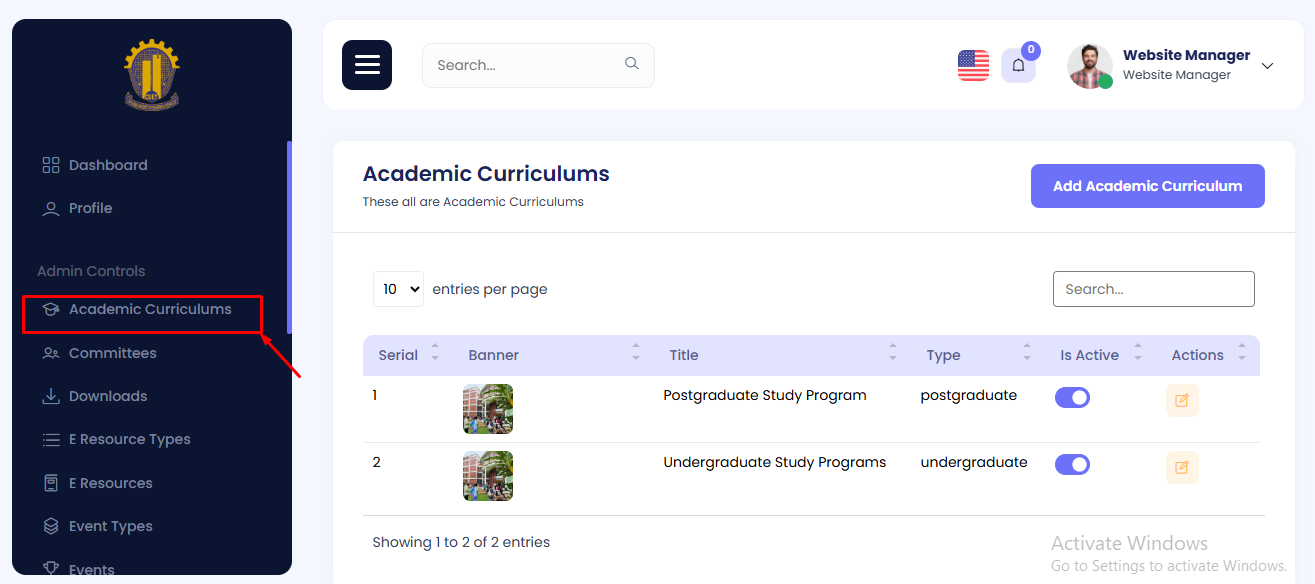
Step 2: Click on Add Academice Curriculam
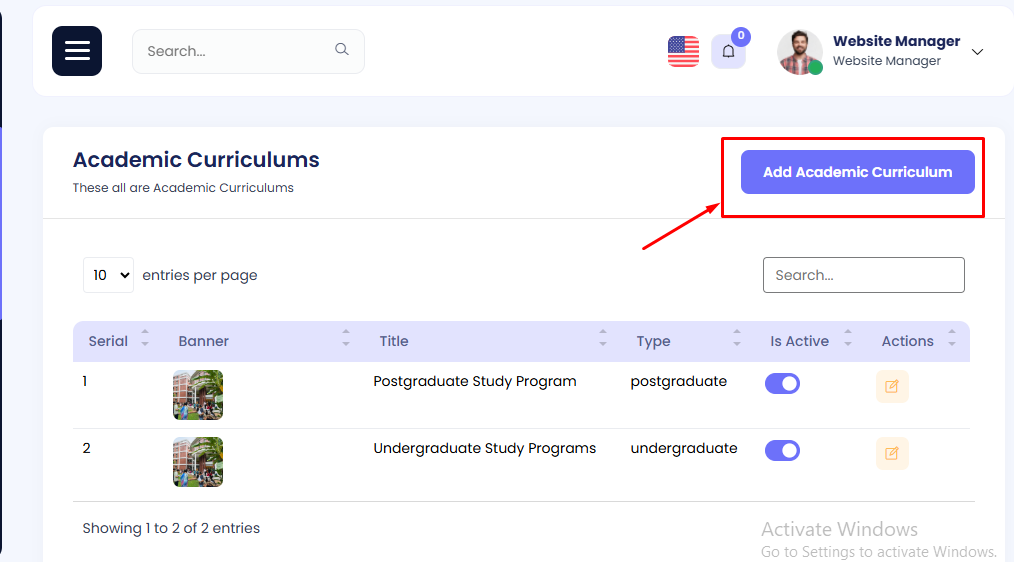
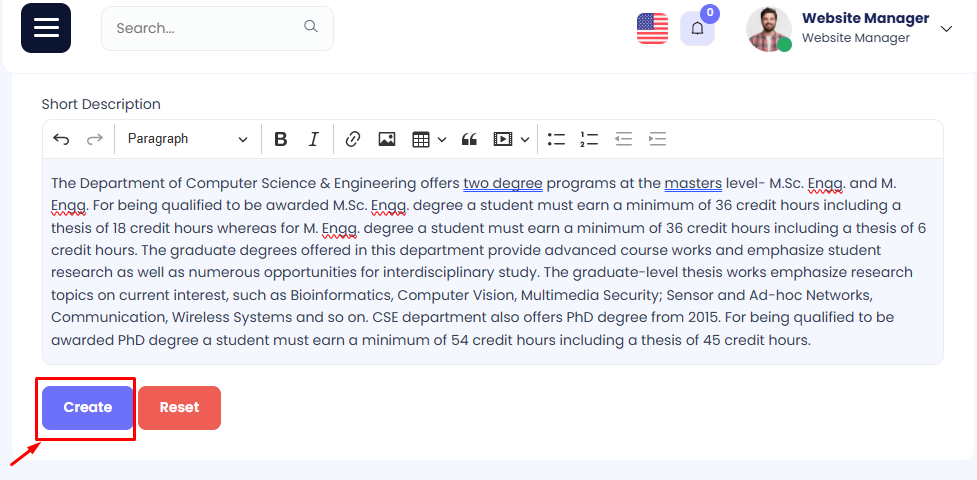
Step 3: Write the title, description, and select images and type of degree.
Step 4: Hit the create button. The details of degree is been created.
Edit Academic Curriculam
Step 1: Navigate to Academice Curriculam in your admin sidebar and click.
Step 2: Press edit button to edit academic curriculam.
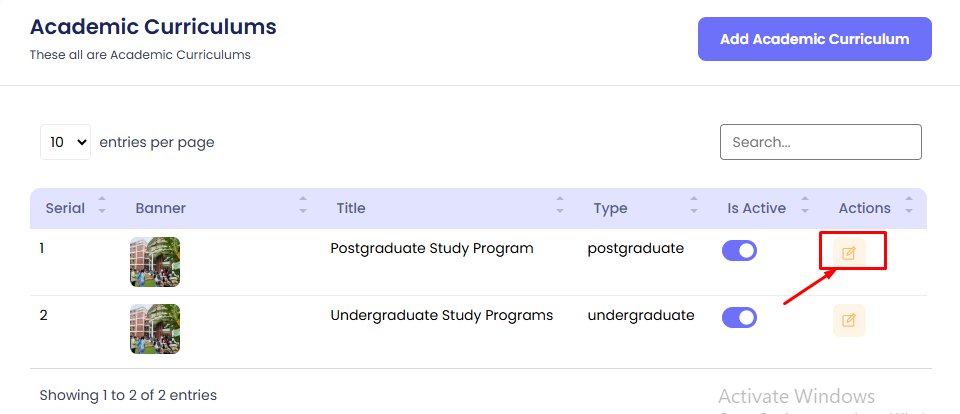
Edit the data as needed. Then press on update button
Academic Curriculam active/deactive
Step 1: Navigate to Academice Curriculam in your admin sidebar and click.
Step 2: Find your target Academic Curriculam from the list.
Step 3: Press the toggle button under the title is_active and active/deactive the Academic Curriculam.
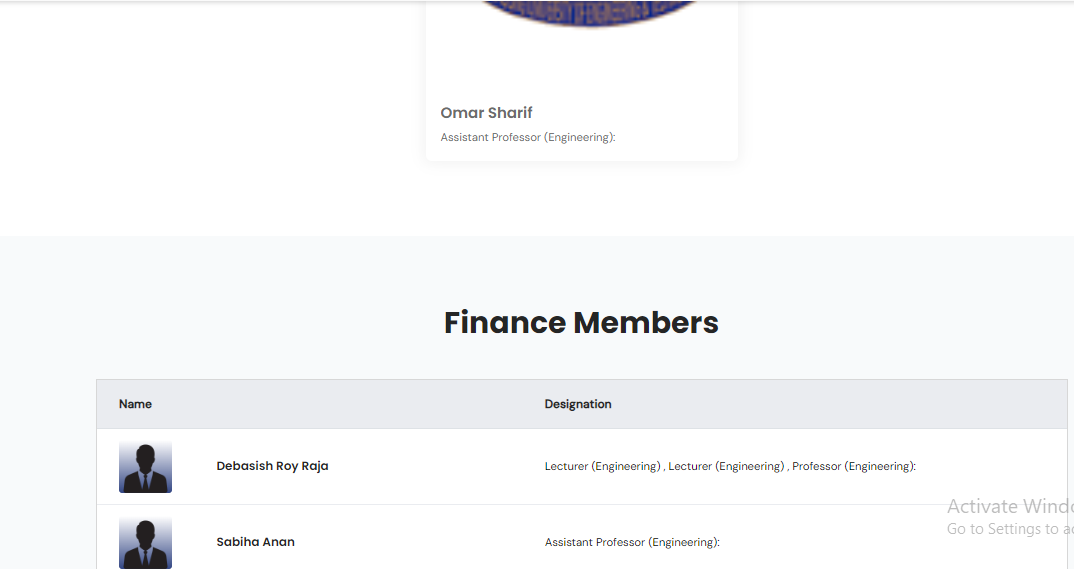
Committees
The available committees can be viewed here.
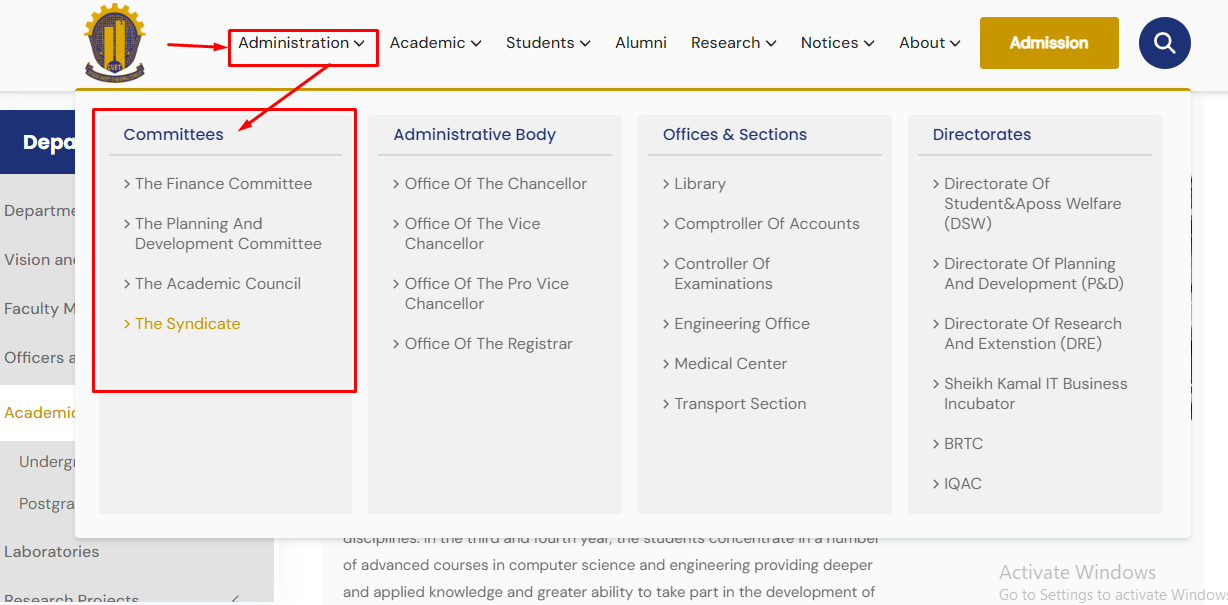
There are several member posted in the committes
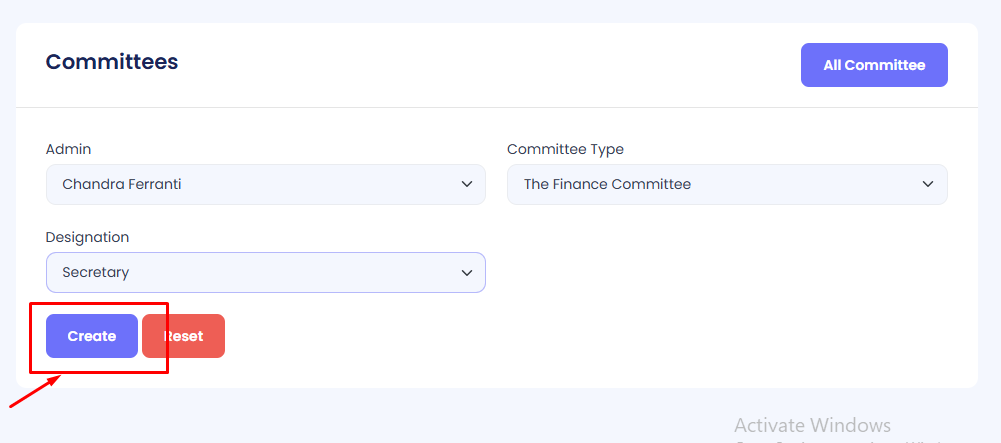
Add a Committee Member
Step 1: Navigate to Committees in your admin sidebar and click.
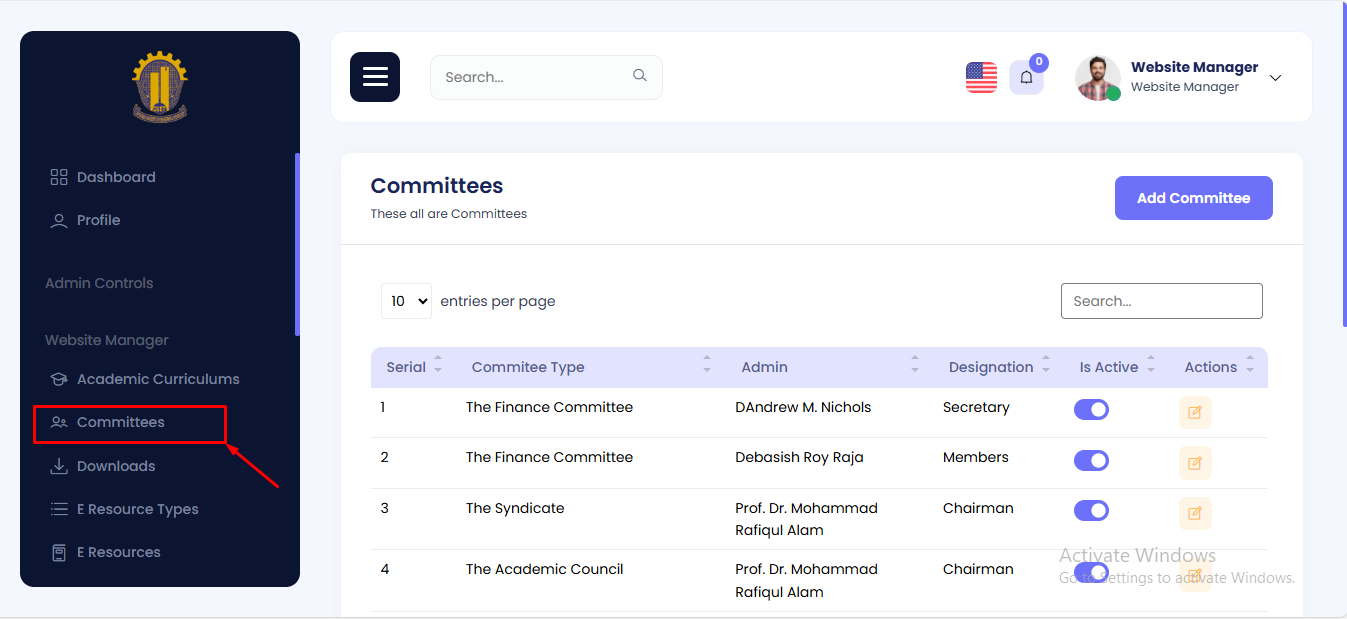
Step 2: Click on Add Committee
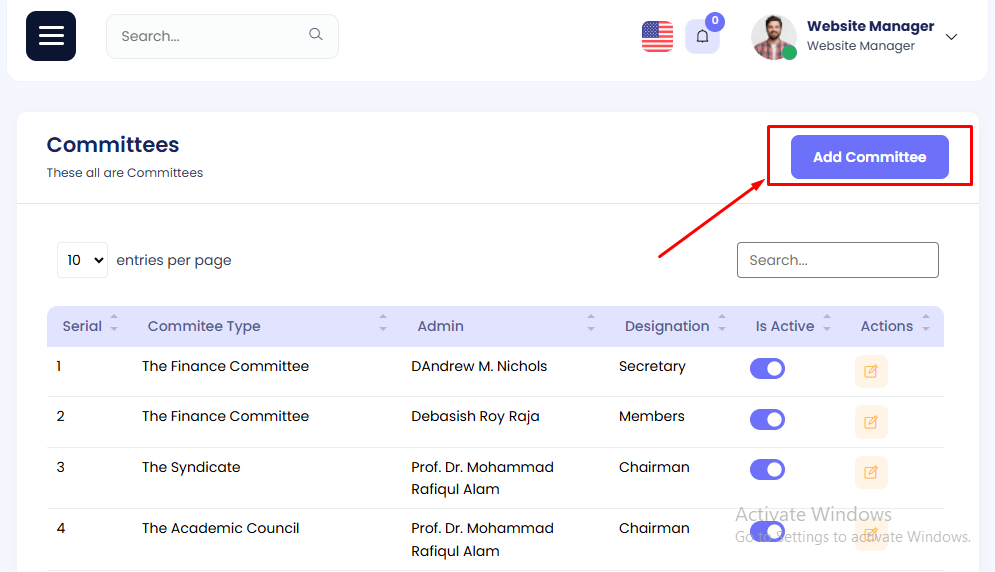
Step 3: Select the Admin, Designation and Type of Committee . Then Hit the create button.
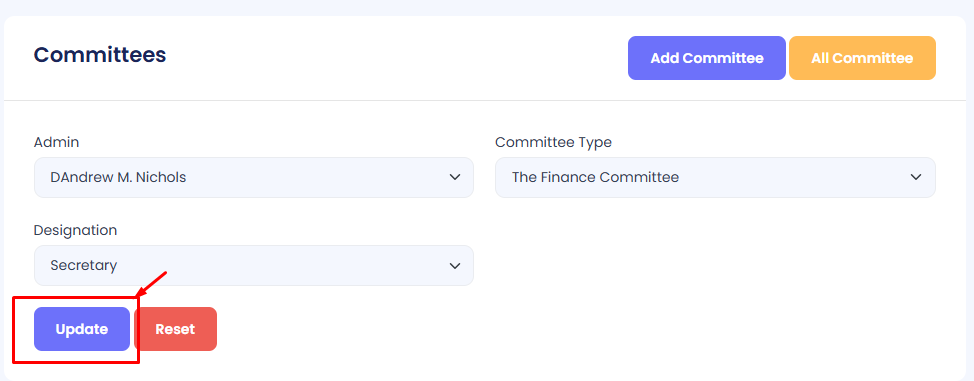
Edit Committee
Step 1: Navigate to Committees in your admin sidebar and click.
Step 2: Press edit button to edit committee.
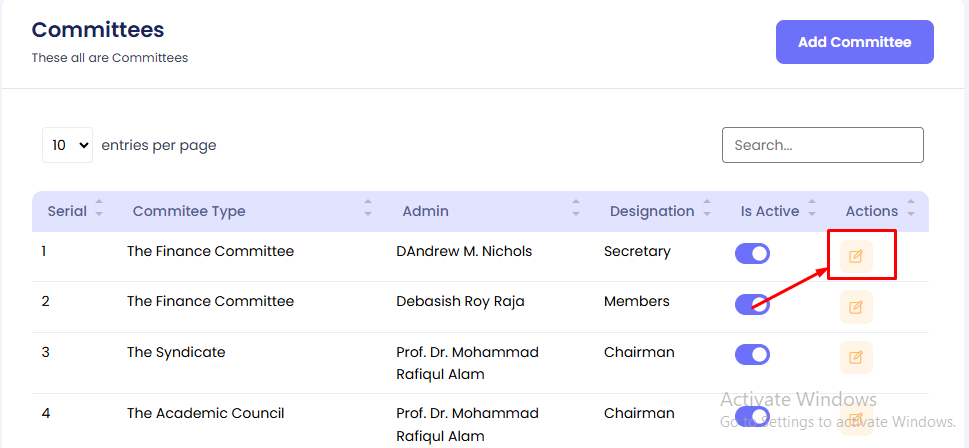
Edit the data as needed. Then press on update button
Downloads
In this section, the admin can add important files for users to download.
Add Downloads
Step 1: Navigate to Downloads in your admin sidebar and click. Here you will see a list of dowloads entries.
Step 2: Click on Add Job Downloads
Step 3:Fillup the form with correct title, attach file and hit create button.
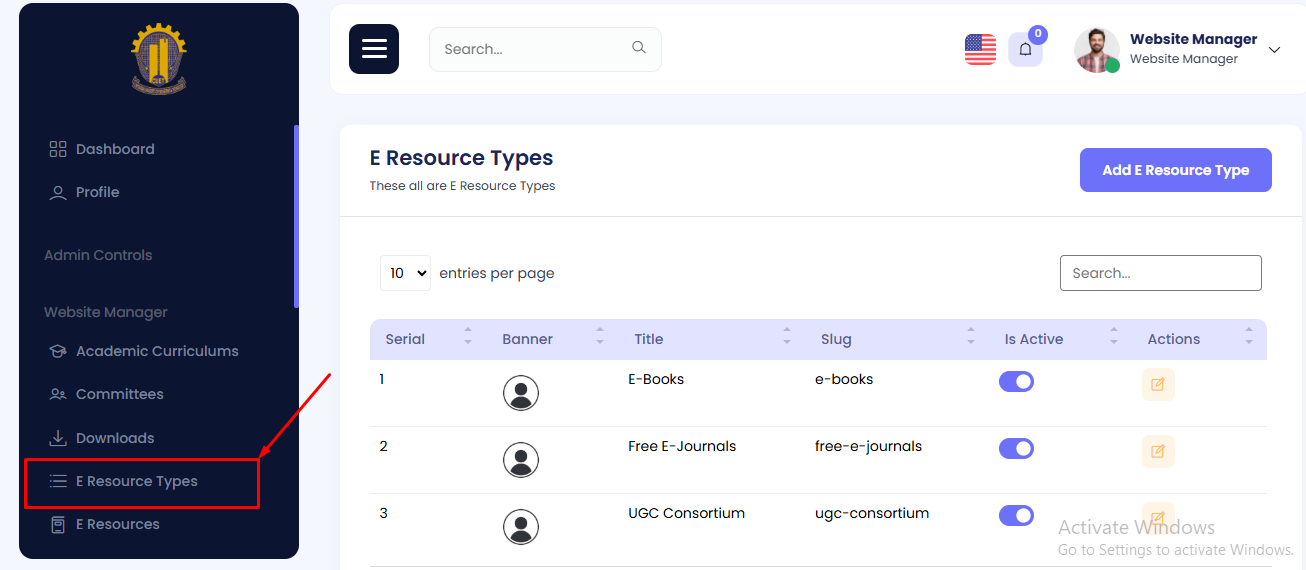
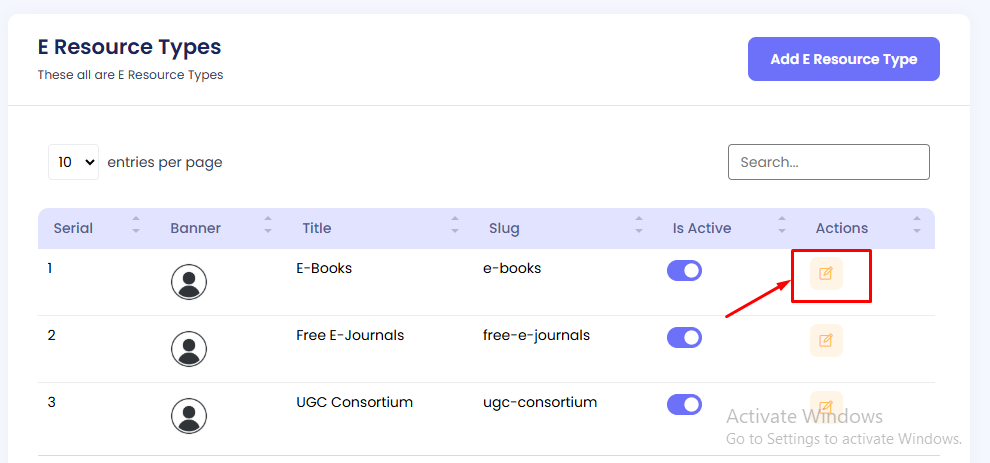
E-Resources Type
The available E-Resources type can be viewed here.

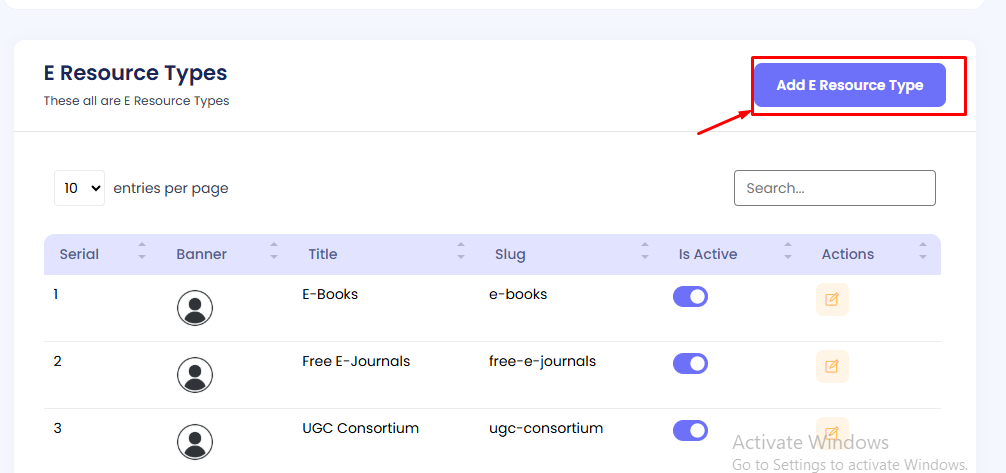
Add a E-Resources Type
Step 1: Navigate to E-Resources Type in your admin sidebar and click.
Step 2: Click on Add E-Resources Type
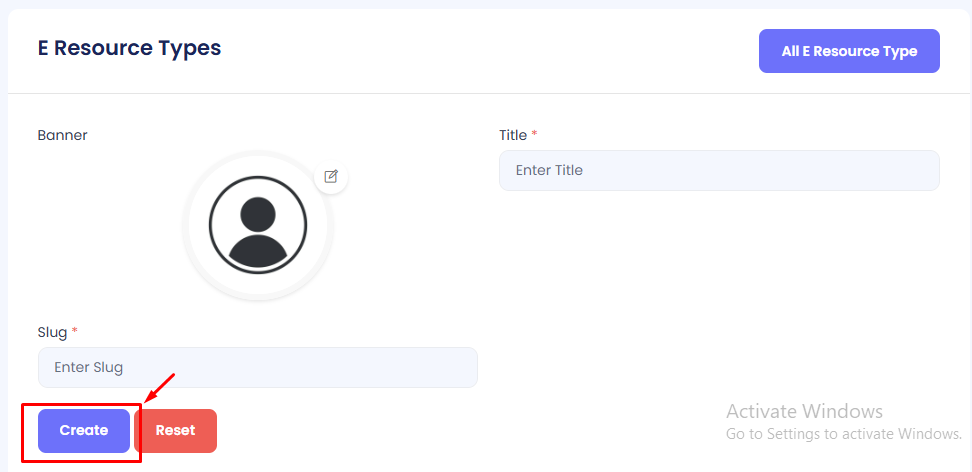
Step 3: Enter the baner, title and slug in the form. Then Hit the create button.
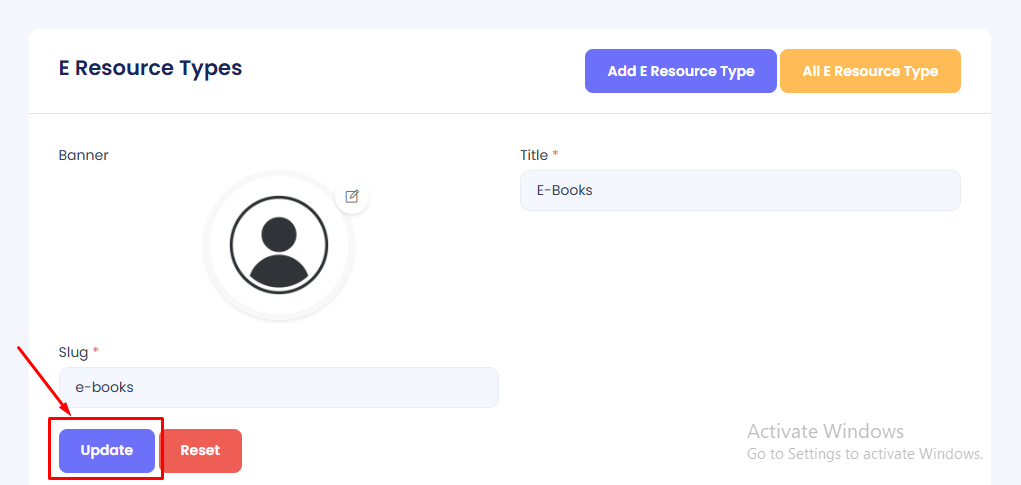
Edit E-Resources Type
Step 1: Navigate to E-Resources Type in your admin sidebar and click.
Step 2: Press edit button to edit committee.
Edit the data as needed. Then press on update button
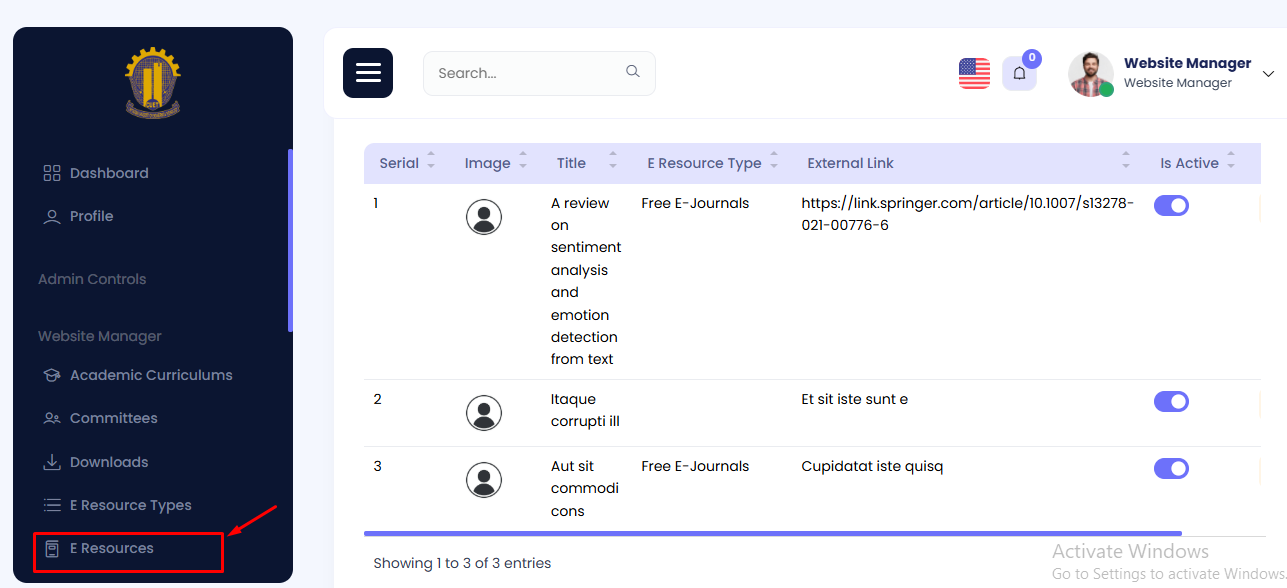
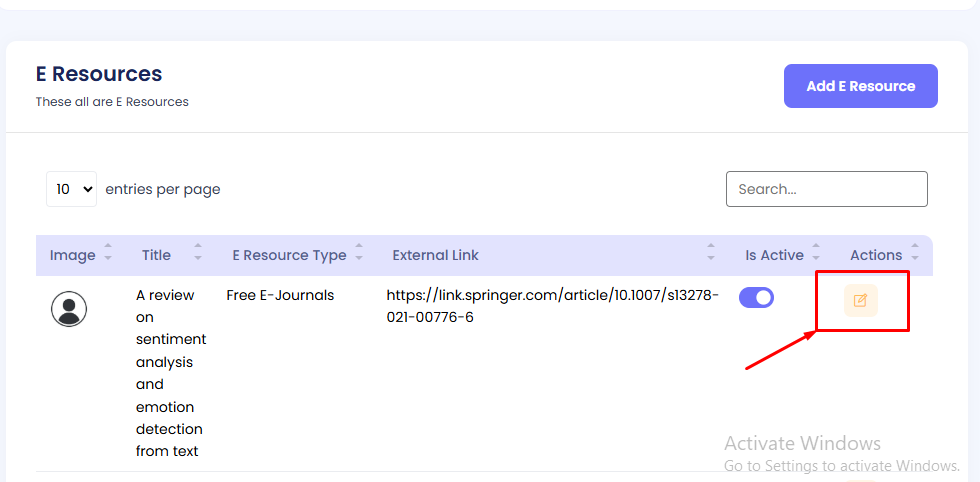
E-Resources
The available E-Resources can be viewed here.
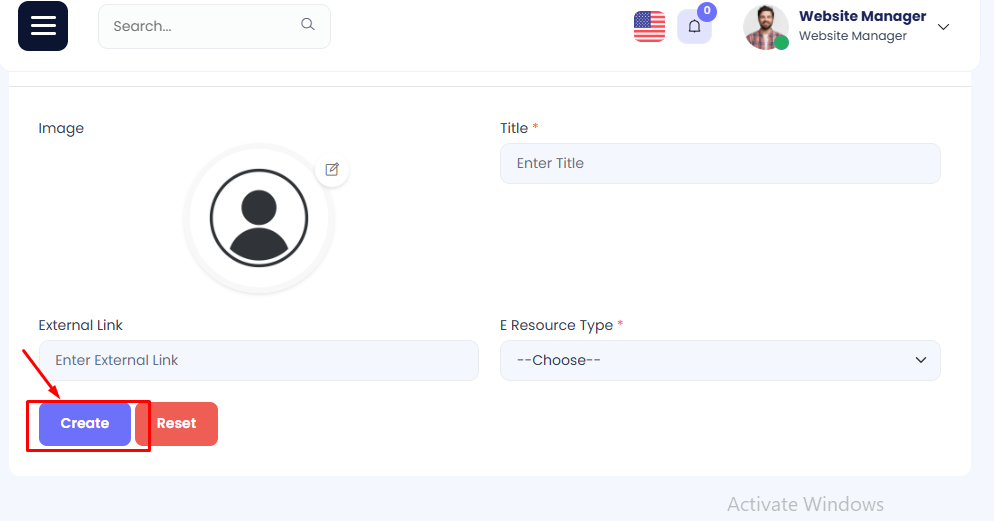
Add a E-Resources
Step 1: Navigate to E-Resources in your admin sidebar and click.
Step 2: Click on Add E-Resources
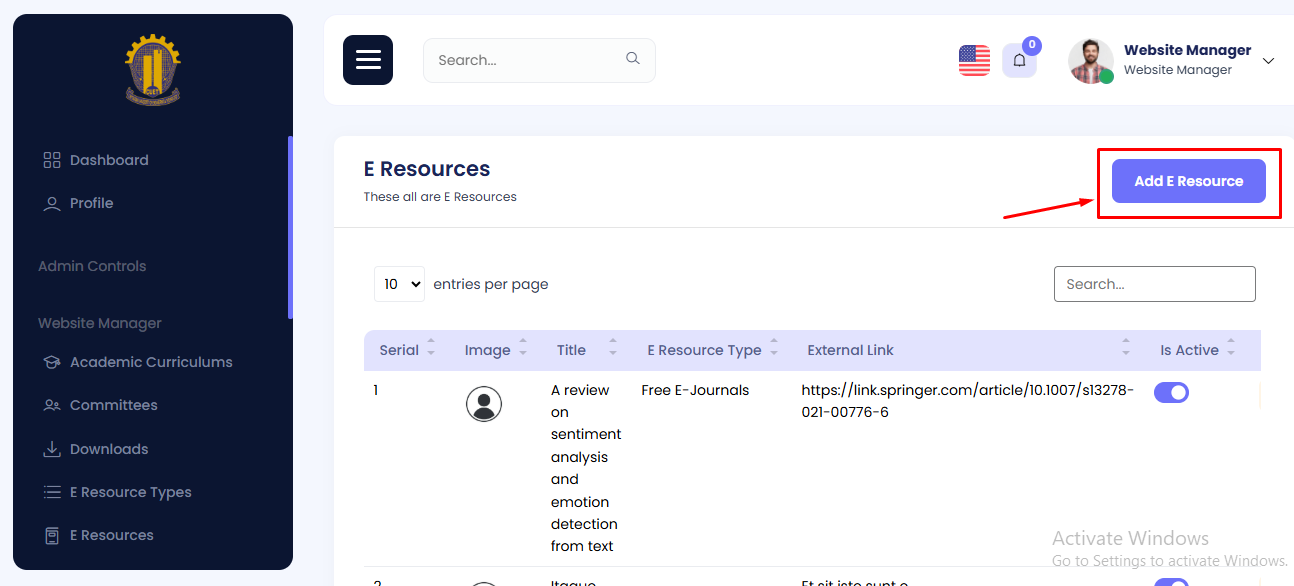
Step 3: Enter the baner, title and type in the form. Then Hit the create button.
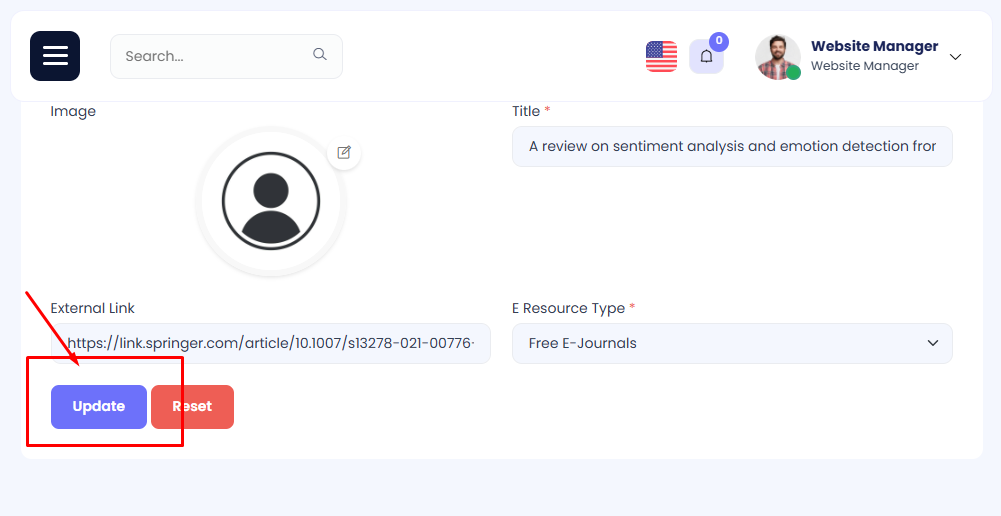
Edit E-Resources
Step 1: Navigate to E-Resources in your admin sidebar and click.
Step 2: Press edit button to edit committee.
Edit the data as needed. Then press on update button
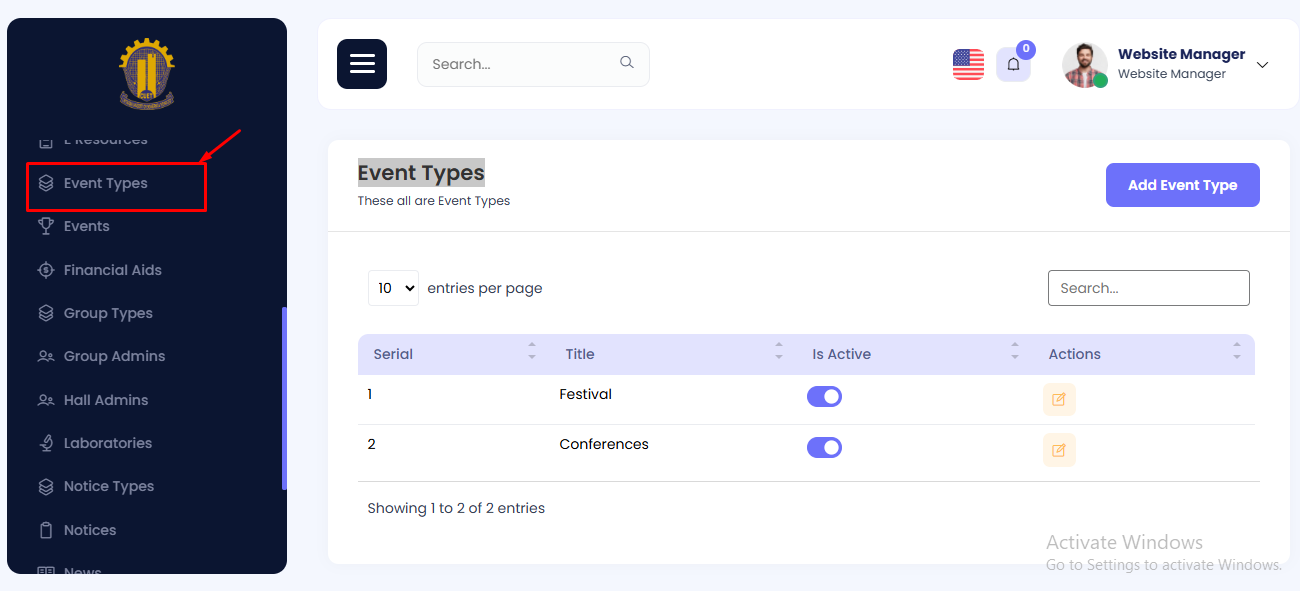
Event Types Type
The available Event Types type can be viewed here.
Add a Event Types Type
Step 1: Navigate to Event Types Type in your admin sidebar and click.
Step 2: Click on Add Event Types Type
Step 3: Enter the baner, title and slug in the form. Then Hit the create button.
Edit Event Types Type
Step 1: Navigate to Event Types Type in your admin sidebar and click.
Step 2: Press edit button to edit committee.
Edit the data as needed. Then press on update button
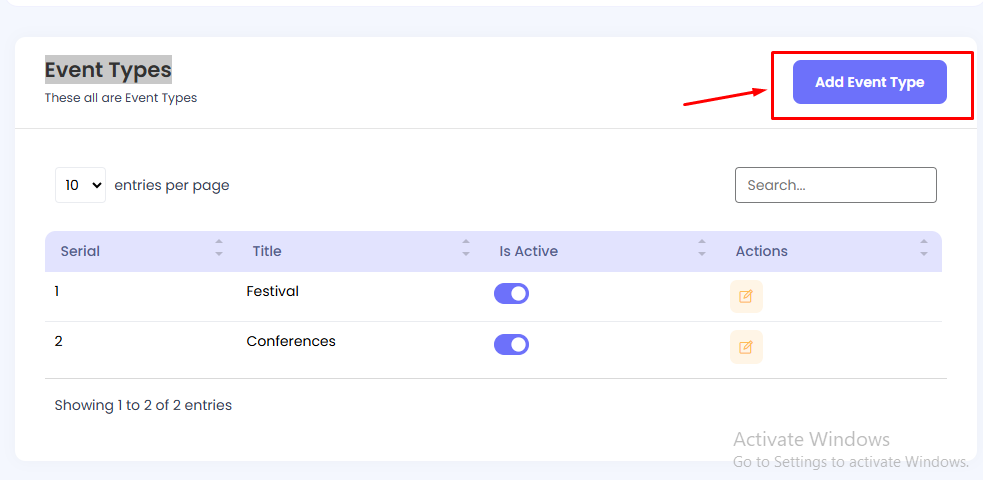
Event
The available Event can be viewed here.
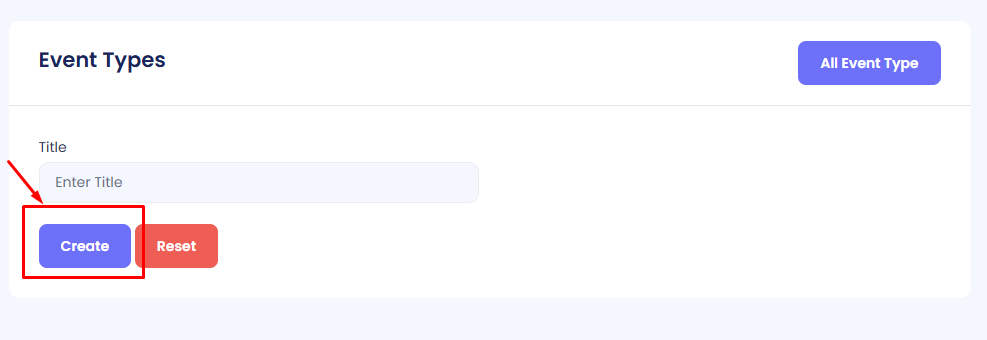
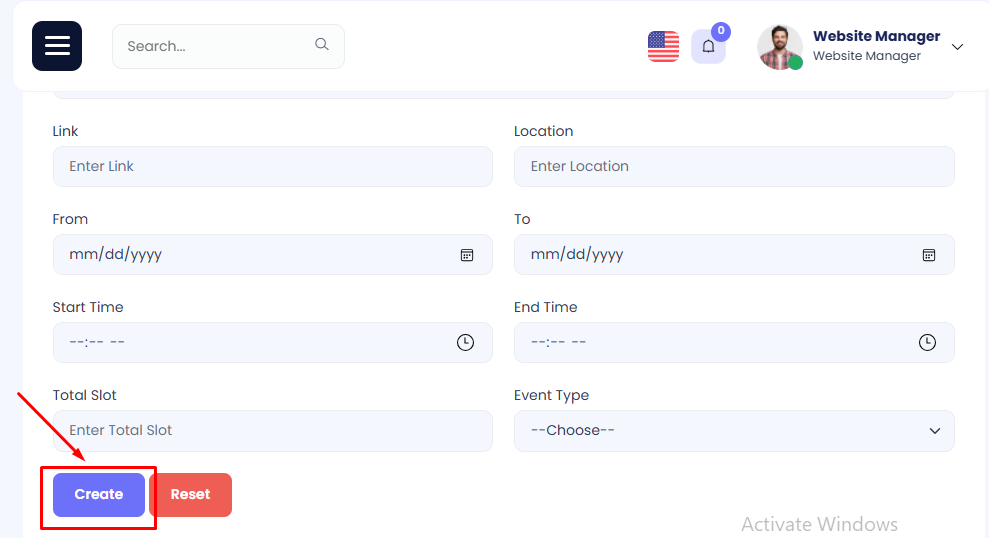
Add a Event
Step 1: Navigate to Event in your admin sidebar and click.
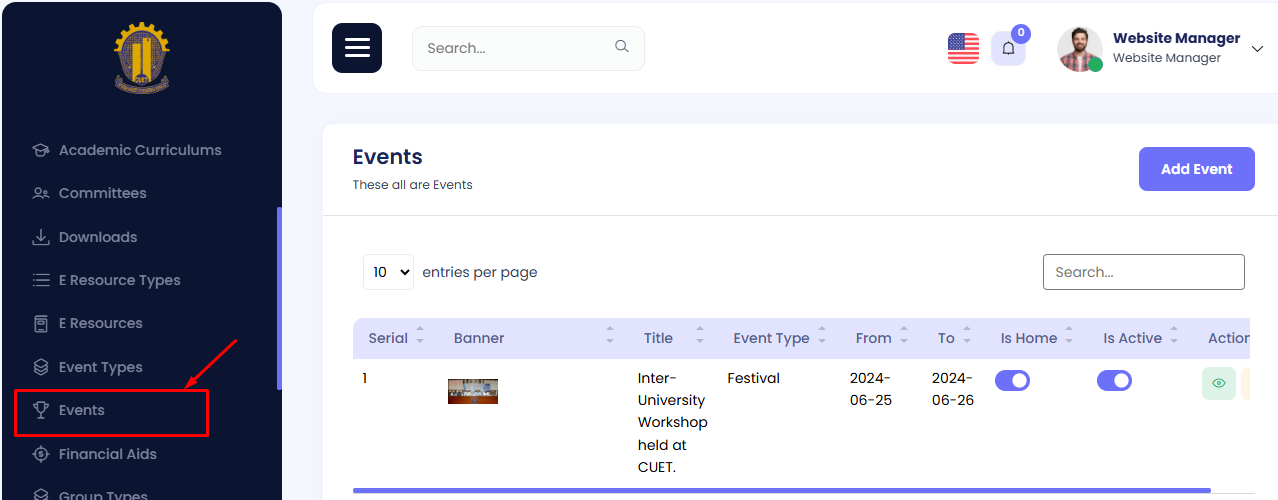
Step 2: Click on Add Event
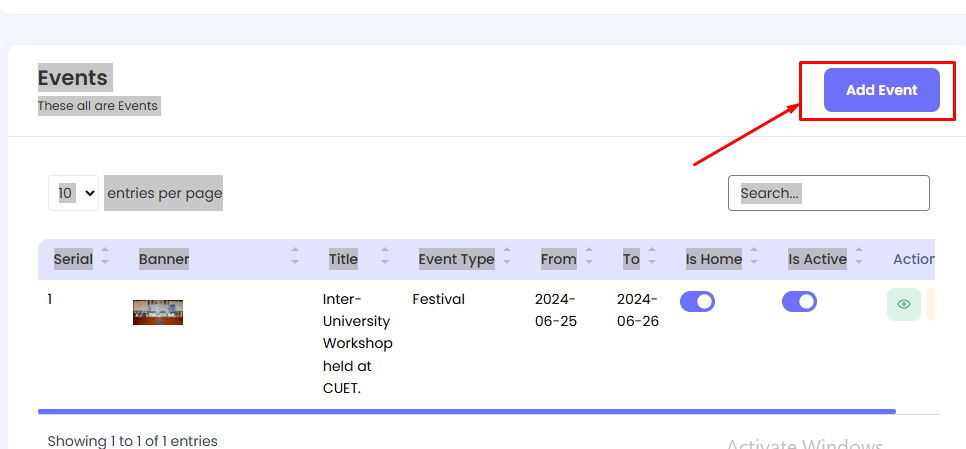
Step 3: Enter the baner, title and type in the form. Then Hit the create button.
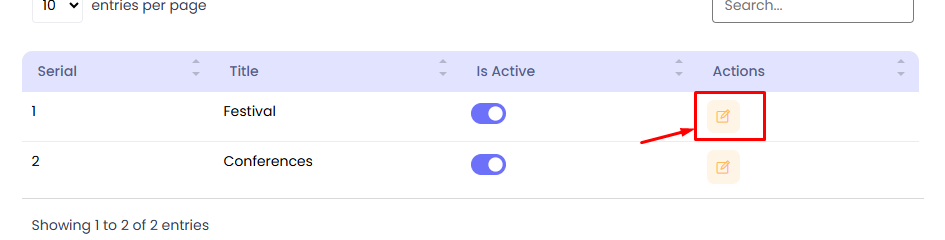
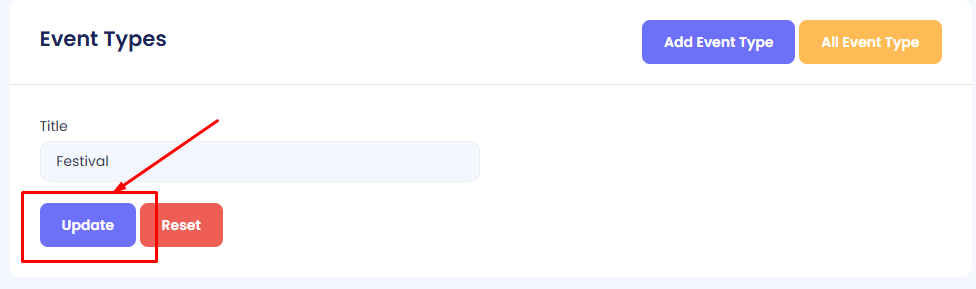
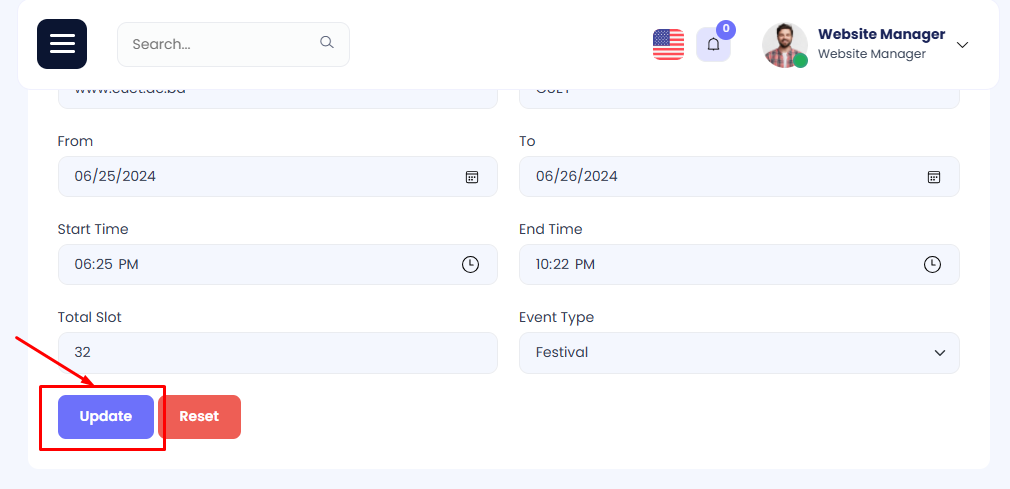
Edit Event
Step 1: Navigate to Event in your admin sidebar and click.
Step 2: Press edit button to edit committee.
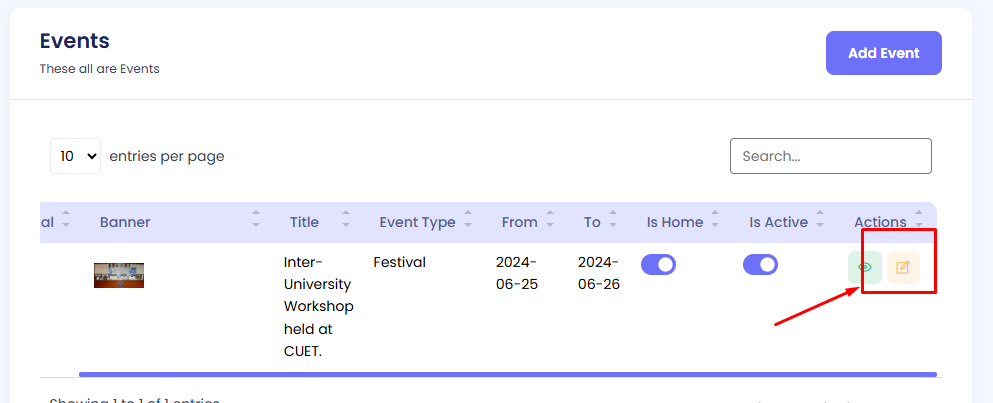
Edit the data as needed. Then press on update button
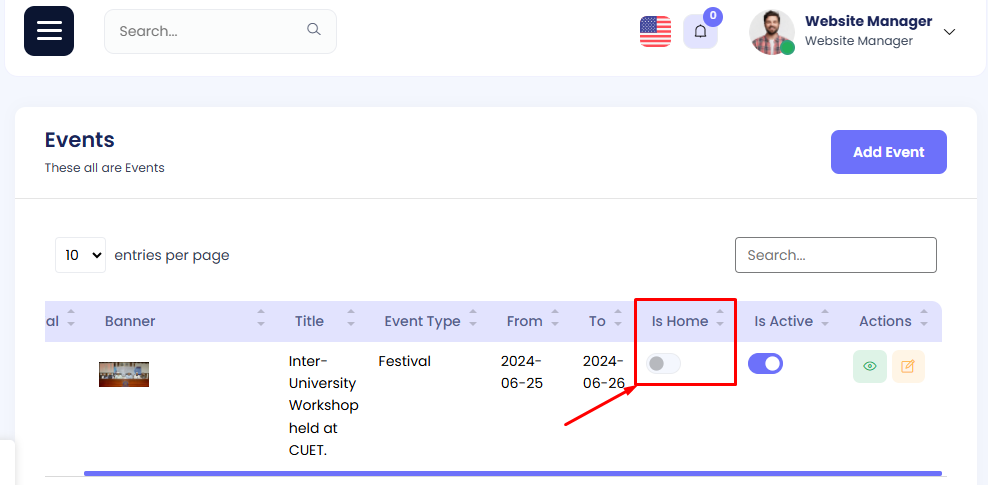
Is Home
It is similar to active/deactive. It allows a event to view in the home page.
Step 1: Navigate to Event in your admin sidebar and click.
Step 2: Find your target Academic Event from the list.
Step 3: Press the toggle button under the title is_home and active/deactive the Academic Curriculam.
Financial Aid
The available Financial Aids can be viewed here.
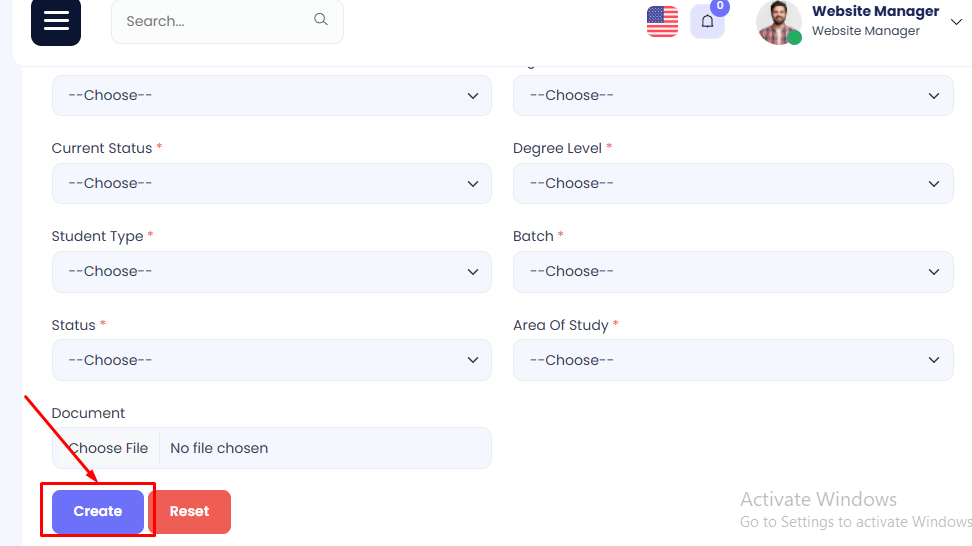
Add Financial Aid
Step 1: Navigate to Financial Aid in your admin sidebar and click.
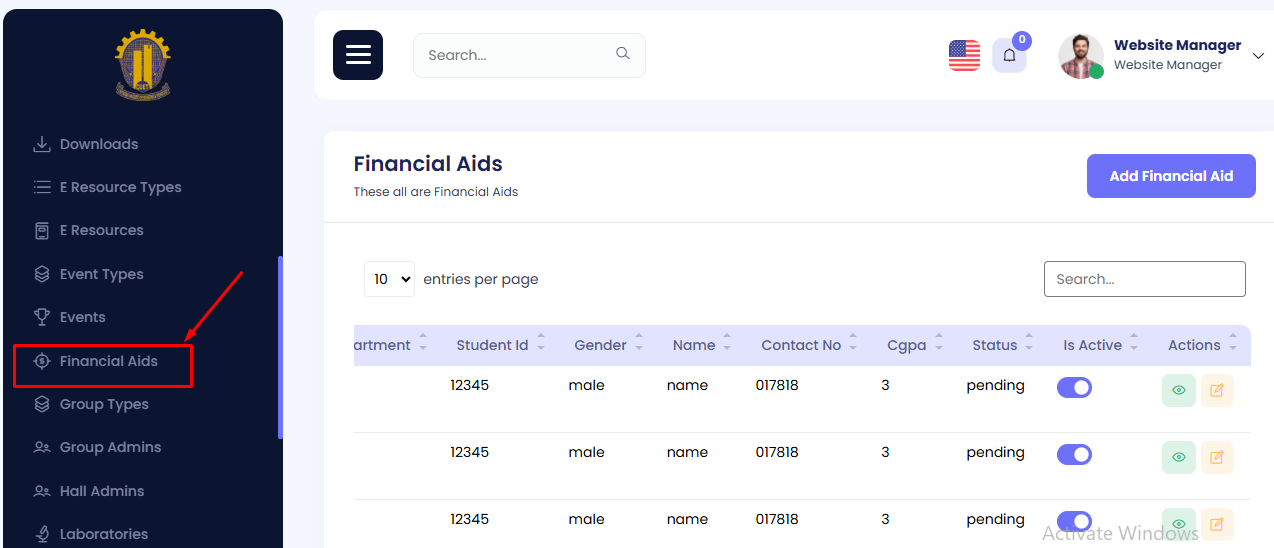
Step 2: Click on Add Financial Aid.
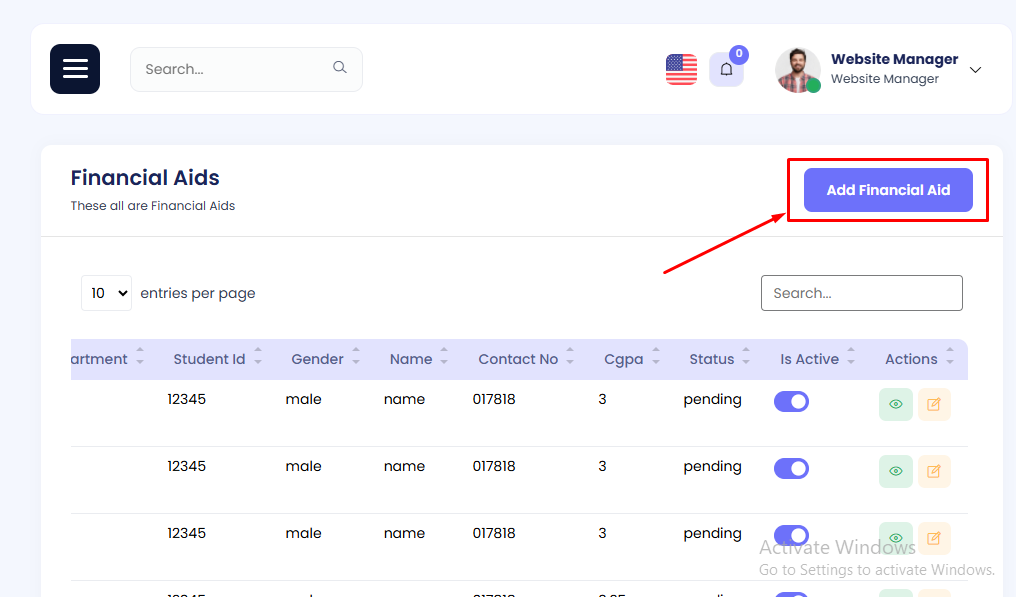
Step 3: Enter the required details (e.g., Department, Student ID, Gender, Name, Contact Number, CGPA, etc.) in the form. Then hit the Create button.
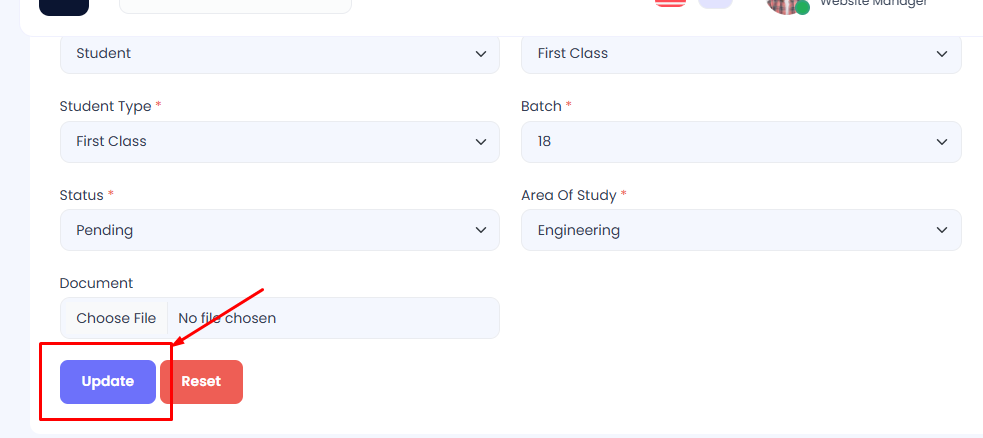
Edit Financial Aid
Step 1: Navigate to Financial Aid in your admin sidebar and click.
Step 2: Press the Edit button to modify an existing record.
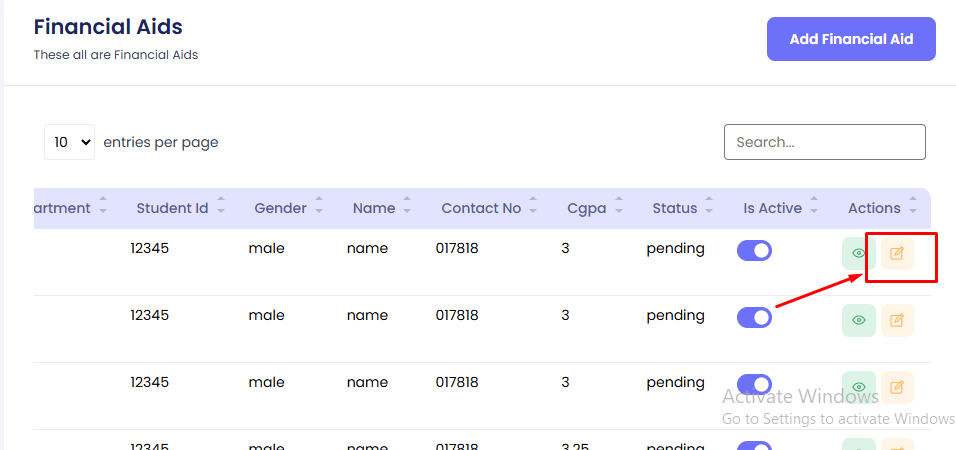
Edit the data as needed. Then press the Update button.
Activate/Deactivate Financial Aid
Step 1: Navigate to Financial Aid in your admin sidebar and click.
Step 2: Find the target Financial Aid record in the list.
Step 3: Use the toggle button under the "Is Active" column to activate or deactivate the record as needed.

Group Types
The available Group Types can be viewed here.
Add a Group Type
Step 1: Navigate to Group Types in your admin sidebar and click.
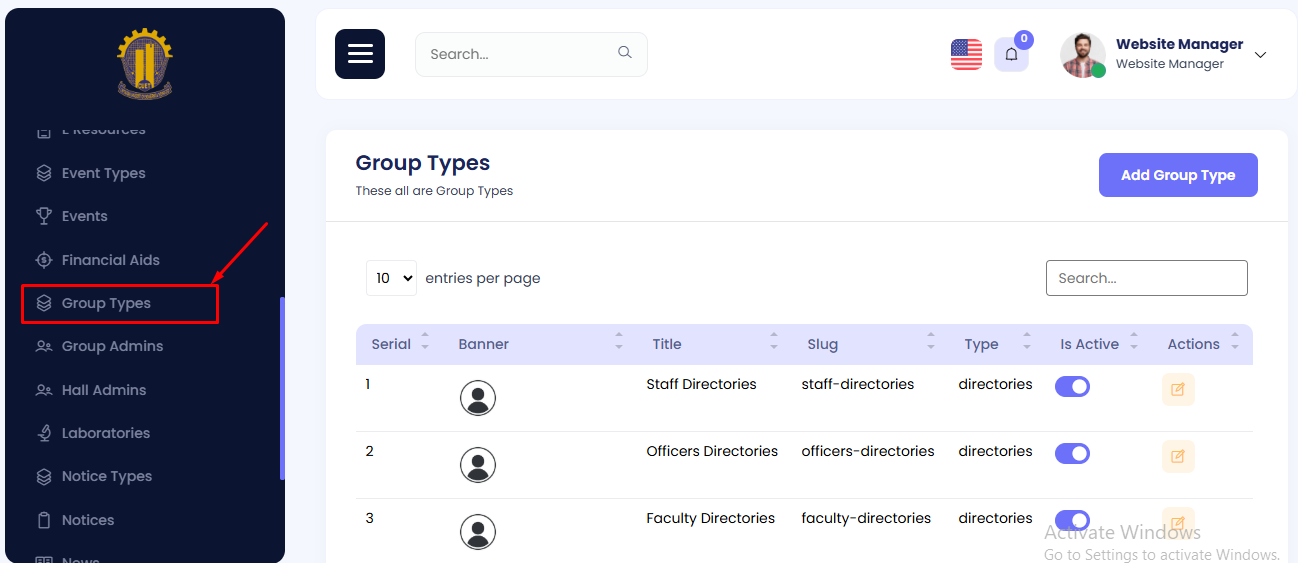
Step 2: Click on Add Group Type.
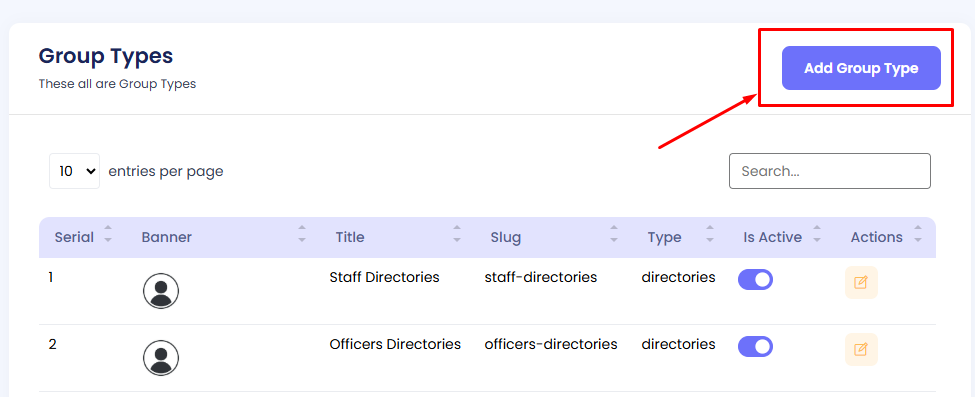
Step 3: Enter the banner, title, slug, and type in the form. Then hit the Create button.
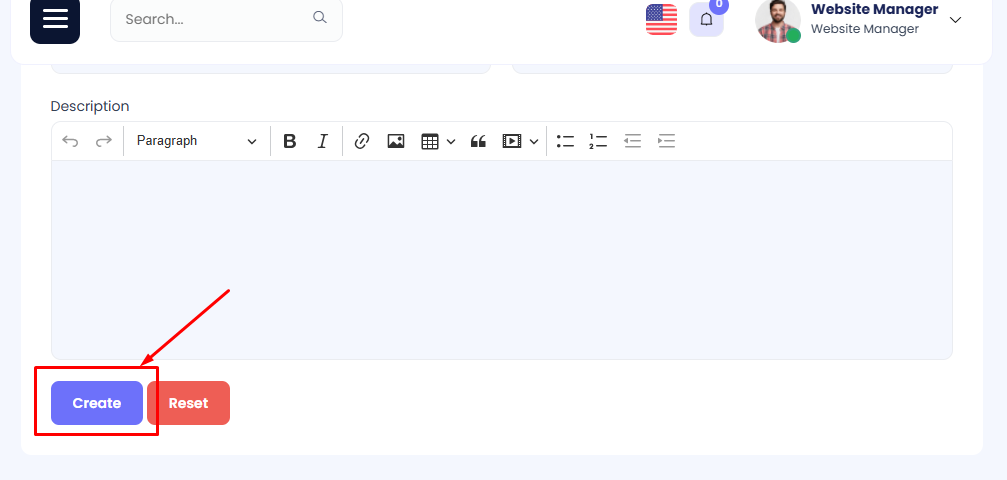
Edit Group Type
Step 1: Navigate to Group Types in your admin sidebar and click.
Step 2: Press the Edit button to modify an existing group type.
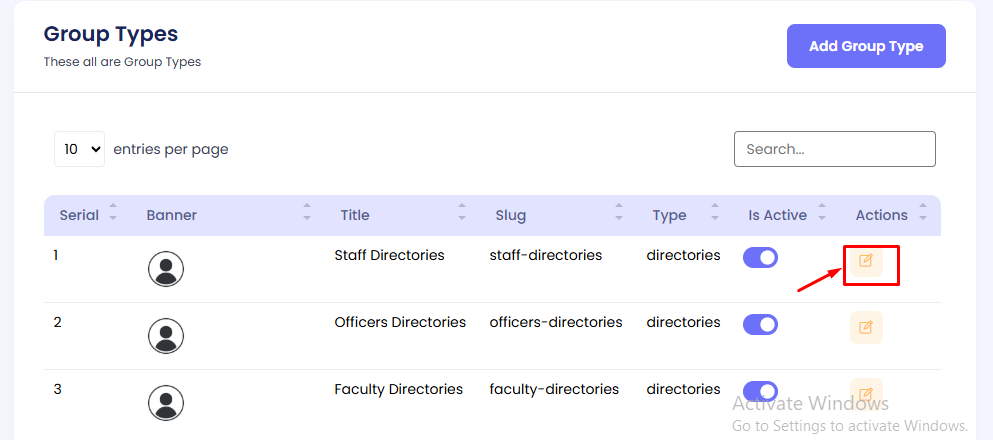
Edit the data as needed. Then press the Update button.

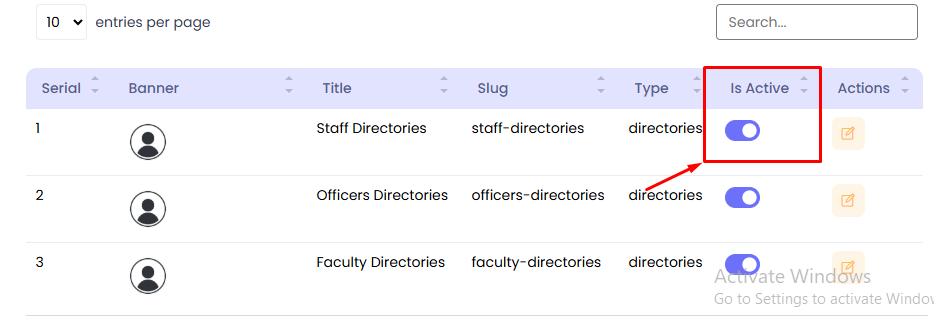
Activate/Deactivate Group Type
Step 1: Navigate to Group Types in your admin sidebar and click.
Step 2: Locate the target Group Type in the list.
Step 3: Use the toggle button under the "Is Active" column to activate or deactivate the group type as needed.
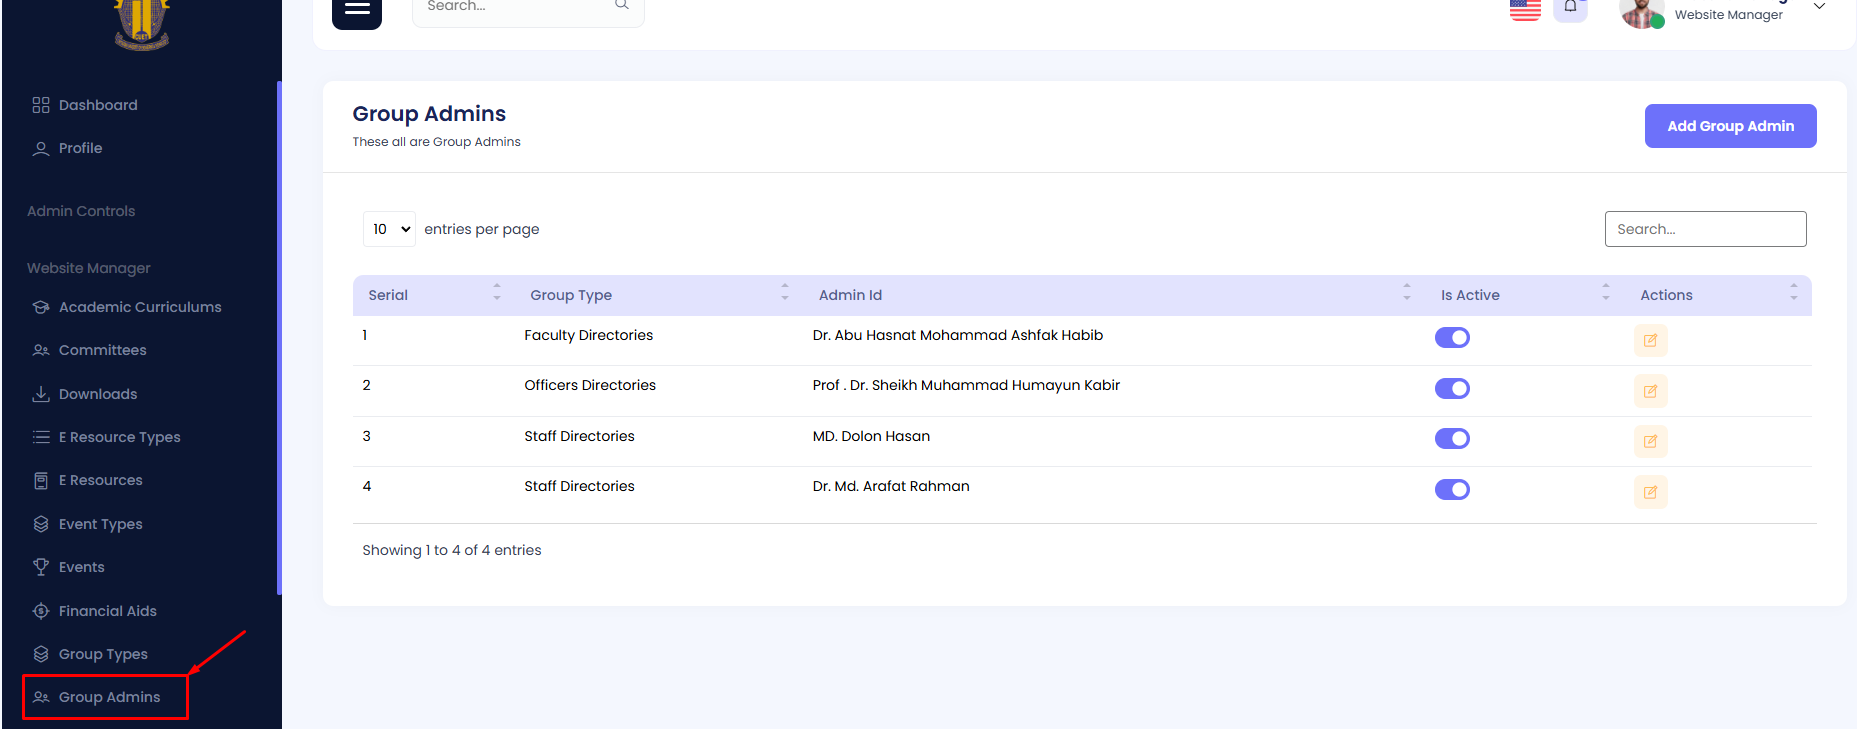
Group Admins
The list of different Group Admins can be viewed here, with columns such as Serial, Group Type, Admin ID, Active Status, and Available Actions.
Add a Group Admin
Step 1: Navigate to Group Admins in your admin sidebar and click.
Step 2: Click on Add Group Admin.
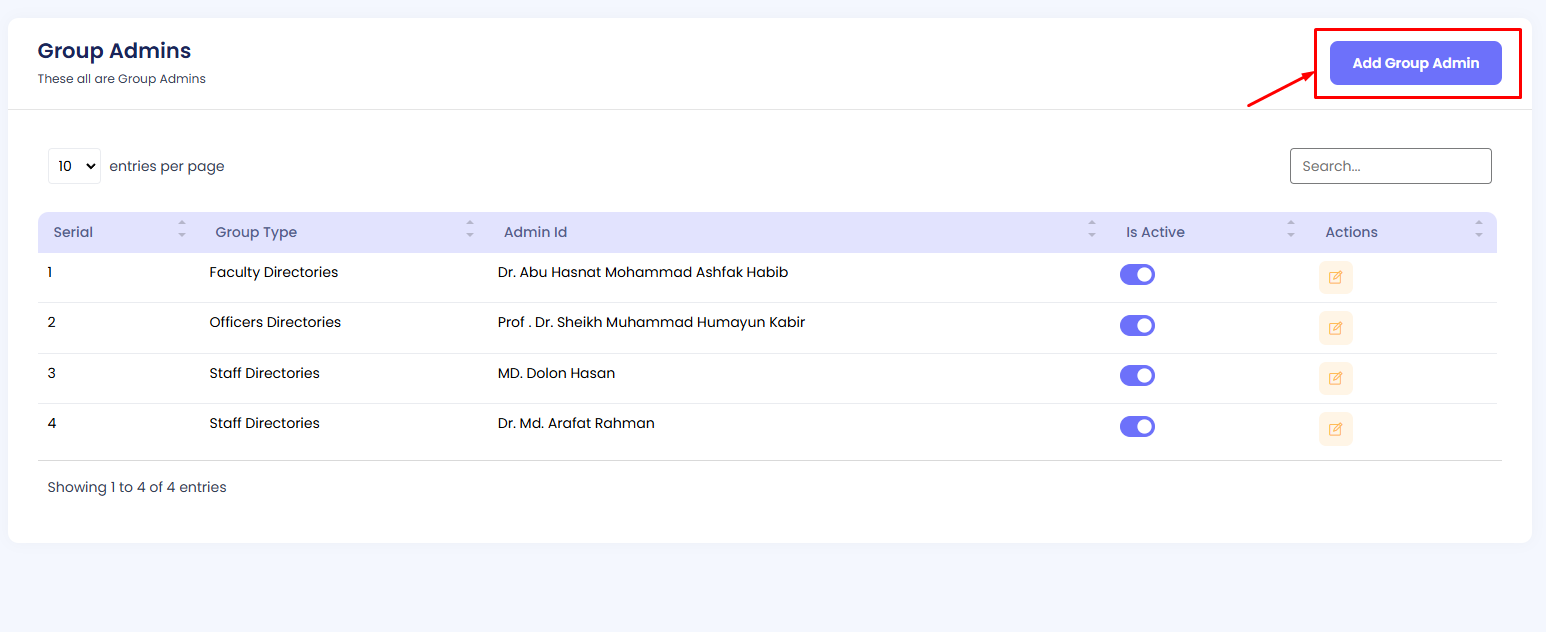
Step 3: Fill in the form with the required details, including Group Type and Admin ID. Then hit the Create button.

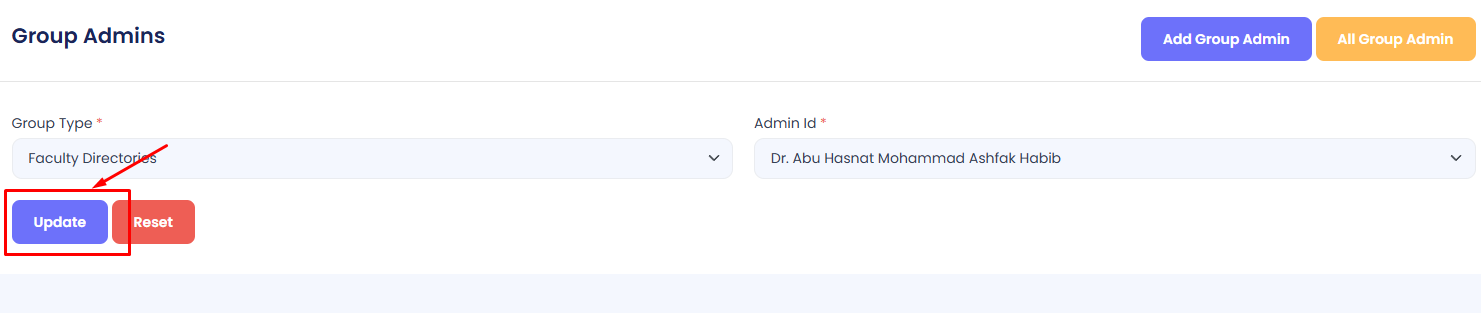
Edit Group Admin
Step 1: Navigate to Group Admins in your admin sidebar and click.
Step 2: Press the Edit button to modify an existing group admin.
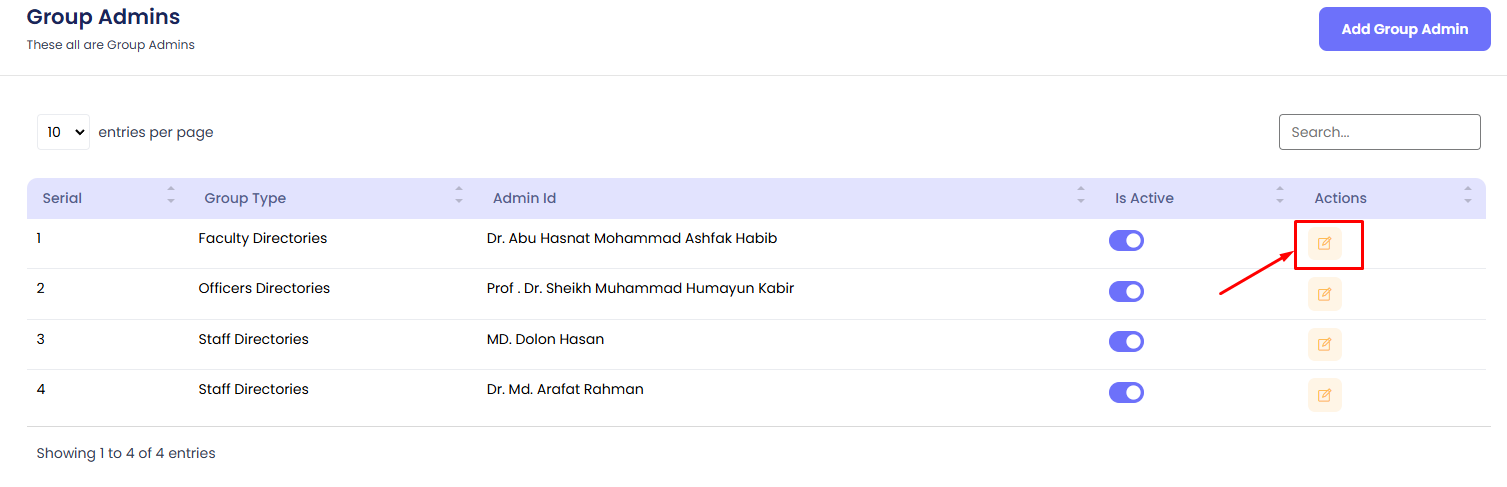
Edit the necessary fields such as Group Type and Admin ID. Then press the Update button.
Activate/Deactivate Group Admin
Step 1: Navigate to Group Admins in your admin sidebar and click.
Step 2: Locate the target Group Admin in the list.
Step 3: Use the toggle button under the "Is Active" column to activate or deactivate the group admin as required.

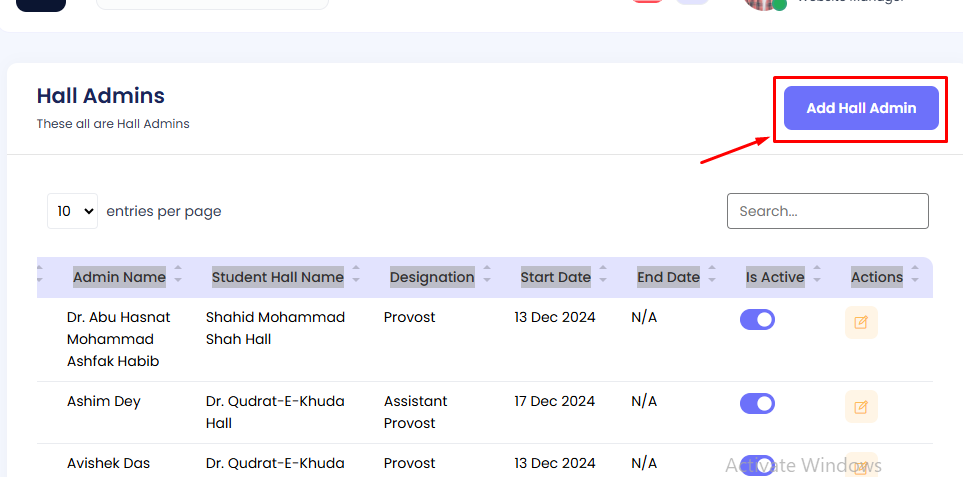
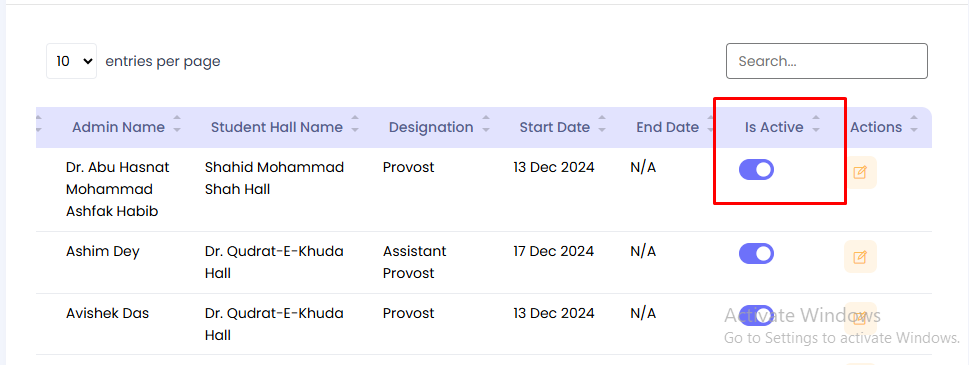
Hall Admins
The name of Hall Admins can be viewed here, with details such as serial, admin name, student hall name, designation, start date, end date, active status, and available actions.
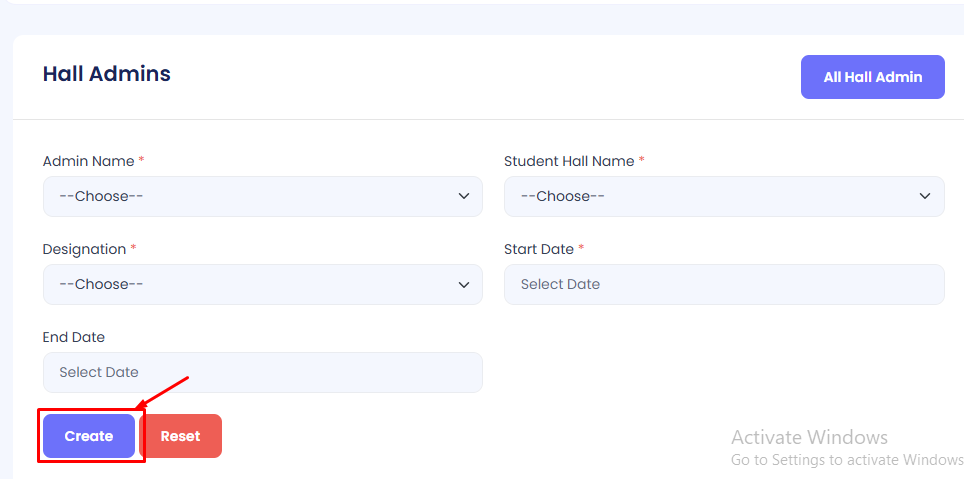
Add a Hall Admin
Step 1: Navigate to Hall Admins in your admin sidebar and click.
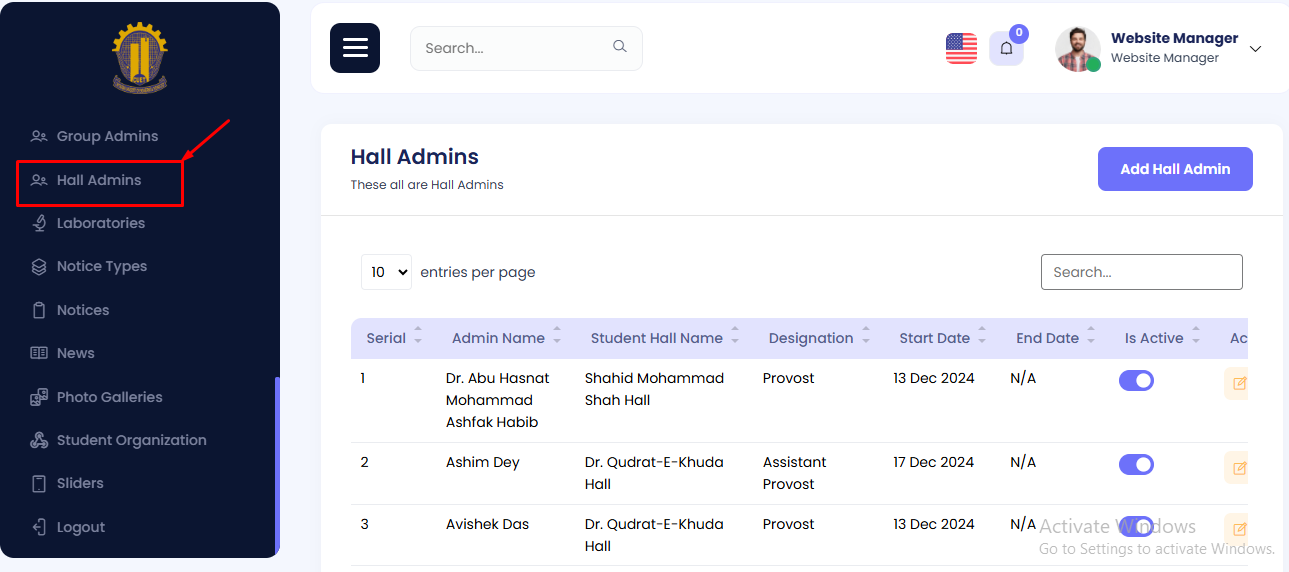
Step 2: Click on Add Hall Admin.
Step 3: Fill in the form with the required details, including Admin Name, Student Hall Name, Designation, Start Date, and End Date. Then hit the Create button.
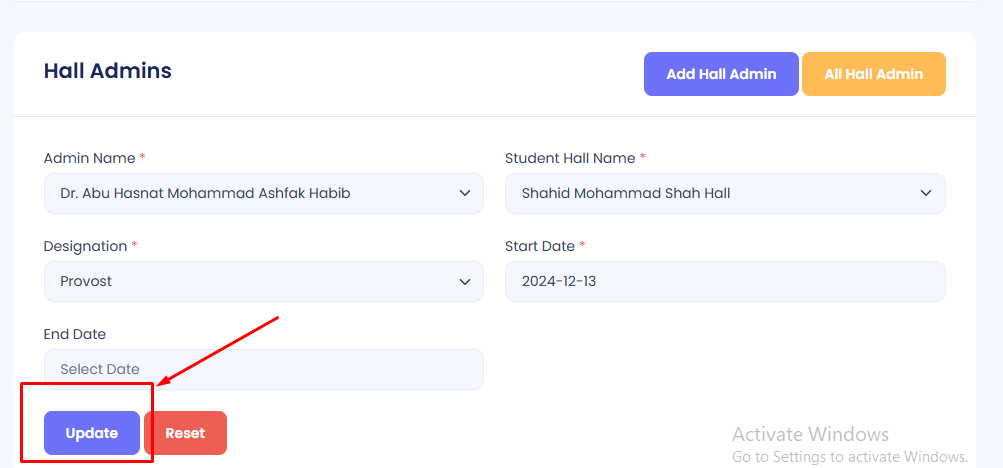
Edit Hall Admin
Step 1: Navigate to Hall Admins in your admin sidebar and click.
Step 2: Press the Edit button to modify an existing hall admin.
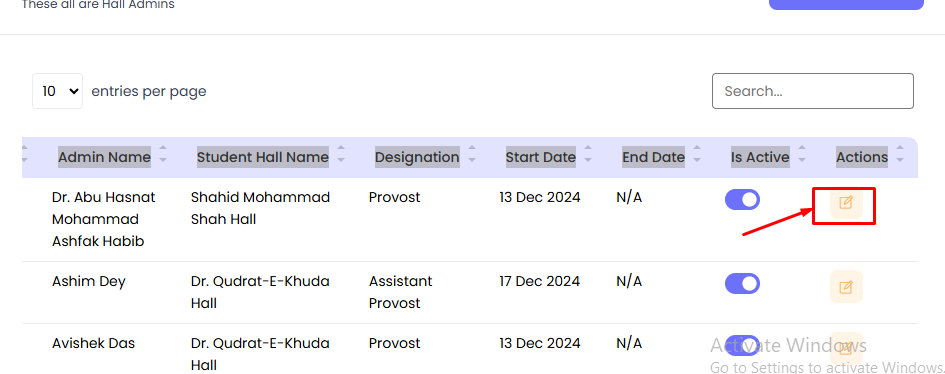
Edit the necessary fields such as Admin Name, Designation, Start Date, and End Date. Then press the Update button.
Activate/Deactivate Hall Admin
Step 1: Navigate to Hall Admins in your admin sidebar and click.
Step 2: Locate the target Hall Admin in the list.
Step 3: Use the toggle button under the "Is Active" column to activate or deactivate the hall admin as required.
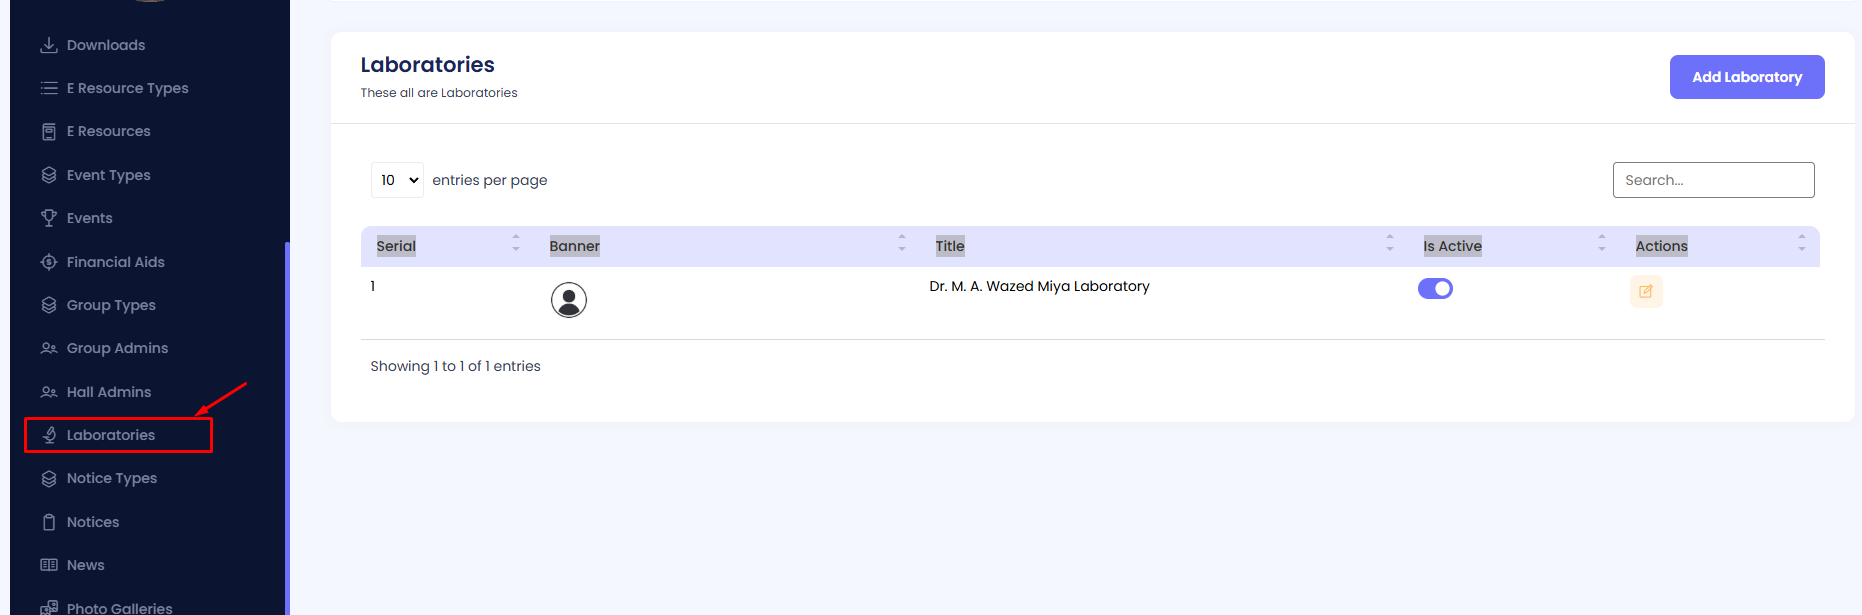
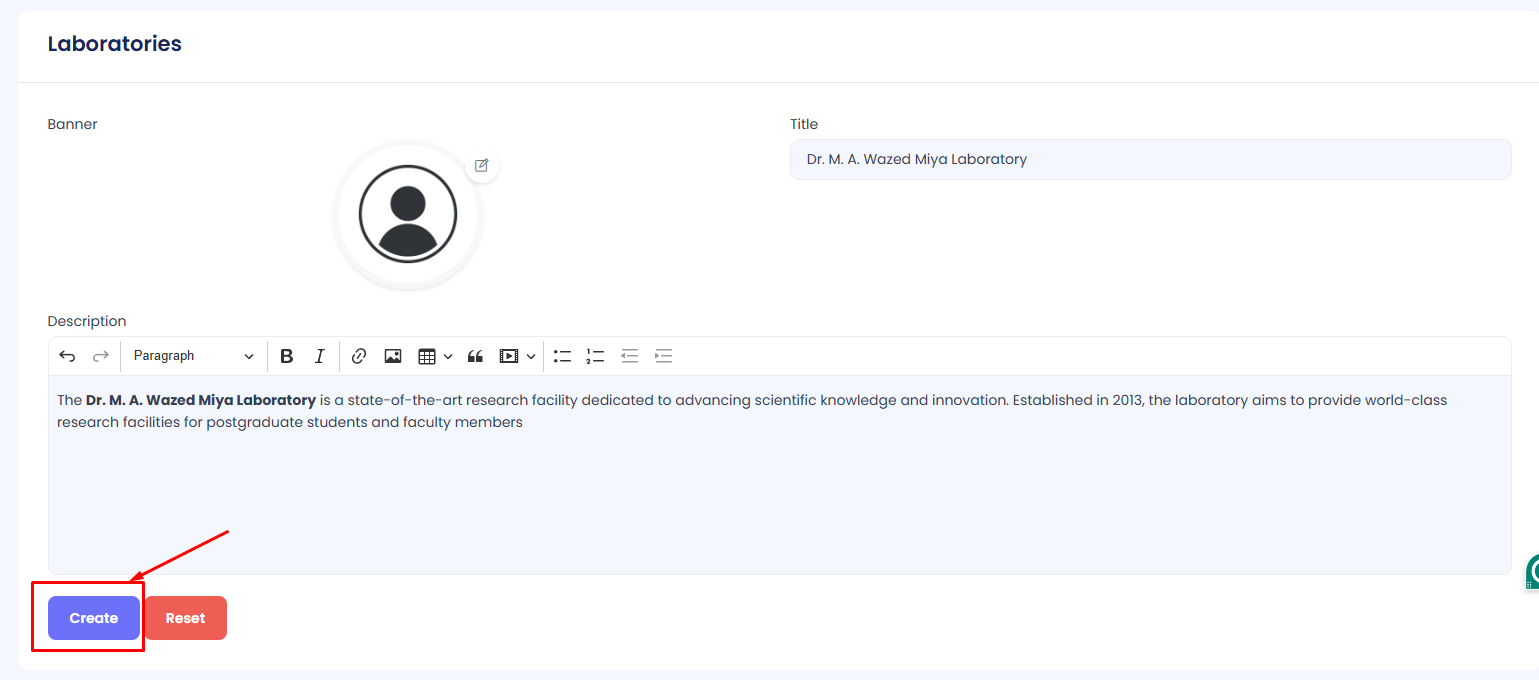
Laboratories
The details of Laboratories can be viewed here, with columns such as Serial, Banner, Title, Active Status, and Available Actions.
Add a Laboratory
Step 1: Navigate to Laboratories in your admin sidebar and click.
Step 2: Click on Add Laboratory.
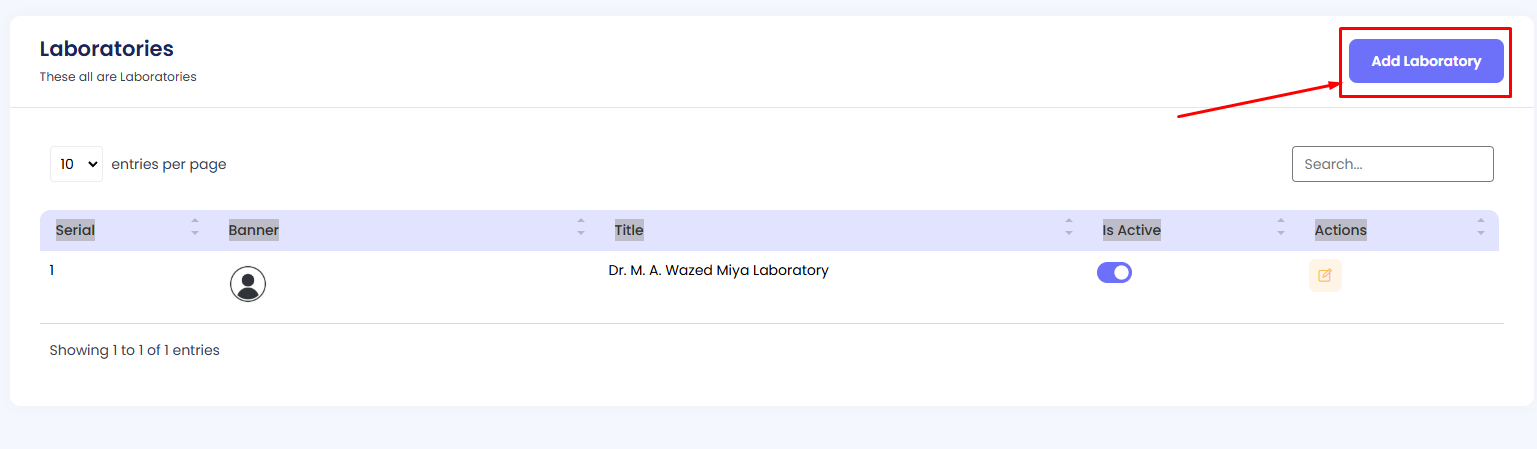
Step 3: Fill in the form with the required details, including Banner (upload an image) and Title. Then hit the Create button.
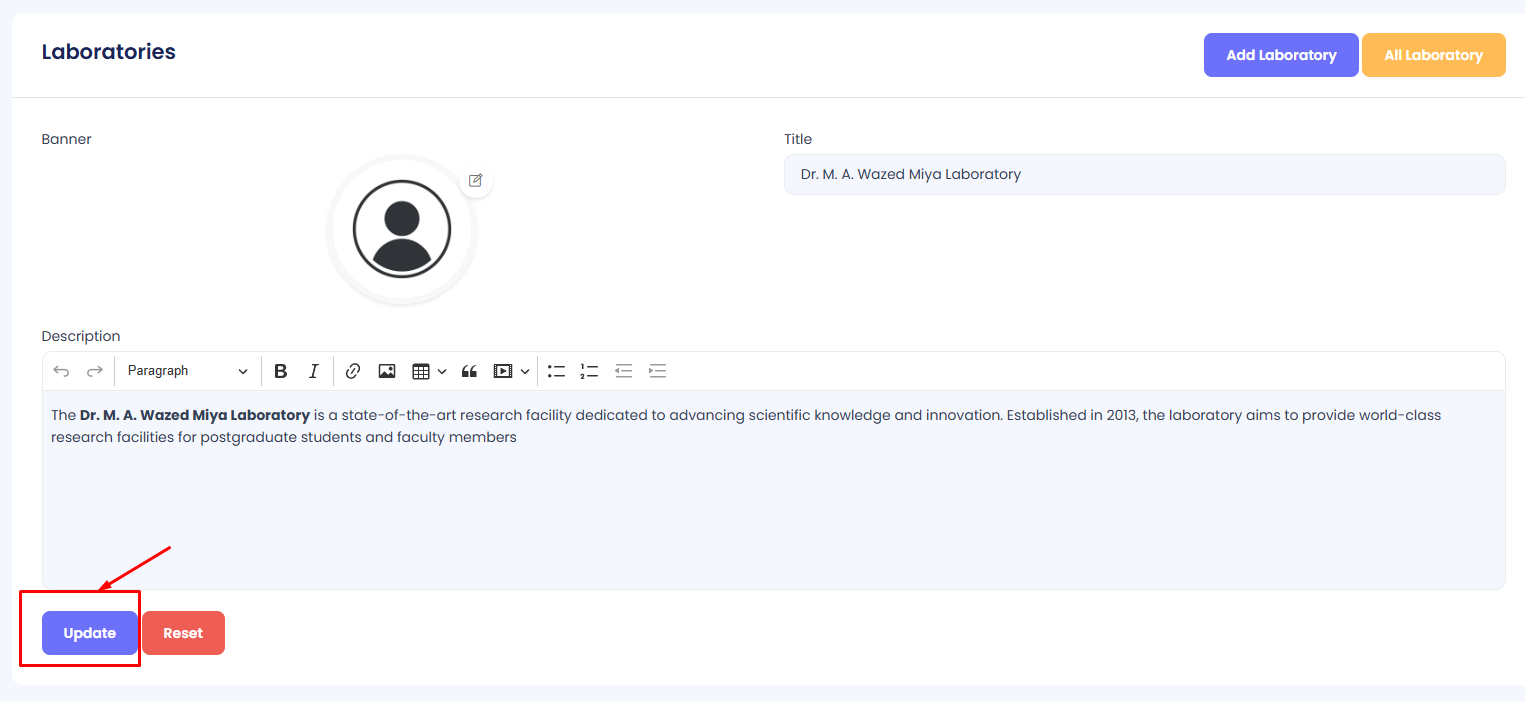
Edit Laboratory
Step 1: Navigate to Laboratories in your admin sidebar and click.
Step 2: Press the Edit button to modify an existing laboratory.

Edit the necessary fields such as Banner (upload a new image) and Title. Then press the Update button.
Activate/Deactivate Laboratory
Step 1: Navigate to Laboratories in your admin sidebar and click.
Step 2: Locate the target Laboratory in the list.
Step 3: Use the toggle button under the "Is Active" column to activate or deactivate the laboratory as required.

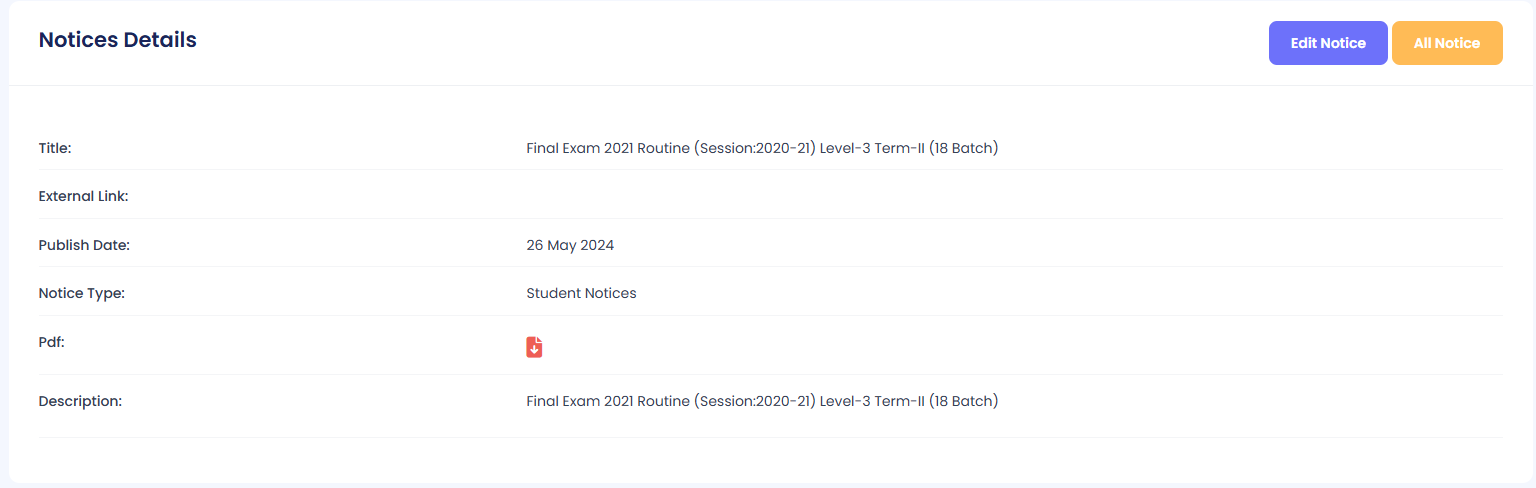
Notices
The details of Notices can be viewed here, with columns such as Serial, Title, Notice Type, PDF, Publish Date, Active Status, and Available Actions.
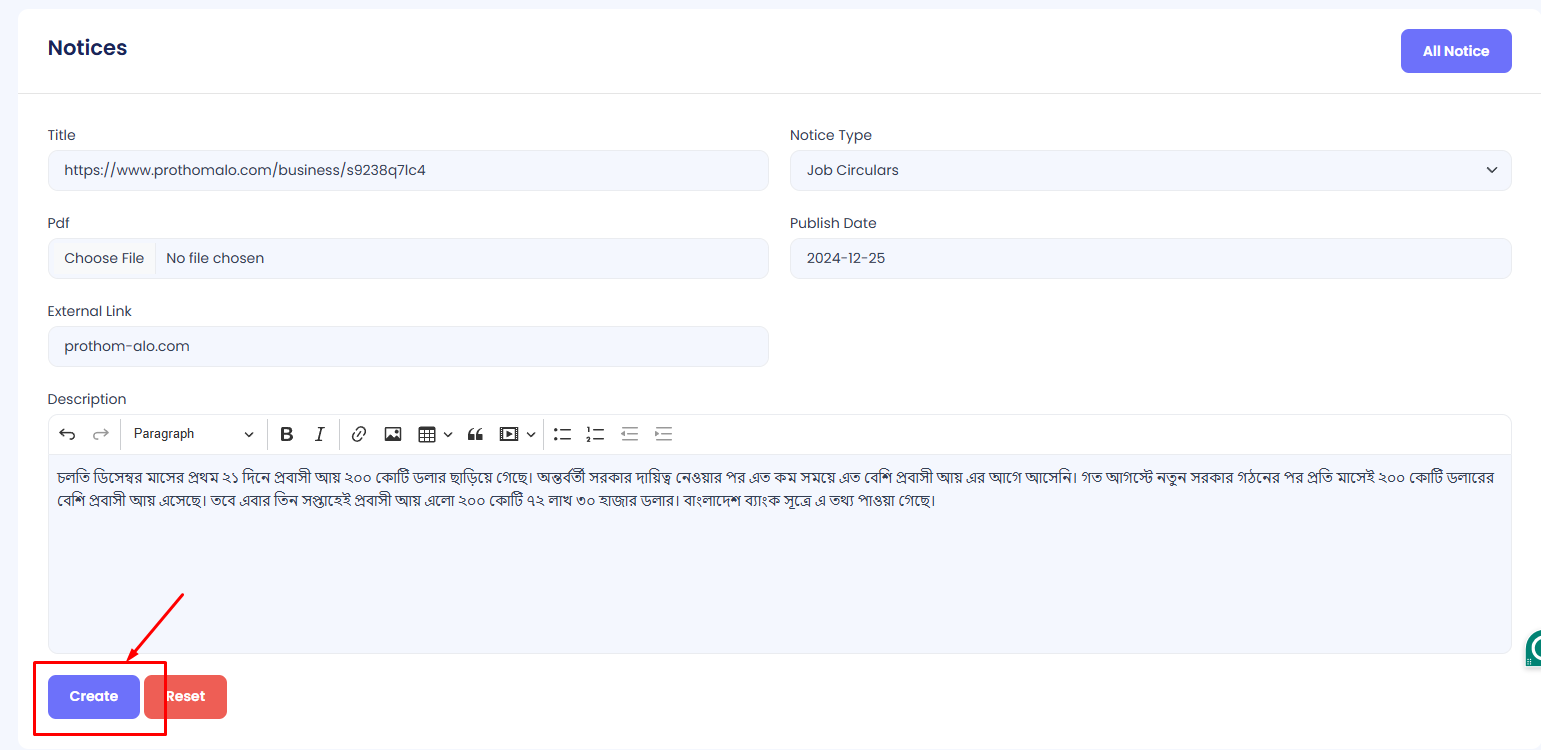
Add a Notice
Step 1: Navigate to Notices in your admin sidebar and click.
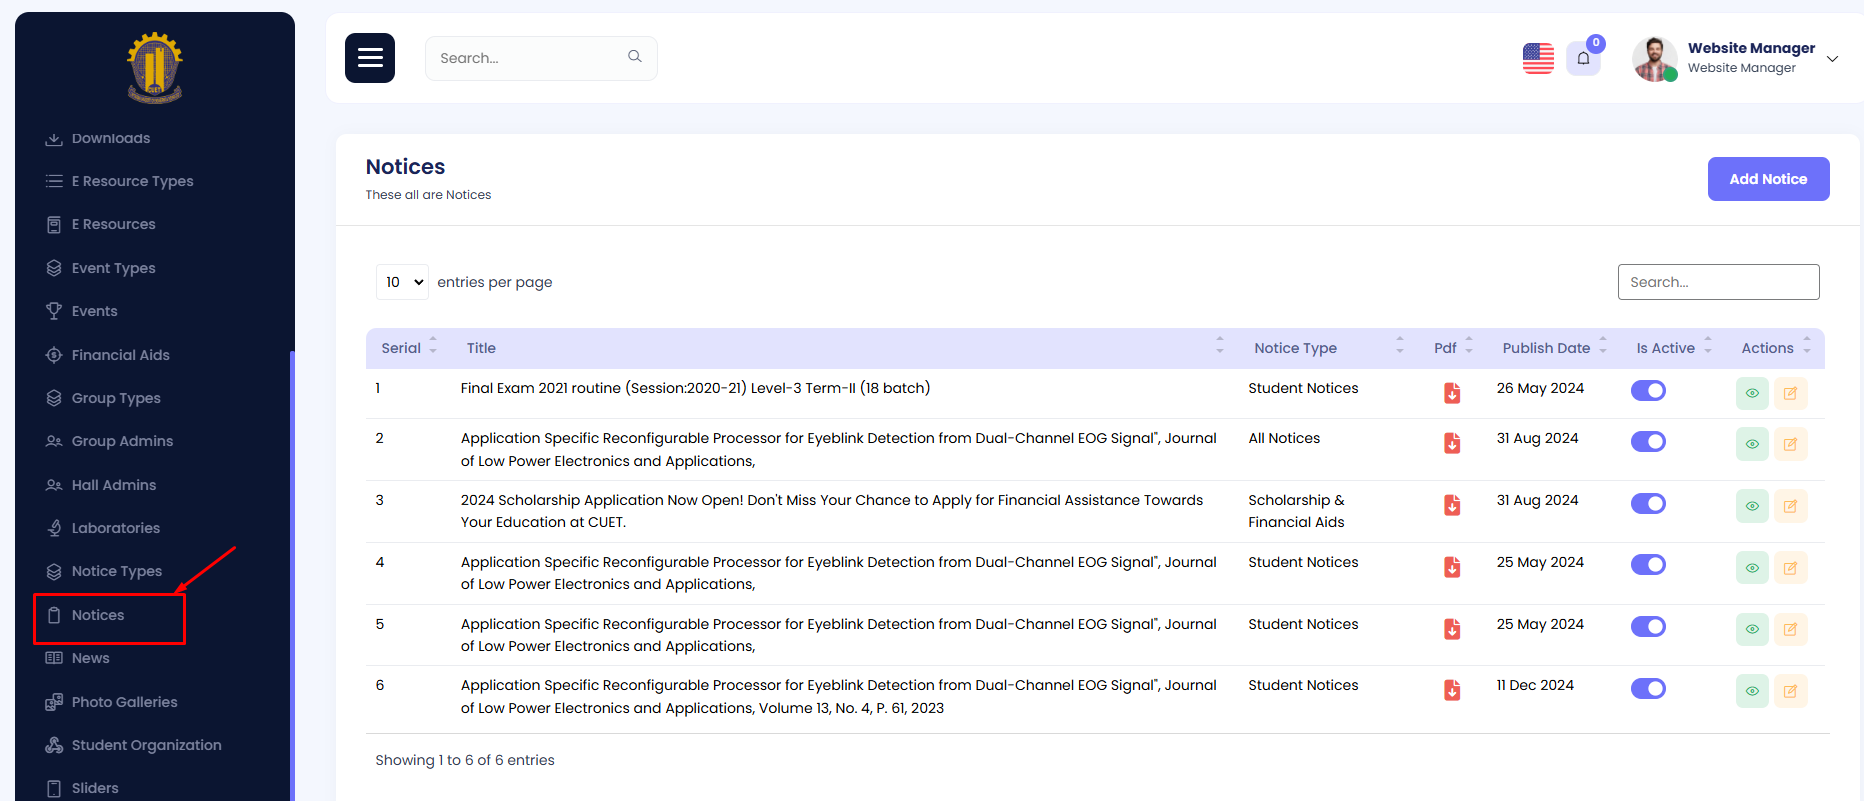
Step 2: Click on Add Notice.
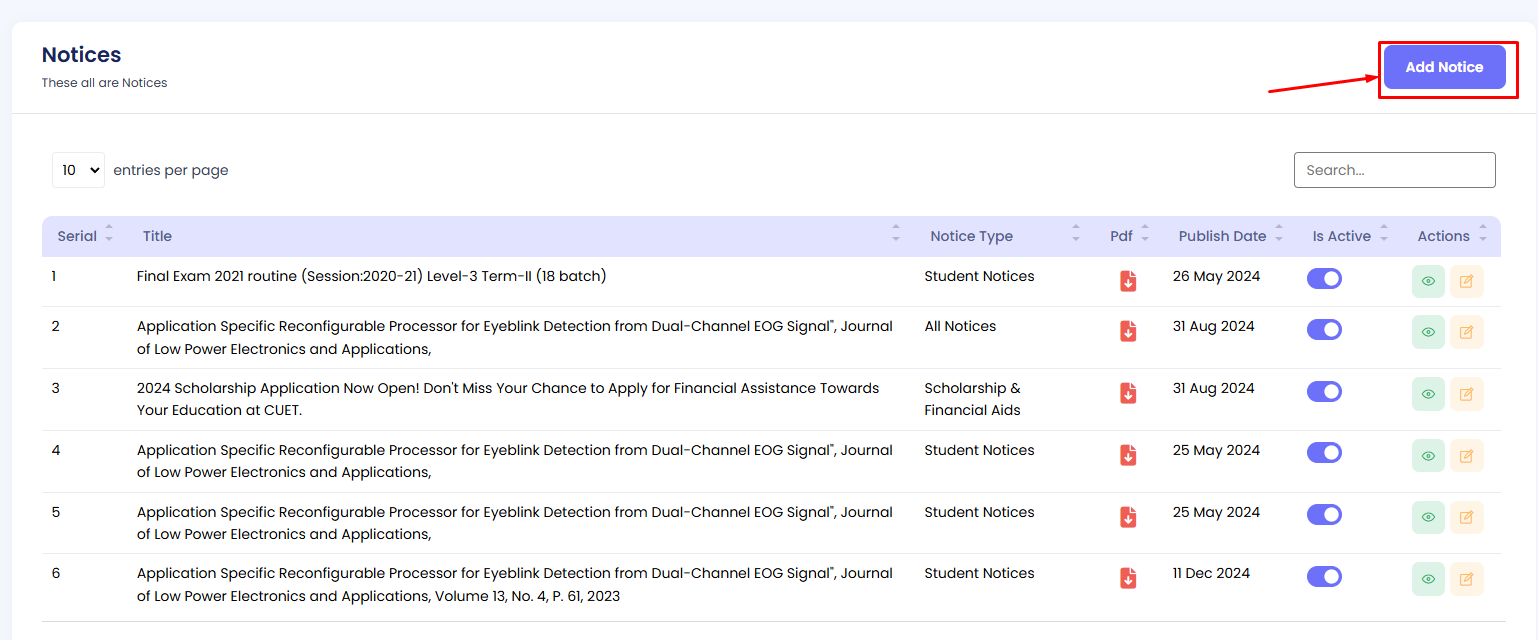
Step 3: Fill in the form with the required details, including Title, Notice Type (select the category), and PDF (upload a file). Set the Publish Date, then click the Create button.
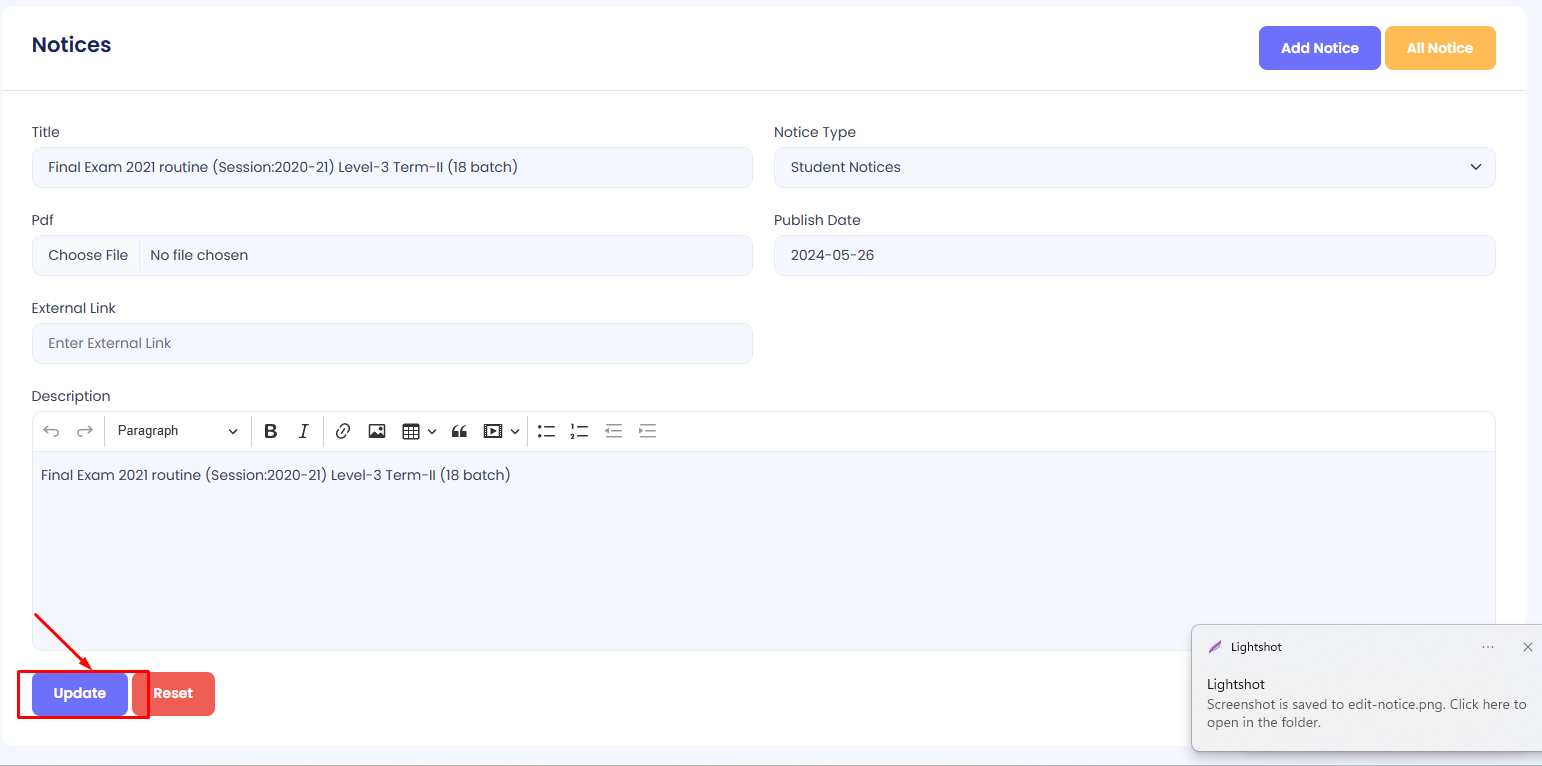
Edit Notice
Step 1: Navigate to Notices in your admin sidebar and click.
Step 2: Press the Edit button to modify an existing notice.
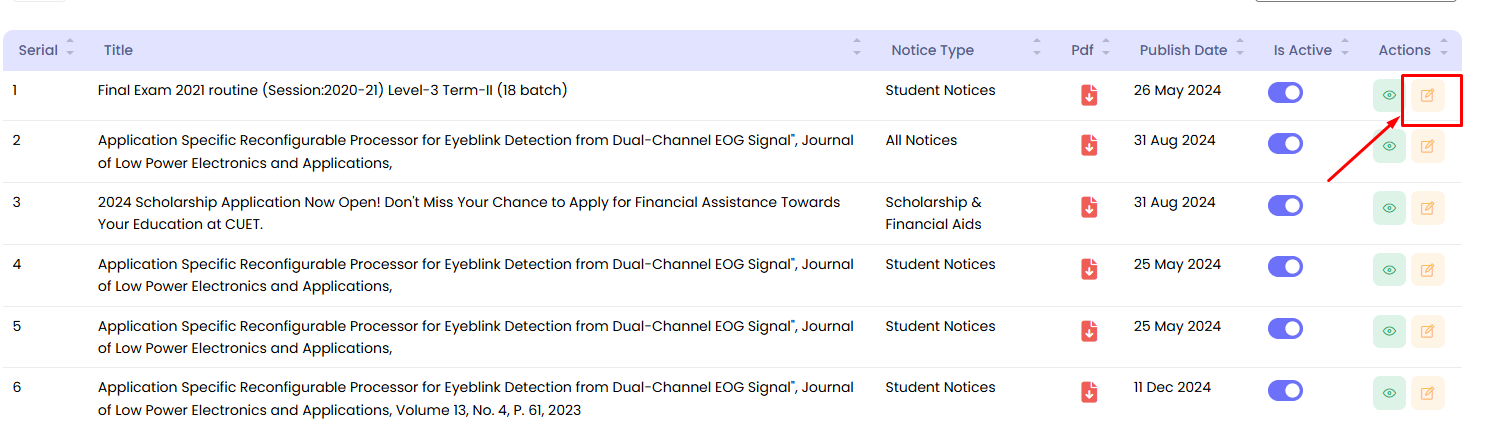
Edit the necessary fields such as Title, Notice Type, PDF (upload a new file), or Publish Date. Then click the Update button.
View Notice
Step 1: Navigate to Notices in your admin sidebar and click.
Step 2: Press the View button to see the full details of the notice.
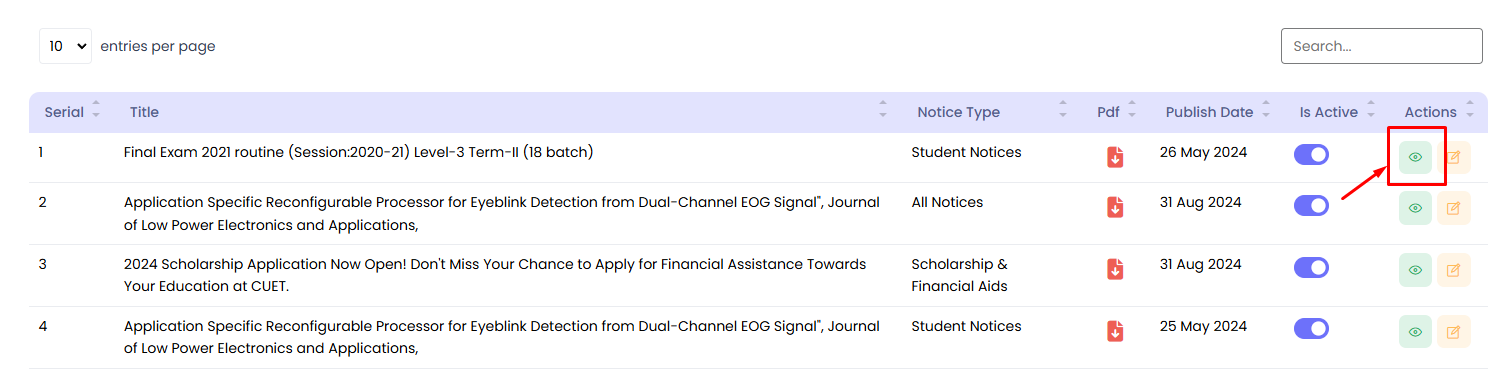
The notice details, including the Title, Notice Type, PDF, Publish Date, and Active Status, will be displayed in a new window or a modal.
Activate/Deactivate Notice
Step 1: Navigate to Notices in your admin sidebar and click.
Step 2: Locate the target Notice in the list.
Step 3: Use the toggle button under the "Is Active" column to activate or deactivate the notice as required.

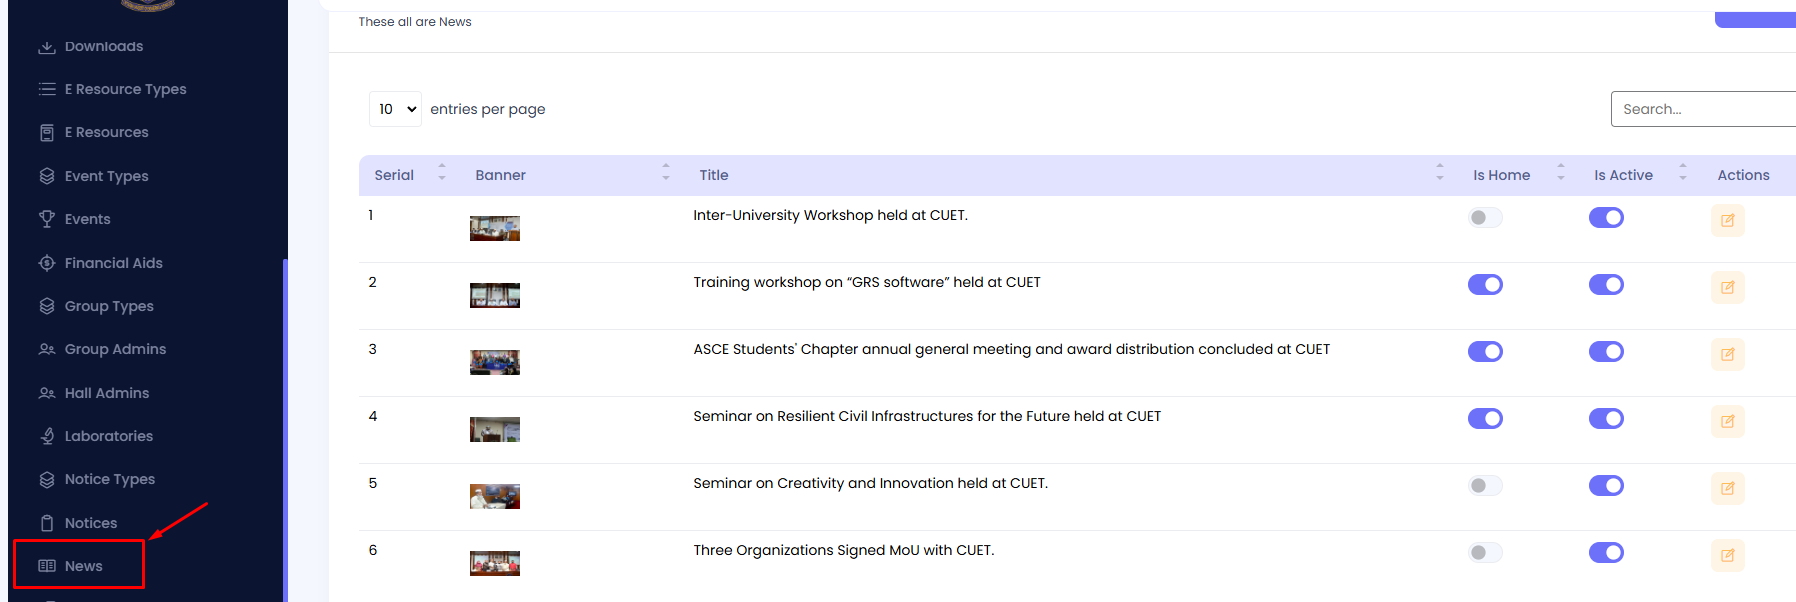
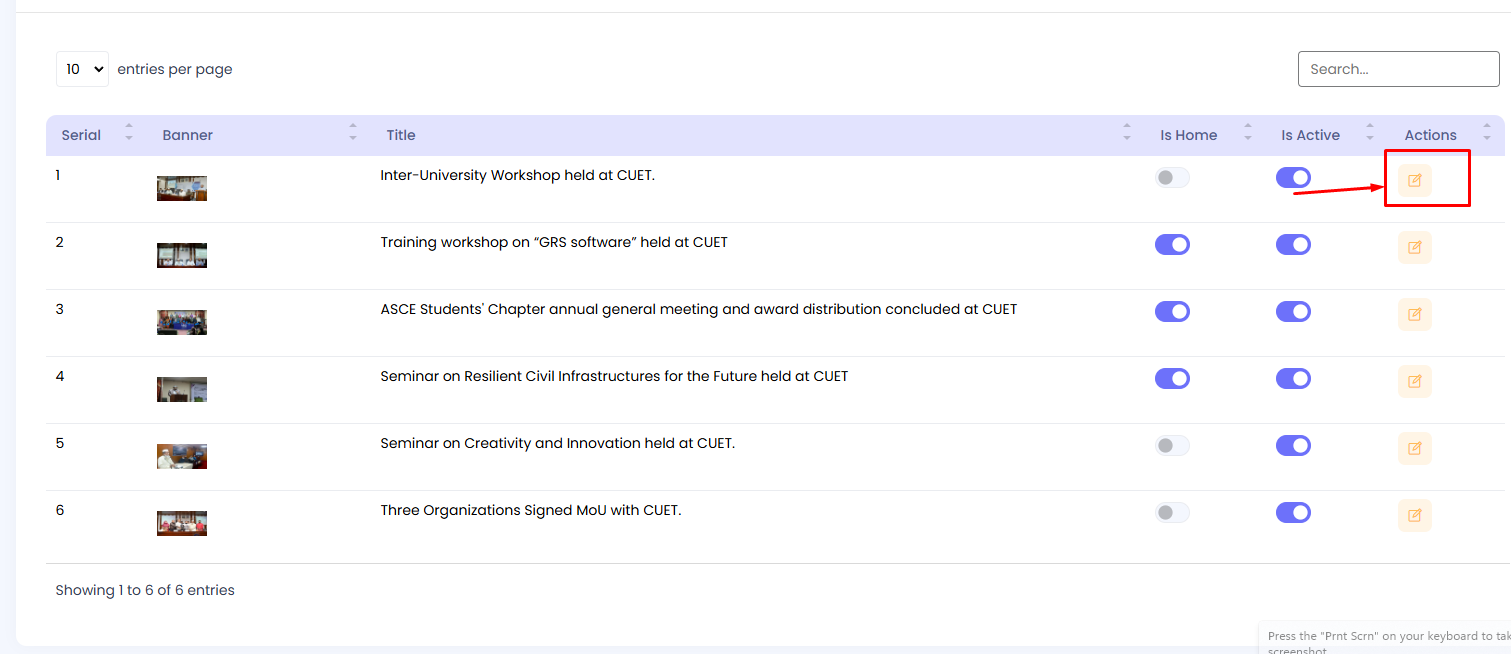
News
The details of News can be viewed and managed here. The table includes columns like Serial, Banner, Title, Is Home, Is Active, and Actions. You can add, edit, activate/deactivate, and display news on the homepage as needed.
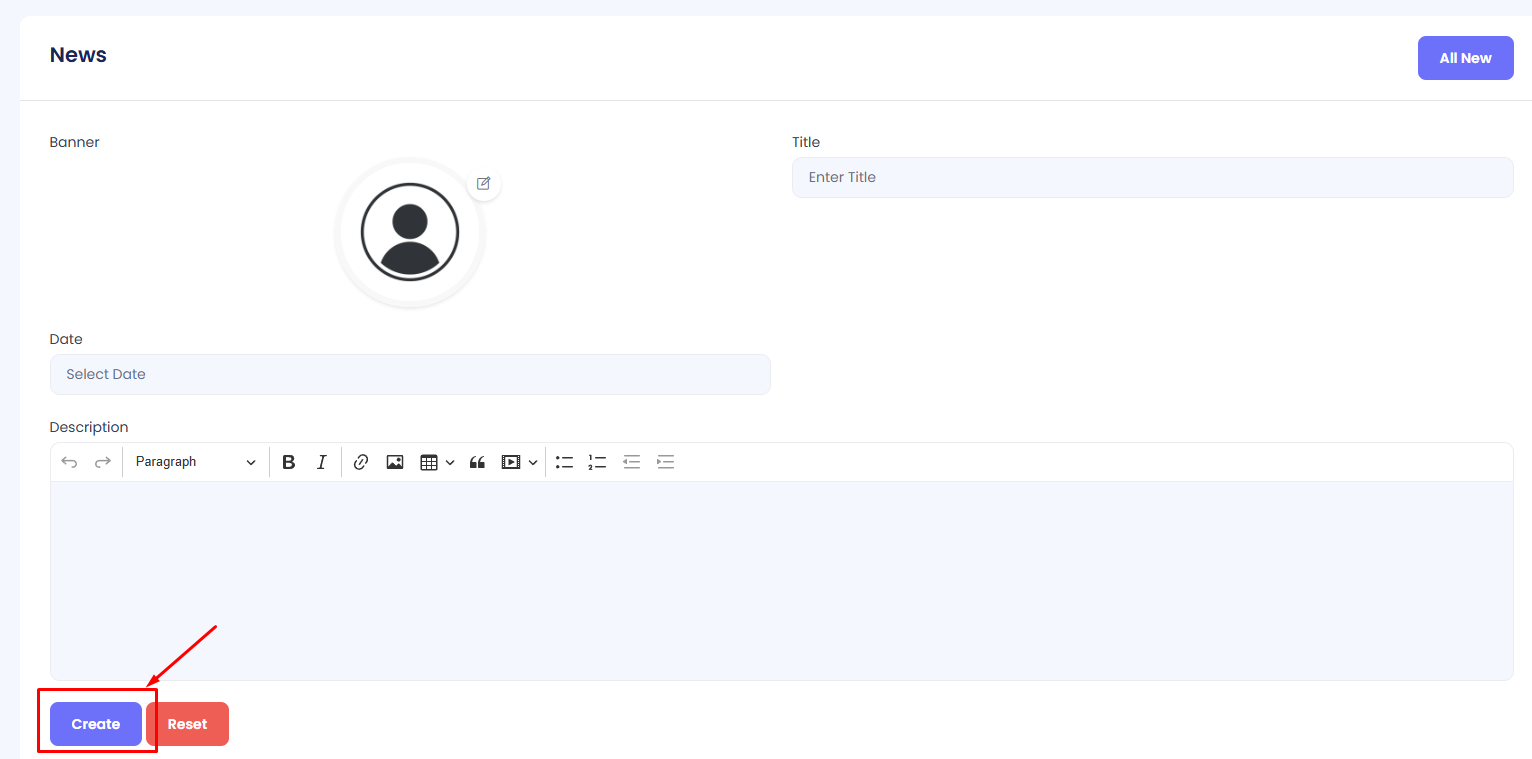
Add News
Step 1: Navigate to News in your admin sidebar and click.
Step 2: Click on the Add New button in the top-right corner.
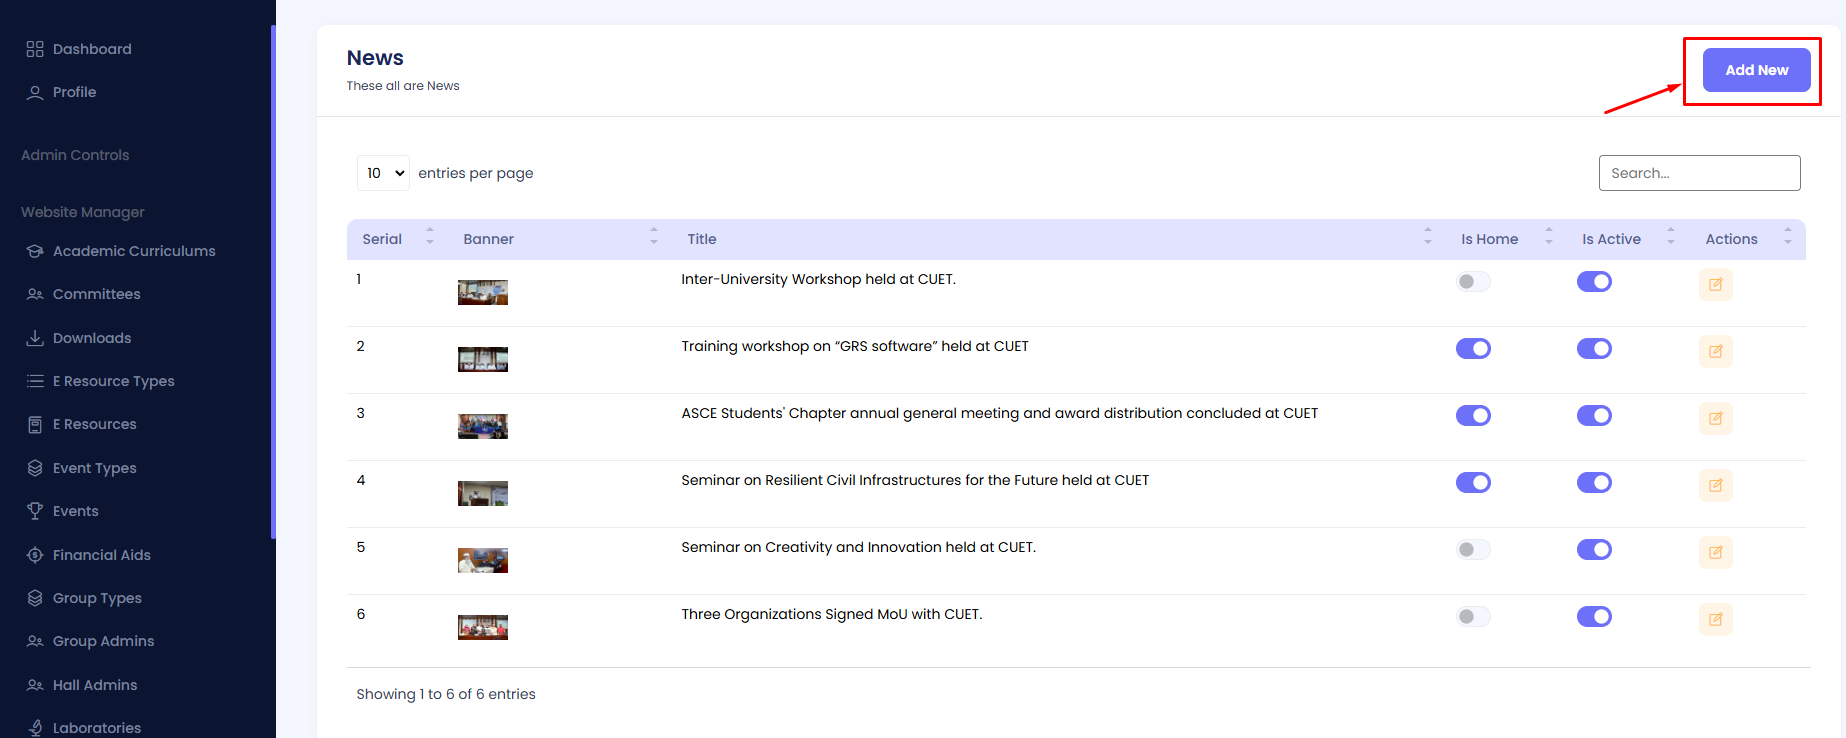
Step 3: Fill in the required details in the form, including:
- Title: The headline of the news.
- Banner: Upload an image to represent the news.
- Description: Provide the content of the news.
Once completed, click the Create button to save the news.
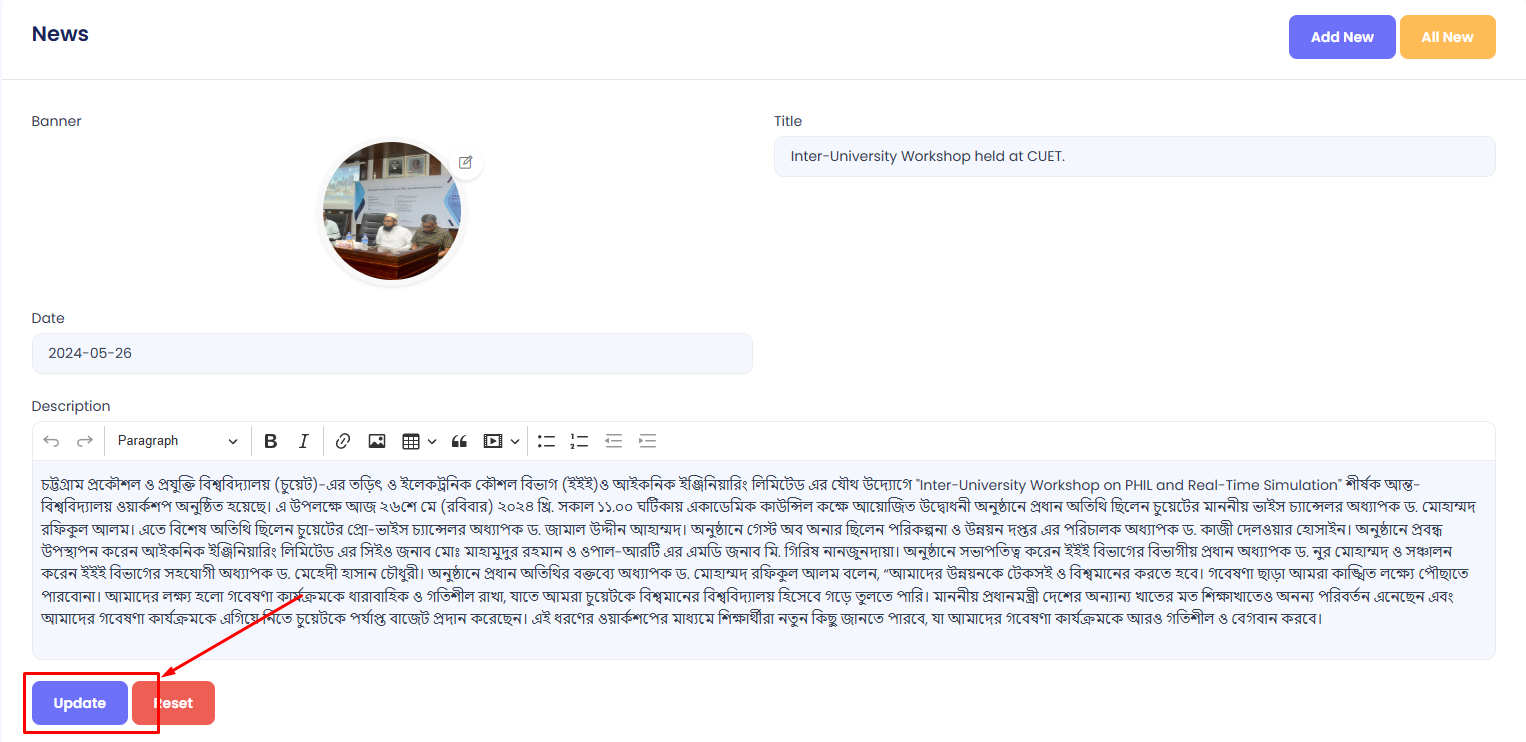
Edit News
Step 1: Navigate to the News section in your admin sidebar and click.
Step 2: Locate the news item you want to edit and click the Edit button (pencil icon) in the Actions column.
Modify the fields as needed (Title, Banner, Description, Is Home, Is Active) and click the Update button to save changes.
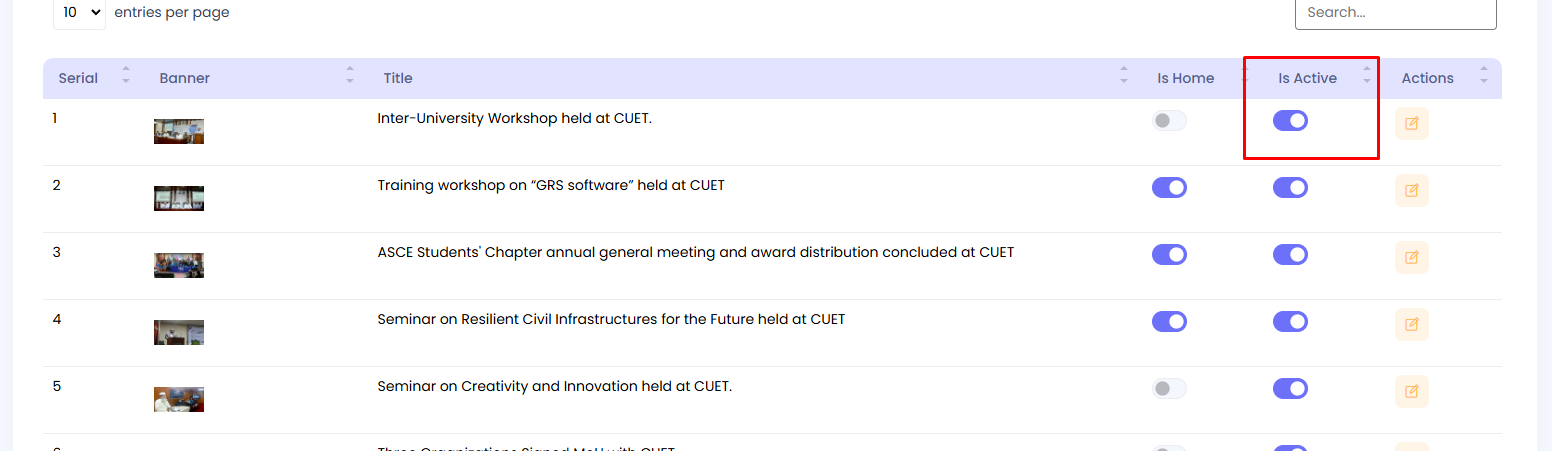
Activate/Deactivate News
Step 1: Navigate to the News section in your admin sidebar and click.
Step 2: Locate the Is Active column for the target news item.
Step 3: Use the toggle switch to activate or deactivate the news. Blue indicates active, while gray indicates inactive.
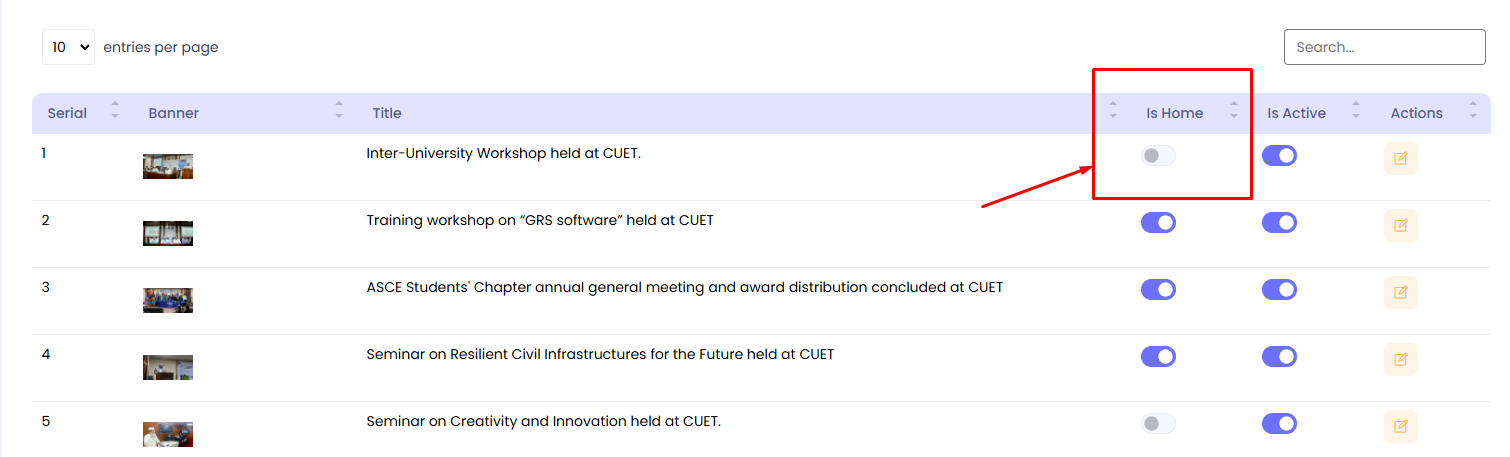
Display News on Homepage
Step 1: Navigate to the News section in your admin sidebar and click.
Step 2: Locate the Is Home column for the target news item.
Step 3: Use the toggle switch to display the news on the homepage. Blue indicates the news is displayed on the homepage, while gray indicates it is not.
Search and Filter News
Use the search bar at the top-right corner to find specific news items. You can also adjust the number of entries displayed per page using the dropdown menu at the top-left corner of the table.

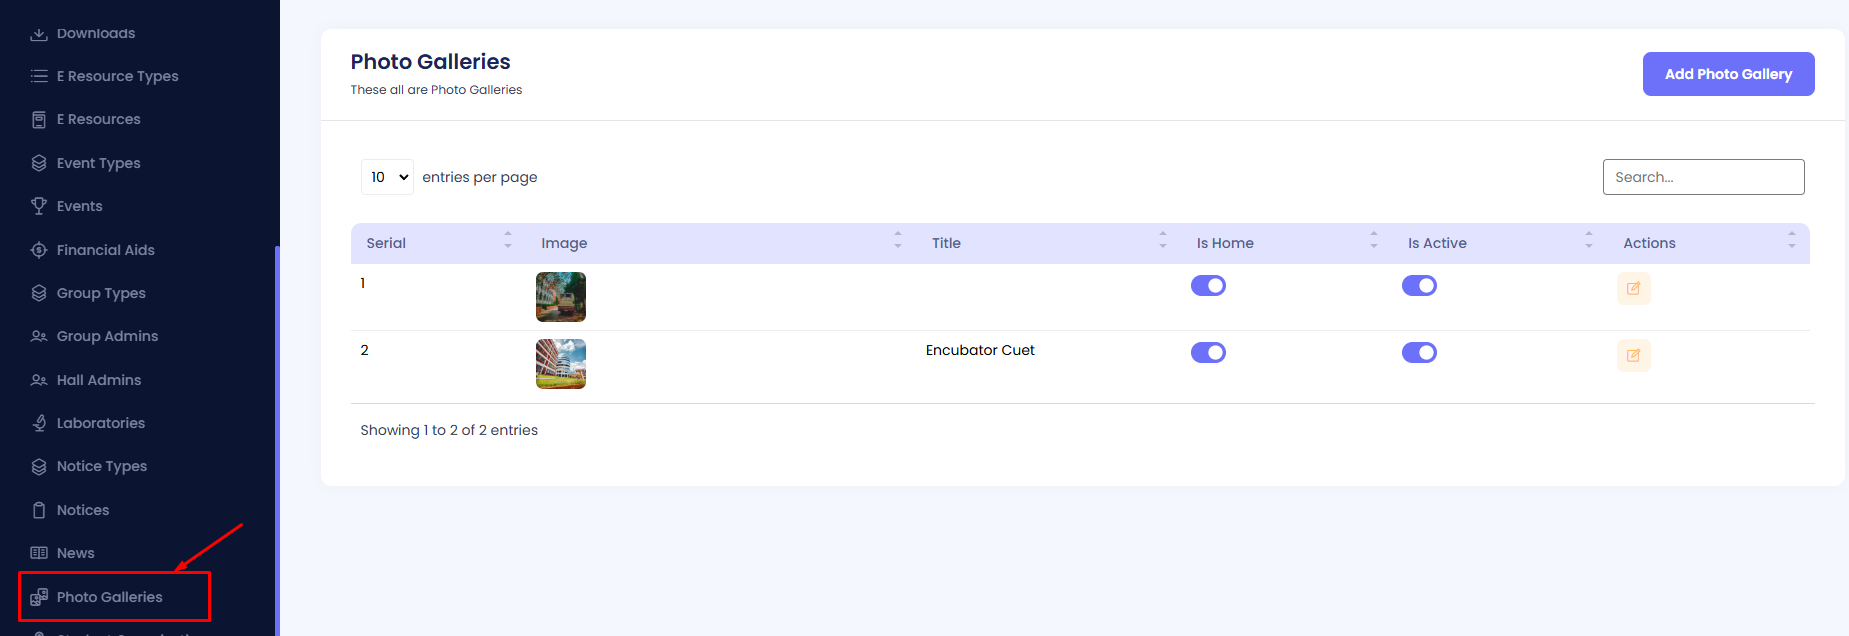
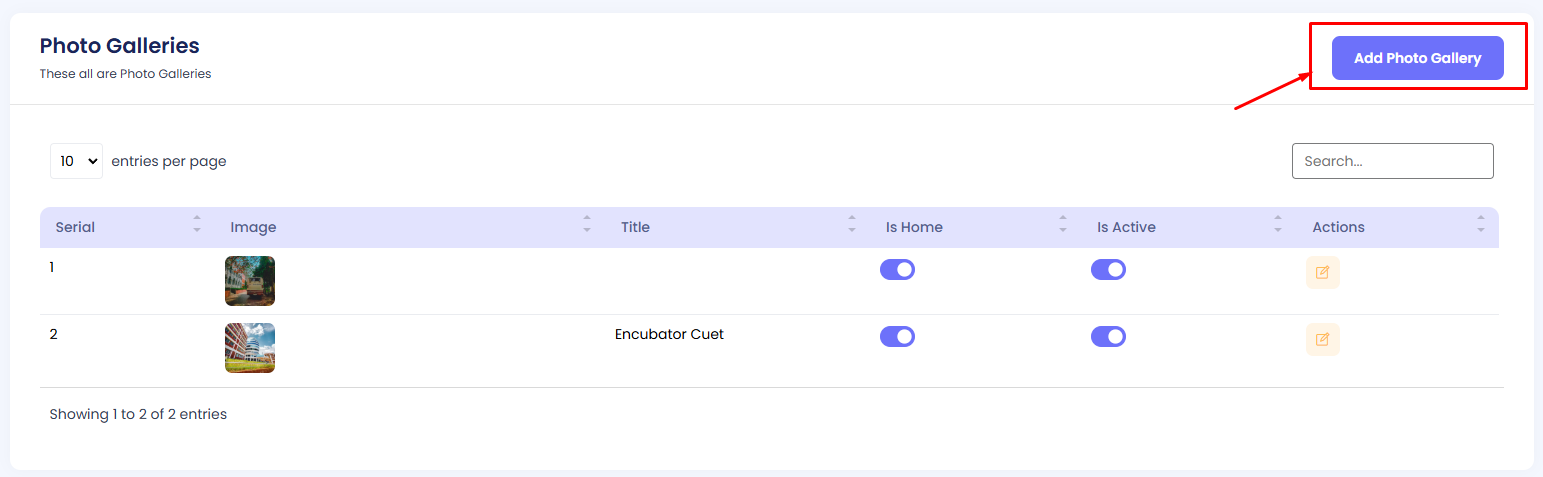
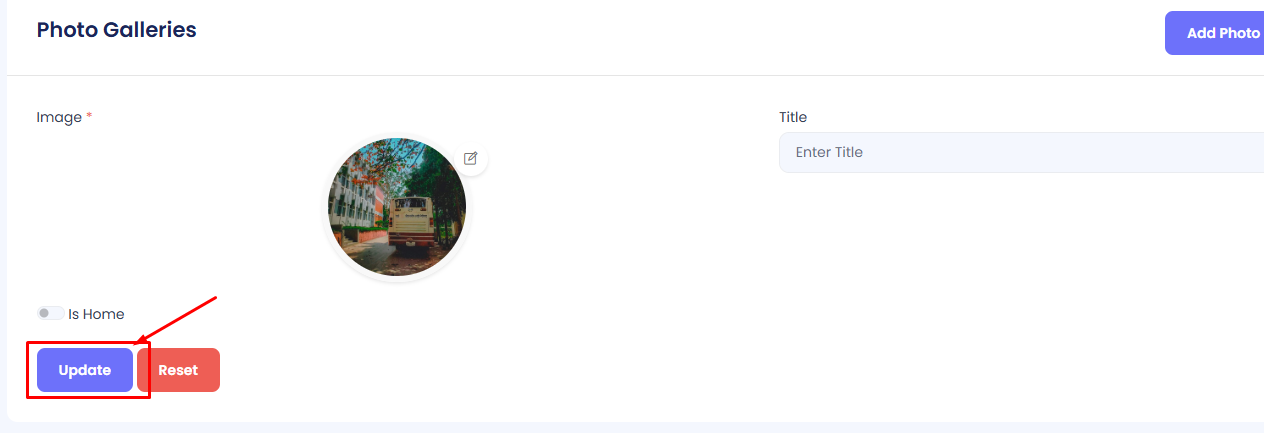
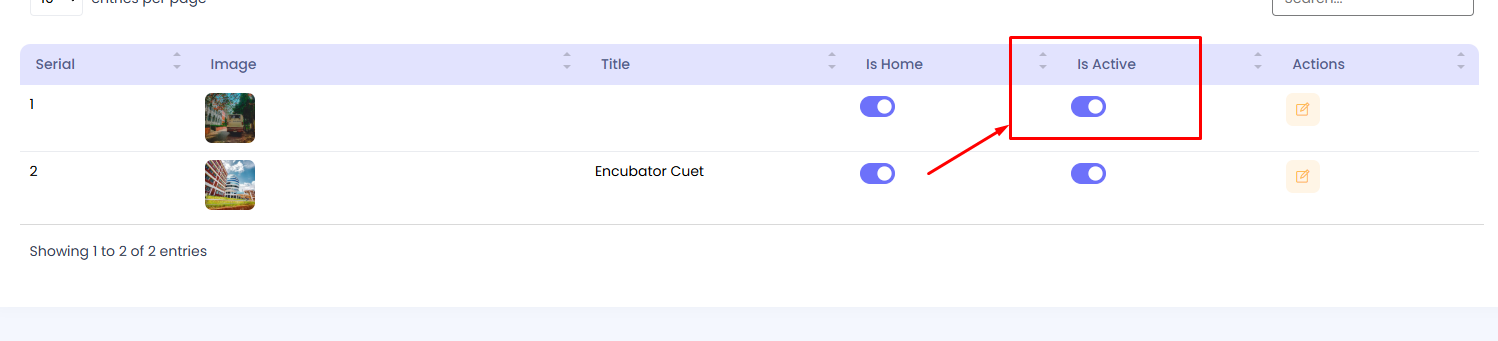
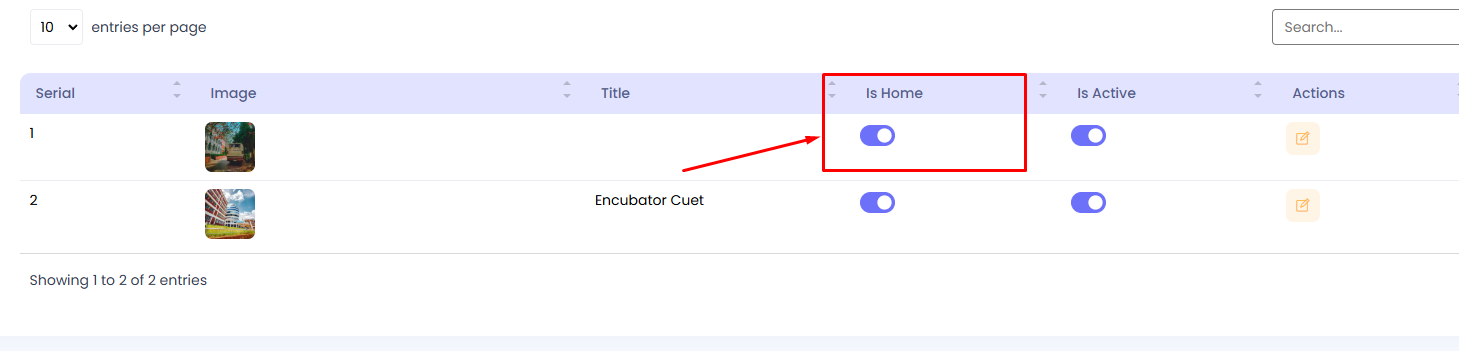
Photo Gallery
The details of Photo Gallery can be viewed and managed here. The table includes columns like Serial, Image, Title, Is Home, Is Active, and Actions. You can add, edit, activate/deactivate, and display photos on the homepage as needed.
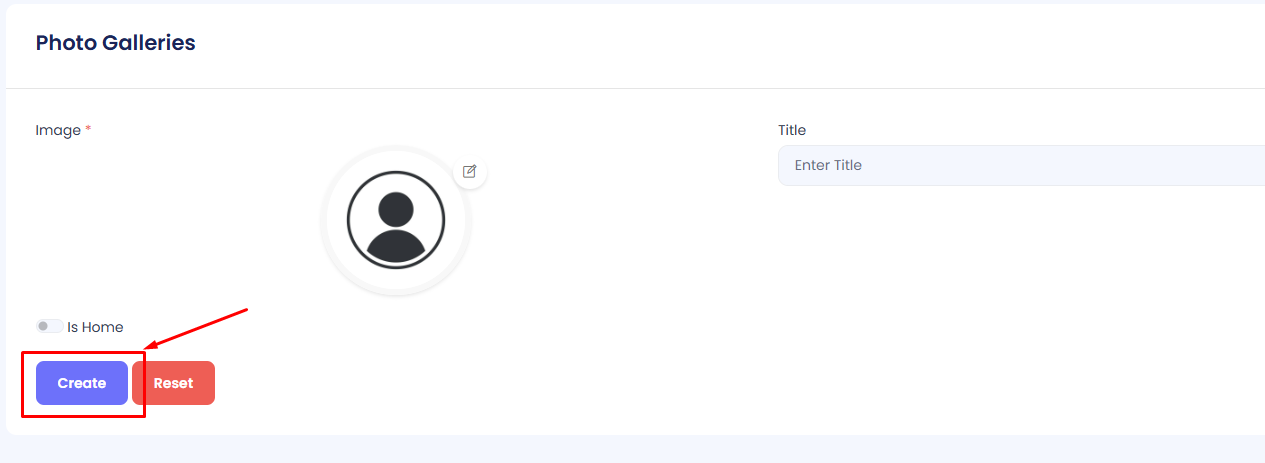
Add Photo
Step 1: Navigate to Photo Gallery in your admin sidebar and click.
Step 2: Click on the Add New button in the top-right corner.
Step 3: Fill in the required details in the form, including:
- Title: The title of the photo.
- Image: Upload the image to be displayed in the gallery.
- Description: Provide a description of the photo (optional).
- Is Home: Select whether to display this photo on the homepage.
- Is Active: Set the active status to enable or disable the photo.
Once completed, click the Create button to save the photo.
Edit Photo
Step 1: Navigate to the Photo Gallery section in your admin sidebar and click.
Step 2: Locate the photo you want to edit and click the Edit button (pencil icon) in the Actions column.
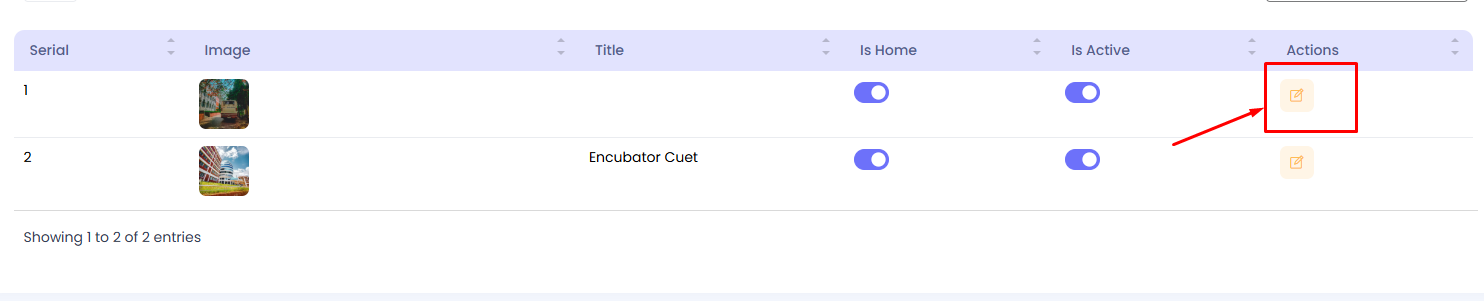
Modify the fields as needed (Title, Image, Description, Is Home, Is Active) and click the Update button to save changes.
Activate/Deactivate Photo
Step 1: Navigate to the Photo Gallery section in your admin sidebar and click.
Step 2: Locate the Is Active column for the target photo.
Step 3: Use the toggle switch to activate or deactivate the photo. Blue indicates active, while gray indicates inactive.
Display Photo on Homepage
Step 1: Navigate to the Photo Gallery section in your admin sidebar and click.
Step 2: Locate the Is Home column for the target photo.
Step 3: Use the toggle switch to display the photo on the homepage. Blue indicates the photo is displayed on the homepage, while gray indicates it is not.
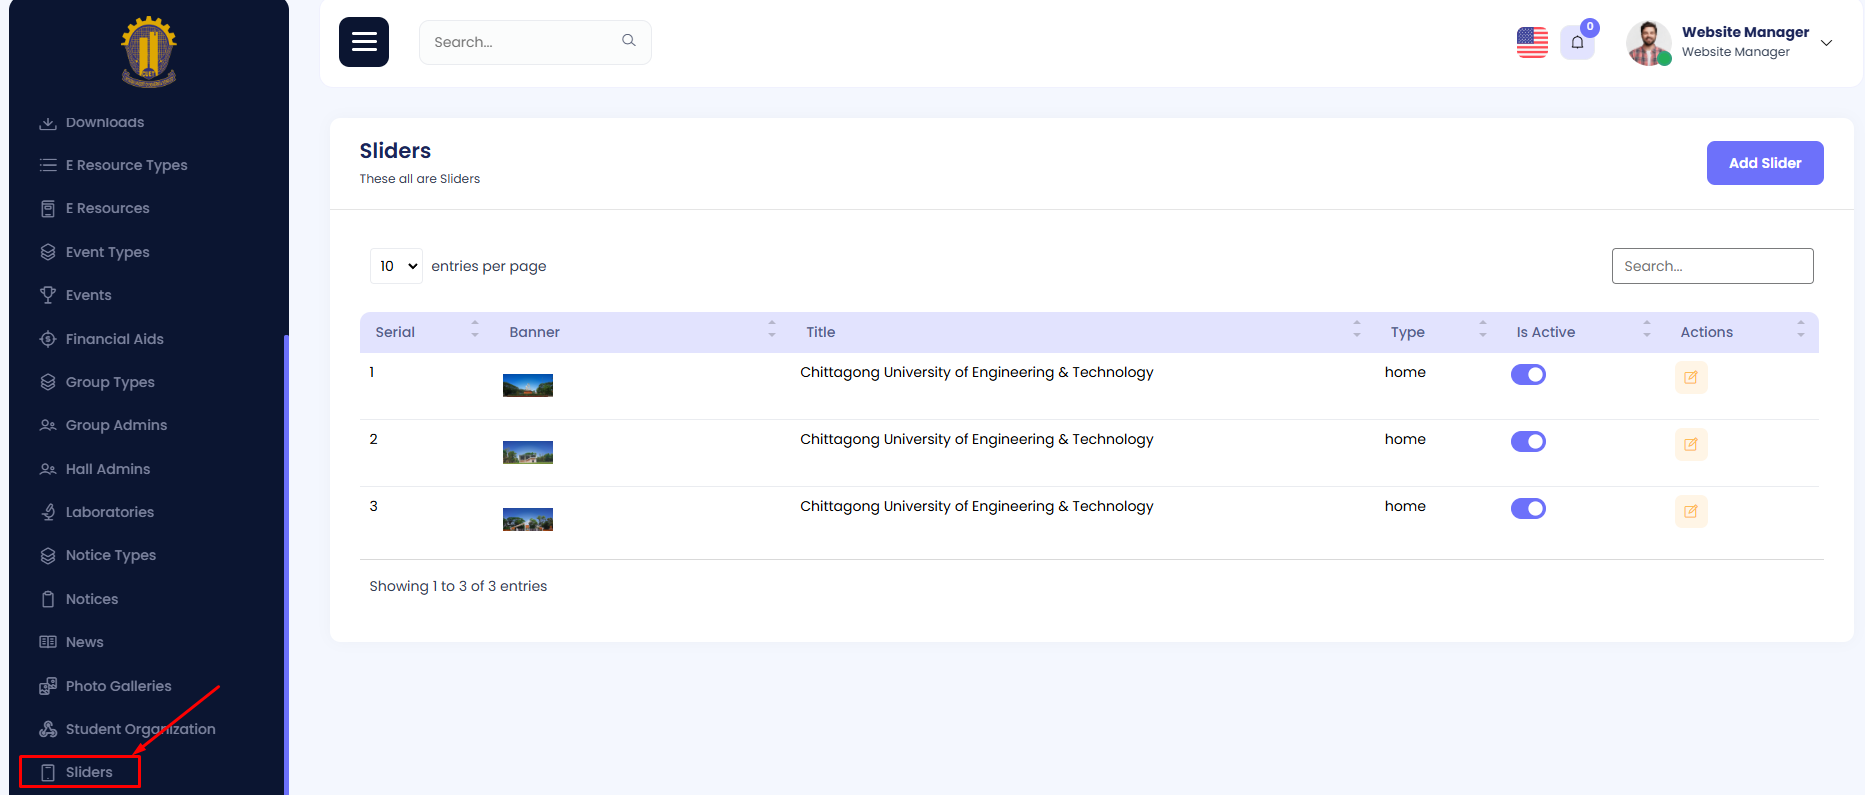
Slider
The details of the Slider can be viewed and managed here. The table includes columns like Serial, Banner, Title, Type, Is Active, and Actions. You can add, edit, activate/deactivate, and display banners in the slider as needed. The slider allows you to feature images or banners with specific content and links that can be displayed on your website's homepage or in specific sections based on the type of slider.
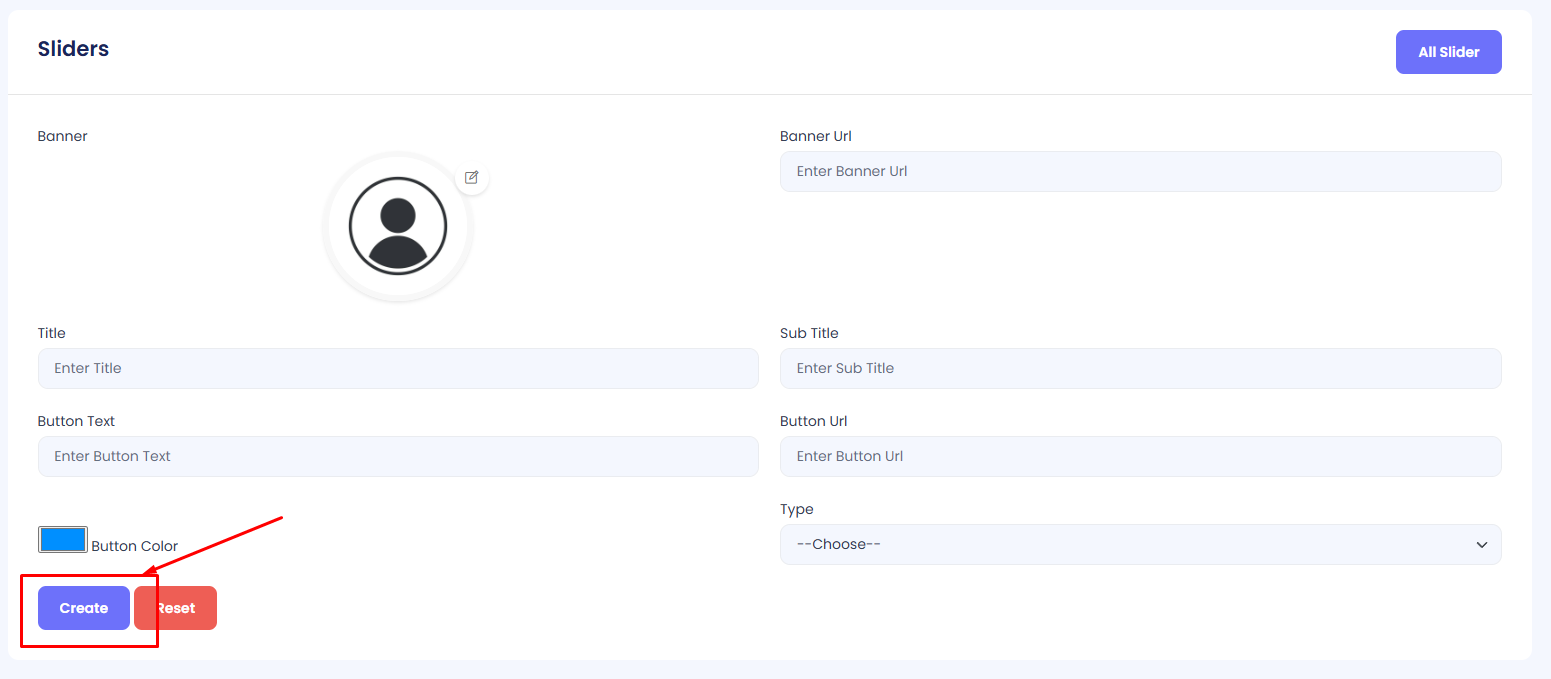
Add Slider
Step 1: Navigate to Slider in your admin sidebar and click.
Step 2: Click on the Add New button in the top-right corner.
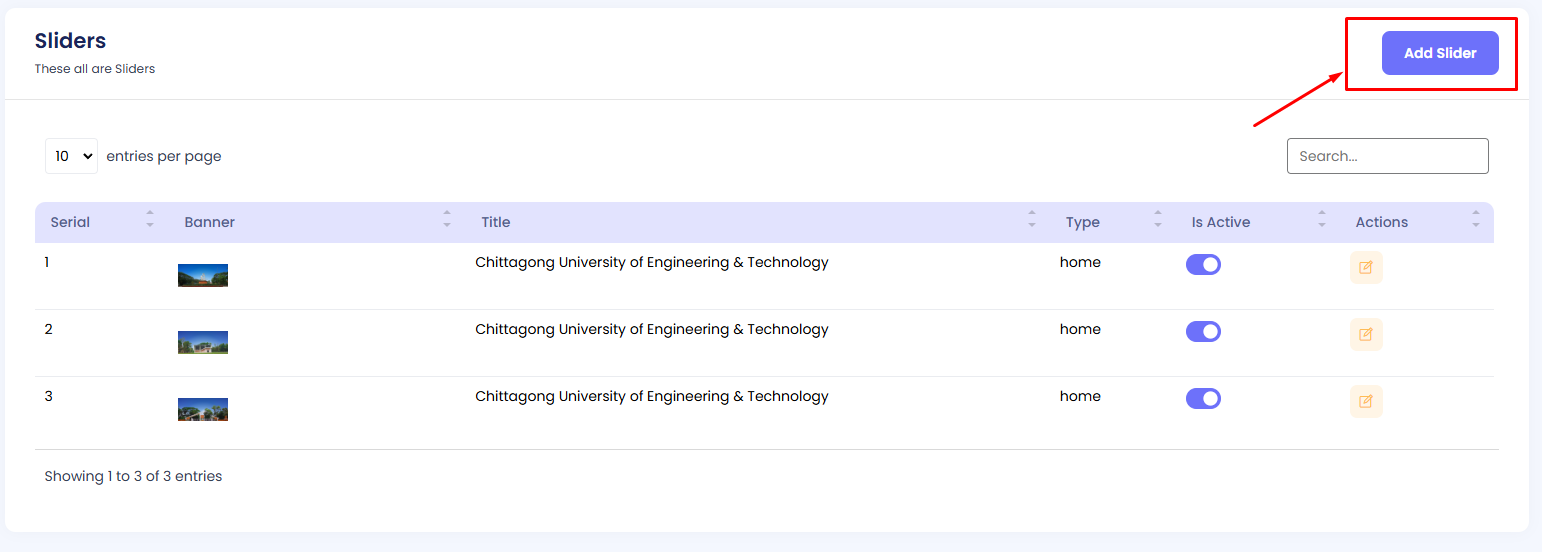
Step 3: Fill in the required details in the form, including:
- Title: The title of the slider banner.
- Banner: Upload the banner image to be displayed in the slider.
- Banner Url: Add a URL to redirect when the banner is clicked.
- Button Text: The text to be displayed on the button associated with the banner.
- Button Url: Add a URL to redirect when the button is clicked.
- Type: Select the type of slider (e.g., department, home, promotional, etc.).
Once completed, click the Create button to save the slider.
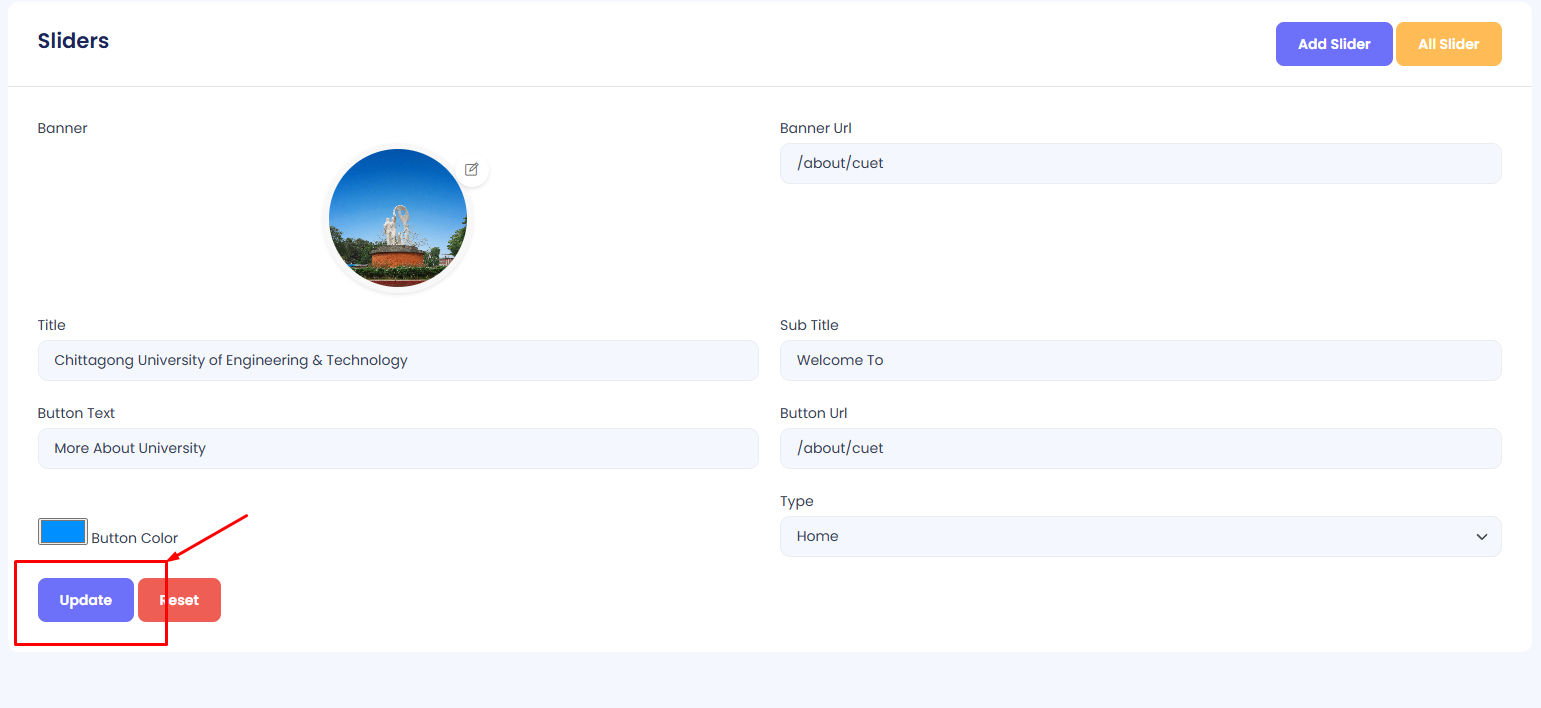
Edit Slider
Step 1: Navigate to the Slider section in your admin sidebar and click.
Step 2: Locate the slider you want to edit and click the Edit button (pencil icon) in the Actions column.
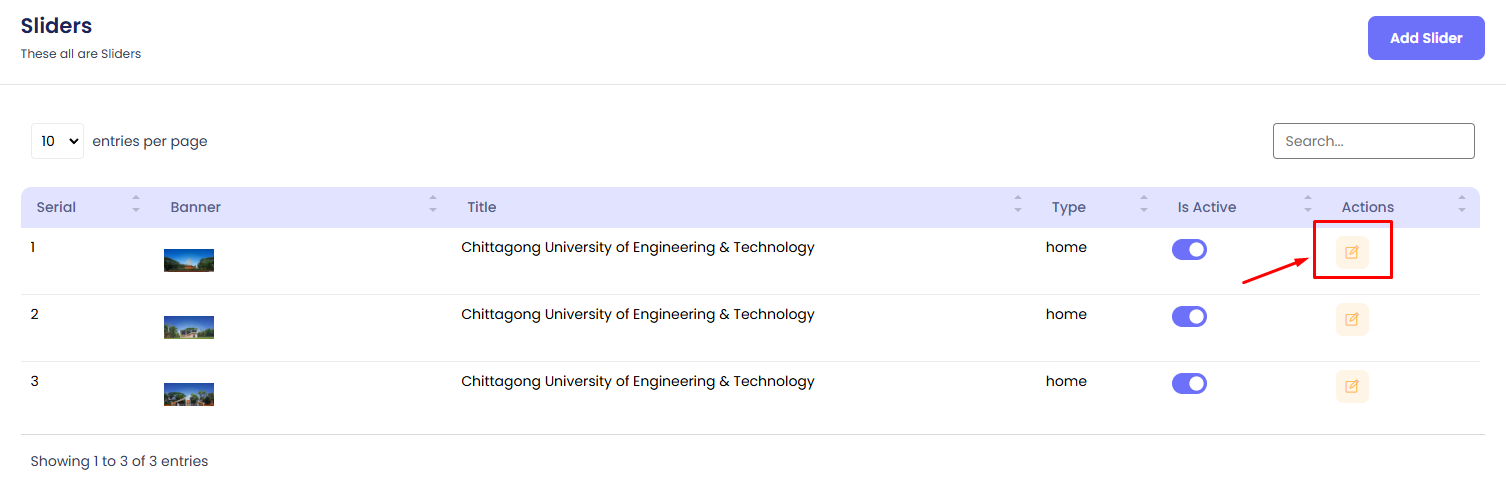
Modify the fields as needed (Title, Banner, Type, Is Active) and click the Update button to save changes.
Activate/Deactivate Slider
Step 1: Navigate to the Slider section in your admin sidebar and click.
Step 2: Locate the Is Active column for the target slider.
Step 3: Use the toggle switch to activate or deactivate the slider. Blue indicates active, while gray indicates inactive.

Display Slider on Homepage
Step 1: Navigate to the Slider section in your admin sidebar and click.
Step 2: Locate the Is Active column for the target slider.
Step 3: Use the toggle switch to display the slider on the homepage. Blue indicates the slider is displayed on the homepage, while gray indicates it is not.

CUET Academic - Documentation
- Item Name : CUET Academic
- Created: 22 December 2024
- Author : TheTork
- Support Mail: Support Mail
This documentation is designed to assist you with each step of customization. Please read it carefully to understand how this module is structured and how to edit it effectively.
System Requirements
To use CUET, make sure your hosting provider is running the following software:
- Backend: Laravel 10
- Frontend: Next.js 14
- Server: Apache, nginx, or another compatible web server
- Database: MySQL Database server
- PHP Version: PHP 8 or higher
- Node.js Version: Node.js 18 or higher
- Memory: Minimum 4GB RAM (8GB recommended)
- Storage: Minimum 20GB disk space
Required PHP Extensions
- PDO PHP extension
- OpenSSL PHP extension
- mbstring PHP extension
- exif PHP extension
- fileinfo PHP extension
- xml PHP extension
- Ctype PHP extension
- JSON PHP extension
- Tokenizer PHP extension
- cURL PHP extension
- zip PHP extension
- iconv PHP extension
- Ensure the
mod_rewriteApache module is enabled
Recommended PHP Limits
Many issues that you may run into such as: white screen, demo content fails when importing, empty page content and other similar issues are all related to low PHP configuration limits. The solution is to increase the PHP limits. You can do this on your own, or contact your web host and ask them to increase those limits to a minimum as follows:
max_execution_time 300memory_limit 256Mpost_max_size 64Mupload_max_filesize 32Mmax_input_time = 60max_input_vars = 3000
On this project, we're using the Laravel 10.x. Please go to Laravel documentation page for more information. Also consider upgrading your PHP version to the latest stable.
Installation Process
Laravel 10 Installation
- Ensure you have Composer installed. If not, download it from Composer's official website.
- Run the following command to create a new Laravel project:
composer create-project laravel/laravel project-name - Navigate to the project directory:
cd project-name - Set the application key:
php artisan key:generate - Configure your environment variables in the
.envfile for database and other settings. - Run the Laravel development server:
php artisan serve - Access the application at http://localhost:8000.
Next.js 14 Installation
- Ensure you have Node.js installed. Download it from Node.js official website.
- Run the following command to create a new Next.js project:
npx create-next-app@latest project-name - Navigate to the project directory:
cd project-name - Start the development server:
npm run dev - Access the application at http://localhost:3000.
Additional Notes
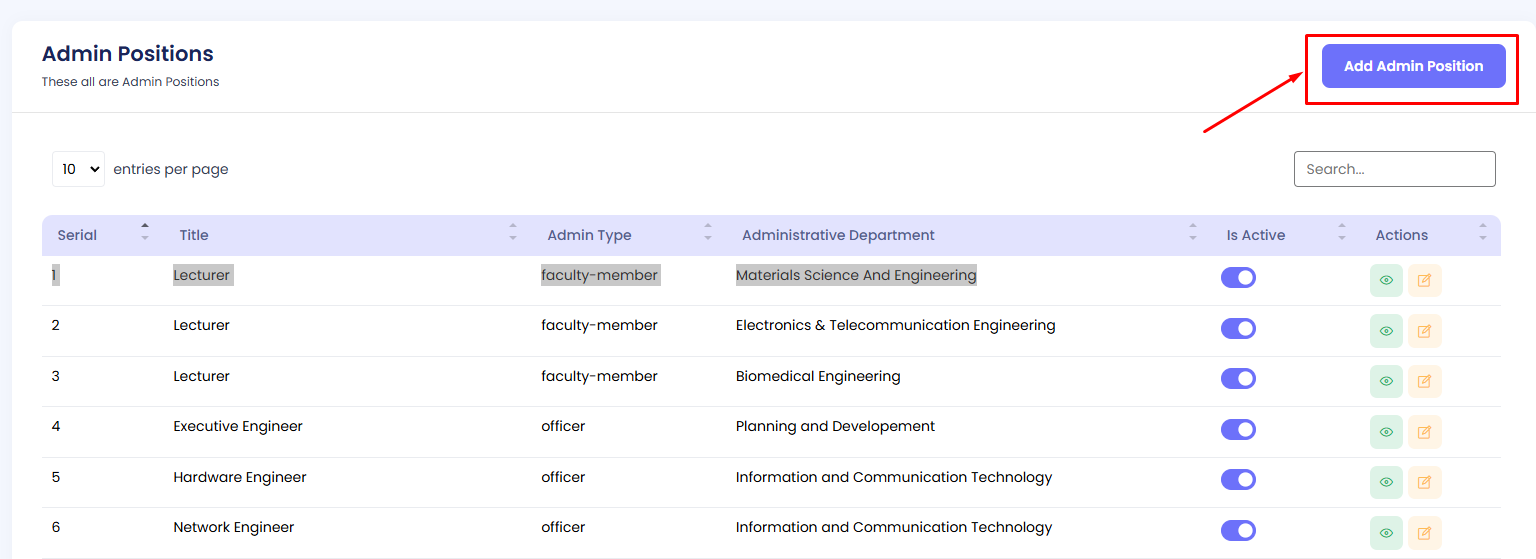
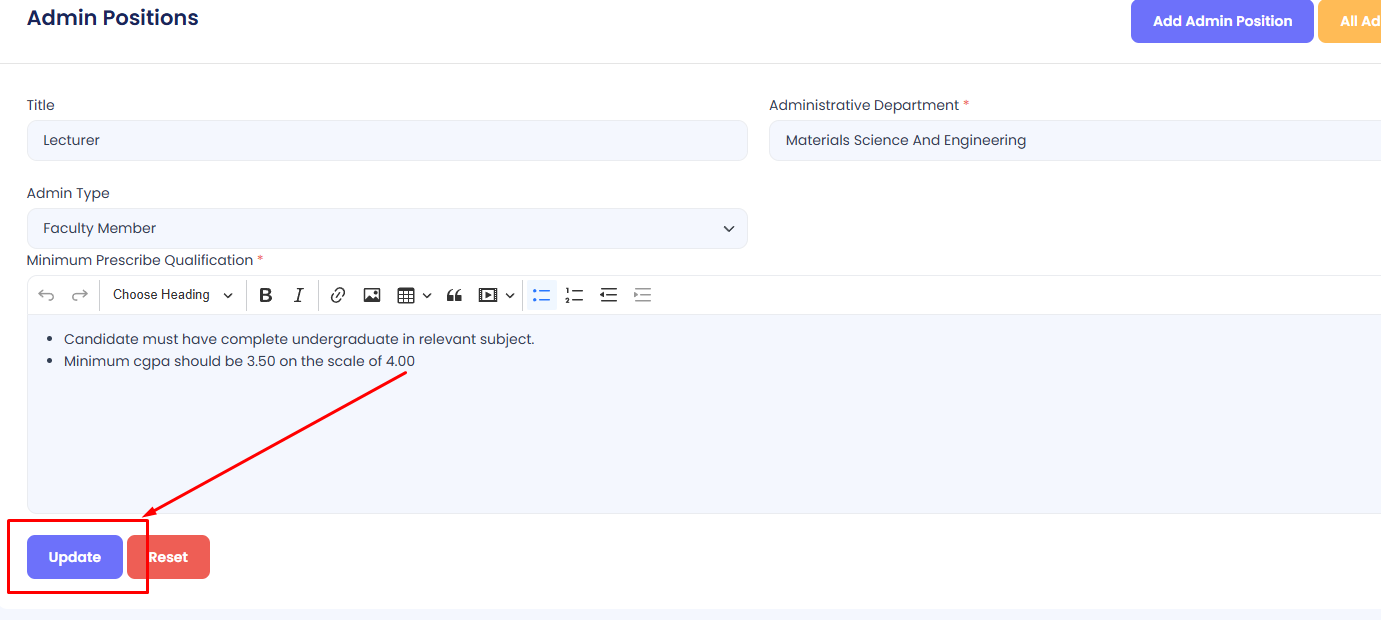
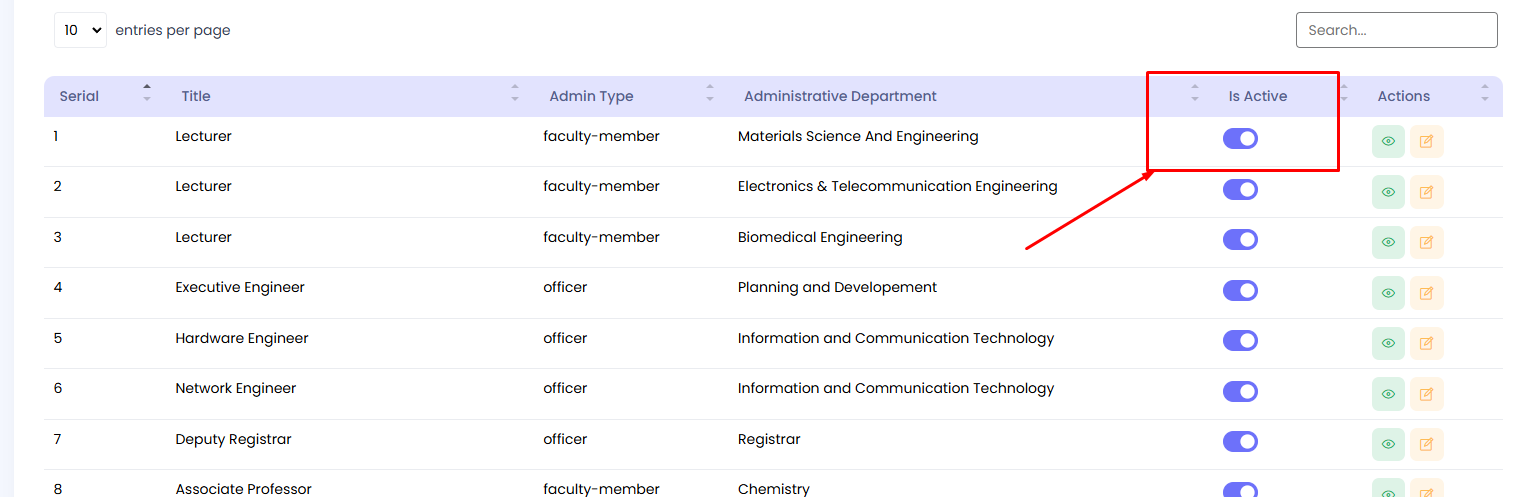
Admin Positions
The list of different Admin Positions can be viewed here, with columns such as Serial, Title, Admin Type, Administrative Department, Is Active, and Available Actions. You can add, edit, activate/deactivate, and manage admin positions as needed.
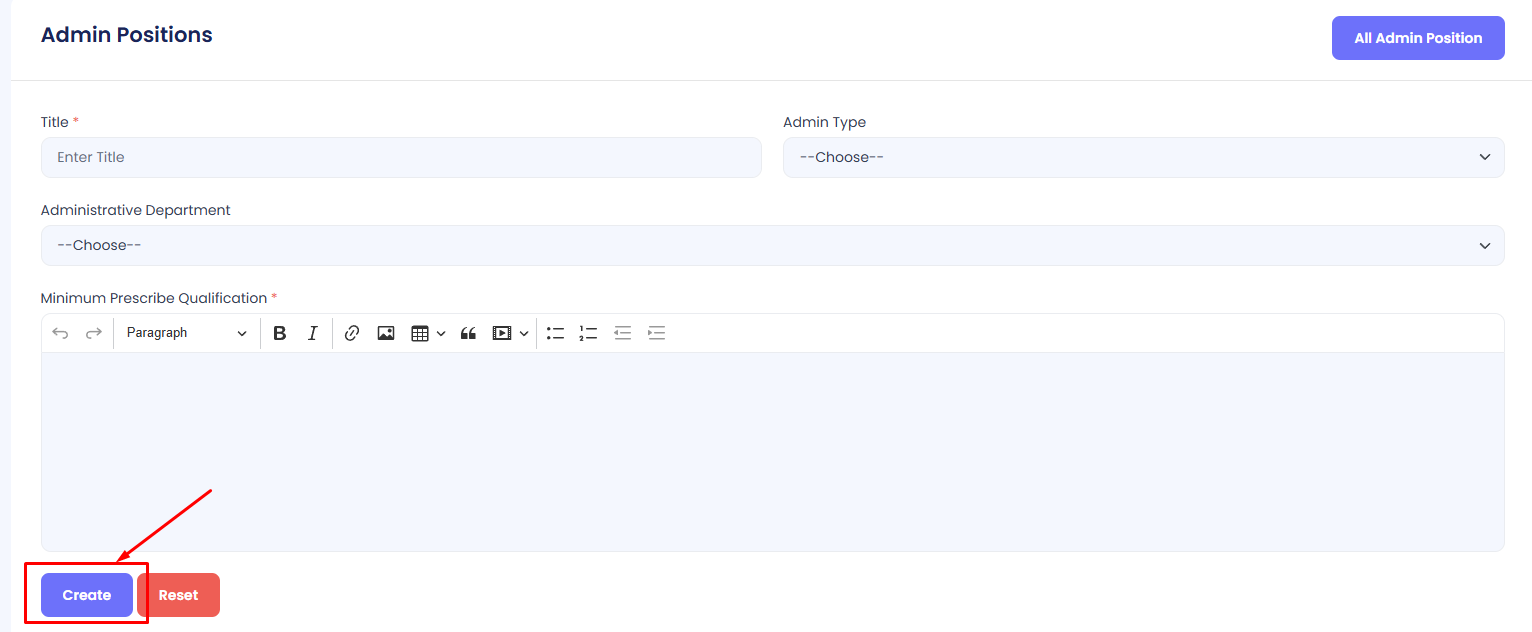
Add an Admin Position
Step 1: Navigate to Admin Positions in your admin sidebar and click.
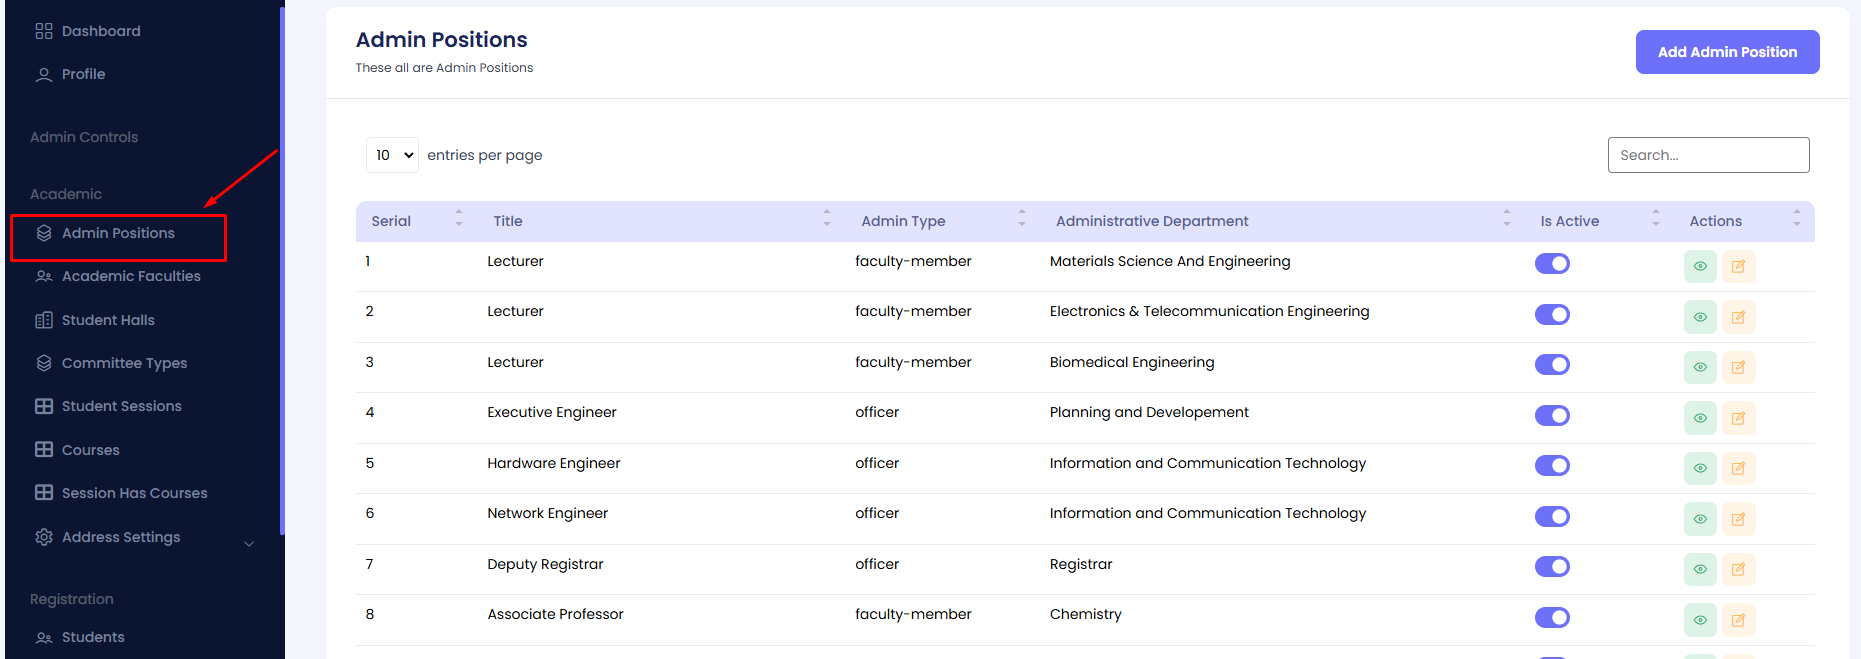
Step 2: Click on Add Admin Position.
Step 3: Fill in the form with the required details, including Title, Admin Type, and Administrative Department. Then hit the Create button.
Edit Admin Position
Step 1: Navigate to Admin Positions in your admin sidebar and click.
Step 2: Press the Edit button to modify an existing admin position.
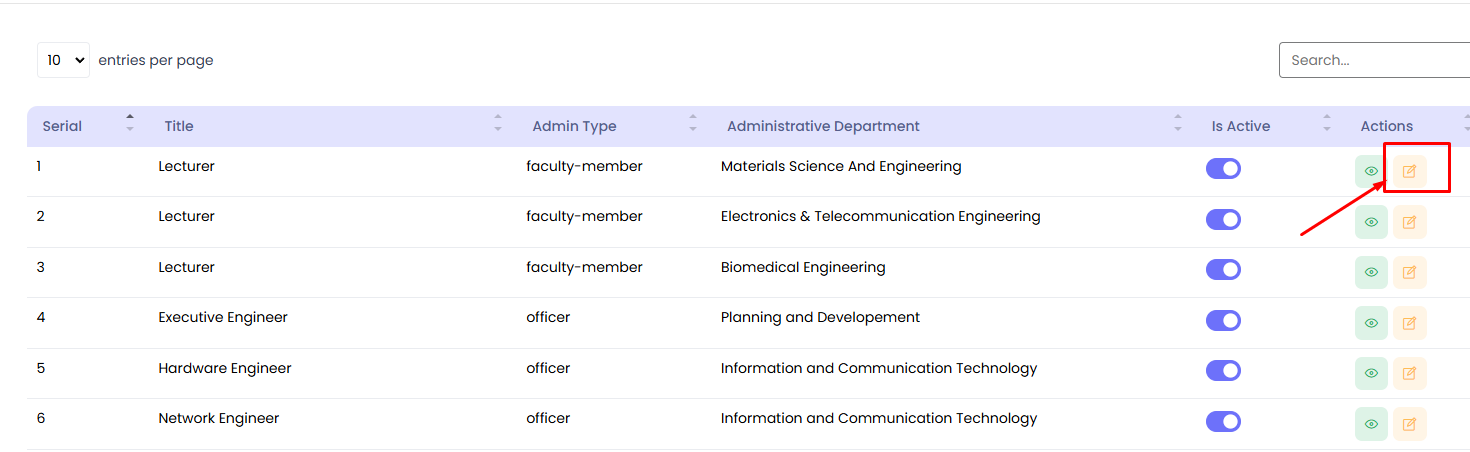
Edit the necessary fields such as Title, Admin Type, and Administrative Department. Then press the Update button.
Activate/Deactivate Admin Position
Step 1: Navigate to Admin Positions in your admin sidebar and click.
Step 2: Locate the target Admin Position in the list.
Step 3: Use the toggle button under the "Is Active" column to activate or deactivate the admin position as required.
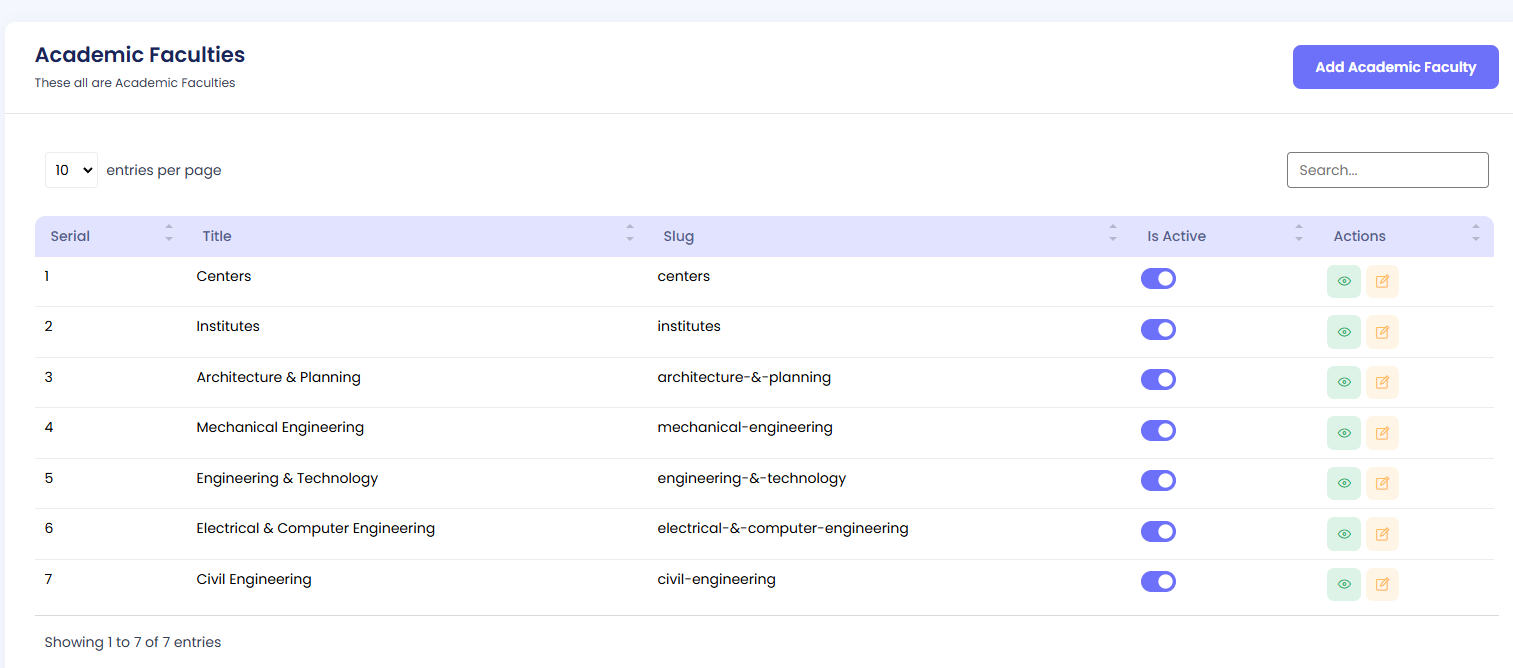
Academic Faculties
The list of different Academic Faculties can be viewed here, with columns such as Serial, Title, Slug, Is Active, and Available Actions. You can add, edit, activate/deactivate, and manage academic faculties as needed.
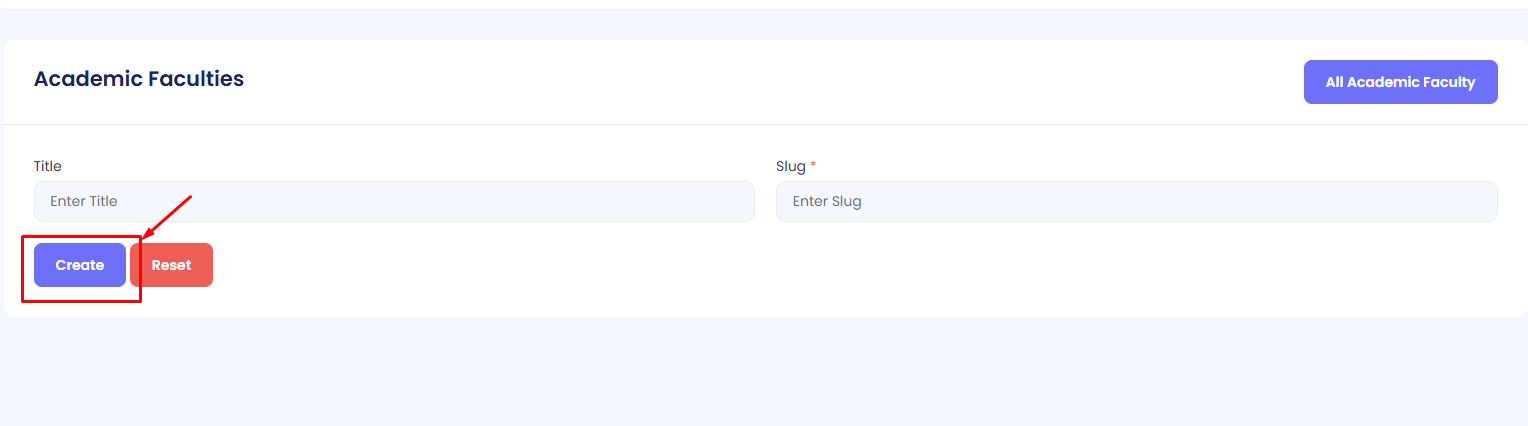
Add an Academic Faculty
Step 1: Navigate to Academic Faculties in your admin sidebar and click.
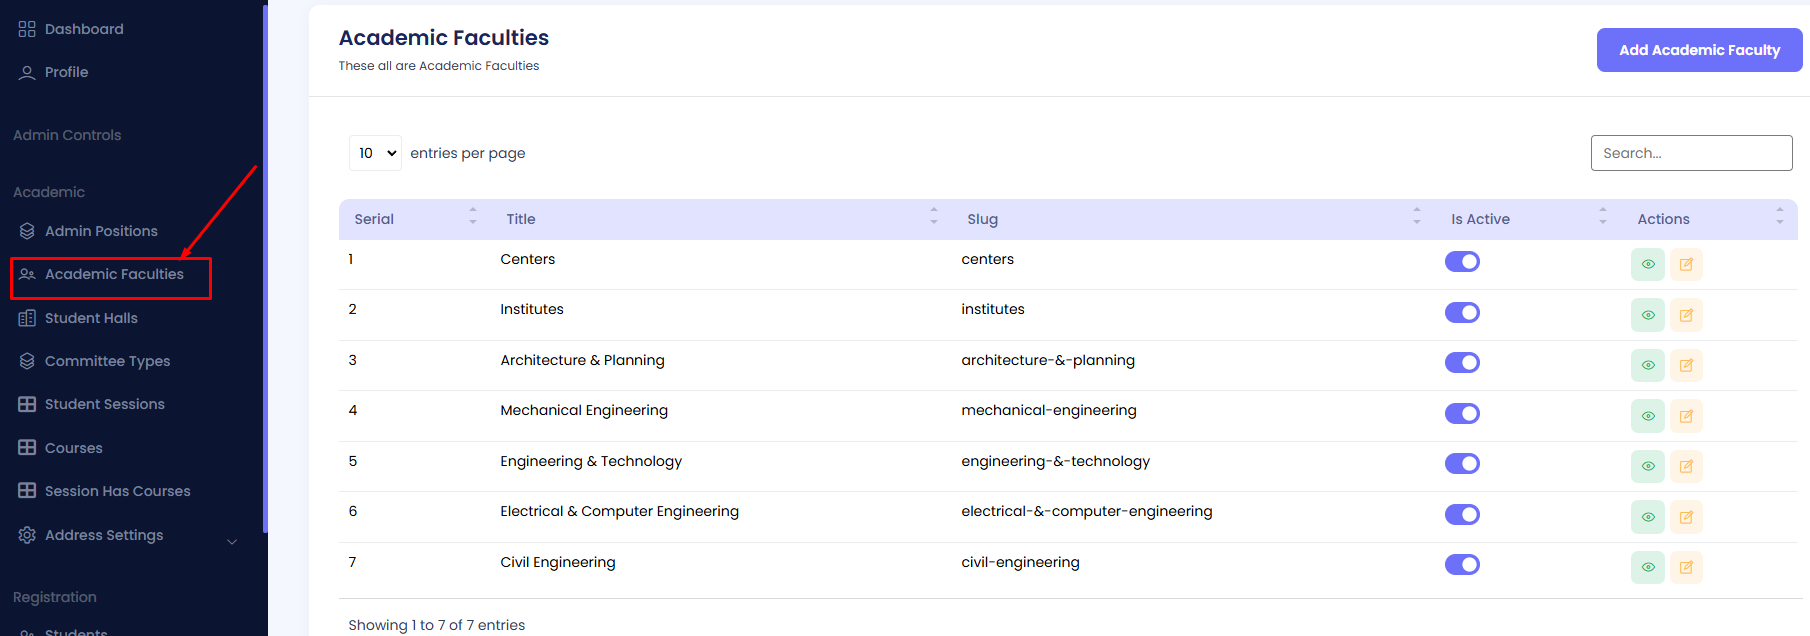
Step 2: Click on Add Academic Faculty.
Step 3: Fill in the form with the required details, including Title and Slug. Then hit the Create button.
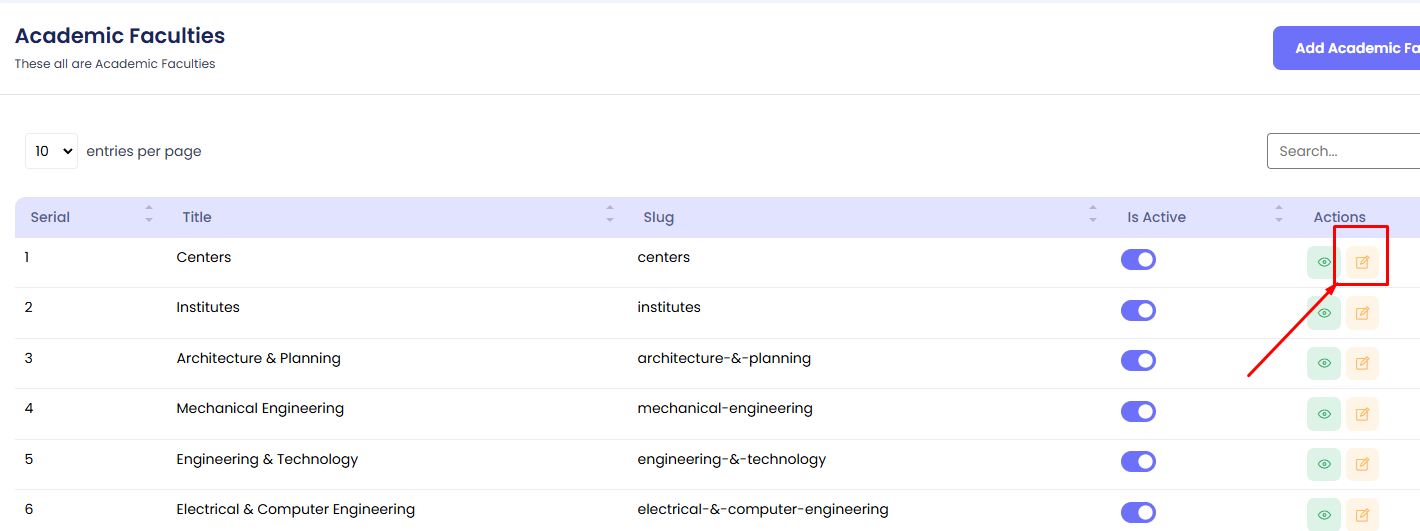
Edit Academic Faculty
Step 1: Navigate to Academic Faculties in your admin sidebar and click.
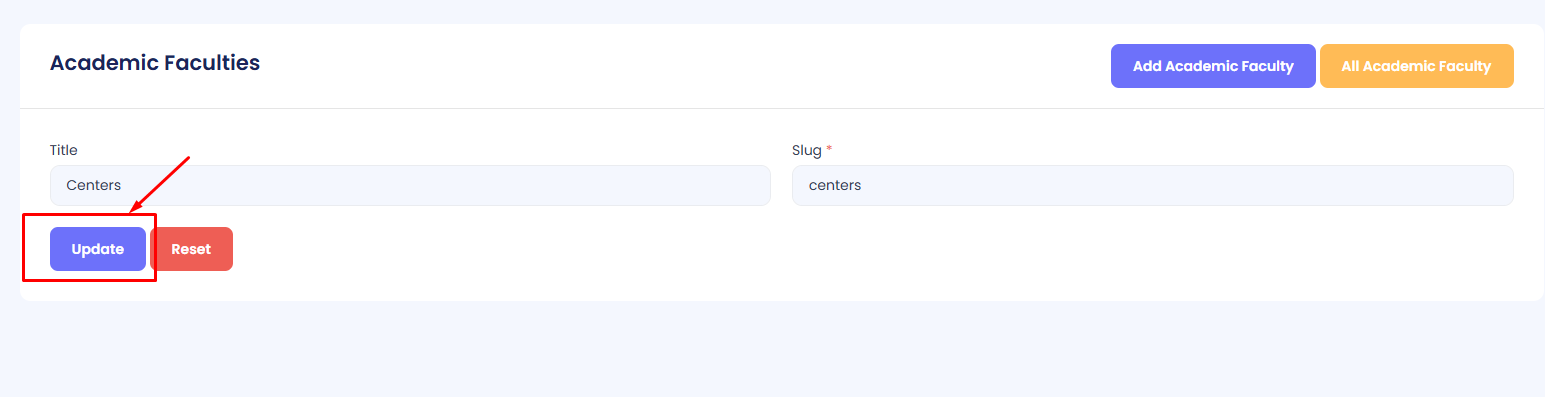
Step 2: Press the Edit button to modify an existing academic faculty.
Edit the necessary fields such as Title and Slug. Then press the Update button.
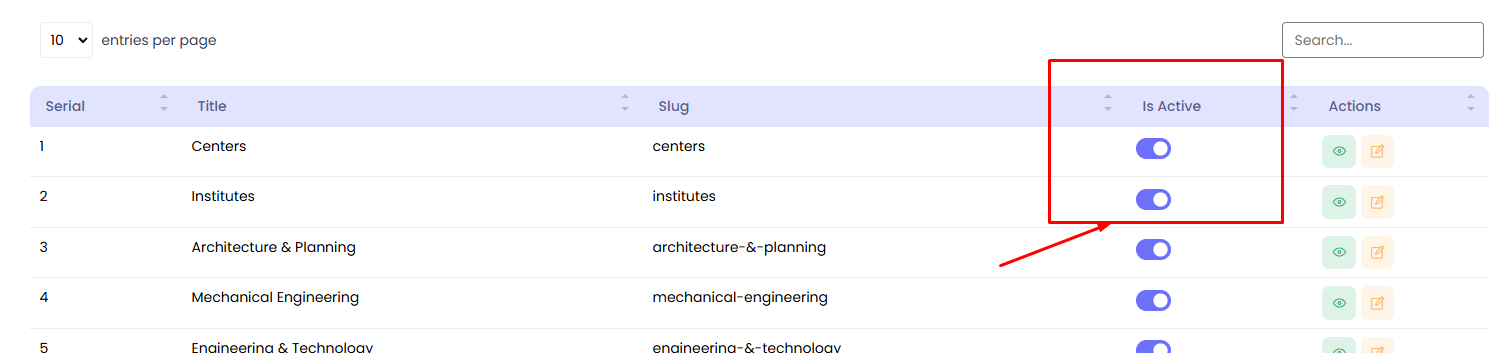
Activate/Deactivate Academic Faculty
Step 1: Navigate to Academic Faculties in your admin sidebar and click.
Step 2: Locate the target Academic Faculty in the list.
Step 3: Use the toggle button under the "Is Active" column to activate or deactivate the academic faculty as required.
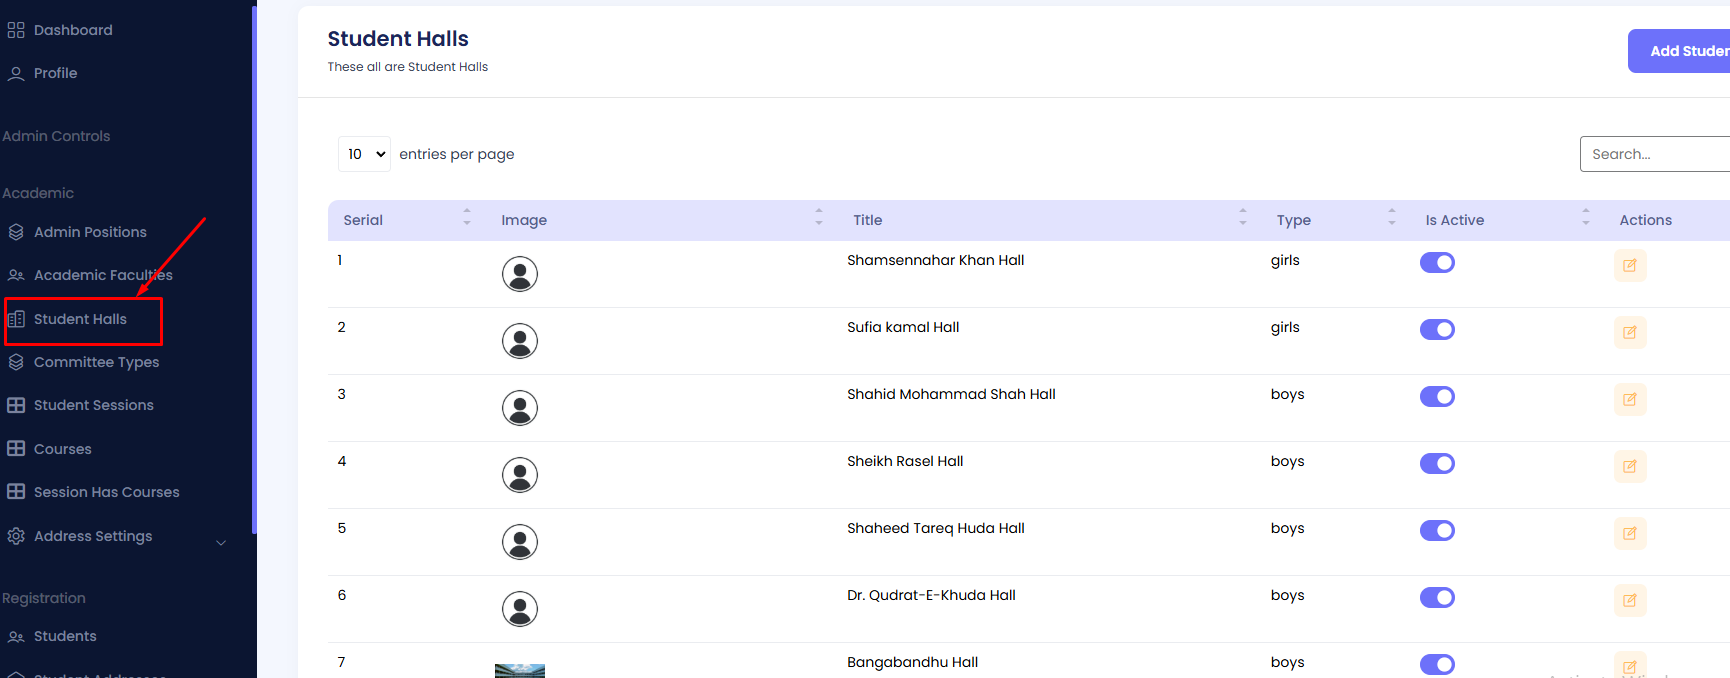
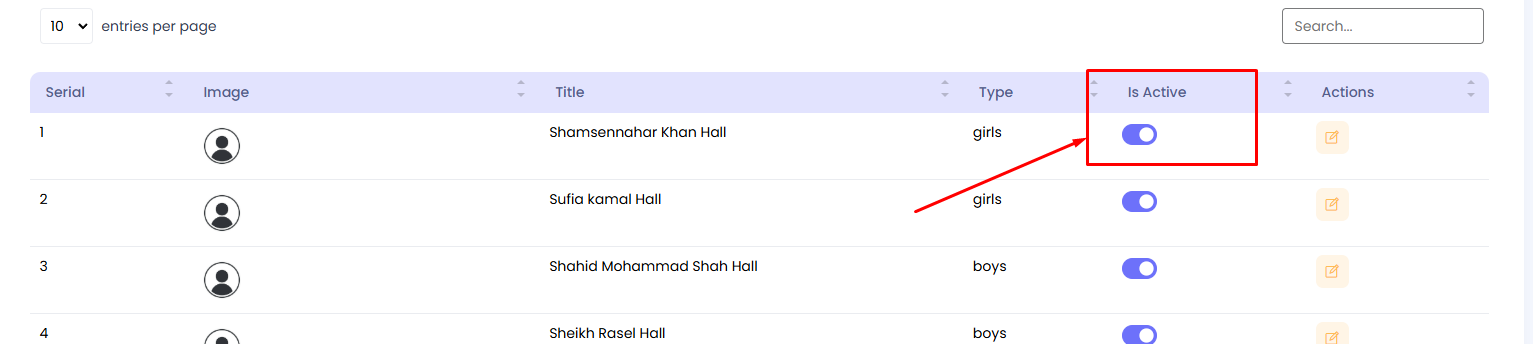
Student Halls
The list of different Student Halls can be viewed here, with columns such as Serial, Image, Title, Type (Girls/Boys), Is Active, and Available Actions. You can add, edit, activate/deactivate, and manage student halls as needed.
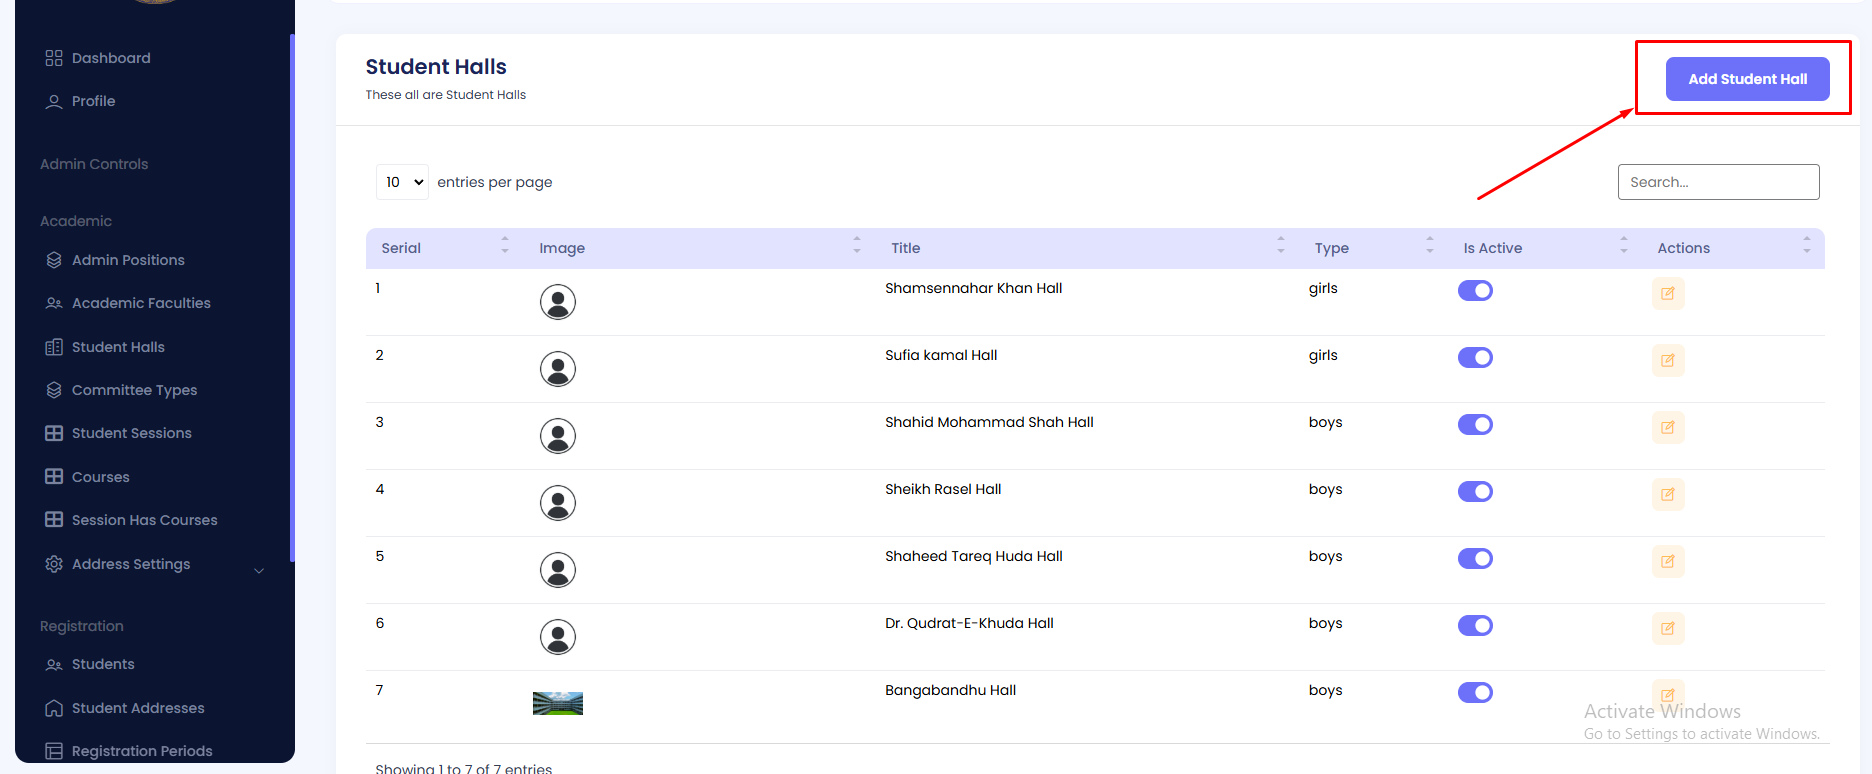
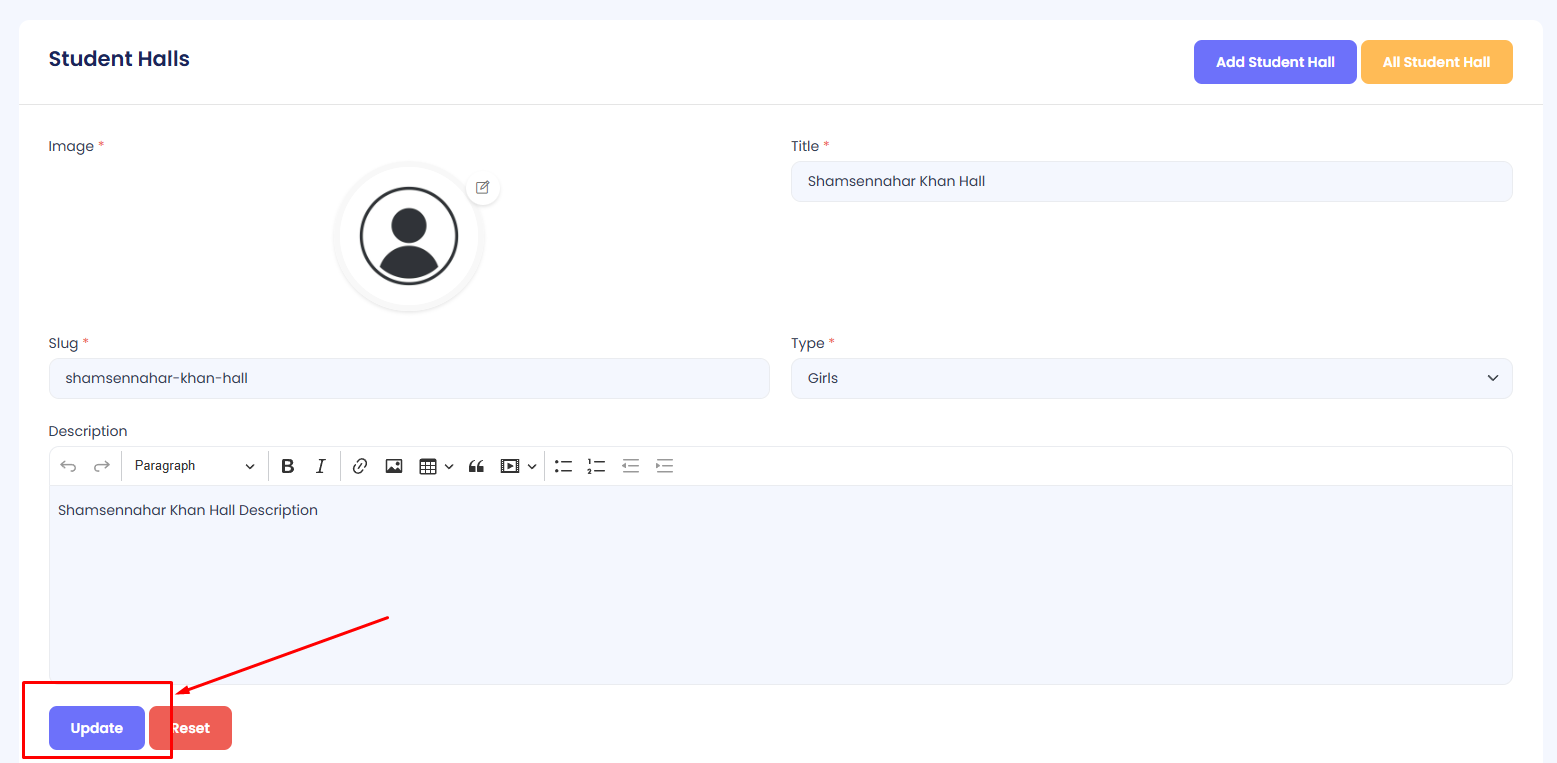
Add a Student Hall
Step 1: Navigate to Student Halls in your admin sidebar and click.
Step 2: Click on Add Student Hall.
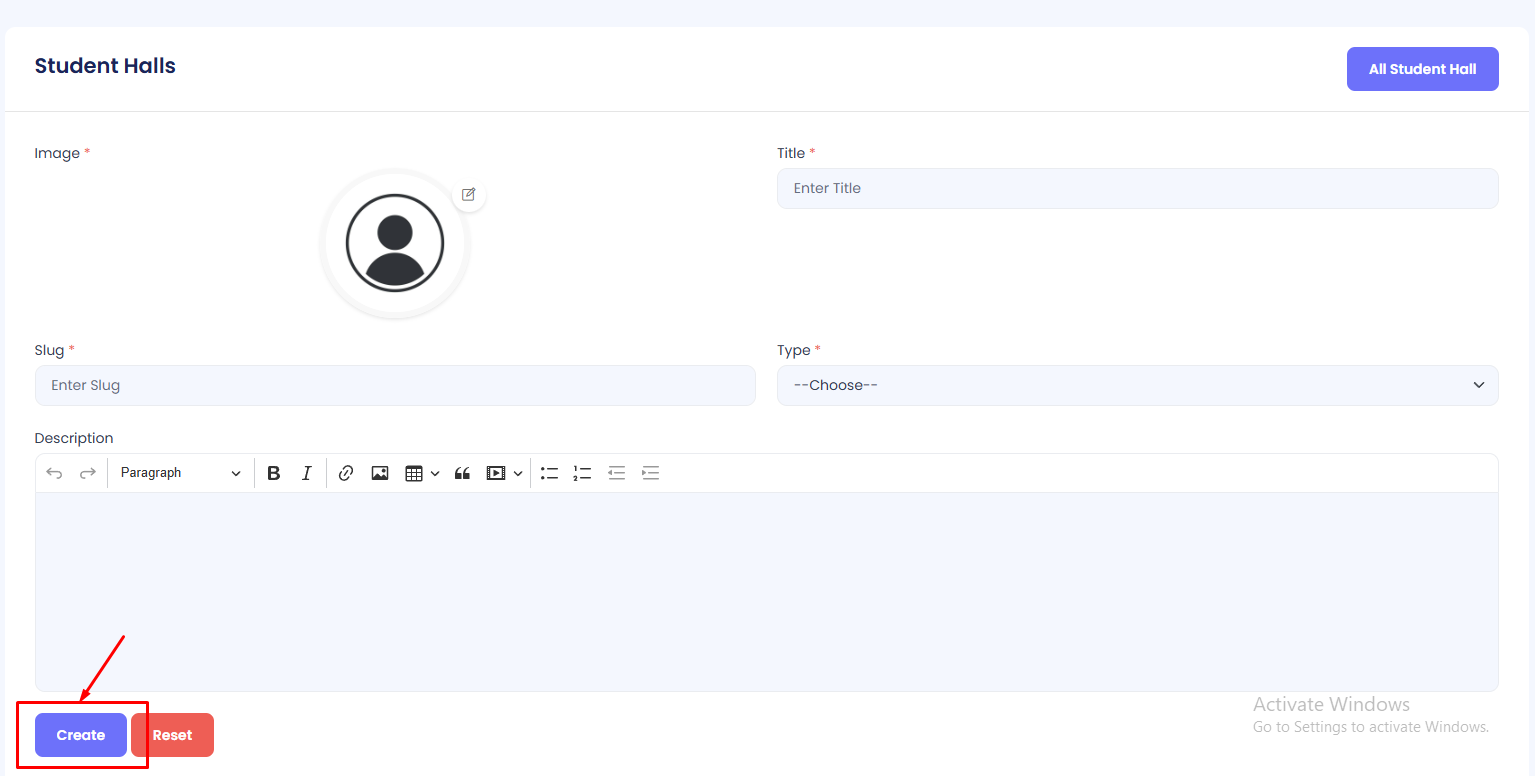
Step 3: Fill in the form with the required details, including Title, Type (Girls/Boys), and upload an Image. Then hit the Create button.
Edit Student Hall
Step 1: Navigate to Student Halls in your admin sidebar and click.
Step 2: Press the Edit button to modify an existing student hall.
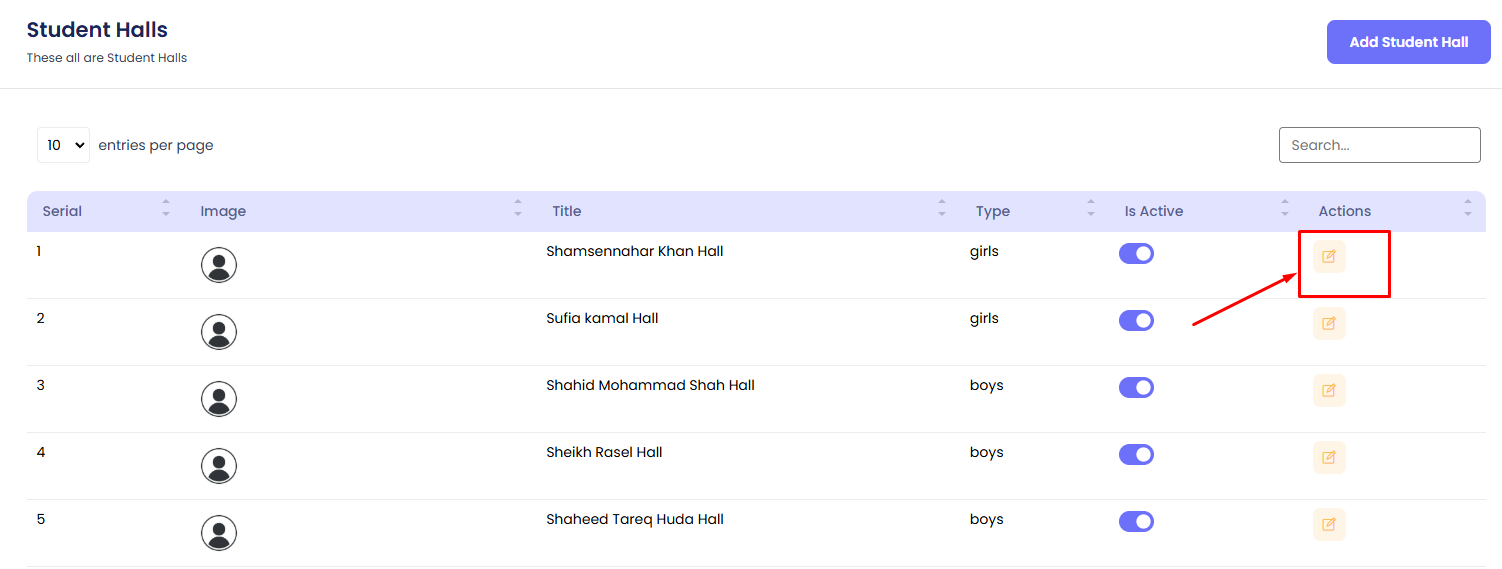
Edit the necessary fields such as Title, Type, and Image. Then press the Update button.
Activate/Deactivate Student Hall
Step 1: Navigate to Student Halls in your admin sidebar and click.
Step 2: Locate the target Student Hall in the list.
Step 3: Use the toggle button under the "Is Active" column to activate or deactivate the student hall as required.
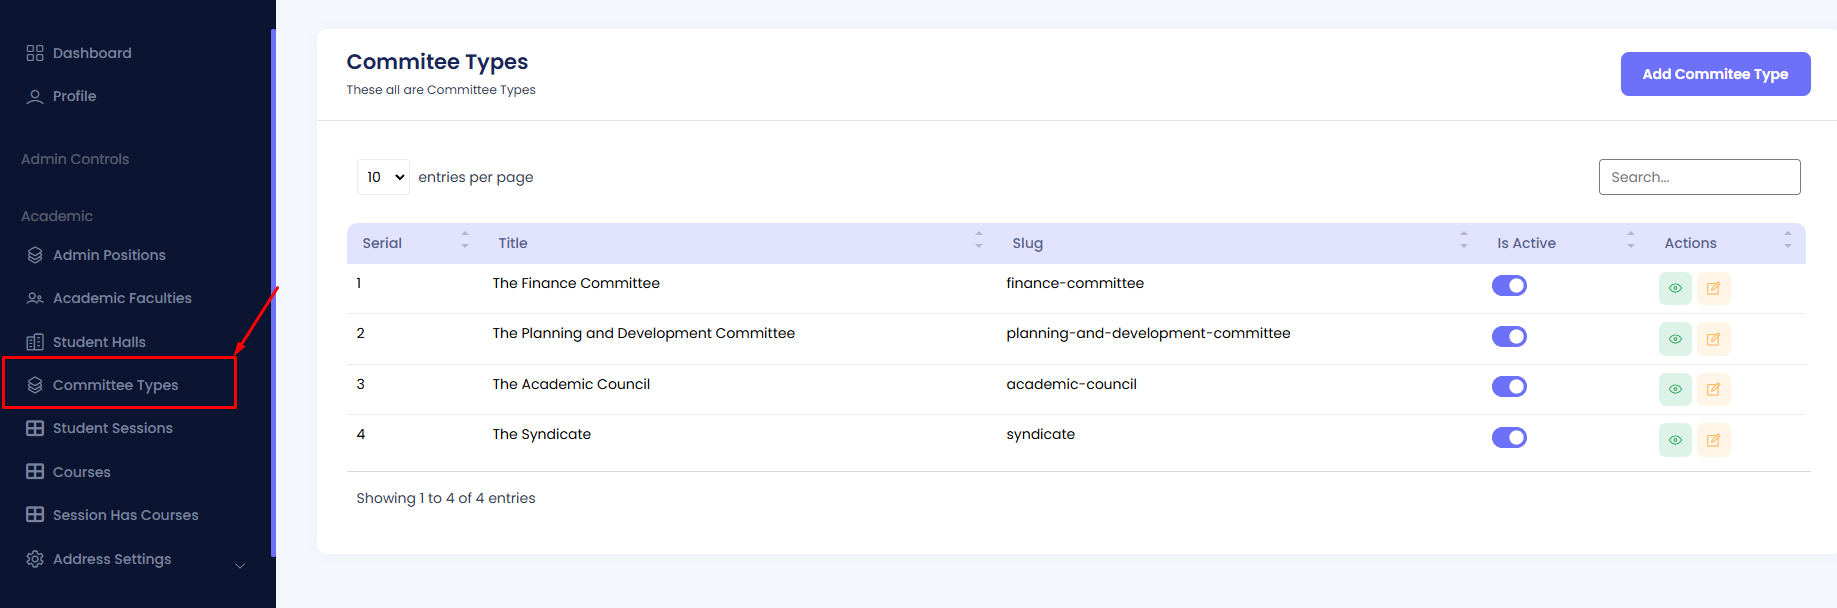
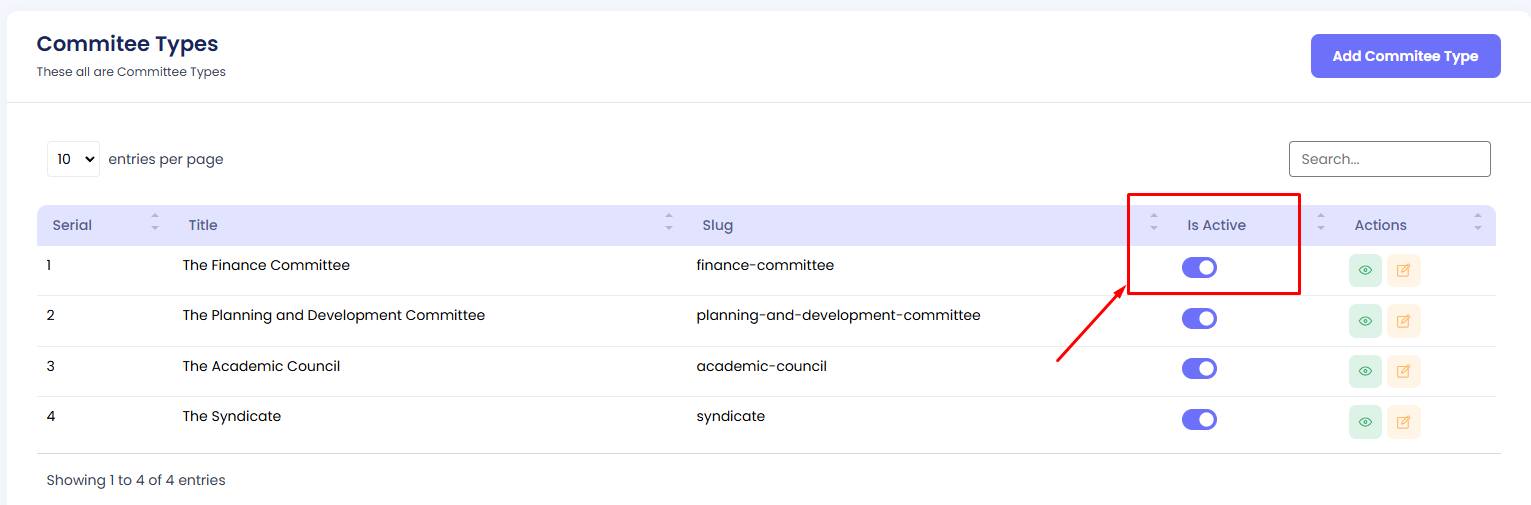
Committee Types
The list of different Committee Types can be viewed here, with columns such as Serial, Title, Slug, Is Active, and Available Actions. You can add, edit, activate/deactivate, and manage committee types as needed.
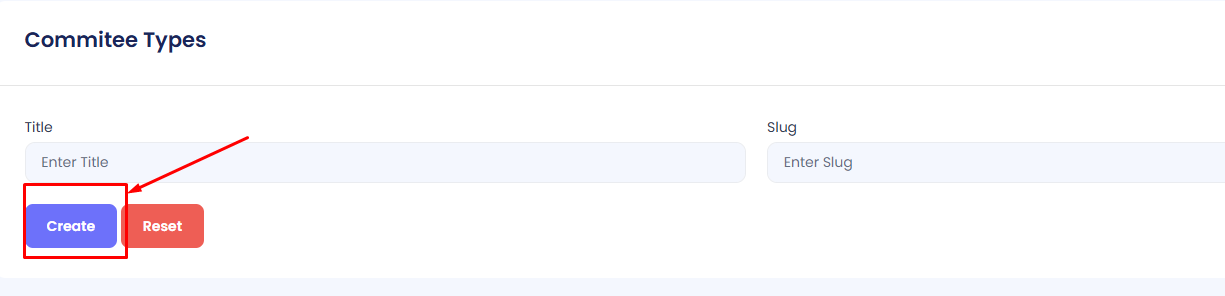
Add a Committee Type
Step 1: Navigate to Committee Types in your admin sidebar and click.
Step 2: Click on Add Committee Type.
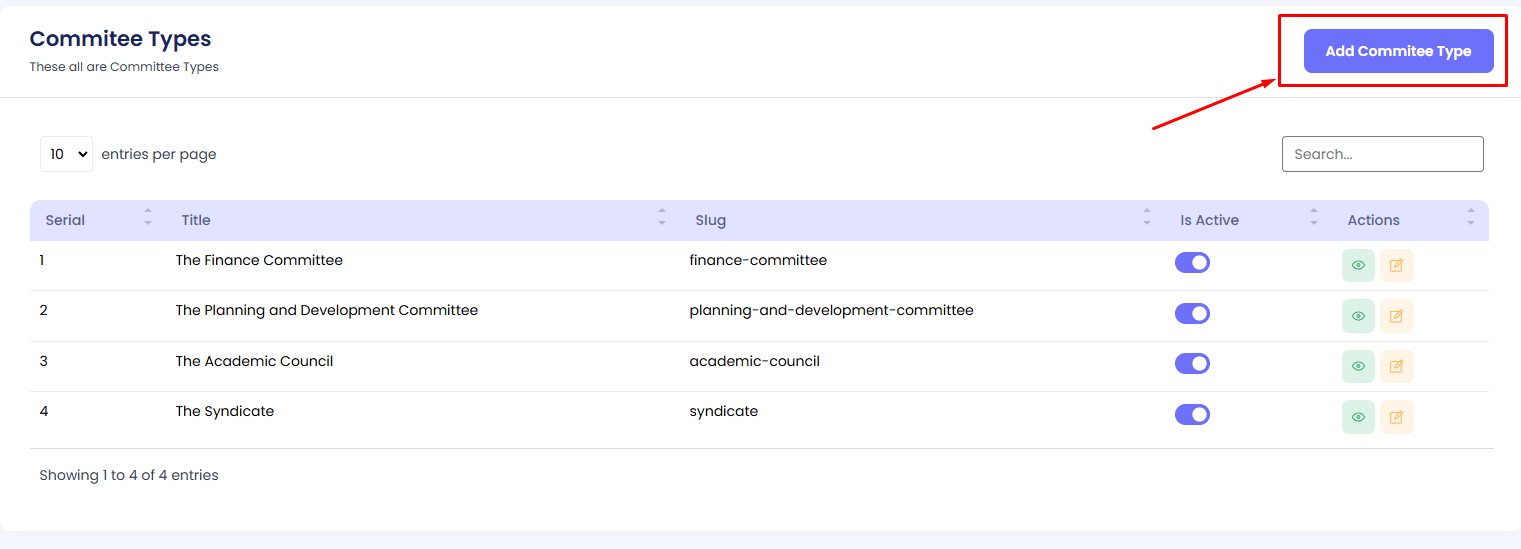
Step 3: Fill in the form with the required details, including Title and Slug. Then hit the Create button.
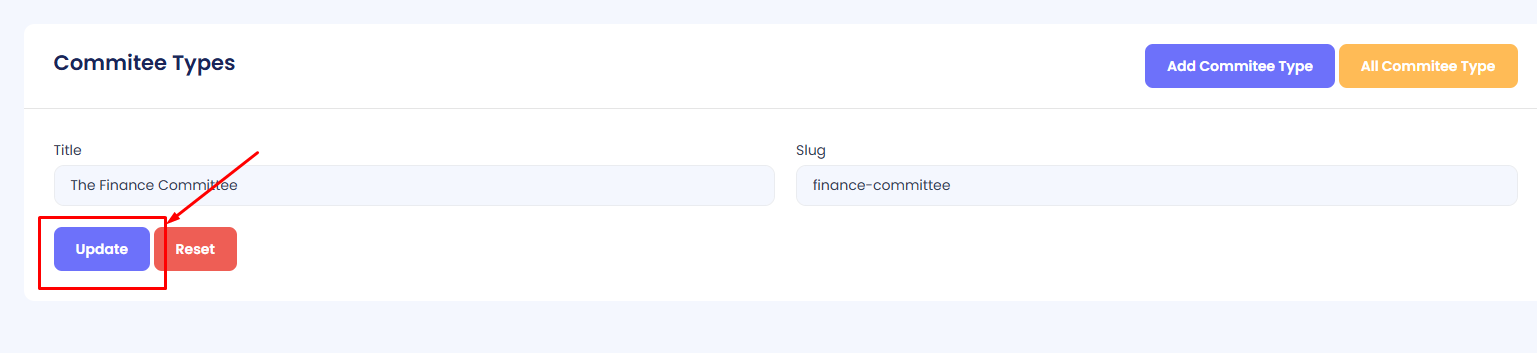
Edit Committee Type
Step 1: Navigate to Committee Types in your admin sidebar and click.
Step 2: Press the Edit button to modify an existing committee type.
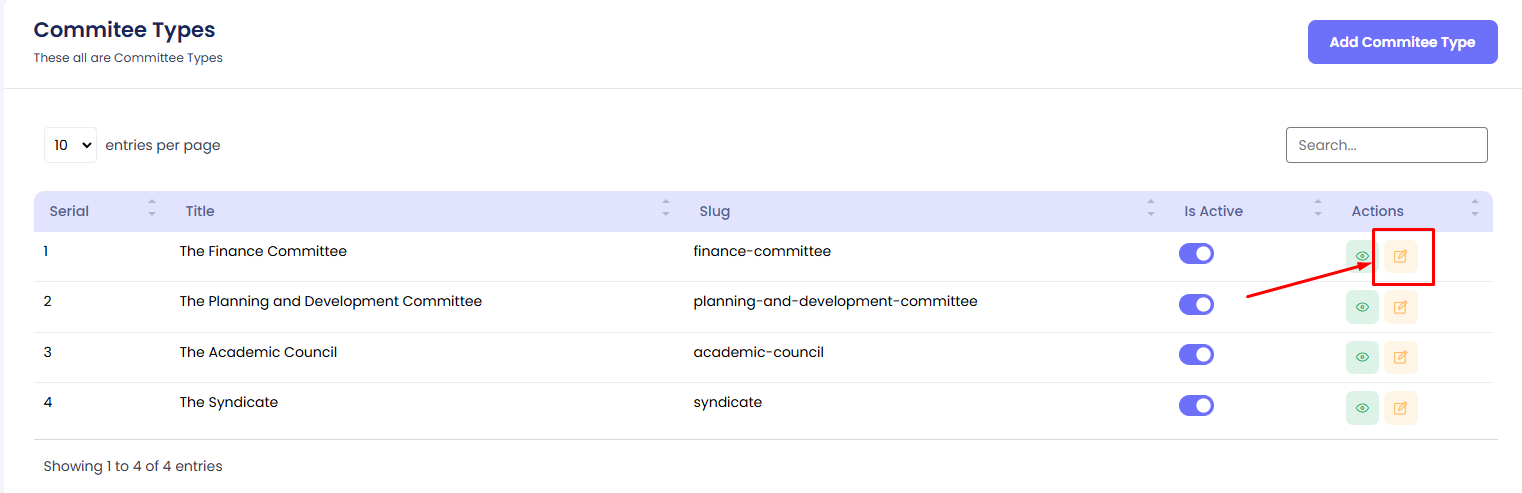
Edit the necessary fields such as Title and Slug. Then press the Update button.
Activate/Deactivate Committee Type
Step 1: Navigate to Committee Types in your admin sidebar and click.
Step 2: Locate the target Committee Type in the list.
Step 3: Use the toggle button under the "Is Active" column to activate or deactivate the committee type as required.
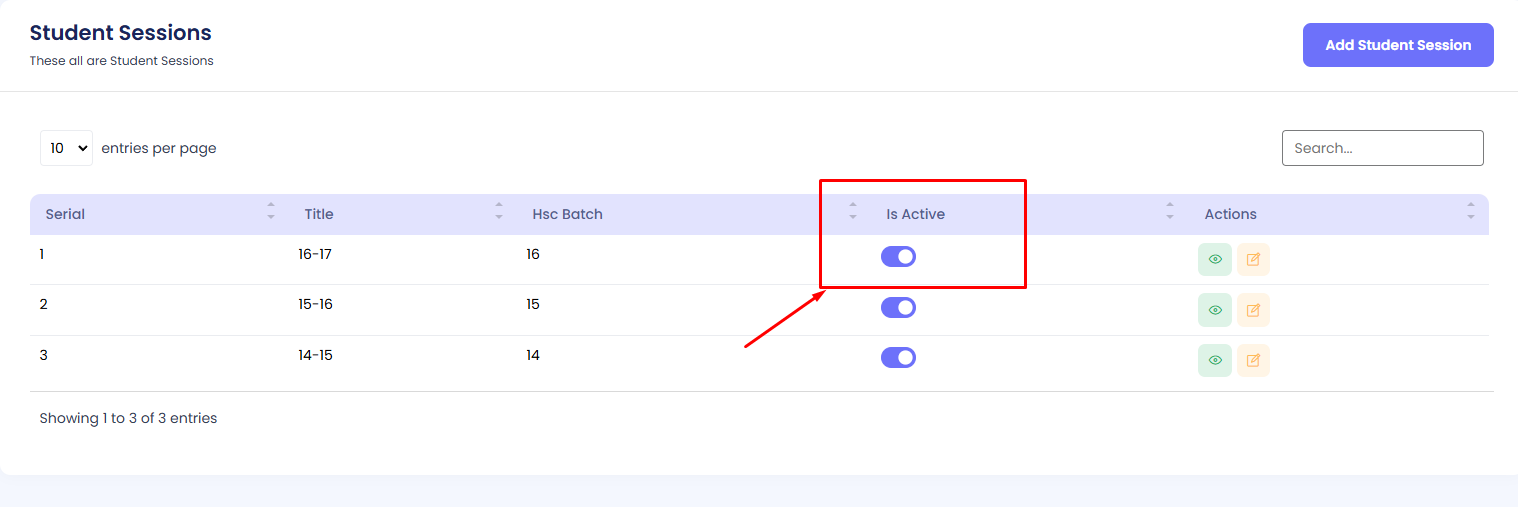
Student Sessions
The list of different Student Sessions can be viewed here, with columns such as Serial, Title, HSC Batch, Is Active, and Available Actions. You can add, edit, activate/deactivate, and manage student sessions as needed.
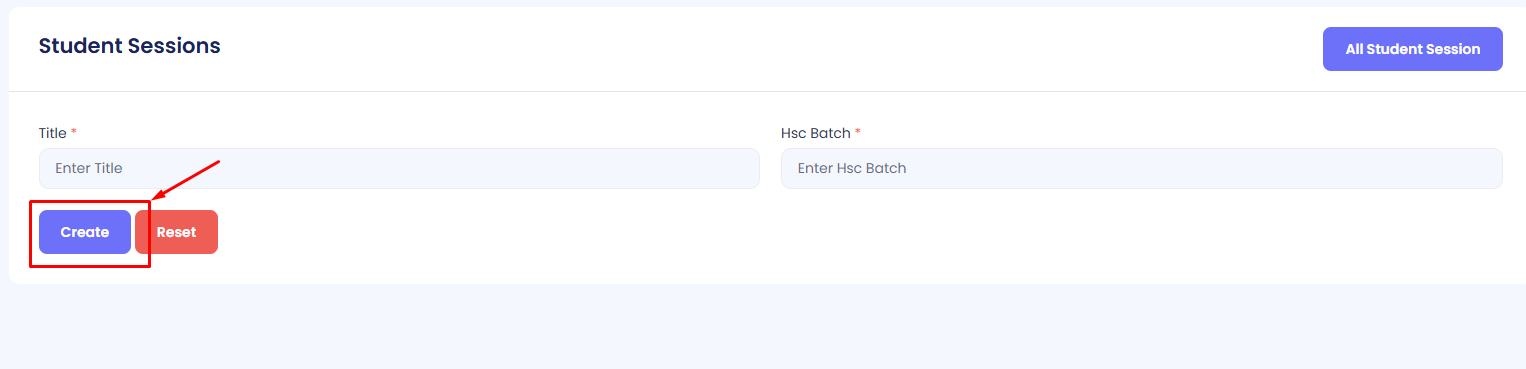
Add a Student Session
Step 1: Navigate to Student Sessions in your admin sidebar and click.

Step 2: Click on Add Student Session.
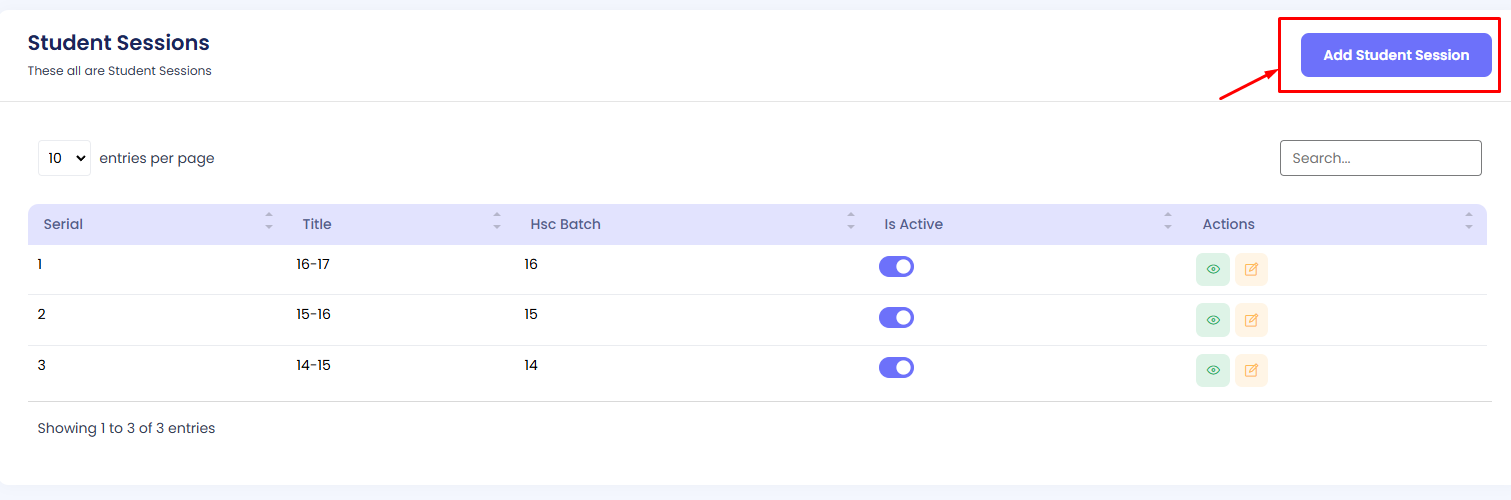
Step 3: Fill in the form with the required details, including Title and HSC Batch. Then hit the Create button.
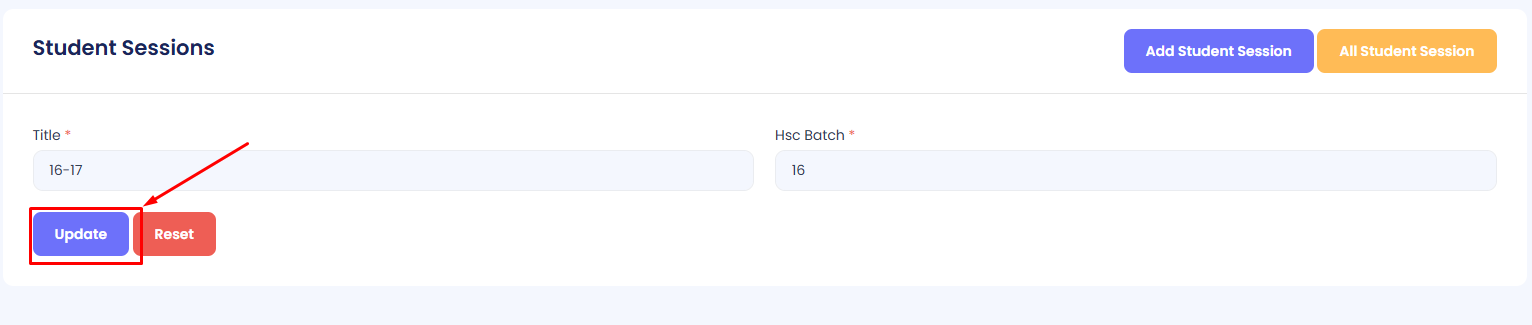
Edit Student Session
Step 1: Navigate to Student Sessions in your admin sidebar and click.
Step 2: Press the Edit button to modify an existing student session.
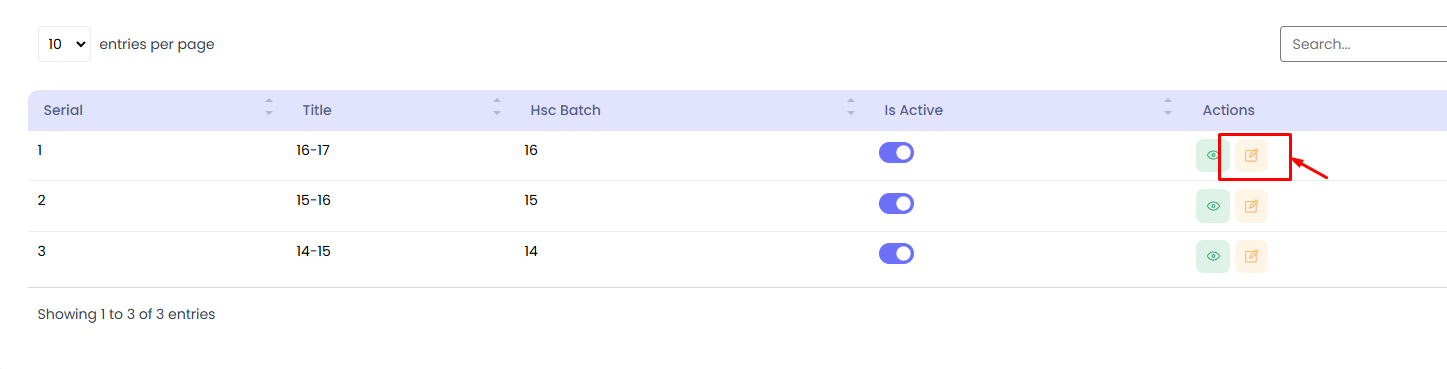
Edit the necessary fields such as Title and HSC Batch. Then press the Update button.
Activate/Deactivate Student Session
Step 1: Navigate to Student Sessions in your admin sidebar and click.
Step 2: Locate the target Student Session in the list.
Step 3: Use the toggle button under the "Is Active" column to activate or deactivate the student session as required.
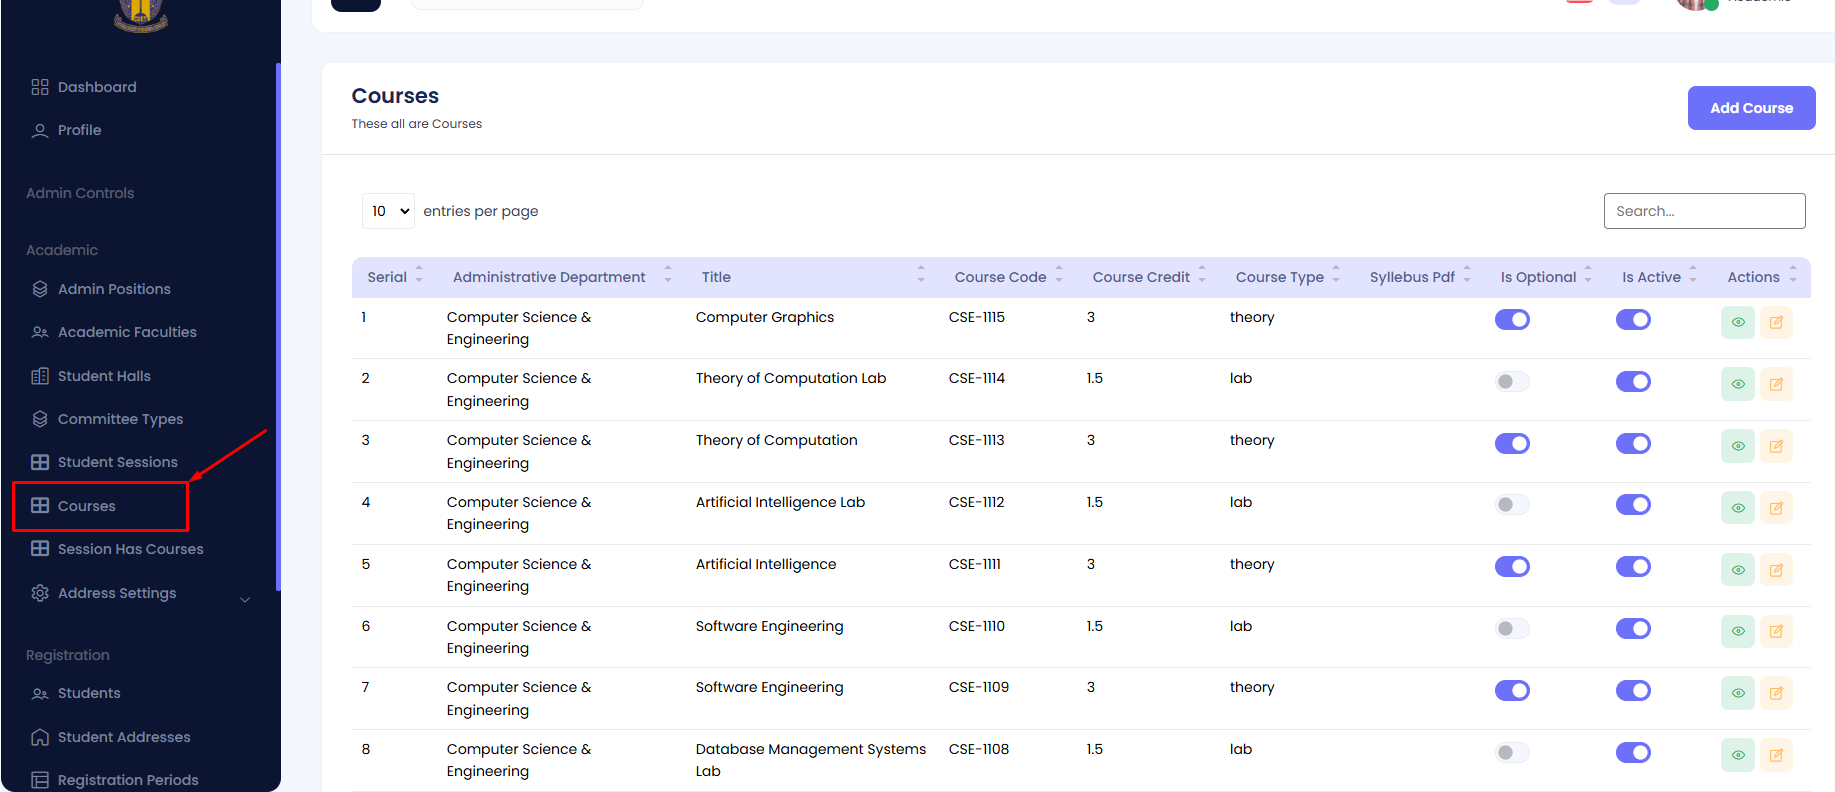
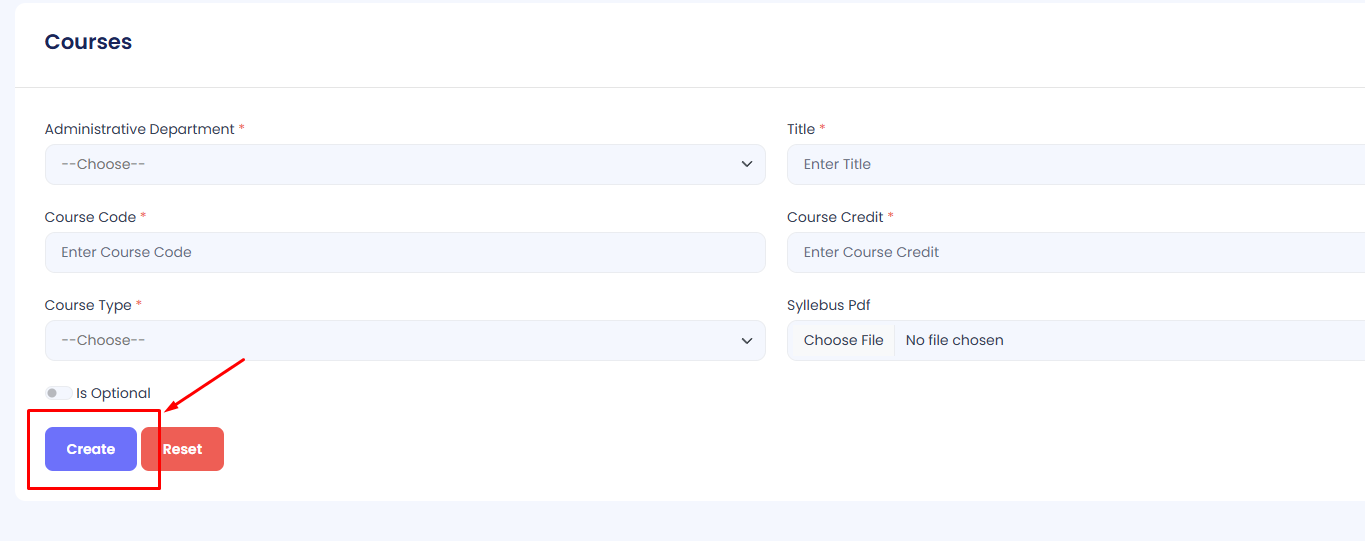
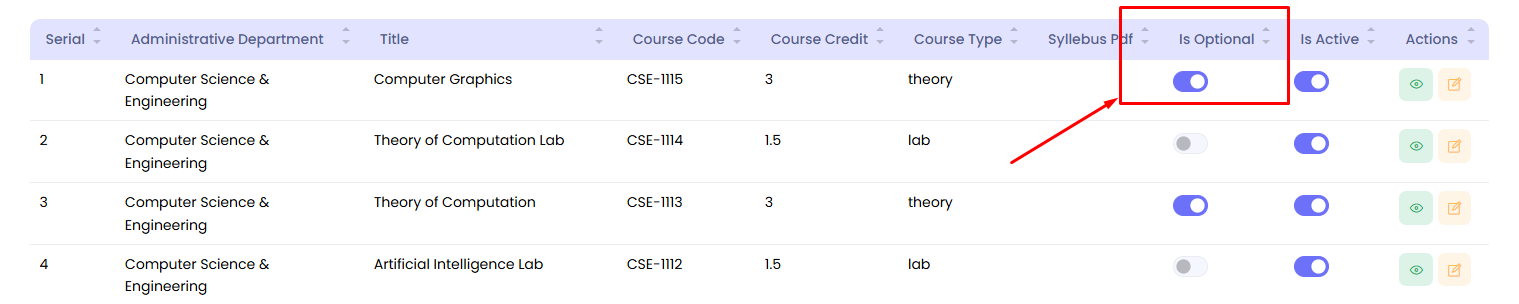
Courses
The list of different Courses can be viewed and managed here, with columns such as Serial, Administrative Department, Title, Course Code, Course Credit, Course Type, Syllabus Pdf, Is Optional, Is Active, and Available Actions. You can add, edit, activate/deactivate, and manage courses as needed.
Add a Course
Step 1: Navigate to Courses in your admin sidebar and click.
Step 2: Click on Add Course.
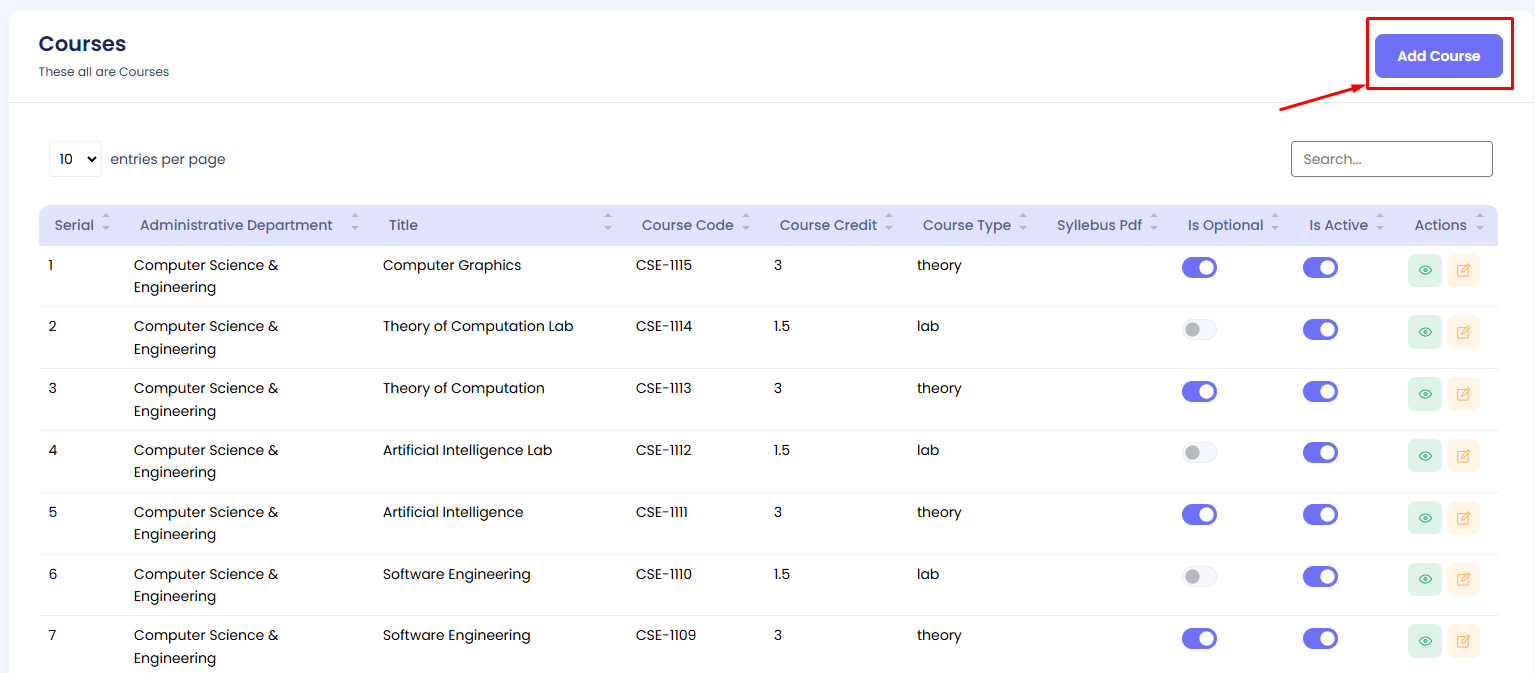
Step 3: Fill in the form with the required details, including Administrative Department, Title, Course Code, Course Credit, Course Type, Syllabus Pdf, Is Optional, and Is Active. Then hit the Create button.
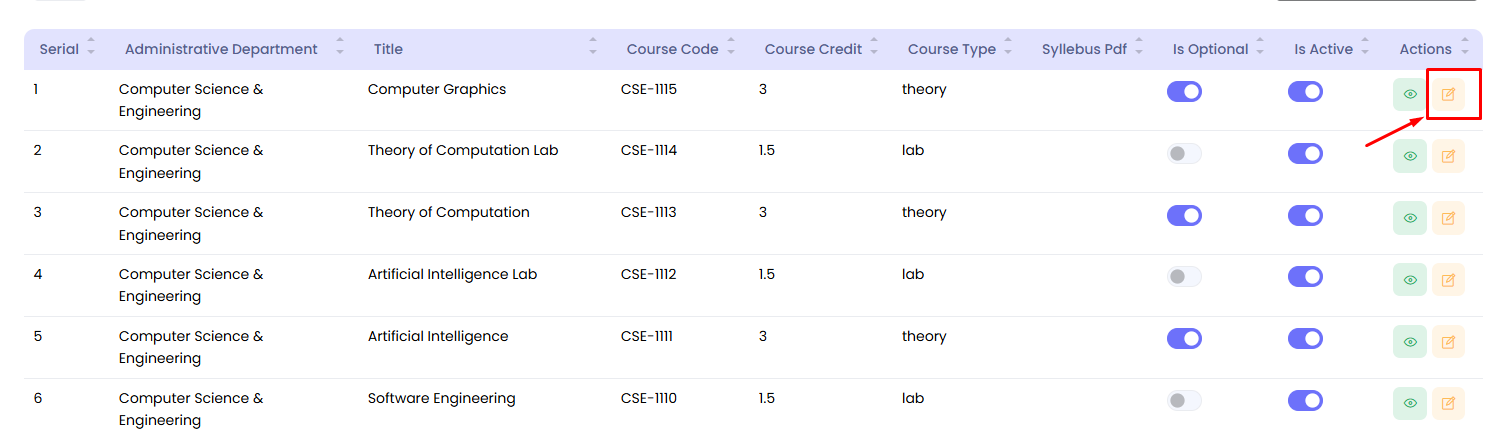
Edit a Course
Step 1: Navigate to Courses in your admin sidebar and click.
Step 2: Press the Edit button to modify an existing course.
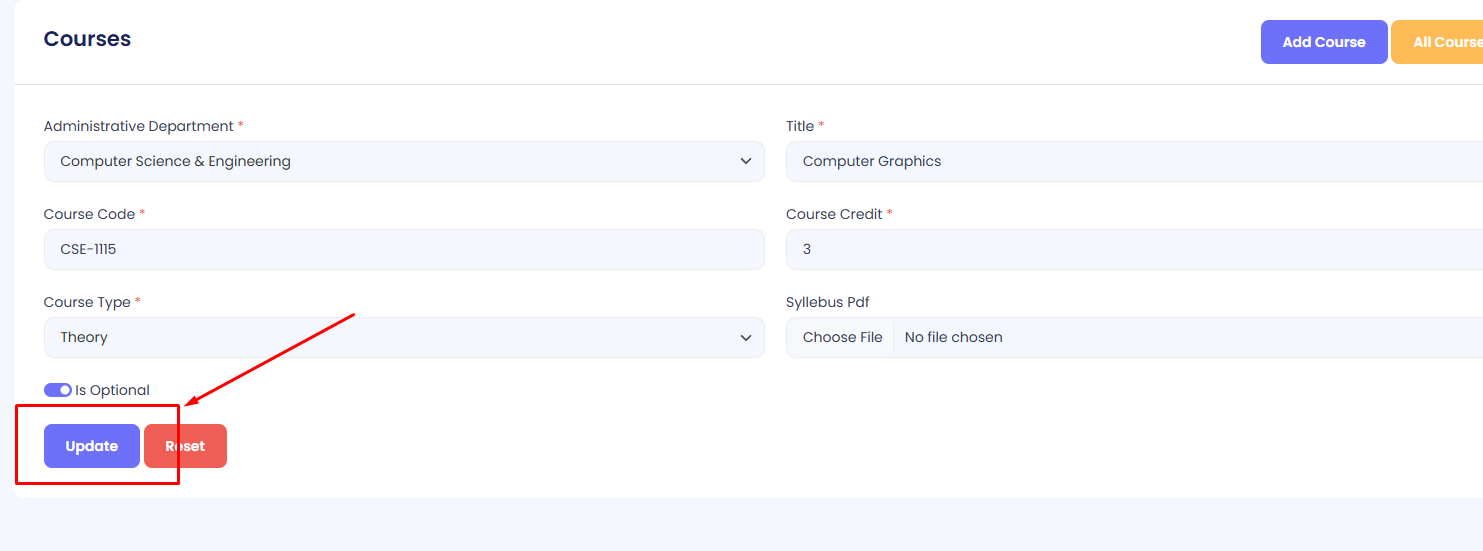
Edit the necessary fields such as Administrative Department, Title, Course Code, Course Credit, Course Type, Syllabus Pdf, Is Optional, and Is Active. Then press the Update button.
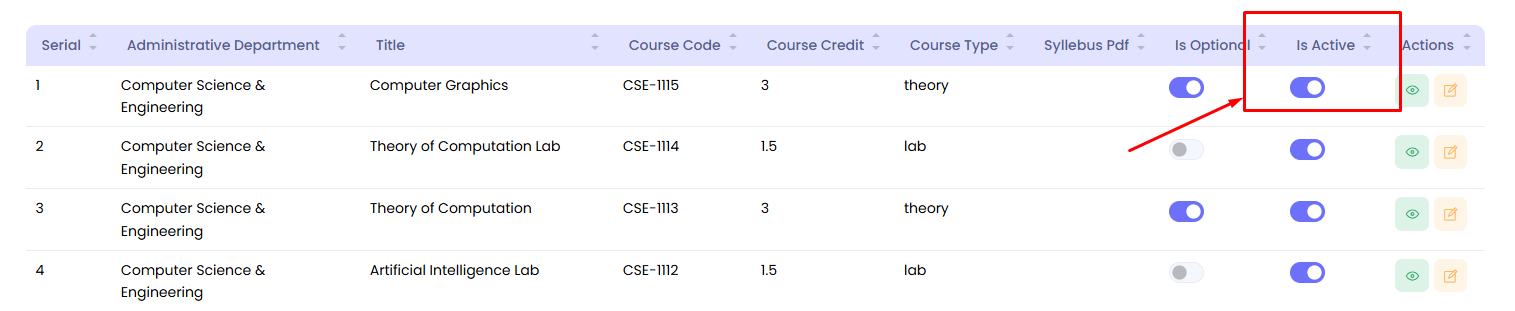
Activate/Deactivate Course
Step 1: Navigate to Courses in your admin sidebar and click.
Step 2: Locate the target Course in the list.
Step 3: Use the toggle button under the "Is Active" column to activate or deactivate the course as required.
Mark Course as Optional
Step 1: Navigate to Courses in your admin sidebar and click.
Step 2: Locate the target Course in the list.
Step 3: Use the toggle button under the "Is Optional" column to mark the course as optional or required as per your needs.
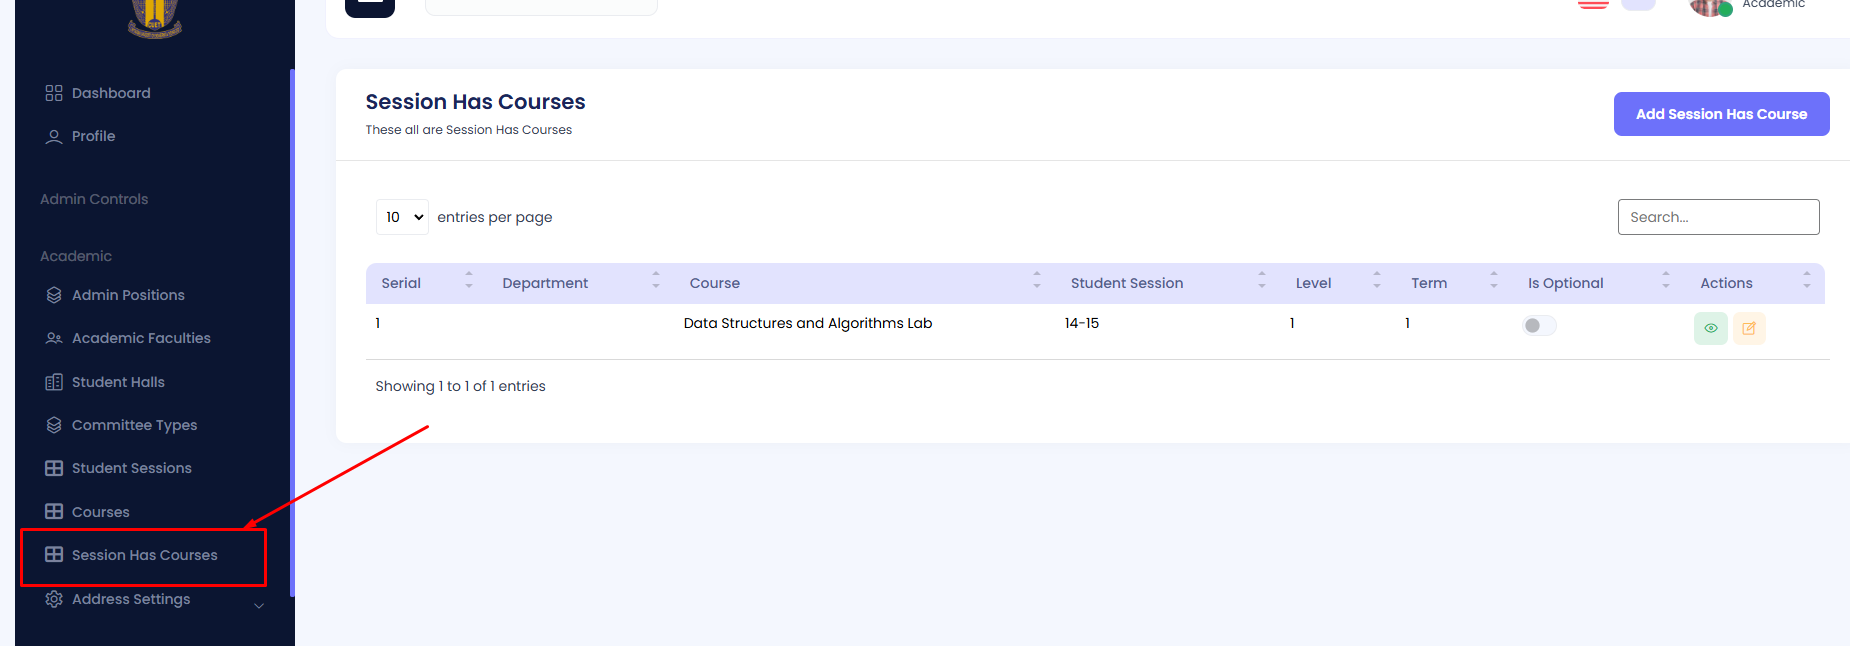
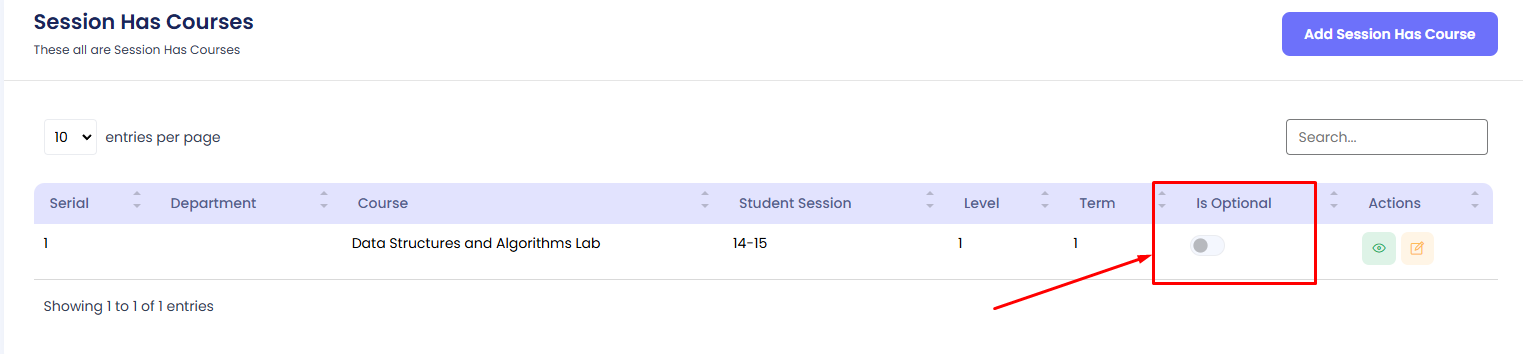
Session Has Courses
The details of Session Has Courses can be viewed and managed here. This section links courses to specific student sessions along with additional details like the level, term, and optional status. The table includes the following columns:
- Serial: Displays the serial number of the entry.
- Department: Shows the name of the academic department offering the course.
- Course: Lists the title of the course associated with the session.
- Student Session: Displays the student session linked to the course.
- Level: Indicates the academic level (e.g., Level 1, Level 2).
- Term: Specifies the term within the level (e.g., Term 1, Term 2).
- Is Optional: States whether the course is optional for the session.
- Actions: Provides options to edit or manage the entry.
Add a Course to a Session
Step 1: Navigate to the Session Has Courses section in your admin sidebar and click.
Step 2: Click on the Add Course button.
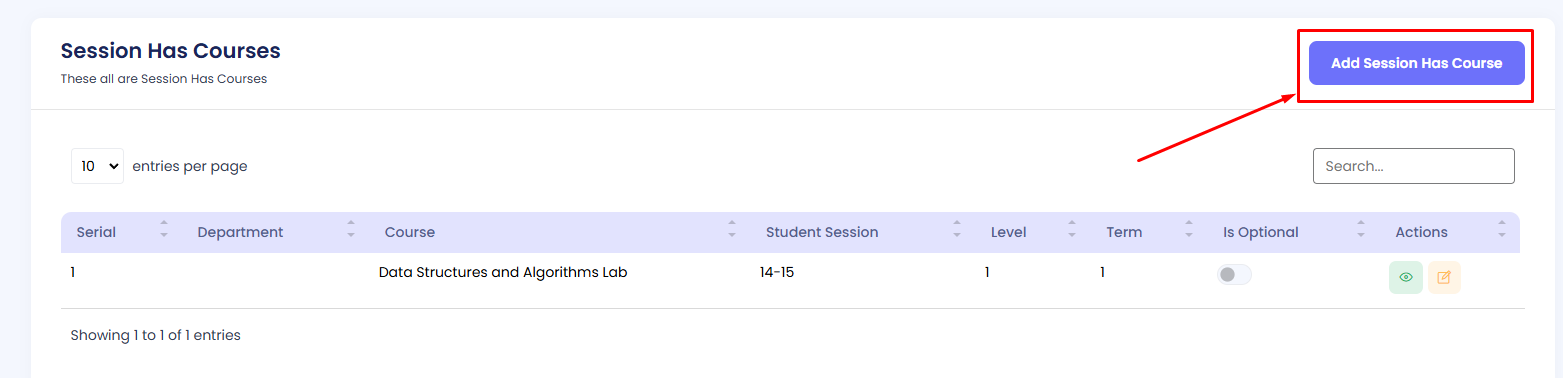
Step 3: Fill in the form with the required details:
- Department: Select the department offering the course.
- Course: Choose the course to associate with the session.
- Student Session: Select the student session for the course.
- Level: Specify the academic level.
- Term: Choose the term within the level.
- Is Optional: Mark whether the course is optional or mandatory.
Once all fields are completed, click on the Create button to save.

Edit a Course in a Session
Step 1: Navigate to the Session Has Courses section in your admin sidebar and click.

Step 2: Press the Edit button beside the target course entry to modify it.
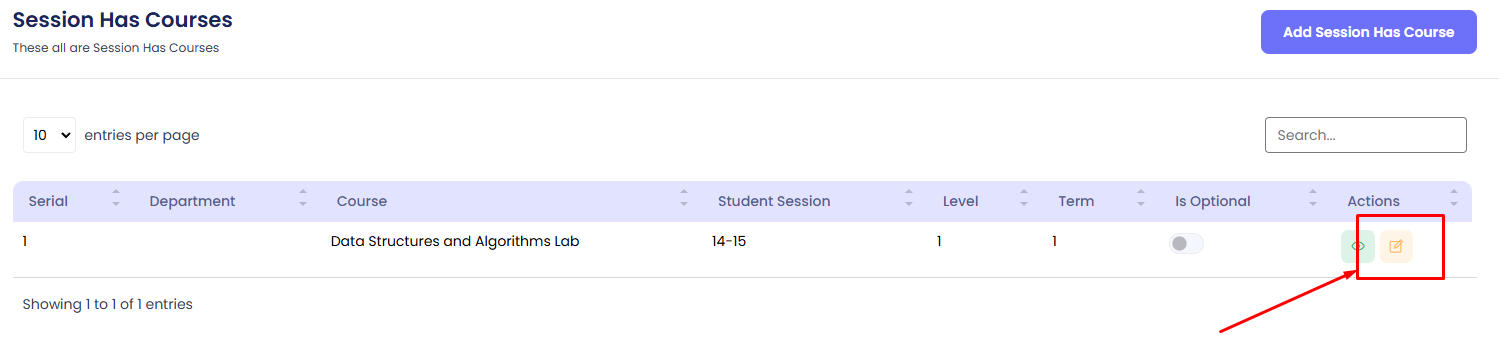
Edit the necessary fields such as Department, Course, Session, Level, Term, or Is Optional. Then click on the Update button to save changes.

Mark Course as Optional
Step 1: Navigate to the Session Has Courses section in your admin sidebar and click.
Step 3: Use the toggle button under the "Is Optional" column to mark the course as optional or required as per your needs.
Division
The list of Divisions can be viewed and managed here. The table includes the following columns:
- Serial: A unique identifier for each division entry.
- Name: The name of the division in English.
- Bangla Name: The name of the division in Bangla.
- Is Active: Indicates whether the division is active or inactive.
- Actions: Options to edit or delete a division.
Add a Division
Step 1: Navigate to Division in your admin sidebar and click.

Step 2: Click on Add Division.

Step 3: Fill in the form with the required details, including:
- Name: Provide the name of the division in English.
- Bangla Name: Provide the name of the division in Bangla.
- Is Active: Specify whether the division should be active or inactive.
Then click the Create button to save the new division.

Edit a Division
Step 1: Navigate to Division in your admin sidebar and click.
Step 2: Locate the division you want to edit and click the Edit button under the "Actions" column.

Edit the necessary fields, such as Name, Bangla Name, or Is Active. Then press the Update button to save your changes.

Activate/Deactivate a Division
Step 1: Navigate to Division in your admin sidebar and click.
Step 2: Locate the target division in the list.
Step 3: Use the toggle button under the "Is Active" column to activate or deactivate the division as needed.

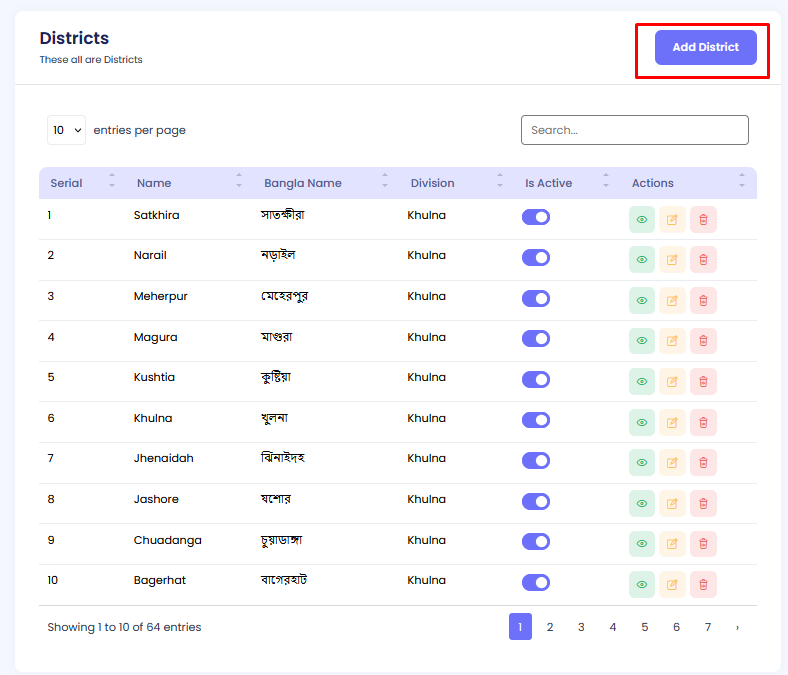
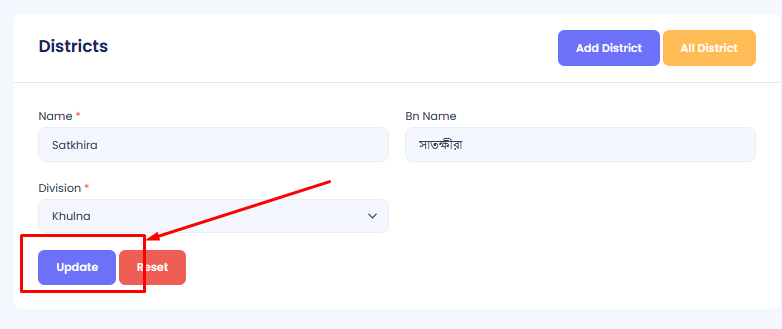
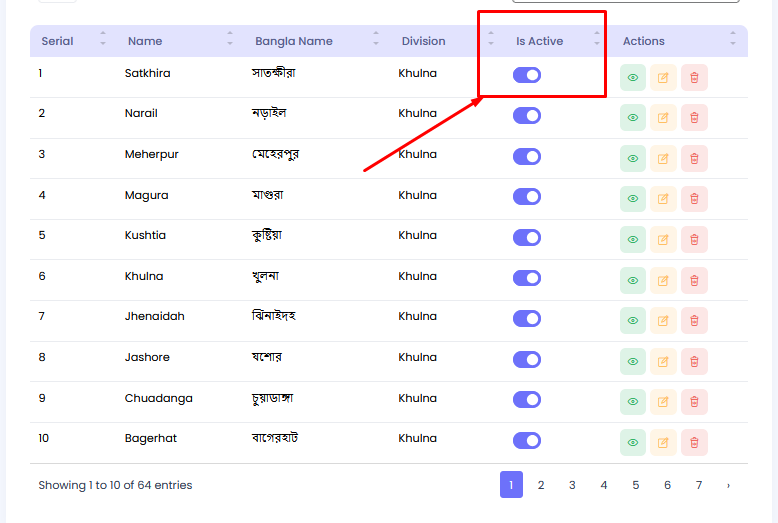
Districts
The list of Districts can be viewed and managed here. The table includes the following columns:
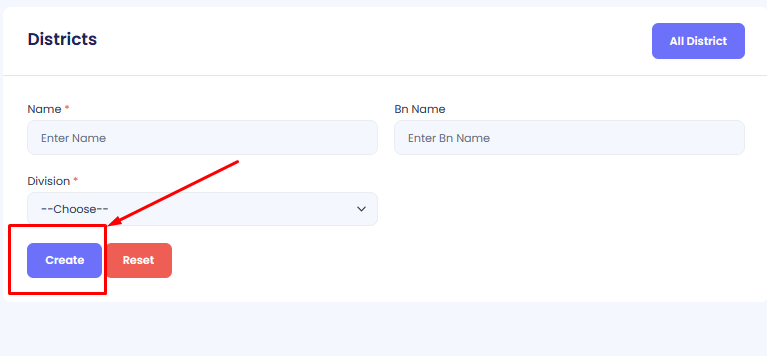
Add a District
Step 1: Navigate to Districts in your admin sidebar and click.

Step 2: Click on Add District.
Step 3: Fill in the form with the required details, including:
- Name: Provide the name of the district in English.
- Bangla Name: Provide the name of the district in Bangla.
- Division: Select the division to which the district belongs.
- Is Active: Specify whether the district should be active or inactive.
Then click the Create button to save the new district.
Edit a District
Step 1: Navigate to Districts in your admin sidebar and click.
Step 2: Locate the district you want to edit and click the Edit button under the "Actions" column.
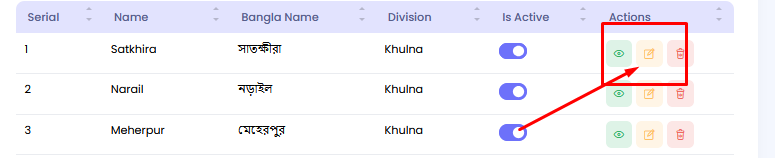
Edit the necessary fields, such as Name, Bangla Name, Division, or Is Active. Then press the Update button to save your changes.
Activate/Deactivate a District
Step 1: Navigate to Districts in your admin sidebar and click.
Step 2: Locate the target district in the list.
Step 3: Use the toggle button under the "Is Active" column to activate or deactivate the district as needed.
Upazilas
The list of Upazilas (sub-districts) can be managed in this section. The table includes the following columns:
- Serial: A unique identifier for each Upazila entry.
- Name: The name of the Upazila in English.
- Bn Name: The name of the Upazila in Bangla.
- District: The district under which the Upazila is located.
- Is Active: Indicates whether the Upazila is active or inactive.
- Actions: Options to edit or delete an Upazila.
Add an Upazila
Step 1: Navigate to Upazilas in your admin sidebar and click.

Step 2: Click on Add Upazila.

Step 3: Fill in the form with the required details, including:
- Name: Provide the name of the Upazila in English.
- Bn Name: Provide the name of the Upazila in Bangla.
- District: Select the district to which the Upazila belongs.
- Is Active: Specify whether the Upazila should be active or inactive.
Then click the Create button to save the new Upazila.

Edit an Upazila
Step 1: Navigate to Upazilas in your admin sidebar and click.
Step 2: Locate the Upazila you want to edit and click the Edit button under the "Actions" column.

Edit the necessary fields, such as Name, Bn Name, District, or Is Active. Then press the Update button to save your changes.

Activate/Deactivate an Upazila
Step 1: Navigate to Upazilas in your admin sidebar and click.
Step 2: Locate the target Upazila in the list.
Step 3: Use the toggle button under the "Is Active" column to activate or deactivate the Upazila as needed.

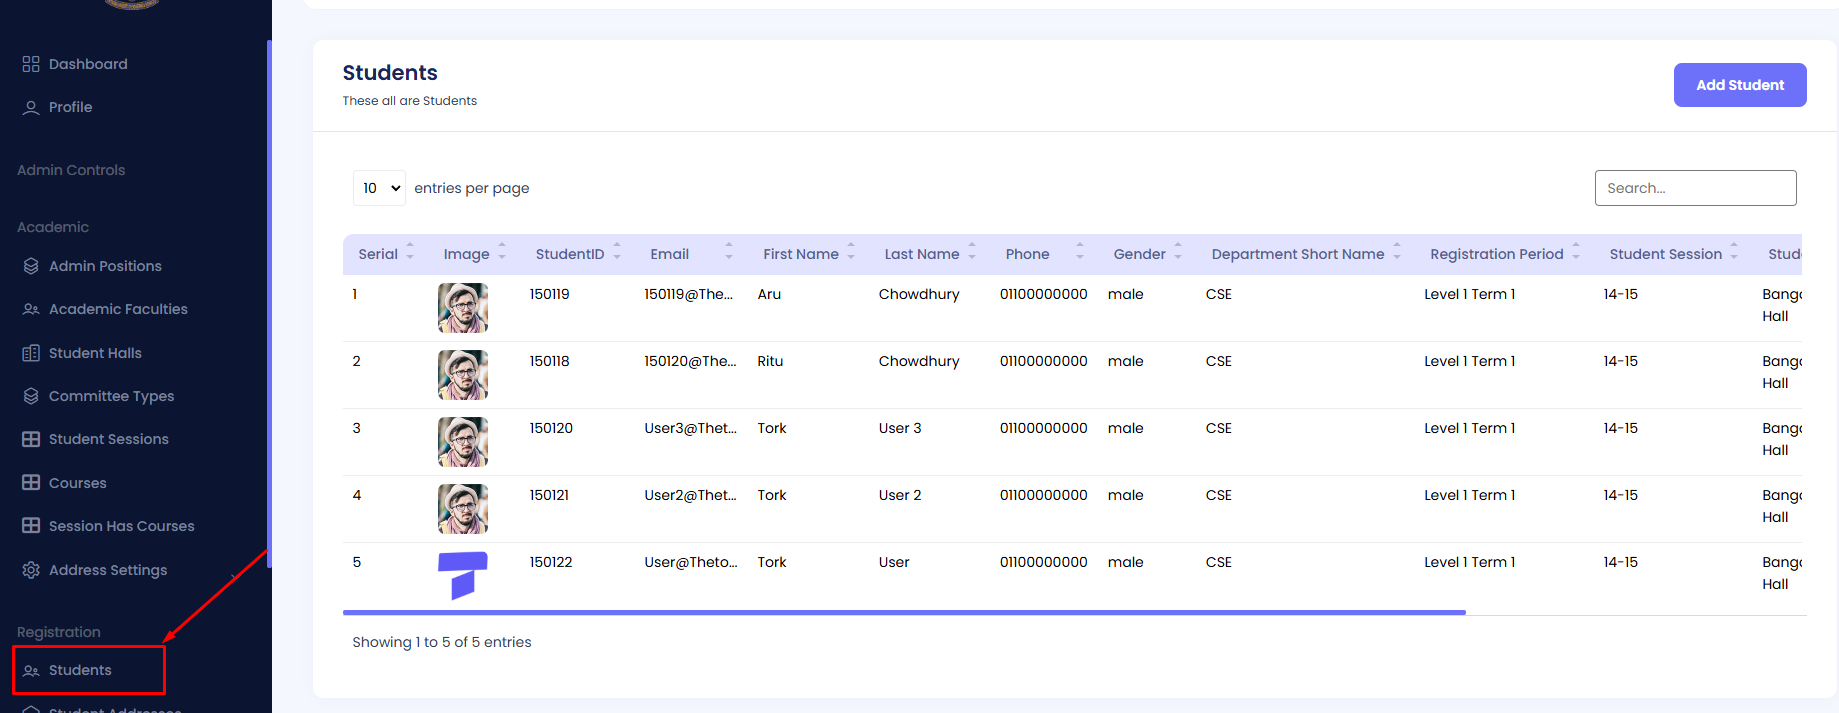
Students
Details of Students can be viewed and managed here. The table includes columns like Serial, Image, Student ID, Email, First Name, Last Name, Phone, Gender, Department Short Name, Registration Period, Student Session, Student Hall, Is Discontinue, Is Cancel, and Actions. You can add, edit, and manage student information as needed.
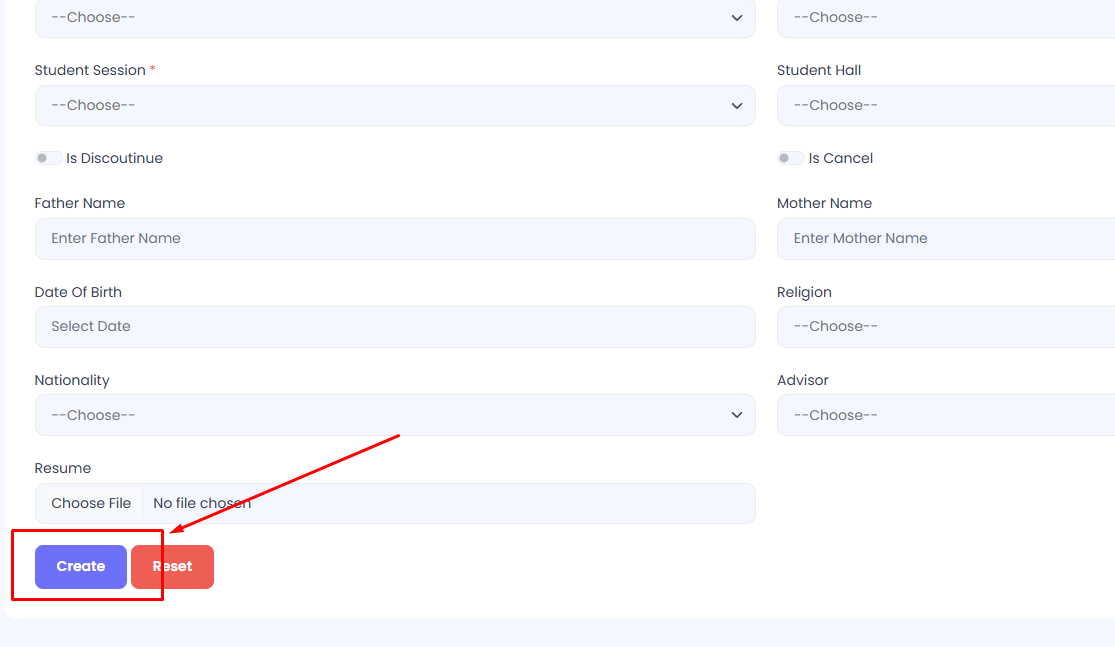
Add a Student
Step 1: Navigate to Students in your admin sidebar and click.
Step 2: Click on Add Student.
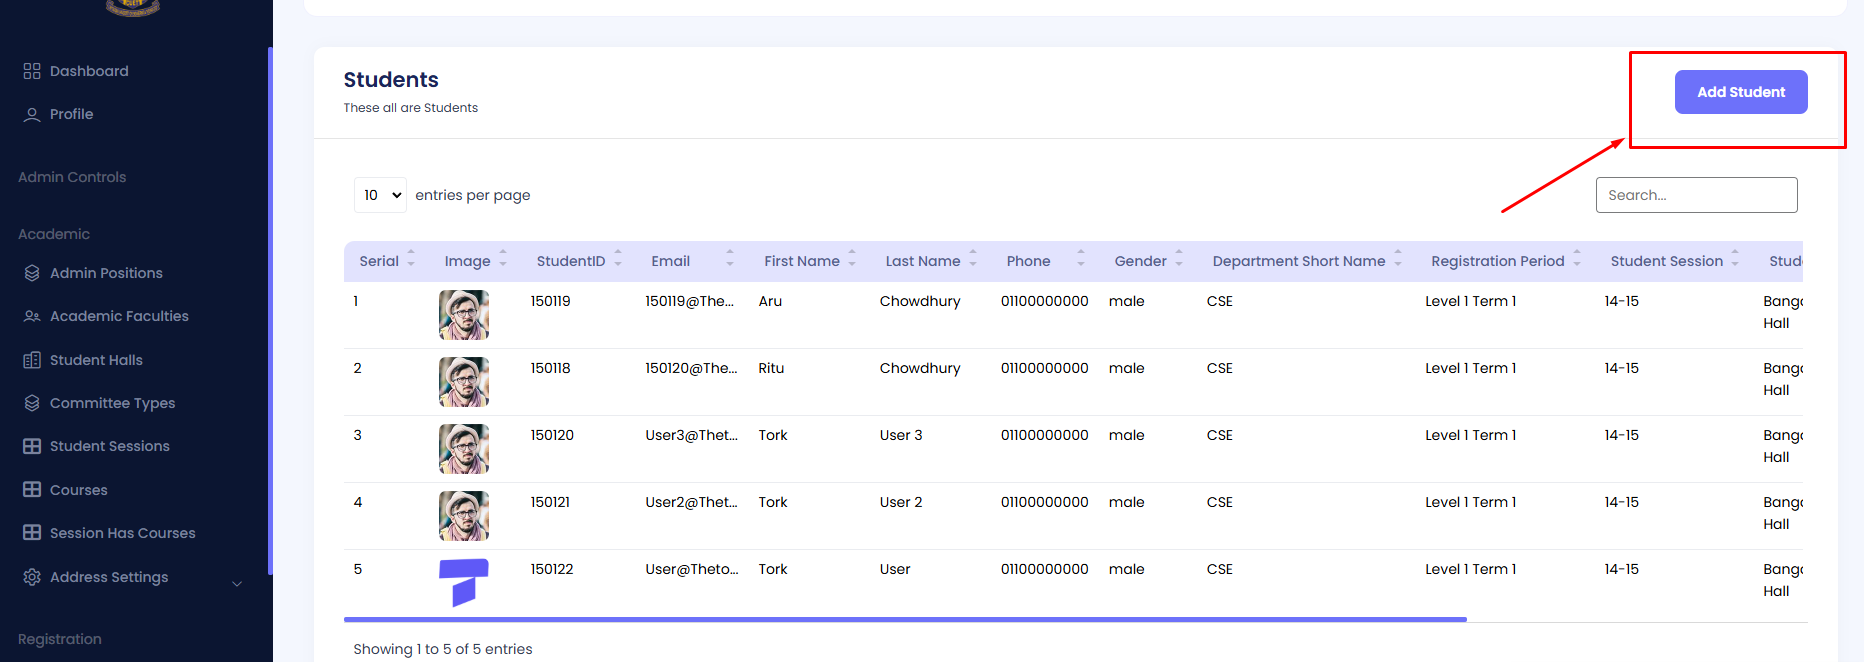
Step 3: Fill in the form with the required details, including Student ID, First Name, Last Name, Email, Phone, Gender, Department, Session, and Hall. Then hit the Create button.
Edit a Student
Step 1: Navigate to Students in your admin sidebar and click.
Step 2: Locate the target student in the list and press the Edit button.
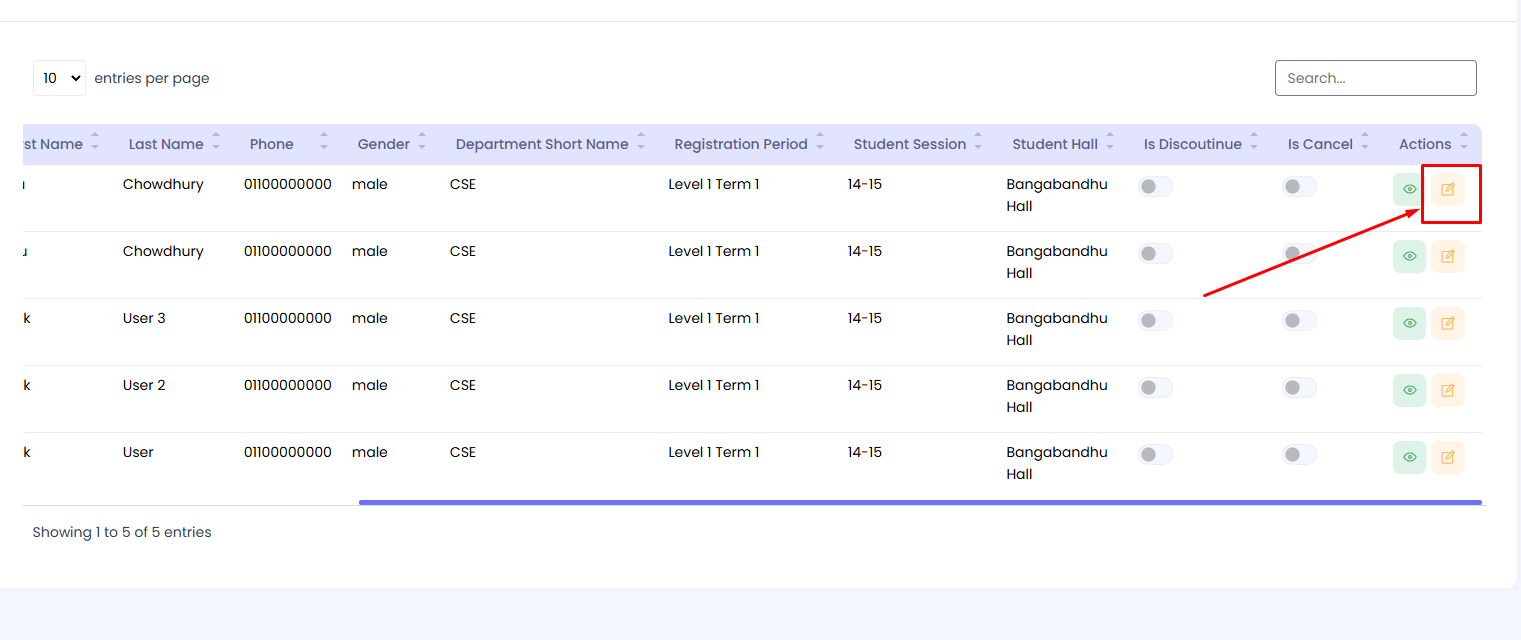
Edit the necessary fields such as First Name, Email, or Department. Then press the Update button.

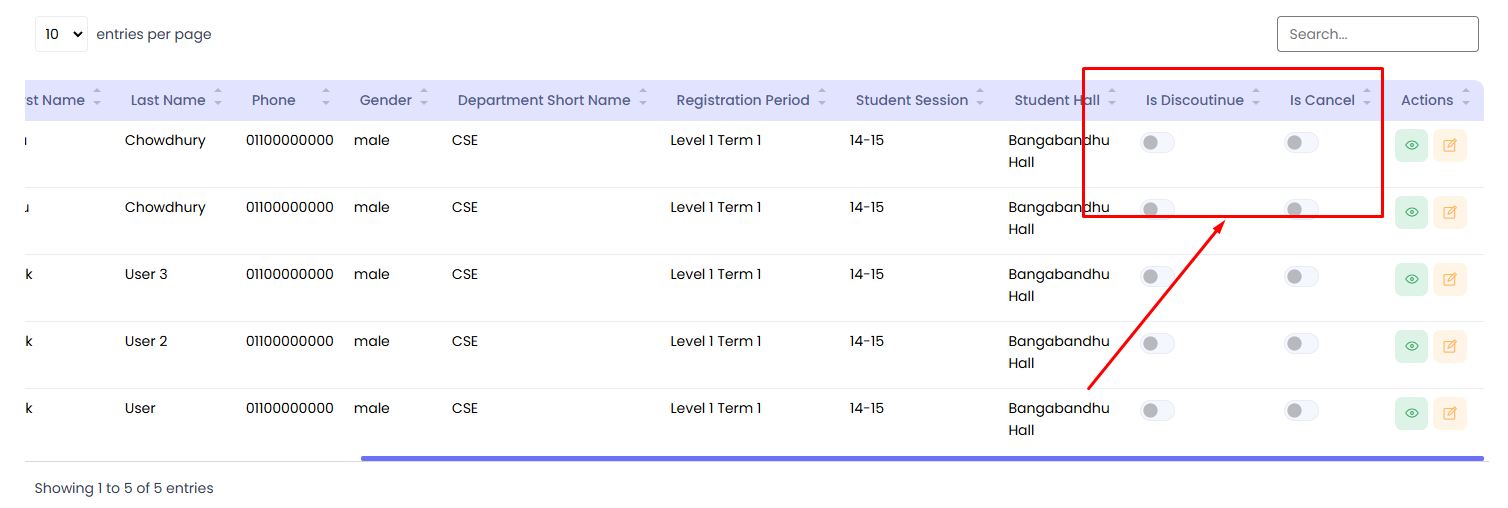
Discontinue or Cancel a Student
Step 1: Navigate to Students in your admin sidebar and click.
Step 2: Locate the target student in the list.
Step 3: Use the toggle buttons under the "Is Discontinue" or "Is Cancel" column to change the status of the student as required.
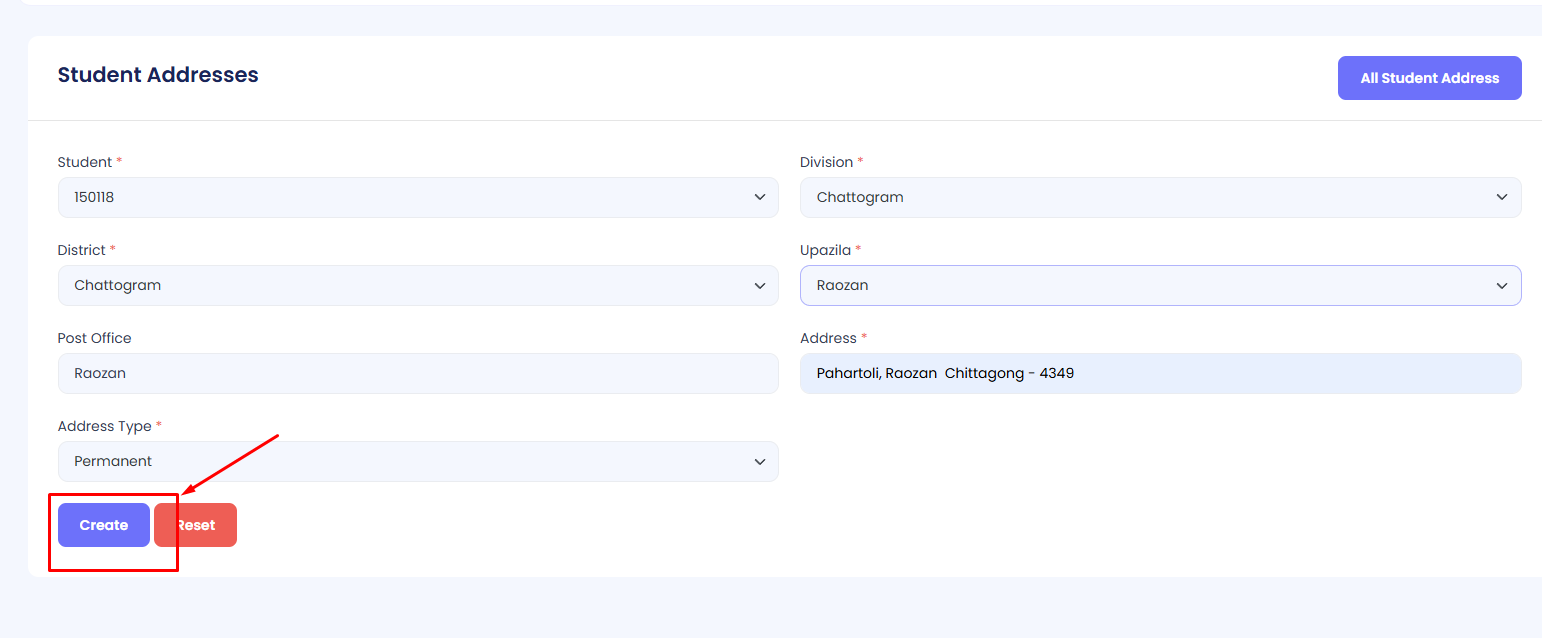
Student Addresses
The Student Addresses section manages information about student locations, including Division, District, Upazila, Post Office, and Address details. The table includes columns for Serial, Student, Division, District, Upazila, Post Office, Address, Address Type, and Actions. You can add, edit, or delete address records as required.
Add a Student Address
Step 1: Navigate to the Student Addresses section in the admin panel.
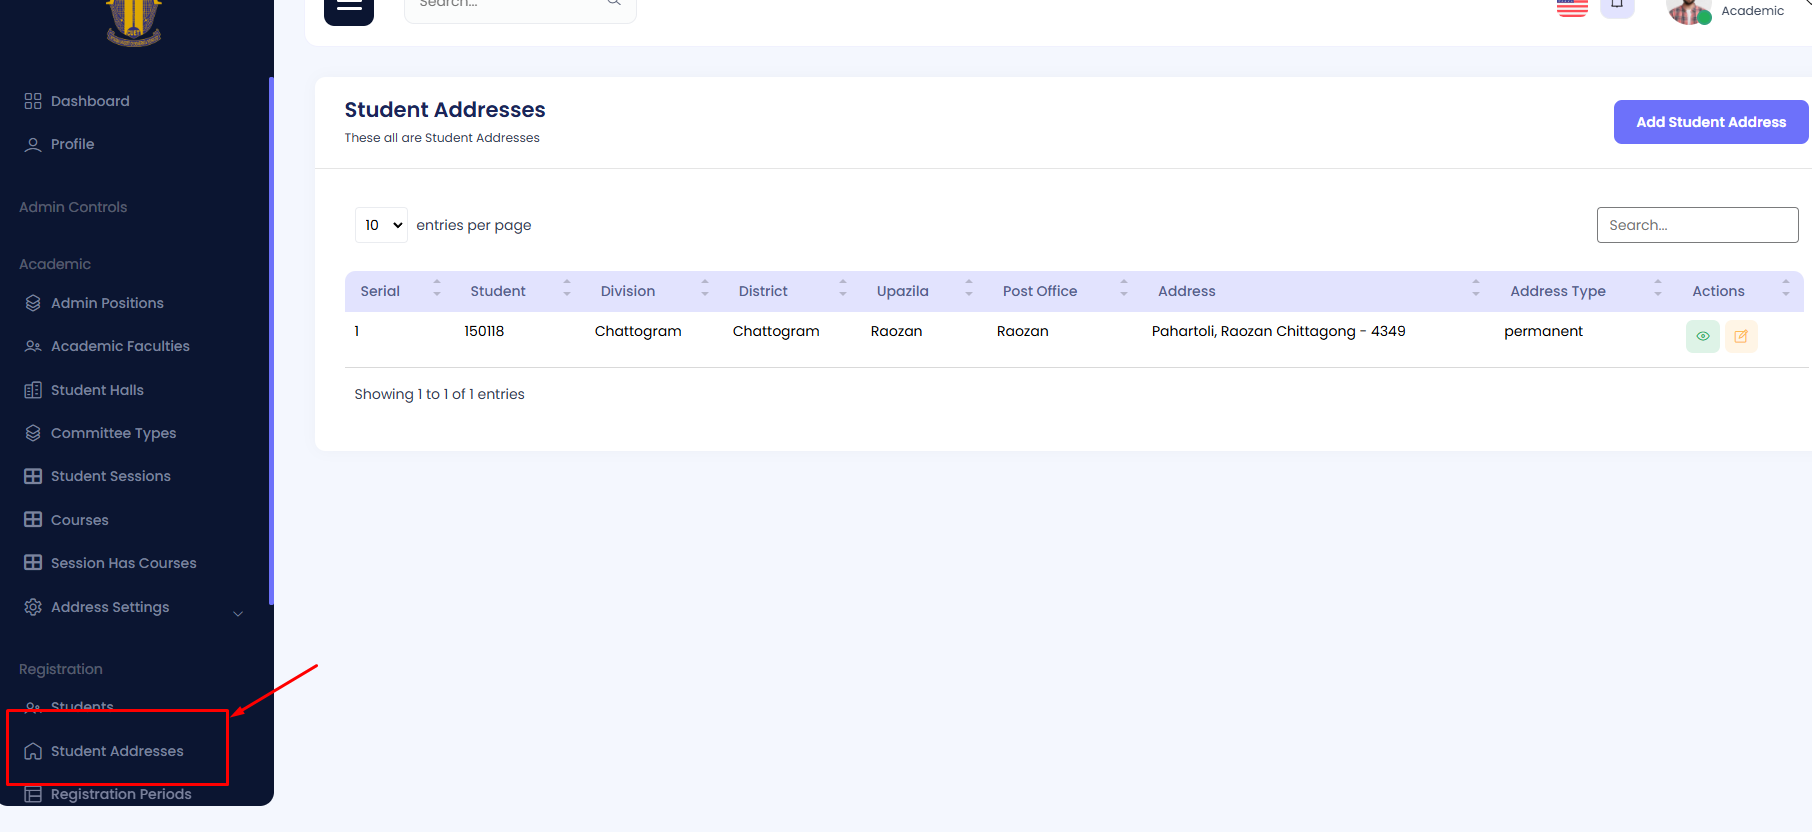
Step 2: Click on Add Address.
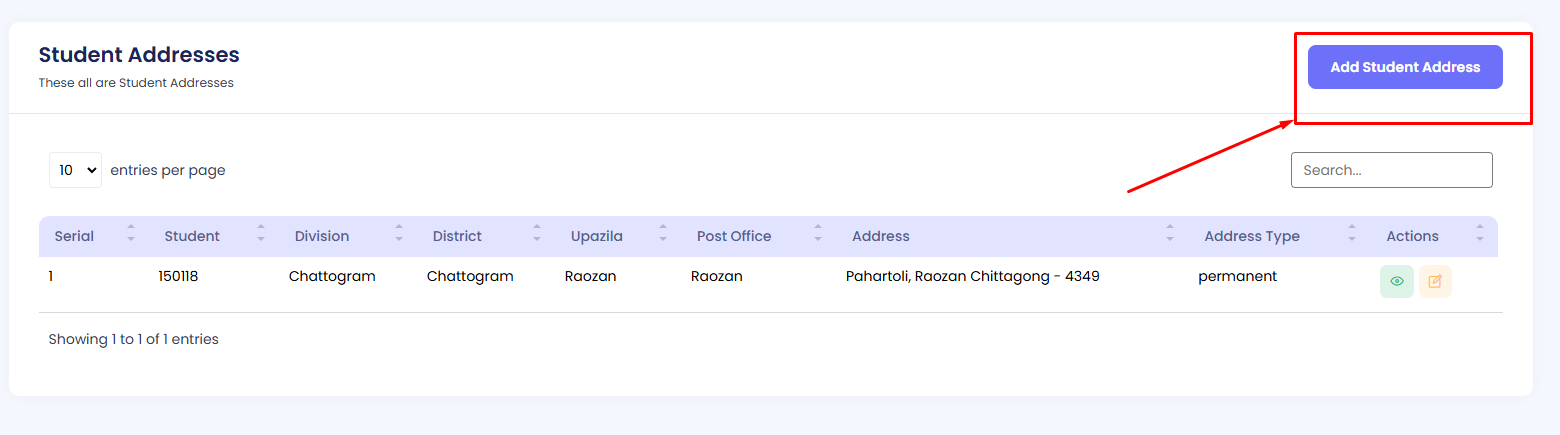
Step 3: Fill in the required details:
Once all details are filled in, click on the Save button to create the address.
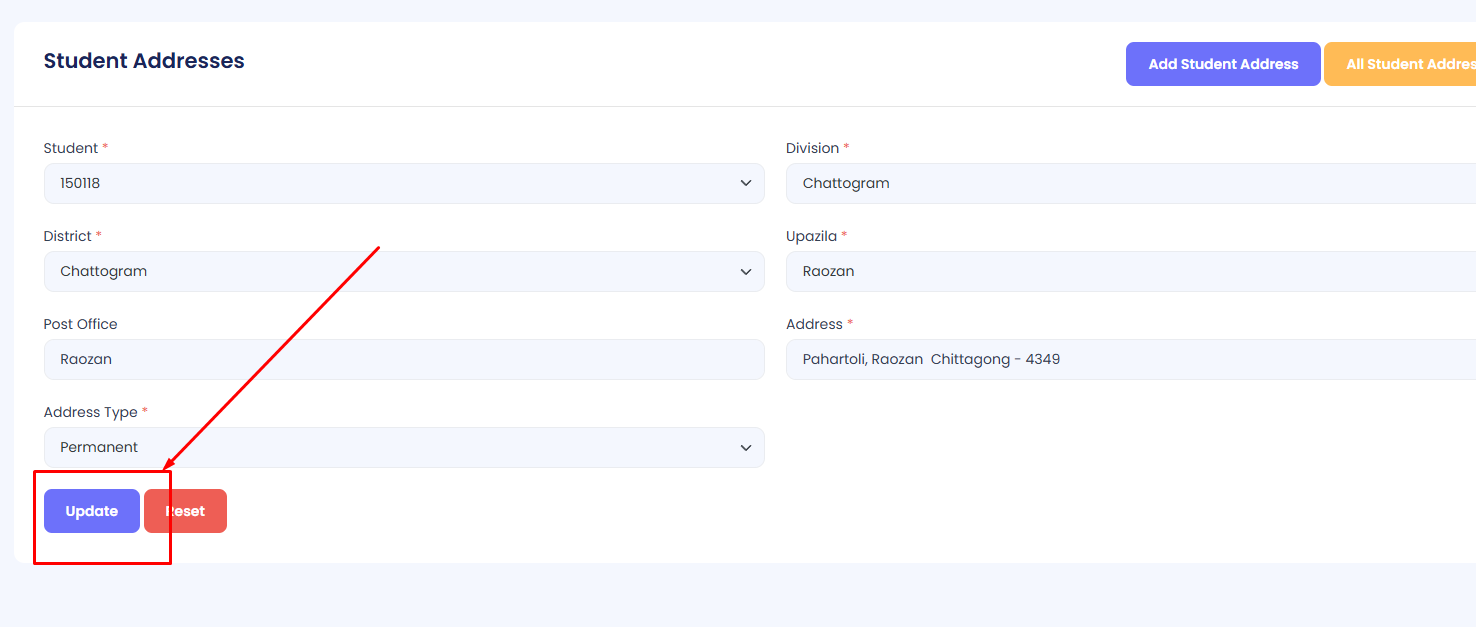
Edit a Student Address
Step 1: Navigate to the Student Addresses section in the admin panel.
Step 2: Locate the target address in the list and click the Edit button under the Actions column.

Step 3: Modify the necessary fields (e.g., Division, District, or Address) and click Update to save the changes.
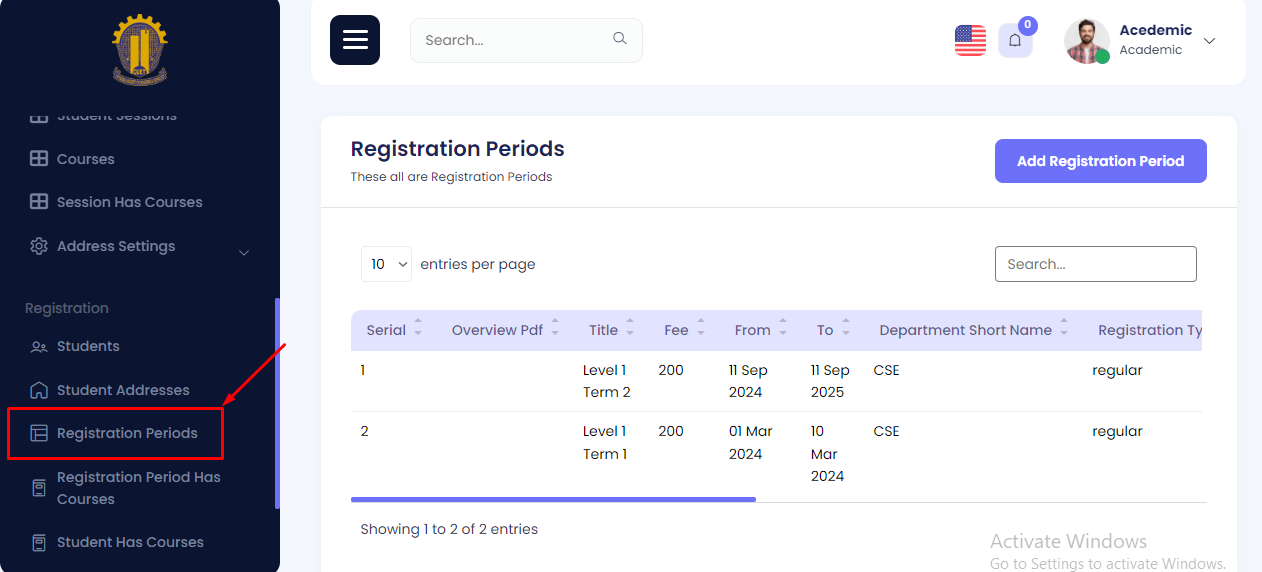
Registration Periods
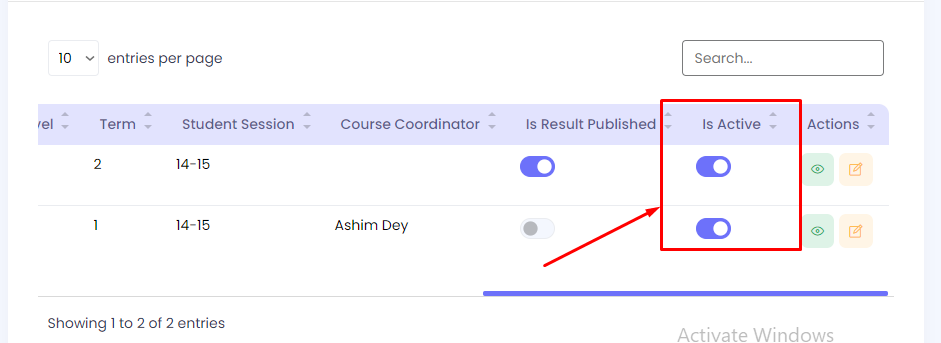
The Registration Periods section manages information about various registration periods, including details like Title, Fee, From, To, Department Short Name, Registration Type, Level, Term, Student Session, Course Coordinator, and status indicators for Is Result Published and Is Active. The table includes columns for Serial, Overview PDF, Title, Fee, From, To, Department Short Name, Registration Type, Level, Term, Student Session, Course Coordinator, Is Result Published, Is Active, and Actions. You can add, edit, or delete registration period records as required.
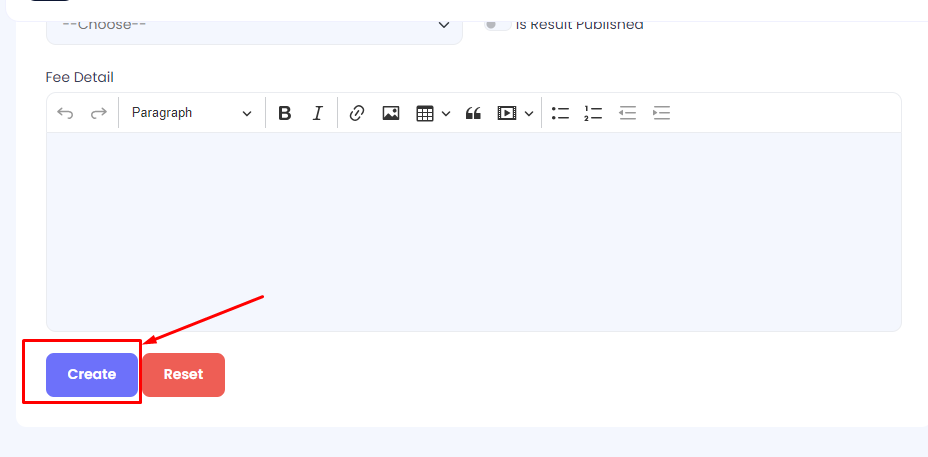
Add a Registration Period
Step 1: Navigate to the Registration Periods section in the admin panel.
Step 2: Click on Add Registration Period.
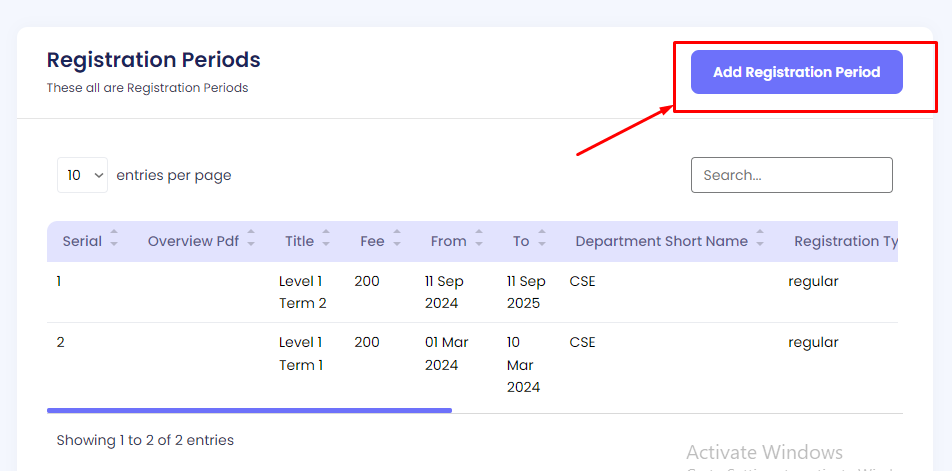
Step 3: Fill in the required details such as Title, Fee, Dates (From & To), Department, Level, Term, etc.
Once all details are filled in, click on the Save button to create the registration period.
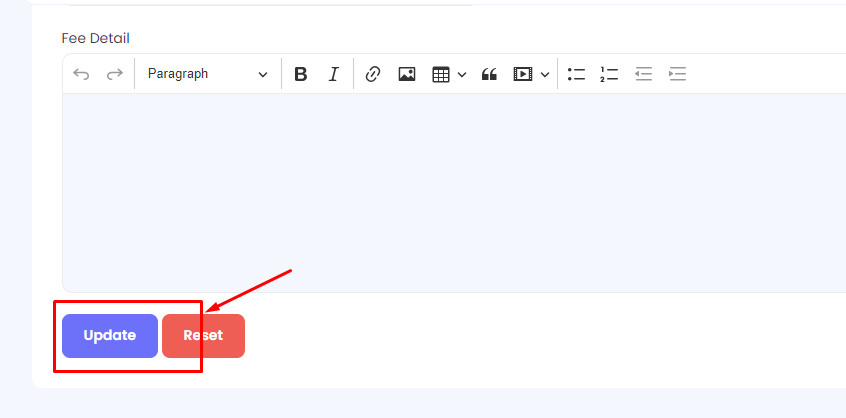
Edit a Registration Period
Step 1: Navigate to the Registration Periods section in the admin panel.
Step 2: Locate the target registration period in the list and click the Edit button under the Actions column.
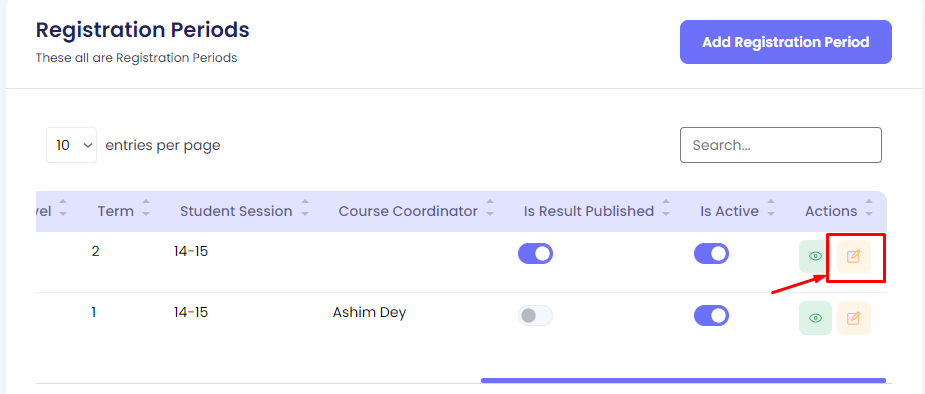
Step 3: Modify the necessary fields (e.g., Title, Fee, or Dates) and click Update to save the changes.
Toggle Button Procedure
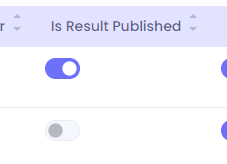
Is Result Published: This toggle button allows you to set whether the registration results are published. Simply click the toggle to change the status between Published and Not Published.
Is Active: This toggle button allows you to activate or deactivate the registration period. Click the toggle to set the status to Active or Inactive.
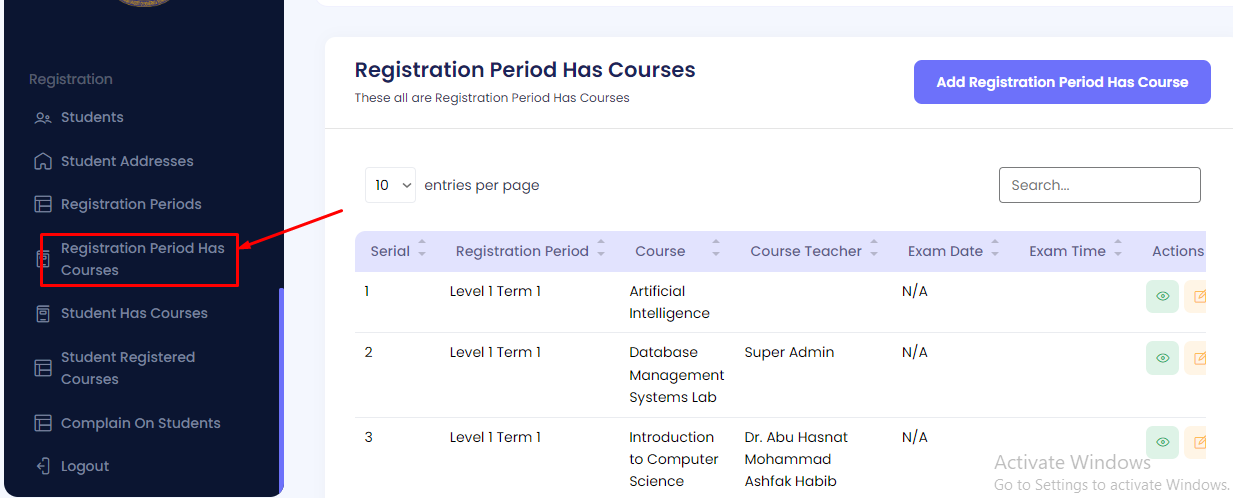
Registration Period Has Courses
The Registration Period Has Courses section allows you to manage courses within specific registration periods. The table includes columns for Serial, Registration Period, Course, Course Teacher, Exam Date, Exam Time, and Actions. You can assign courses to registration periods, modify the course details, and delete records as required.
Add a Course to Registration Period
Step 1: Navigate to the Registration Period Has Courses section in the admin panel.
Step 2: Click on Add Course to Registration Period.
Step 3: Select the desired registration period and assign the corresponding course. You will also need to fill in the course teacher, exam date, and exam time.
- Course: Select the course to be added to the registration period.
- Course Teacher: Assign the instructor for the course.
- Exam Date: Set the date of the exam.
- Exam Time: Specify the time of the exam.
Once all details are filled in, click on the Save button to create the course registration entry.
Edit a Course in Registration Period
Step 1: Navigate to the Registration Period Has Courses section in the admin panel.
Step 2: Locate the target course within the registration period and click the Edit button under the Actions column.
Step 3: Modify the necessary fields (e.g., Course, Course Teacher, Exam Date, or Exam Time) and click Update to save the changes.
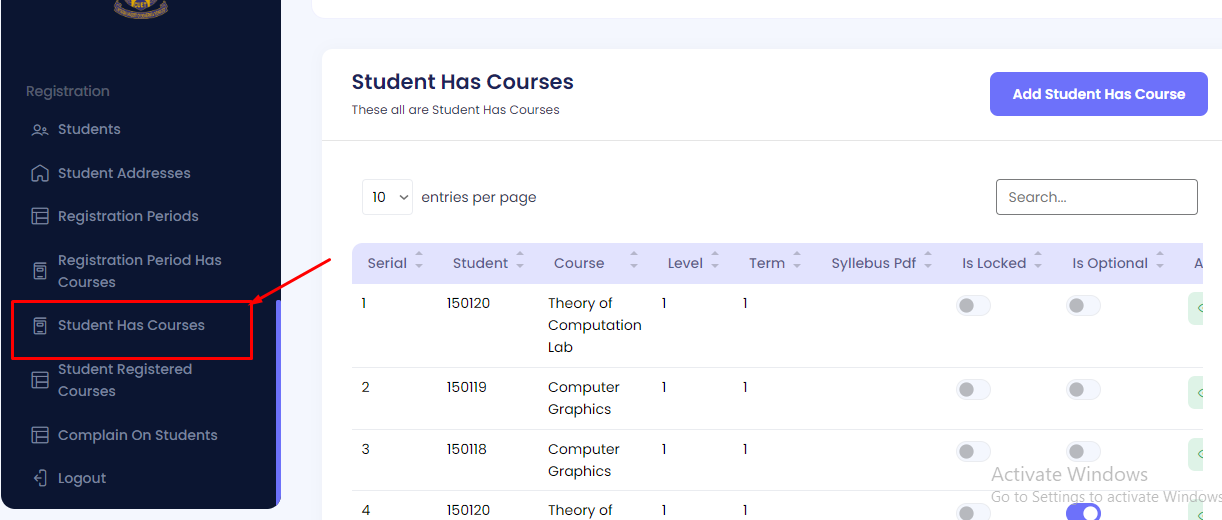
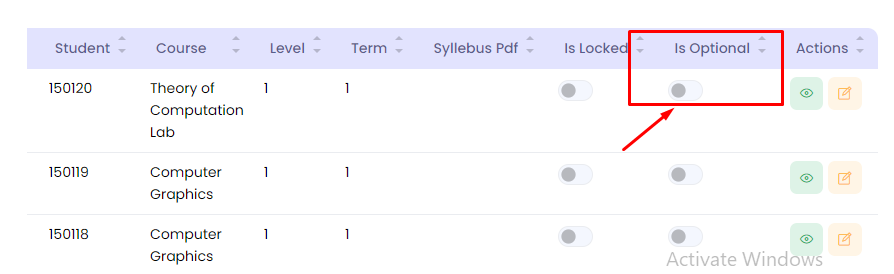
Student Has Courses
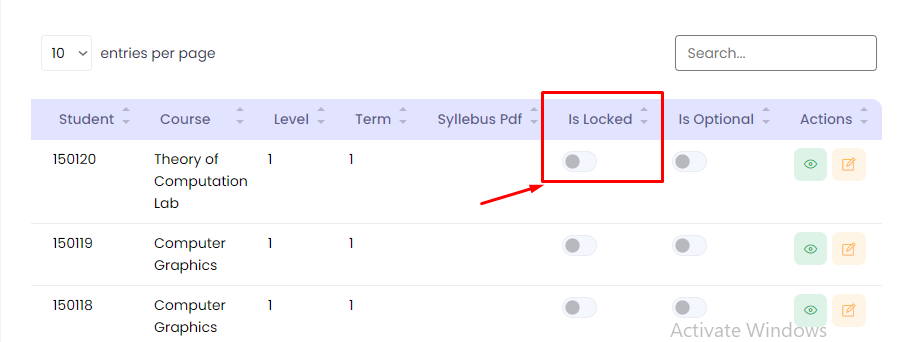
The Student Has Courses section allows you to manage which courses are assigned to students. The table includes columns for Serial, Student, Course, Level, Term, Syllabus PDF, Is Locked, Is Optional, and Actions. You can assign courses to students, modify course details, and delete records as needed. The Is Locked and Is Optional are toggle switches to indicate the status of the course for the student.
Add a Course to Student
Step 1: Navigate to the Student Has Courses section in the admin panel.
Step 2: Click on Add Course to Student.
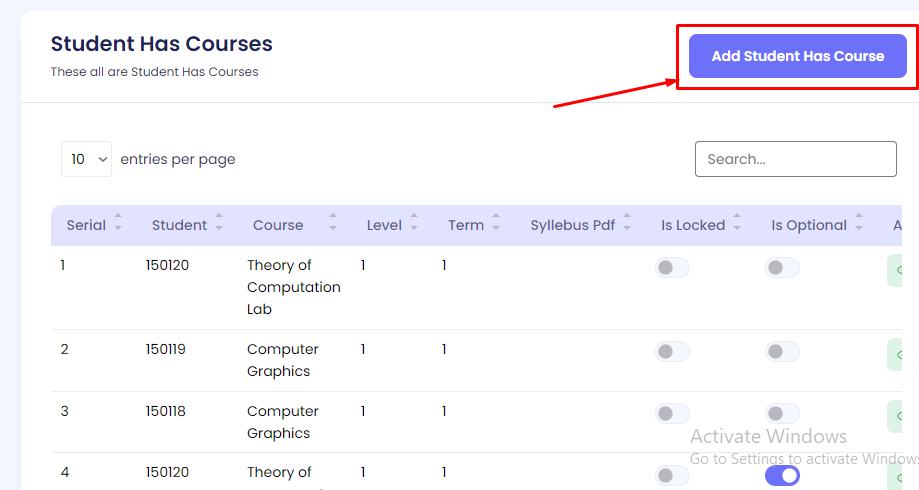
Step 3: Select the student and assign the corresponding course. You will also need to provide the level, term, and syllabus PDF. Additionally, set the status for the toggle switches:
- Is Locked: Use this toggle to lock or unlock the course for the student. Locked courses cannot be modified by the student.
- Is Optional: Use this toggle to set the course as optional for the student. Optional courses are not mandatory.
Once all details are filled in, click on the Save button to assign the course to the student.

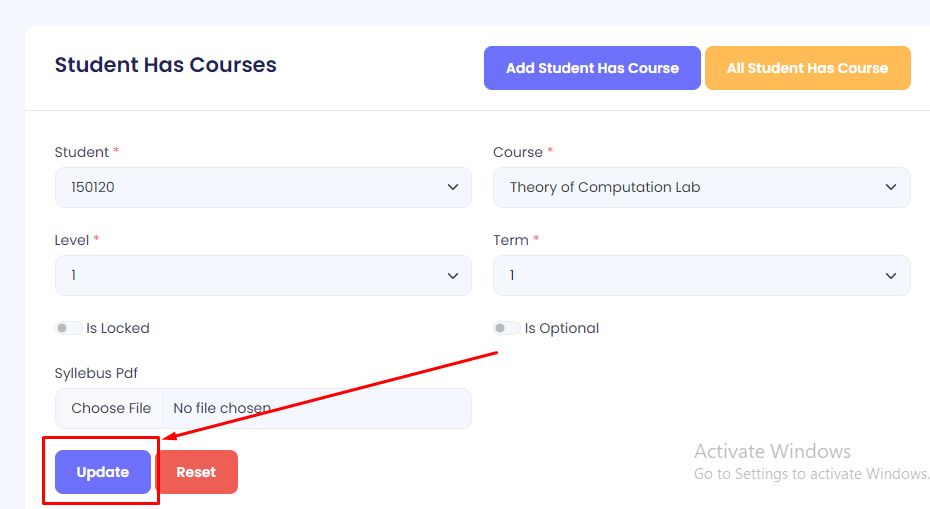
Edit a Course for Student
Step 1: Navigate to the Student Has Courses section in the admin panel.
Step 2: Locate the target course assigned to the student and click the Edit button under the Actions column.
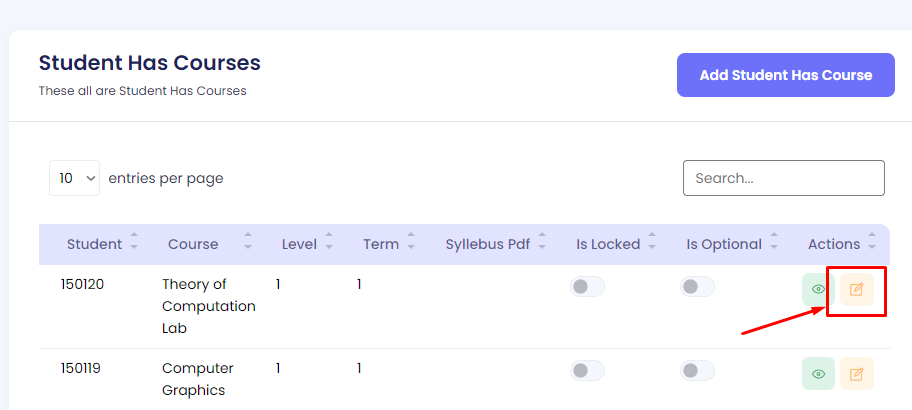
Step 3: Modify the necessary fields (e.g., Course, Level, Term, Syllabus, Is Locked, or Is Optional) and click Update to save the changes.
Toggle Button Procedure
Is Locked: This toggle button allows you to lock or unlock a course for the student. If set to Locked, the student will not be able to modify or access the course freely. If set to Unlocked, the student can modify or access the course content as required.
Is Optional: This toggle button allows you to mark the course as optional or mandatory. If set to Optional, the student may choose whether to take the course. If set to Mandatory, the student is required to complete the course.
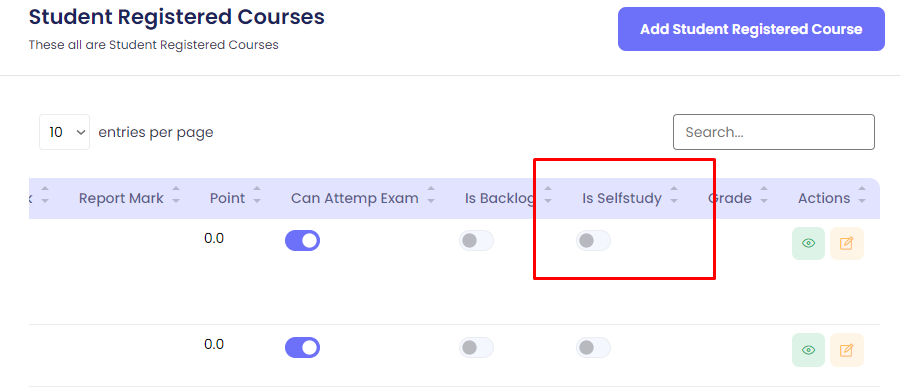
Student Registered Courses
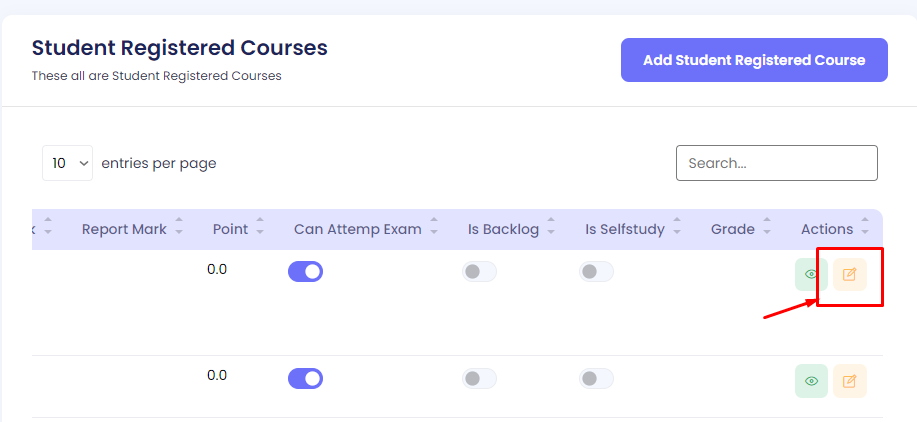
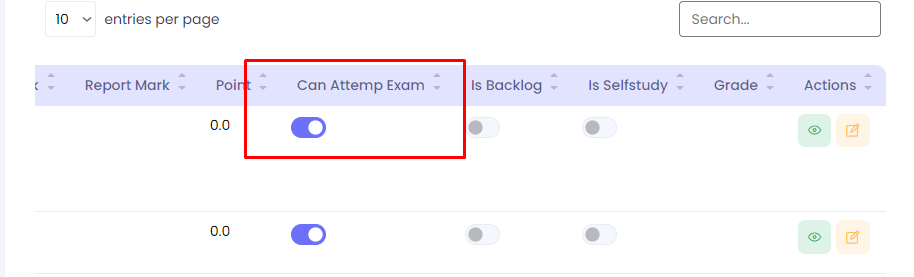
The Student Registered Courses section allows you to manage the courses that students have registered for during a specific registration period. The table includes columns for Serial, Student, Course, Registration Period, Quiz Mark, Viva Mark, Report Mark, Point, Can Attempt Exam, Is Backlog, Is Self-study, Grade, and Actions. You can modify the registration details, assign marks, and change the course status as required.
Register a Course for Student
Step 1: Navigate to the Student Registered Courses section in the admin panel.

Step 2: Click on Register Course for Student.

Step 3: Select the student and assign the corresponding course along with the registration period. You will also need to provide the marks for the quiz, viva, and report, along with the following additional details:
Once all details are filled in, click on the Save button to complete the registration process for the student.

Edit a Registered Course for Student
Step 1: Navigate to the Student Registered Courses section in the admin panel.
Step 2: Locate the target course registration for the student and click the Edit button under the Actions column.
Step 3: Modify the necessary fields (e.g., Course, Marks, Backlog status, Self-study status, Grade) and click Update to save the changes.
Toggle Button Procedure
Can Attempt Exam: This toggle button indicates whether the student is allowed to attempt the exam for the course. If set to Enabled, the student can attempt the exam. If set to Disabled, the student is restricted from attempting the exam.
Is Backlog: This toggle button indicates whether the student has a backlog for the course. If set to Yes, it indicates the student has failed the course and needs to clear it. If set to No, it indicates that the student has passed or is not failing the course.
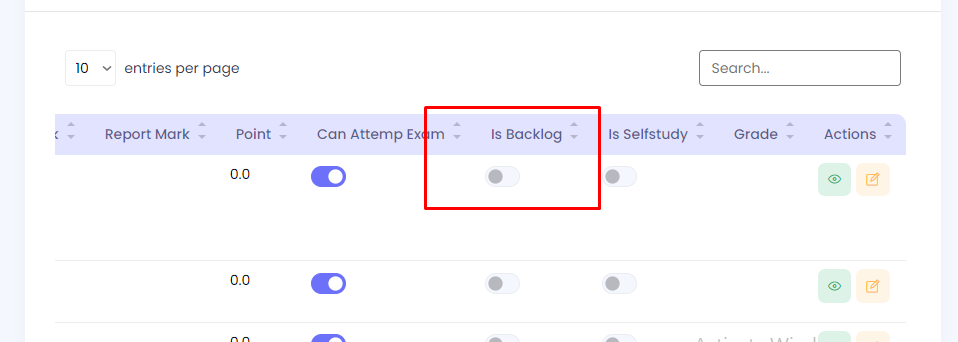
Is Self-study: This toggle button indicates whether the course is a self-study course. If set to Yes, the course is taken independently by the student. If set to No, the course is part of the regular curriculum.
Complain on Students
The Complain on Students section allows you to manage complaints filed against students, track fines, and monitor whether the student can continue registration, take exams, or clear fines.
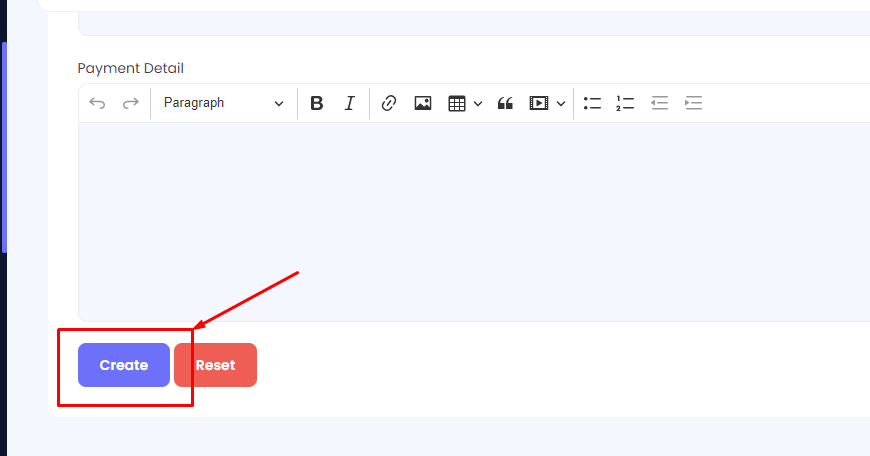
Register a Complaint Against a Student
Step 1: Navigate to the Complain on Students section in the admin panel.
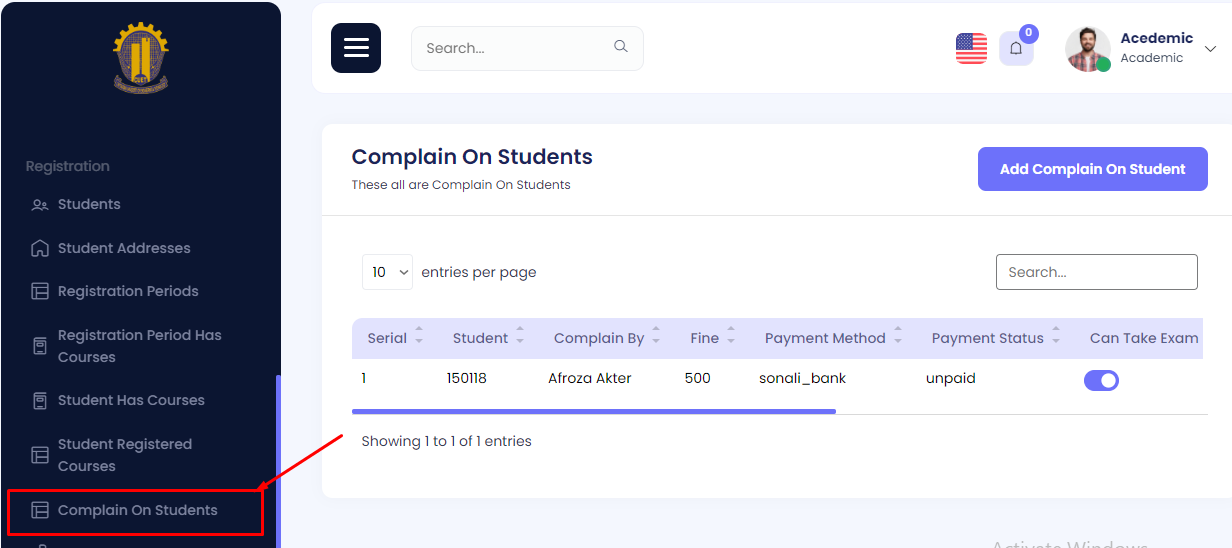
Step 2: Click on Register Complaint.
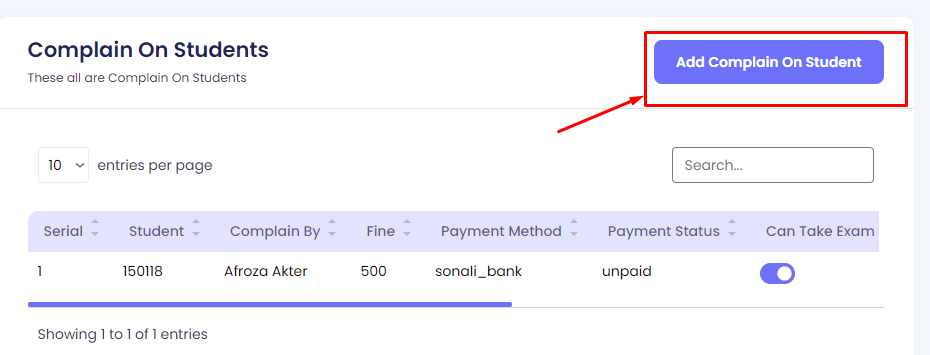
Step 3: Fill in the required complaint details:
- Student: Select the student against whom the complaint is being filed.
- Complain By: Enter the name of the person filing the complaint.
- Fine: Specify the fine imposed on the student.
- Payment Method: Select the payment method used for the fine.
- Payment Status: Indicate the payment status (e.g., Paid, Pending).
- Can Take Exam (toggle button): Set the status of whether the student can take the exam.
- Can Continue Registration (toggle button): Set the status of whether the student can continue registration.
- Can Clear by Fine (toggle button): Set the status of whether the fine can be cleared.
- Is Cleared (toggle button): Set the status of whether the fine has been cleared.
Once all details are filled in, click Save.
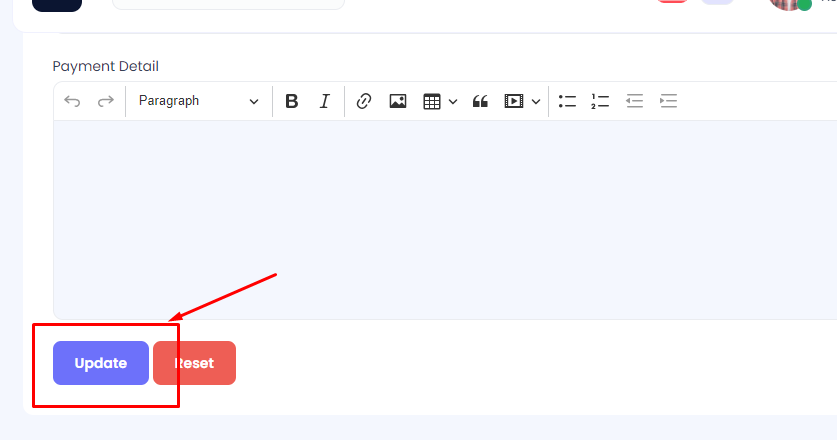
Edit a Complaint Against a Student
Step 1: Navigate to the Complain on Students section in the admin panel.
Step 2: Locate the complaint and click Edit.
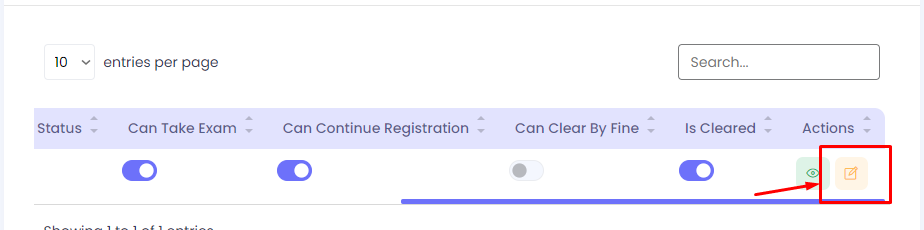
Step 3: Modify the necessary fields and click Update.
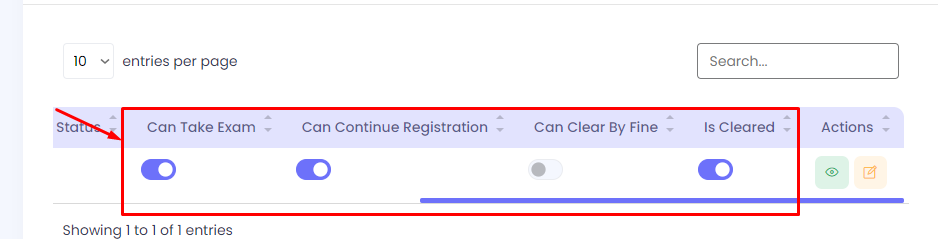
Toggle Button Procedure
Can Take Exam: Toggle to enable or disable the student's ability to take the exam.
Can Continue Registration: Toggle to allow or restrict the student's ability to continue registration.
Can Clear by Fine: Toggle to mark if the fine can be cleared by the student.
Is Cleared: Toggle to mark whether the fine has been cleared or not.
CUET Learning Management System (LMS) - Documentation
- Item Name : CUET Learning Management System (LMS)
- Created: 22 December 2024
- Author : TheTork
- Support Mail: Support Mail
This documentation is designed to assist you with each step of customization. Please read it carefully to understand how this module is structured and how to edit it effectively.
System Requirements
To use CUET, make sure your hosting provider is running the following software:
- Backend: Laravel 10
- Frontend: Next.js 14
- Server: Apache, nginx, or another compatible web server
- Database: MySQL Database server
- PHP Version: PHP 8 or higher
- Node.js Version: Node.js 18 or higher
- Memory: Minimum 4GB RAM (8GB recommended)
- Storage: Minimum 20GB disk space
Required PHP Extensions
- PDO PHP extension
- OpenSSL PHP extension
- mbstring PHP extension
- exif PHP extension
- fileinfo PHP extension
- xml PHP extension
- Ctype PHP extension
- JSON PHP extension
- Tokenizer PHP extension
- cURL PHP extension
- zip PHP extension
- iconv PHP extension
- Ensure the
mod_rewriteApache module is enabled
Recommended PHP Limits
Many issues that you may run into such as: white screen, demo content fails when importing, empty page content and other similar issues are all related to low PHP configuration limits. The solution is to increase the PHP limits. You can do this on your own, or contact your web host and ask them to increase those limits to a minimum as follows:
max_execution_time 300memory_limit 256Mpost_max_size 64Mupload_max_filesize 32Mmax_input_time = 60max_input_vars = 3000
On this project, we're using the Laravel 10.x. Please go to Laravel documentation page for more information. Also consider upgrading your PHP version to the latest stable.
Installation Process
Laravel 10 Installation
- Ensure you have Composer installed. If not, download it from Composer's official website.
- Run the following command to create a new Laravel project:
composer create-project laravel/laravel project-name - Navigate to the project directory:
cd project-name - Set the application key:
php artisan key:generate - Configure your environment variables in the
.envfile for database and other settings. - Run the Laravel development server:
php artisan serve - Access the application at http://localhost:8000.
Next.js 14 Installation
- Ensure you have Node.js installed. Download it from Node.js official website.
- Run the following command to create a new Next.js project:
npx create-next-app@latest project-name - Navigate to the project directory:
cd project-name - Start the development server:
npm run dev - Access the application at http://localhost:3000.
Additional Notes
CUET Research and Extension - Documentation
- Item Name : CUET Research and Extension
- Created: 22 December 2024
- Author : TheTork
- Support Mail: Support Mail
This documentation is designed to assist you with each step of customization. Please read it carefully to understand how this module is structured and how to edit it effectively.
System Requirements
To use CUET, make sure your hosting provider is running the following software:
- Backend: Laravel 10
- Frontend: Next.js 14
- Server: Apache, nginx, or another compatible web server
- Database: MySQL Database server
- PHP Version: PHP 8 or higher
- Node.js Version: Node.js 18 or higher
- Memory: Minimum 4GB RAM (8GB recommended)
- Storage: Minimum 20GB disk space
Required PHP Extensions
- PDO PHP extension
- OpenSSL PHP extension
- mbstring PHP extension
- exif PHP extension
- fileinfo PHP extension
- xml PHP extension
- Ctype PHP extension
- JSON PHP extension
- Tokenizer PHP extension
- cURL PHP extension
- zip PHP extension
- iconv PHP extension
- Ensure the
mod_rewriteApache module is enabled
Recommended PHP Limits
Many issues that you may run into such as: white screen, demo content fails when importing, empty page content and other similar issues are all related to low PHP configuration limits. The solution is to increase the PHP limits. You can do this on your own, or contact your web host and ask them to increase those limits to a minimum as follows:
max_execution_time 300memory_limit 256Mpost_max_size 64Mupload_max_filesize 32Mmax_input_time = 60max_input_vars = 3000
On this project, we're using the Laravel 10.x. Please go to Laravel documentation page for more information. Also consider upgrading your PHP version to the latest stable.
Installation Process
Laravel 10 Installation
- Ensure you have Composer installed. If not, download it from Composer's official website.
- Run the following command to create a new Laravel project:
composer create-project laravel/laravel project-name - Navigate to the project directory:
cd project-name - Set the application key:
php artisan key:generate - Configure your environment variables in the
.envfile for database and other settings. - Run the Laravel development server:
php artisan serve - Access the application at http://localhost:8000.
Next.js 14 Installation
- Ensure you have Node.js installed. Download it from Node.js official website.
- Run the following command to create a new Next.js project:
npx create-next-app@latest project-name - Navigate to the project directory:
cd project-name - Start the development server:
npm run dev - Access the application at http://localhost:3000.
Additional Notes
Head of the Department - Documentation
- Item Name : Head of the Department
- Created: 22 December 2024
- Author : TheTork
- Support Mail: Support Mail
This documentation is designed to assist you with each step of customization. Please read it carefully to understand how this module is structured and how to edit it effectively.
System Requirements
To use CUET, make sure your hosting provider is running the following software:
- Backend: Laravel 10
- Frontend: Next.js 14
- Server: Apache, nginx, or another compatible web server
- Database: MySQL Database server
- PHP Version: PHP 8 or higher
- Node.js Version: Node.js 18 or higher
- Memory: Minimum 4GB RAM (8GB recommended)
- Storage: Minimum 20GB disk space
Required PHP Extensions
- PDO PHP extension
- OpenSSL PHP extension
- mbstring PHP extension
- exif PHP extension
- fileinfo PHP extension
- xml PHP extension
- Ctype PHP extension
- JSON PHP extension
- Tokenizer PHP extension
- cURL PHP extension
- zip PHP extension
- iconv PHP extension
- Ensure the
mod_rewriteApache module is enabled
Recommended PHP Limits
Many issues that you may run into such as: white screen, demo content fails when importing, empty page content and other similar issues are all related to low PHP configuration limits. The solution is to increase the PHP limits. You can do this on your own, or contact your web host and ask them to increase those limits to a minimum as follows:
max_execution_time 300memory_limit 256Mpost_max_size 64Mupload_max_filesize 32Mmax_input_time = 60max_input_vars = 3000
On this project, we're using the Laravel 10.x. Please go to Laravel documentation page for more information. Also consider upgrading your PHP version to the latest stable.
Installation Process
Laravel 10 Installation
- Ensure you have Composer installed. If not, download it from Composer's official website.
- Run the following command to create a new Laravel project:
composer create-project laravel/laravel project-name - Navigate to the project directory:
cd project-name - Set the application key:
php artisan key:generate - Configure your environment variables in the
.envfile for database and other settings. - Run the Laravel development server:
php artisan serve - Access the application at http://localhost:8000.
Additional Notes
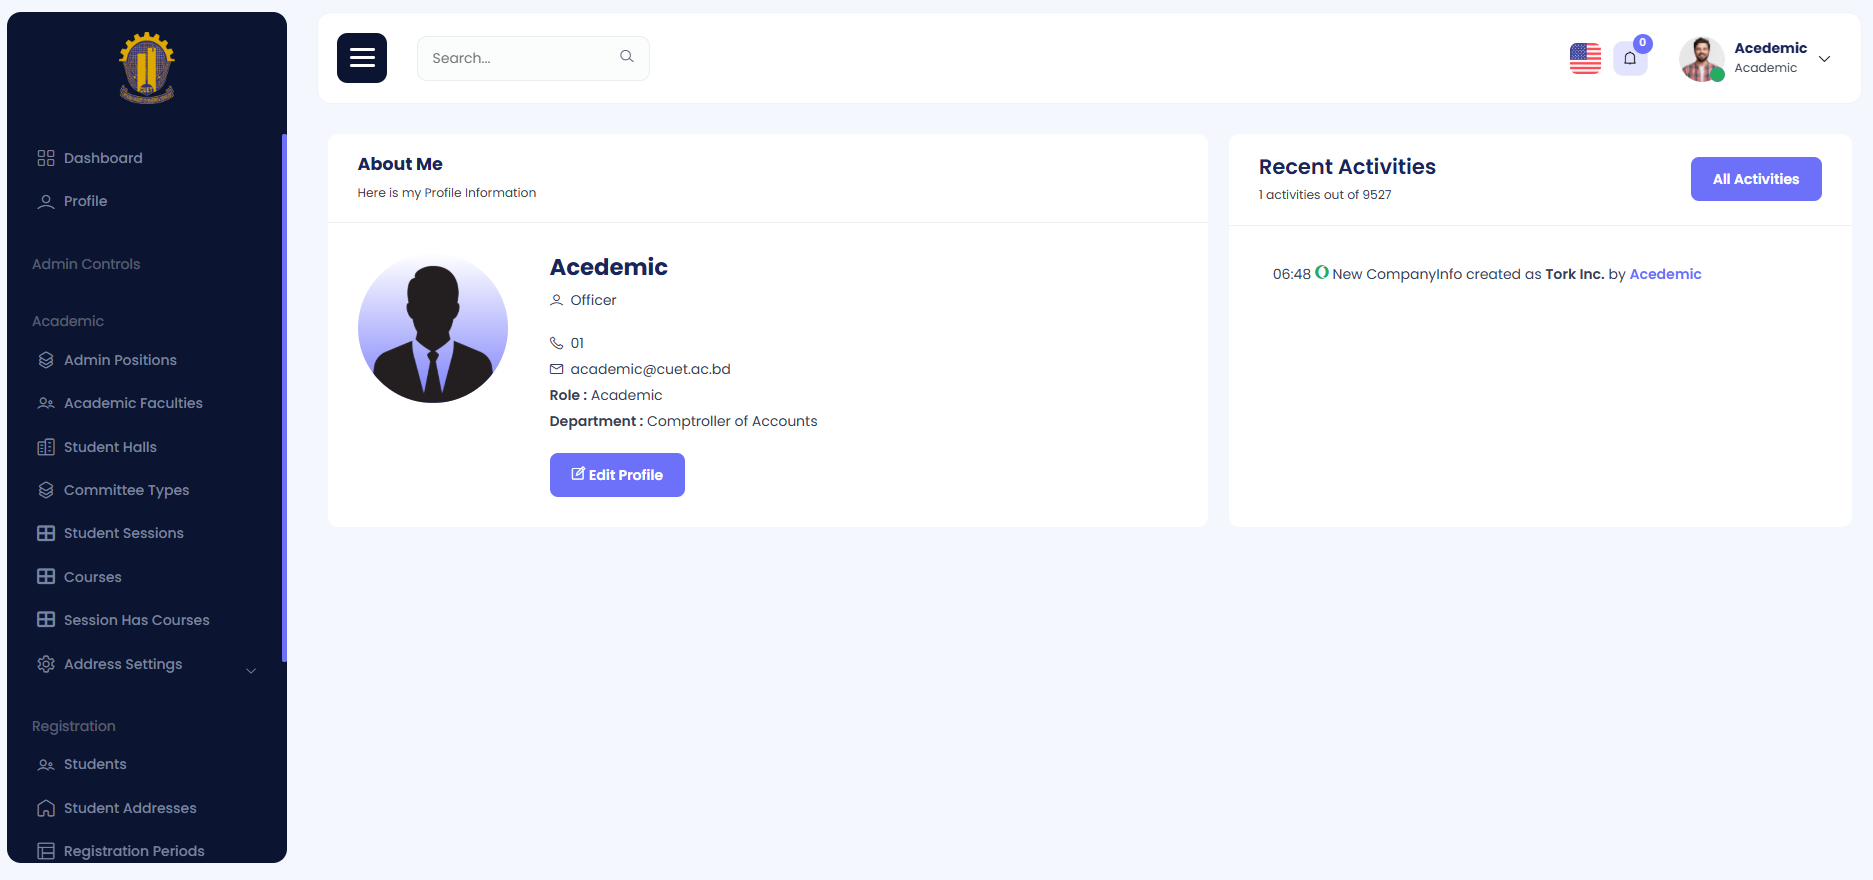
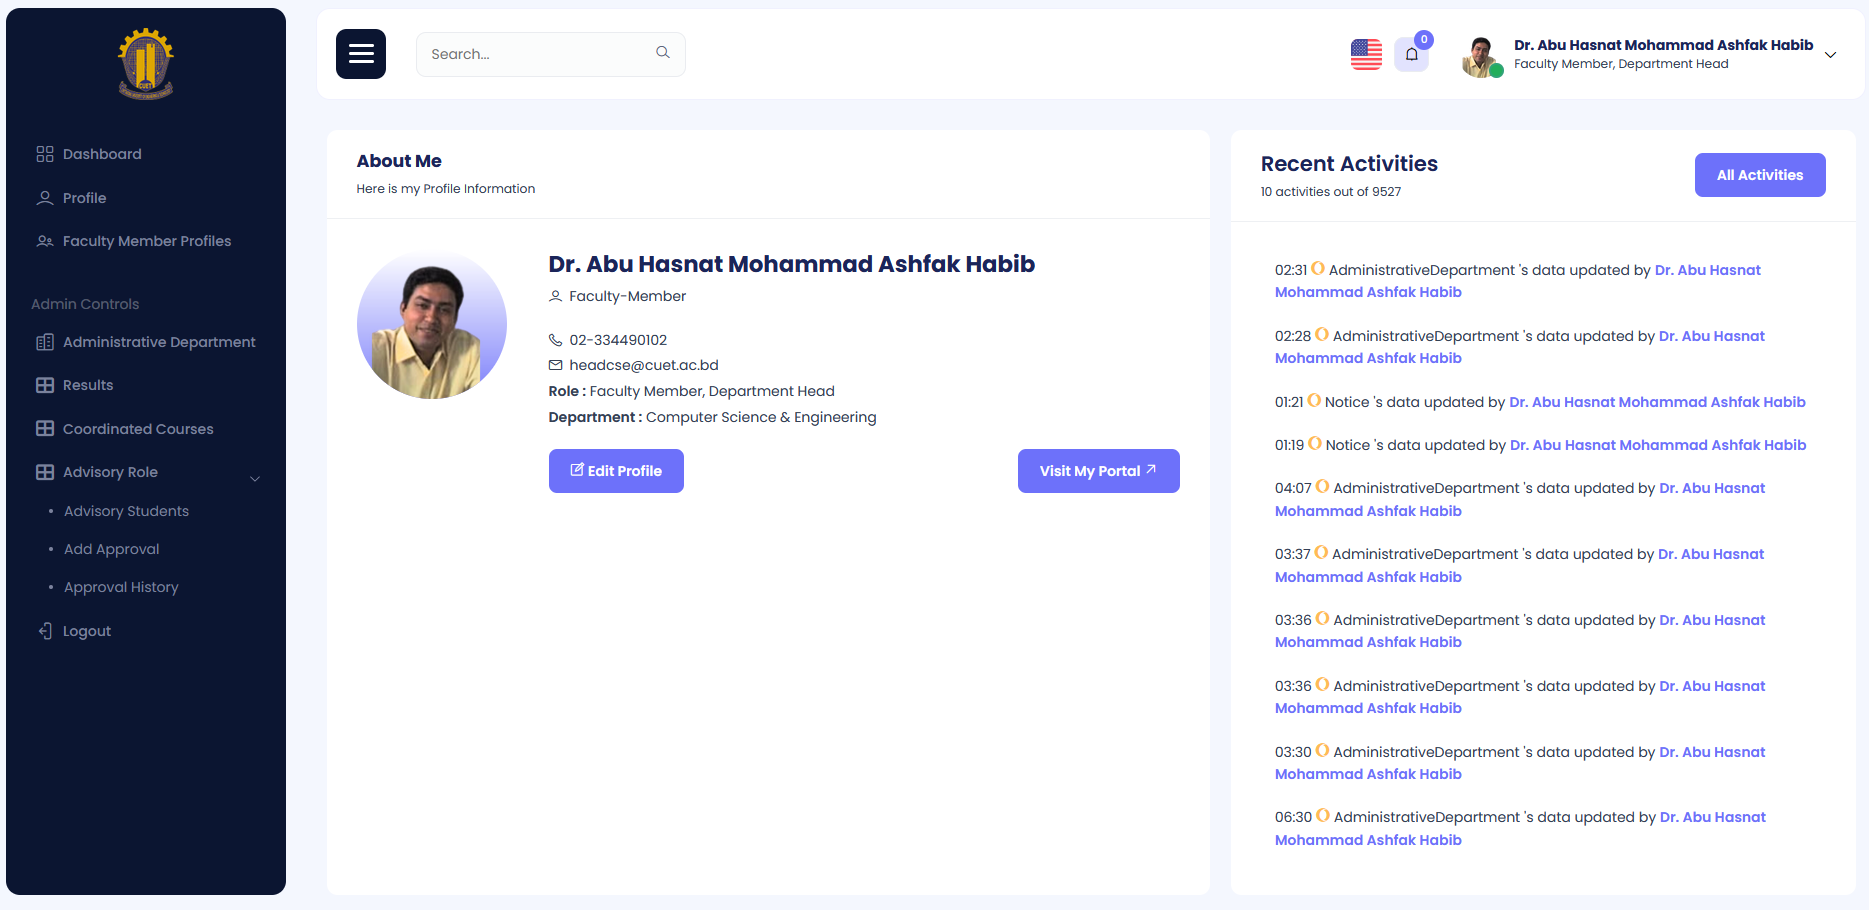
Profile
In this section you can update your profile
Step 1: Navigate to Profile in your admin sidebar and click.
Step 2: Change the name, email or phone number, etc. Then hit submit button.
Update Profile
Faculty members, officers and others can easily update their profile information by following a simple process. After logging in, clicking on the profile button will open a form where you can update your details, including Name, Email, Phone Number, New Password, and Confirm Password.
Steps to Update Profile
Step 1: Click on the Profile button located at the top-right corner of the dashboard.
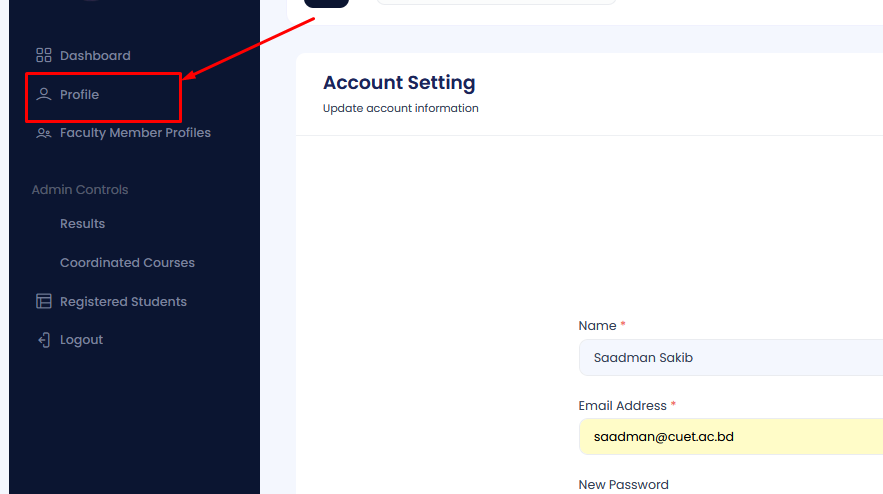
Step 2: A form will appear containing the following fields:
- Name: Your current name will be pre-filled. Edit it if needed.
- Email: Your registered email address will be shown. Update it if necessary.
- Phone Number: Your contact number will be pre-filled. Modify it as required.
- New Password: Enter a new password if you wish to change it.
- Confirm Password: Re-enter the new password to confirm.
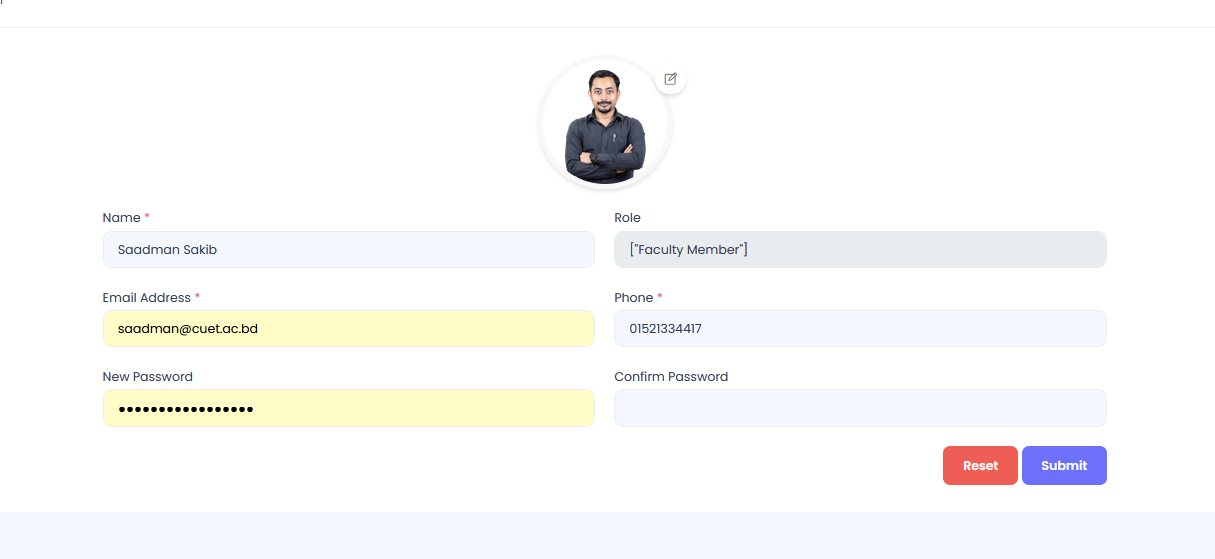
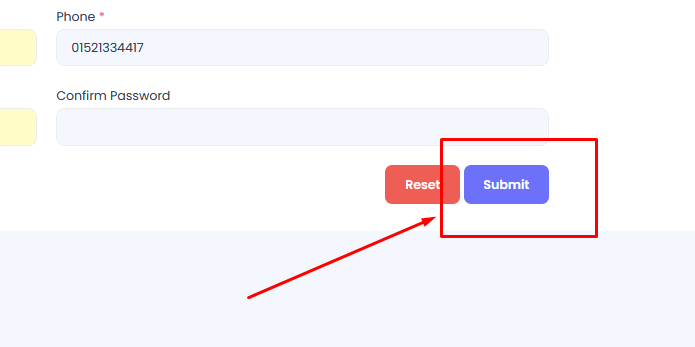
Step 3: Once all changes are made, click on the Submit button to save the updates.
Upon successful submission, your profile will be updated, and any changes to your email or password will take immediate effect. If required, a confirmation email may be sent to verify the updated email address.
Faculty Member Profile Creation
The Faculty Member Profile section allows faculty members to create and update their profiles with detailed information. Follow the steps below to access and manage your profile details.
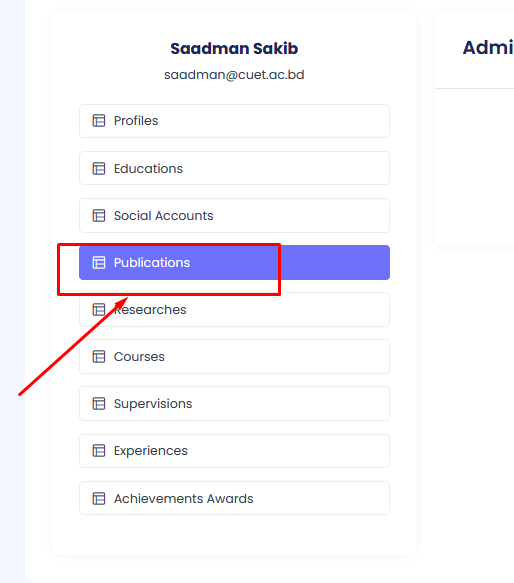
In the Faculty Member Profile menu there are several sub menus. Those are
- Profiles
- Educations
- Social Accounts
- Publications
- Researches
- Courses
- Supervisions
- Experiences
- Achievements Awards
Accessing the Profile Menu
Step 1: Navigate to the Faculty Member Profiles section in the main menu.
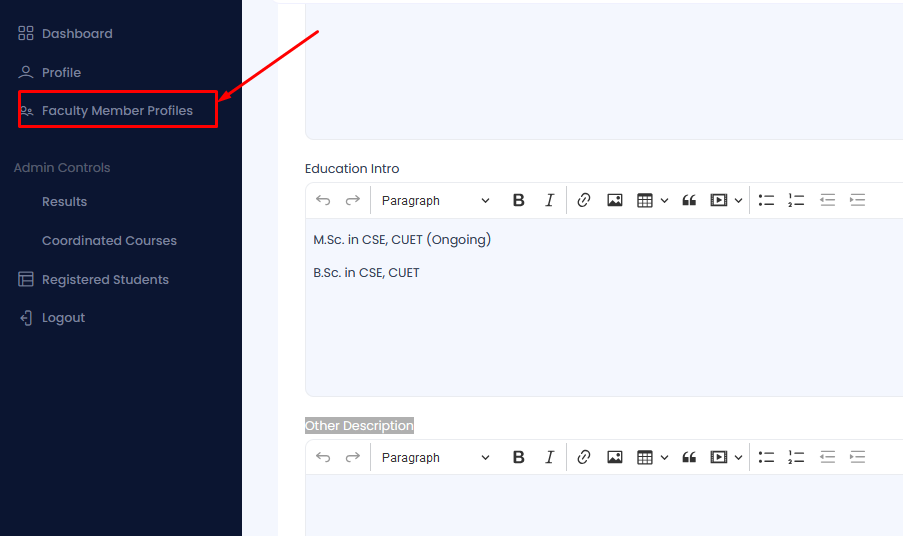
Step 2: From the submenu on the right, click on the first menu item labeled Profile.
Step 3: Click on Edit button positioned on the top right of the page.

Updating Profile Details
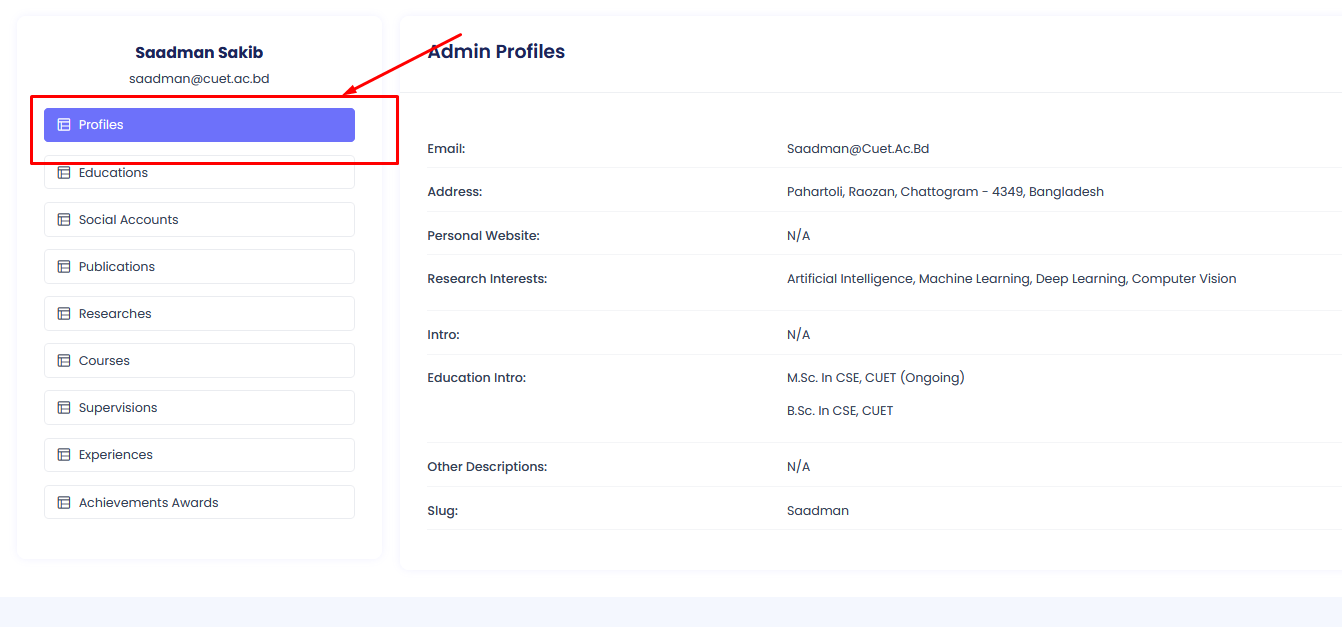
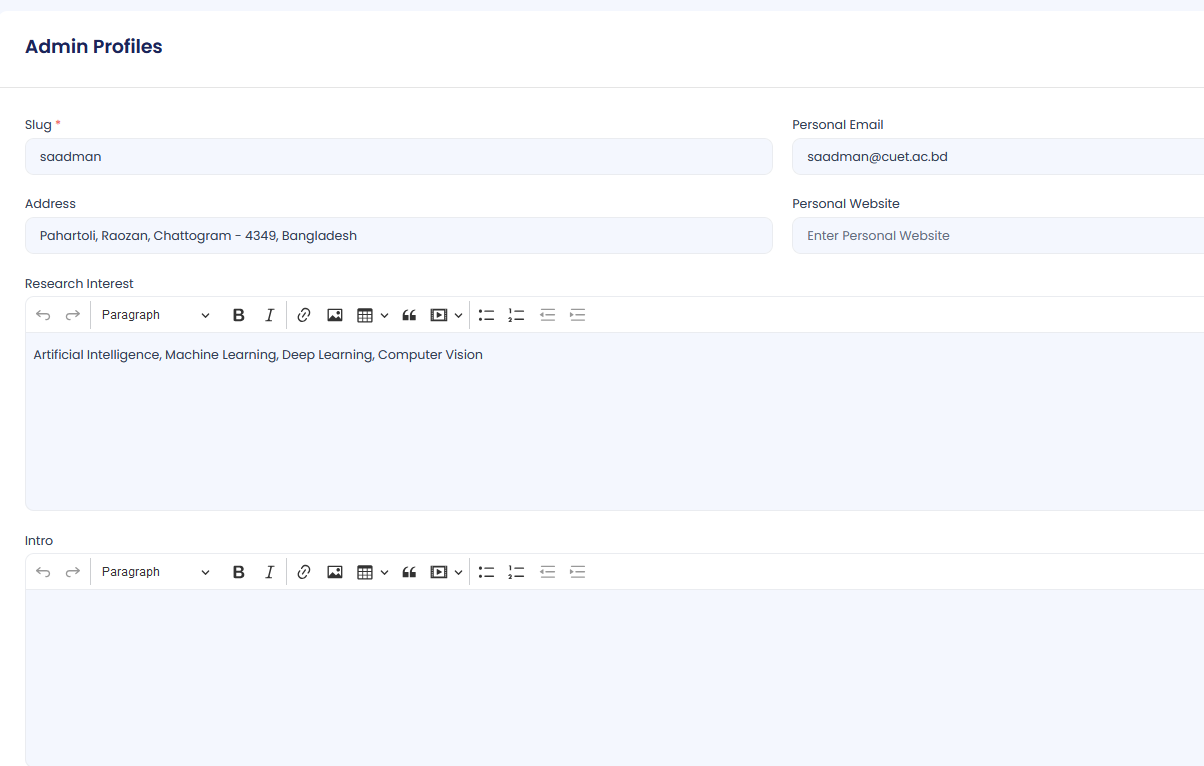
In the profile form, you can update the following fields:
- Slug: A unique identifier for your profile. Ensure it is descriptive and unique.
- Email: Update your email address as required. This will be your contact email.
- Address: Add or update your physical address.
- Personal Website: Provide a link to your personal or professional website, if available.
- Introduction: Write a brief introduction about yourself, including your background and achievements.
- Research Interest: Specify your areas of research interest to showcase your expertise.
- Education Introduction: Add a summary of your educational background.
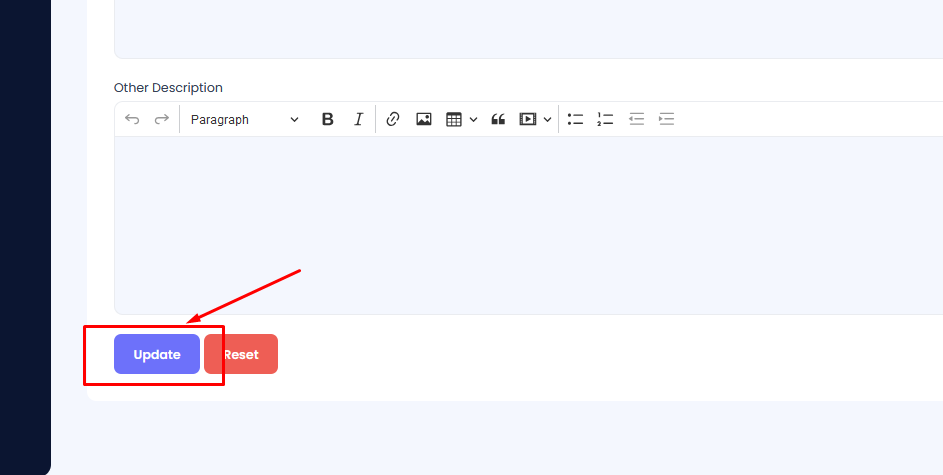
- Other Description: Include any additional details or descriptions that you want to share.
After updating all necessary fields, click the Update button to save your profile details. The changes will be reflected immediately and visible to others based on the system's access permissions.
Education Profile Creation
The Education Profile section allows you to create, update, and delete your education details. Follow the steps below to manage your education information within your Faculty Member Profile.
Accessing the Faculty Member Profile Menu
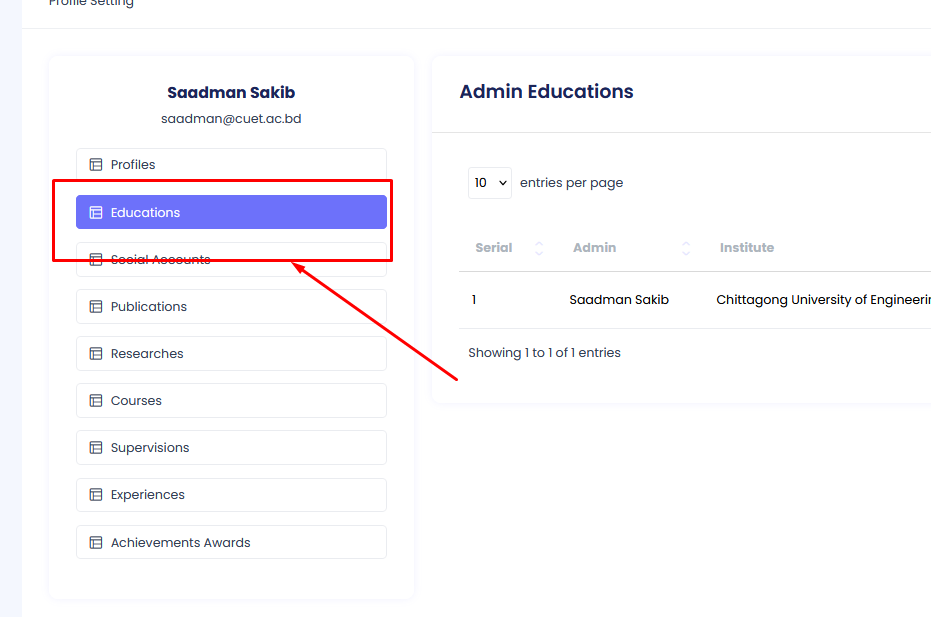
Step 1: Navigate to the Faculty Member Profiles section in the main menu.
Accessing the Education Submenu
Step 3: Once in the Faculty Member Profile section, you will find a submenu on the left side. Click on the menu item labeled Education.
Creating Education Details
In the education form, you can add the following details:
First you have to hit the add new button
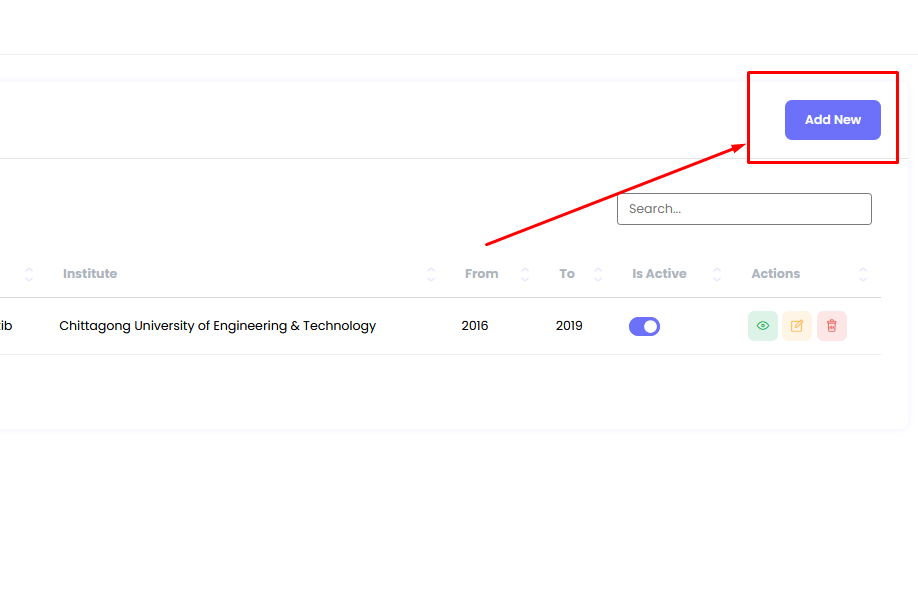
- Institute: Enter the name of the educational institution you attended.
- From: Specify the start date of your education at this institution.
- To: Specify the end date of your education at this institution.
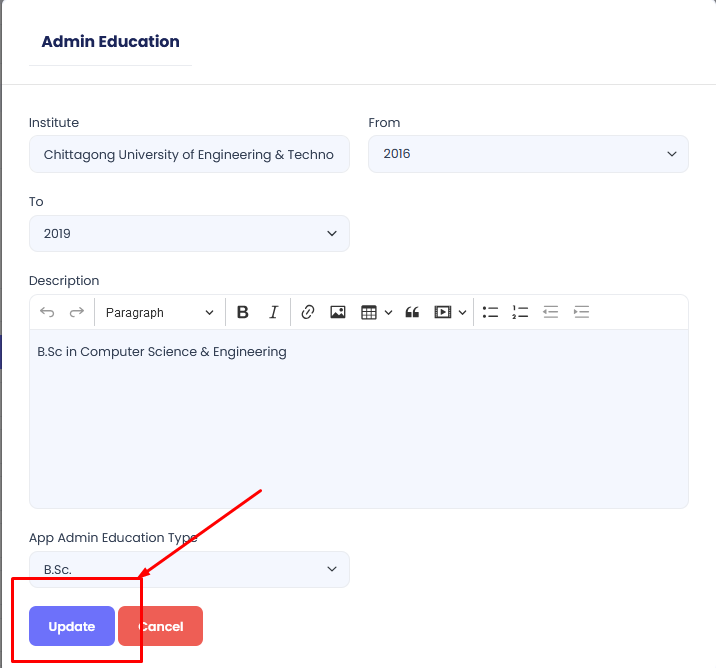
- Description: Provide a brief description of your studies, key subjects, or achievements during your time at the institution.
- Education Type: Choose the type of education (e.g., Bachelor's, Master's, Ph.D., etc.) you pursued at the institute.
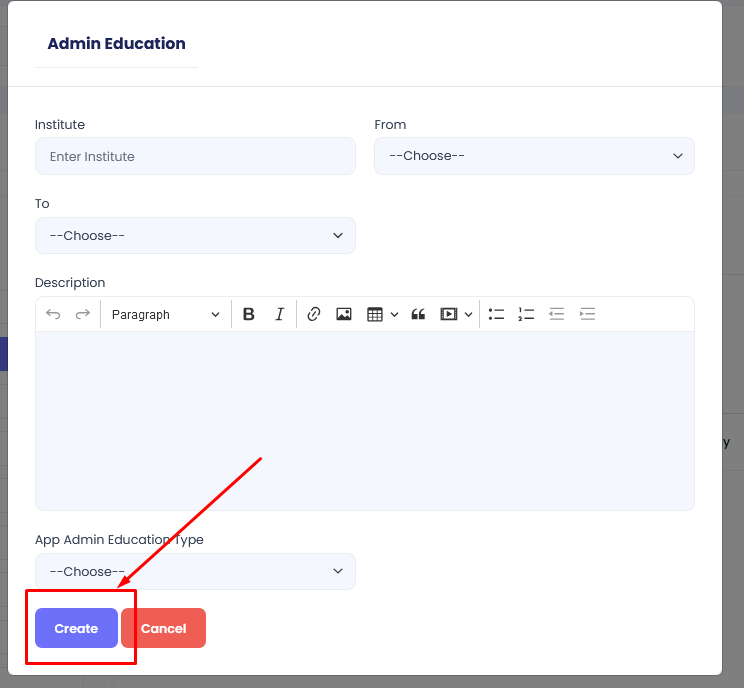
Once you've filled in all required fields, click the Submit button to save your education details. The information will be stored and displayed on your profile as per the system's access permissions.
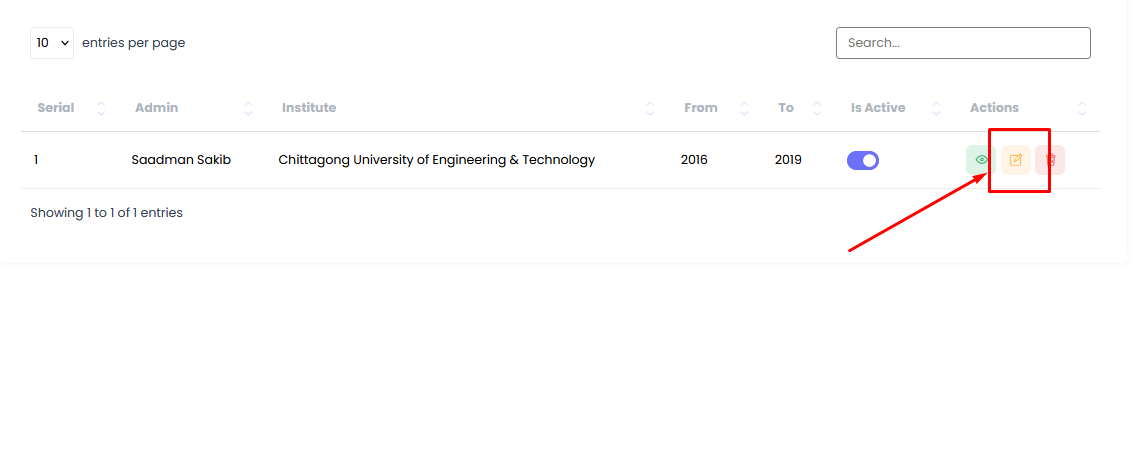
Editing Education Details
If you need to make changes to your education details:
- Step 1: Navigate to the Education Profile section as mentioned above.
- Step 2: Click on the Edit button next to the education entry you want to update.
- Step 3: Modify the relevant fields and click the Save Changes button to update your education details.
Deleting Education Details
If you want to remove an education entry from your profile:
- Step 1: Navigate to the Education Profile section as mentioned above.
- Step 2: Click on the Delete button next to the education entry you want to remove.
- Step 3: Confirm the deletion by clicking the Yes, Delete button in the confirmation prompt.
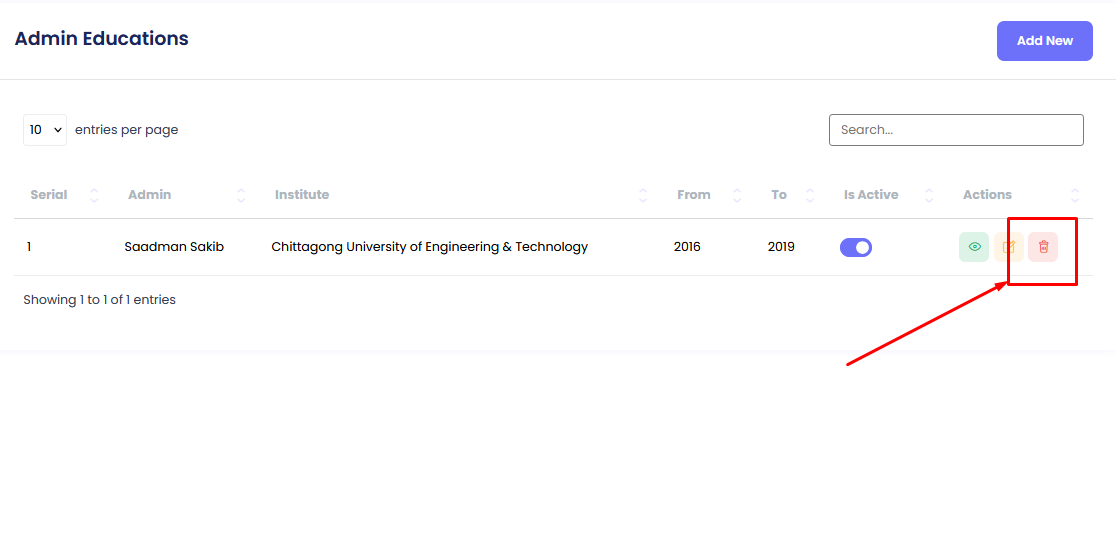
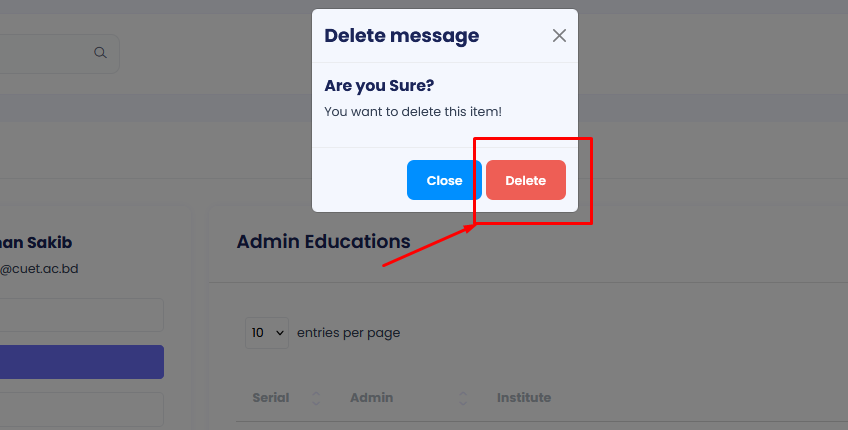
After deleting an education entry, it will no longer be visible on your profile.
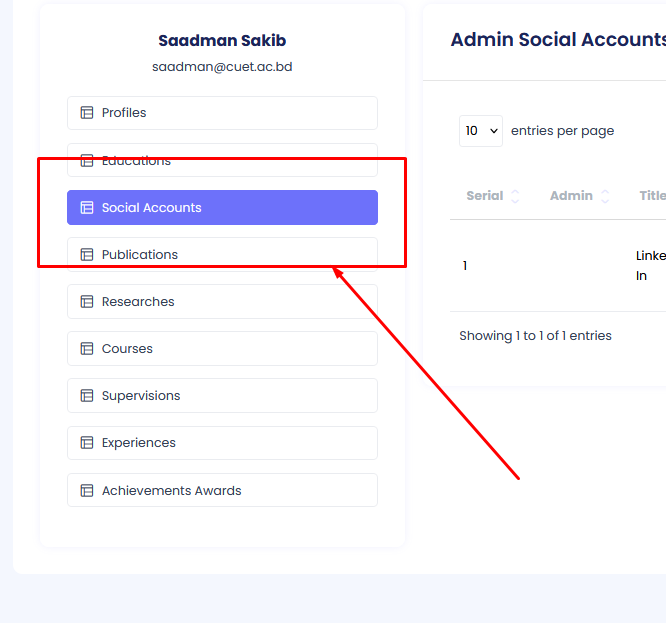
Social Account Profile Creation
The Social Account Profile section allows you to create, update, and delete your social media account details. Follow the steps below to manage your social account information within your Faculty Member Profile.
Accessing the Faculty Member Profile Menu
Step 1: Navigate to the Faculty Member Profiles section in the main menu.
Accessing the Social Accounts Submenu
Step 2: Once in the Faculty Member Profile section, you will find a submenu on the left side. Click on the menu item labeled Social Accounts.
Creating Social Account Details
First you have to hit the add new button
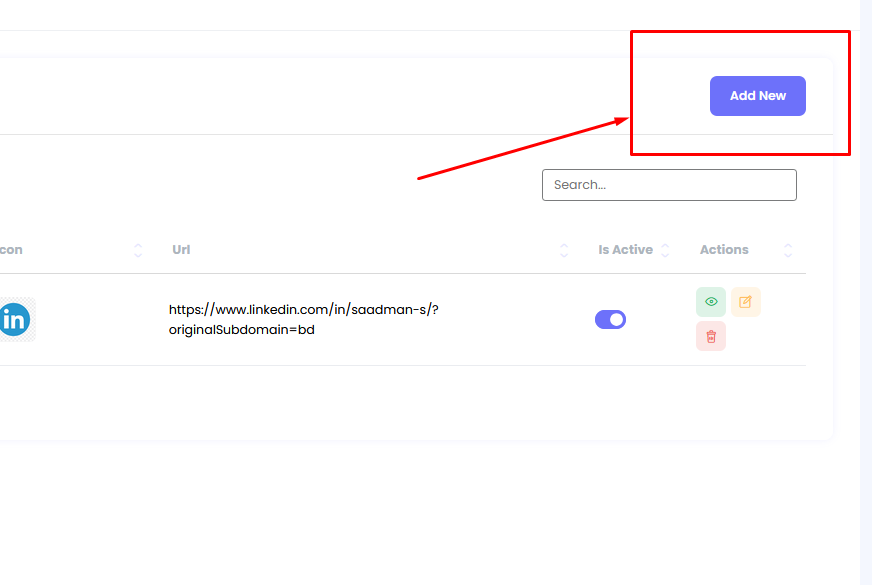
In the social account form, you can add the following details:
- Title: Enter the name of the social media platform (e.g., Twitter, LinkedIn, Facebook).
- URL: Provide the URL to your social media profile.
- Icon: Choose an icon to represent the social media platform (this could be an image or icon URL).
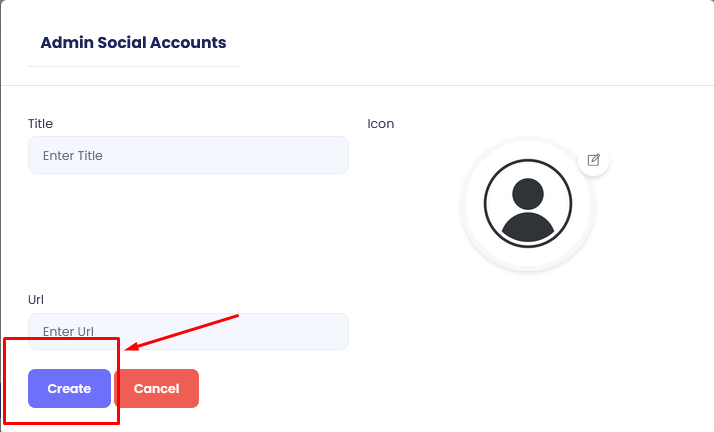
Once you've filled in all required fields, click the Create button to save your social account details. The information will be stored and displayed on your profile as per the system's access permissions.
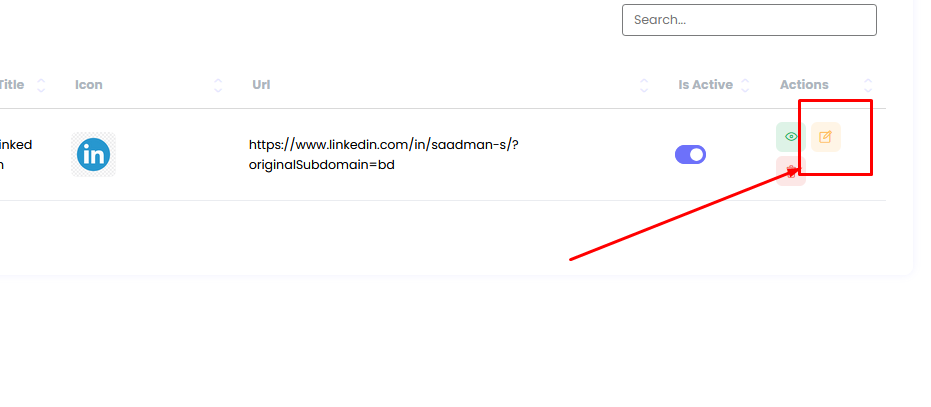
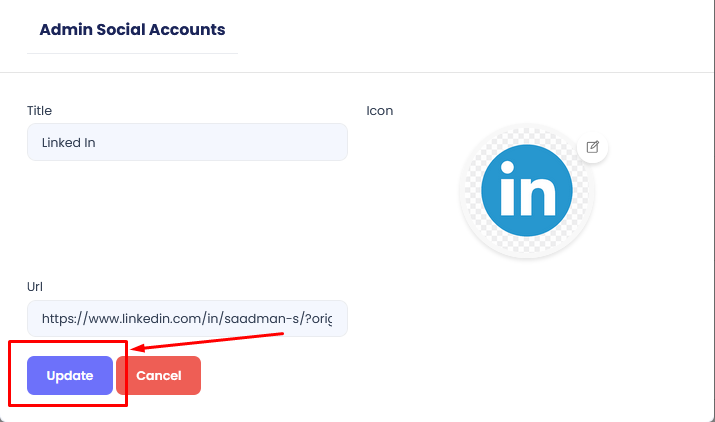
Editing Social Account Details
If you need to make changes to your social account details:
- Step 1: Navigate to the Social Accounts Profile section as mentioned above.
- Step 2: Click on the Edit button next to the social account you want to update.
- Step 3: Modify the relevant fields (e.g., title, URL, or icon) and click the Save Changes button to update your social account details.
Deleting Social Account Details
If you want to remove a social account entry from your profile:
- Step 1: Navigate to the Social Accounts Profile section as mentioned above.
- Step 2: Click on the Delete button next to the social account you want to remove.
- Step 3: Confirm the deletion by clicking the Yes, Delete button in the confirmation prompt.
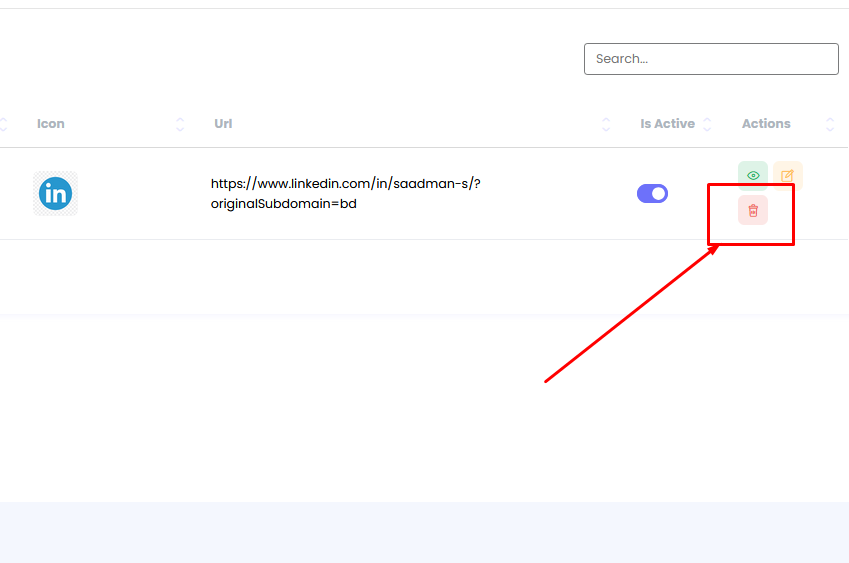
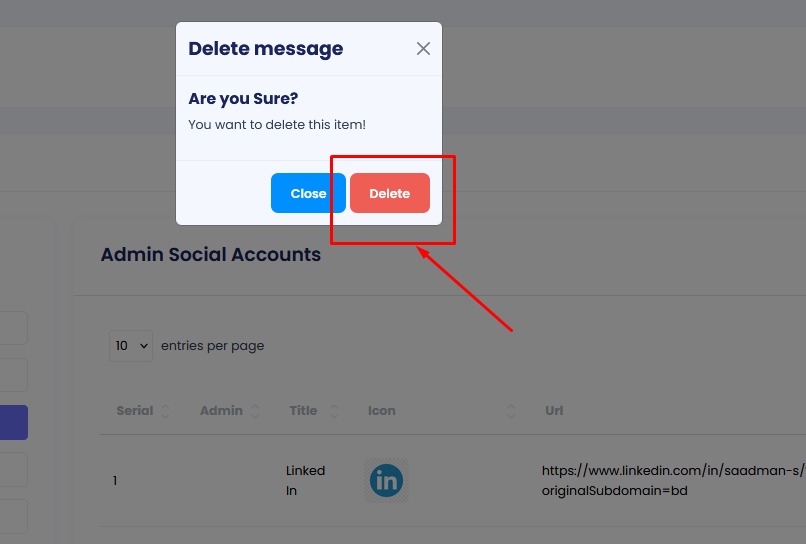
After deleting a social account entry, it will no longer be visible on your profile.
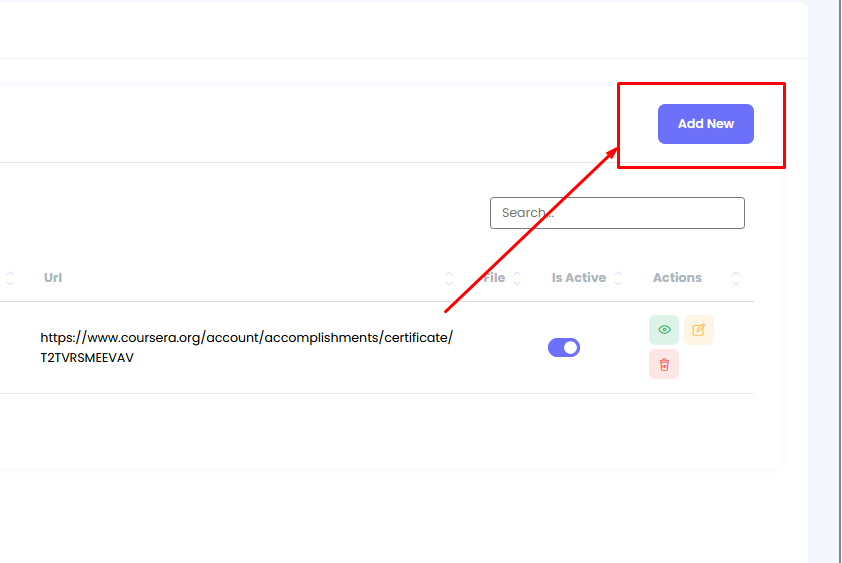
Add Publication
The Publication Profile section allows you to create, update, and delete details about your publications. Follow the steps below to manage your publication information within your Faculty Member Profile.
Accessing the Faculty Member Profile Menu
Step 1: Navigate to the Faculty Member Profiles section in the main menu.
Accessing the Publications Submenu
Step 2: Once in the Faculty Member Profile section, you will find a submenu on the left side. Click on the menu item labeled Publications.
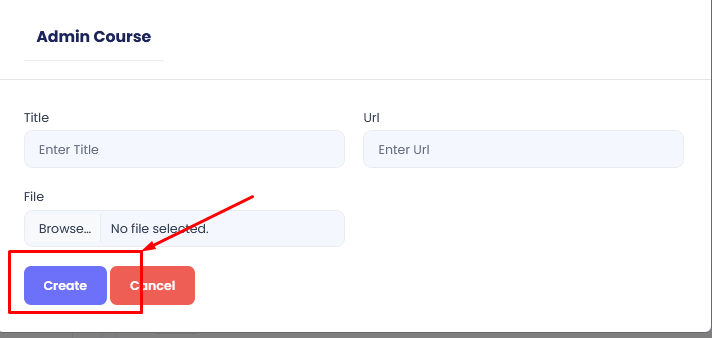
Creating Publication Details
First, you have to hit the Add New button.

In the publication form, you can add the following details:
- Title: Enter the name of the publication (e.g., "Research on Quantum Computing").
- URL: Provide the link to the online version of the publication (if applicable).
- File: Upload the publication file (e.g., PDF, DOCX, etc.).
- Date: Enter the date of publication (e.g., 2025-01-26).
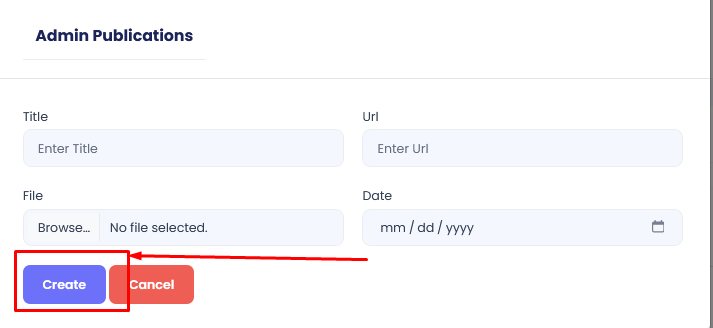
Once you've filled in all required fields, click the Create button to save your publication details. The information will be stored and displayed on your profile as per the system's access permissions.
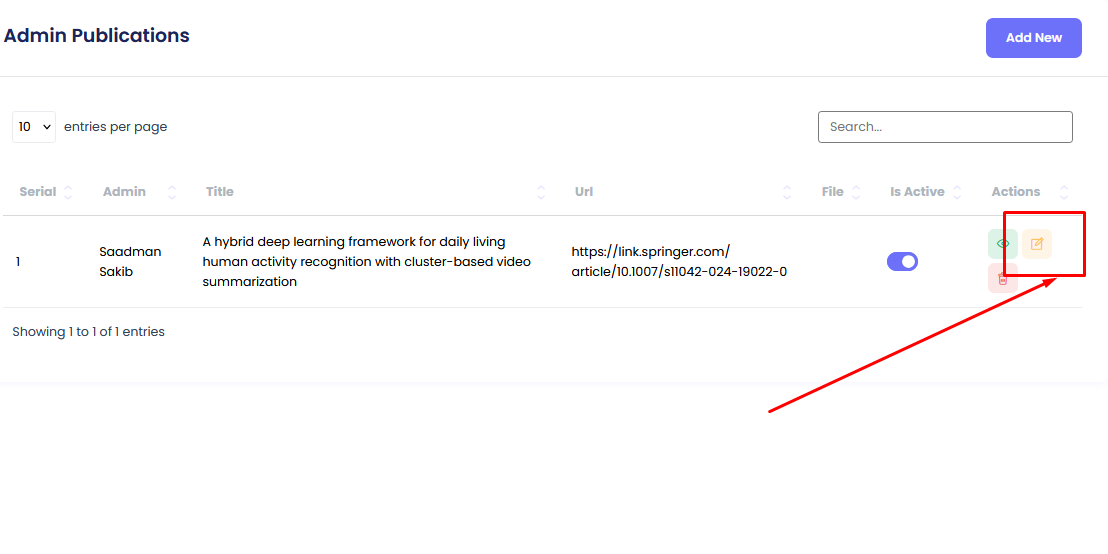
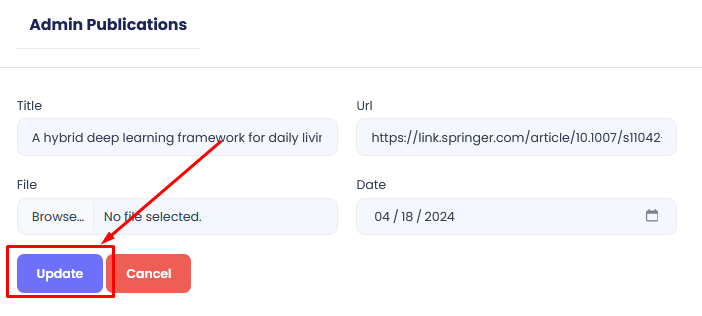
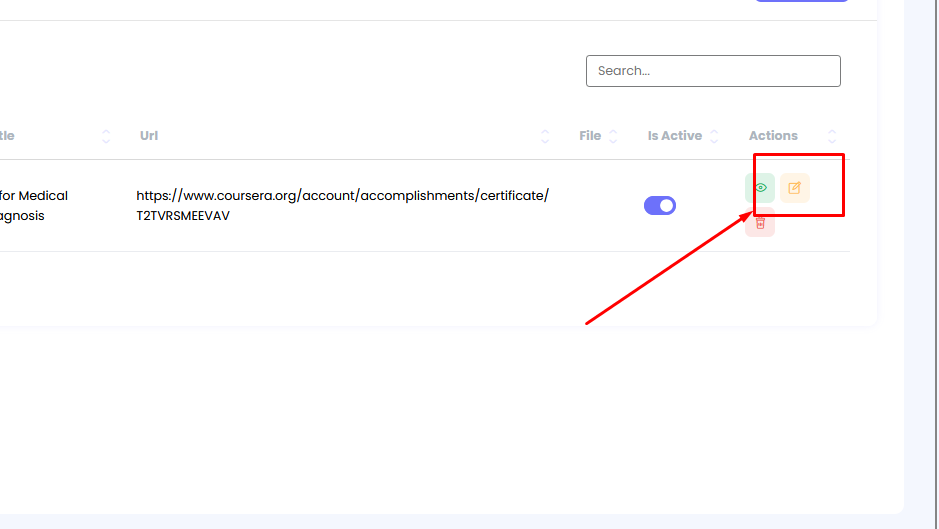
Editing Publication Details
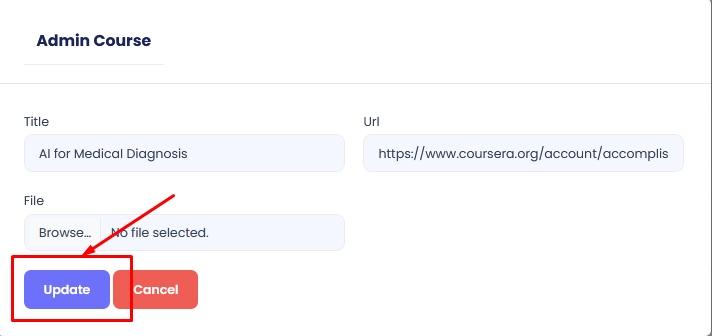
If you need to make changes to your publication details:
- Step 1: Navigate to the Publications Profile section as mentioned above.
- Step 2: Click on the Edit button next to the publication you want to update.
- Step 3: Modify the relevant fields (e.g., title, URL, file, or date) and click the Save Changes button to update your publication details.
Deleting Publication Details
If you want to remove a publication entry from your profile:
- Step 1: Navigate to the Publications Profile section as mentioned above.
- Step 2: Click on the Delete button next to the publication you want to remove.
- Step 3: Confirm the deletion by clicking the Yes, Delete button in the confirmation prompt.
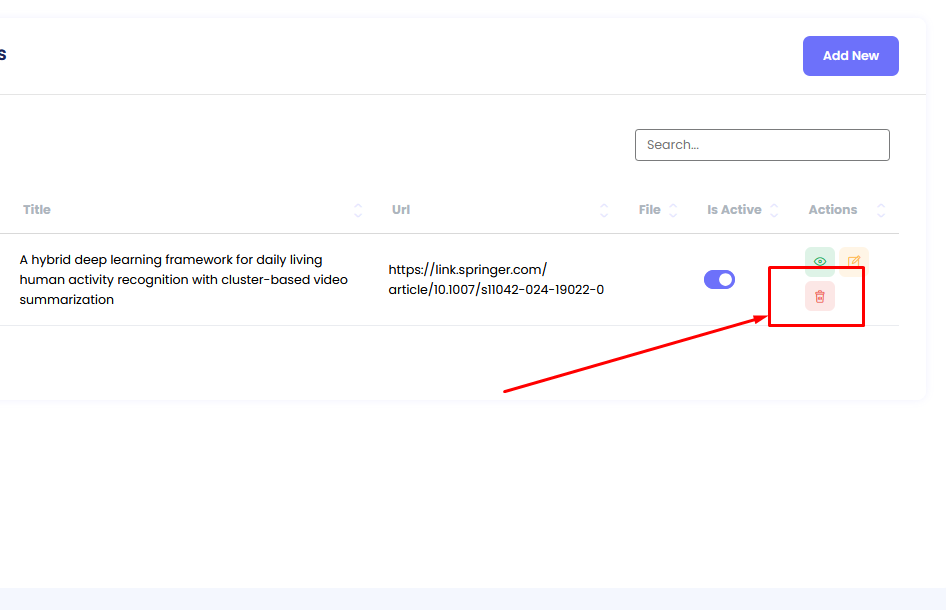
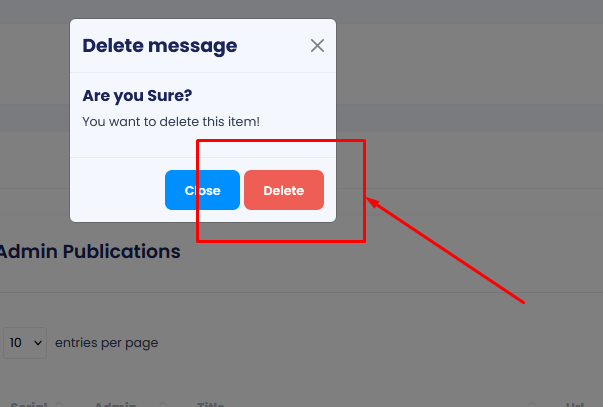
After deleting a publication entry, it will no longer be visible on your profile.
Add Research
The Research Profile section allows you to create, update, and delete details of your research projects. Follow the steps below to manage your research information within your Faculty Member Profile.
Accessing the Faculty Member Profile Menu
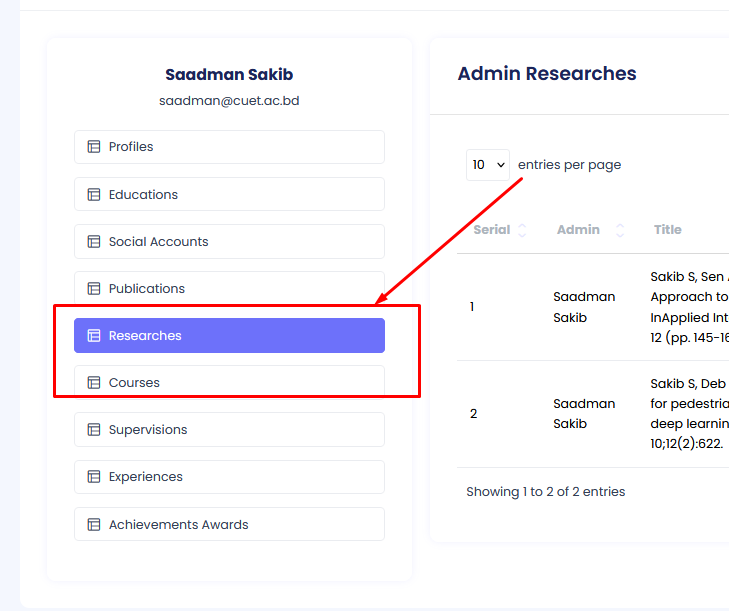
Step 1: Navigate to the Faculty Member Profiles section in the main menu.
Accessing the Research Submenu
Step 2: Once in the Faculty Member Profile section, you will find a submenu on the left side. Click on the menu item labeled Research.
Creating Research Details
First, you have to hit the add new button.
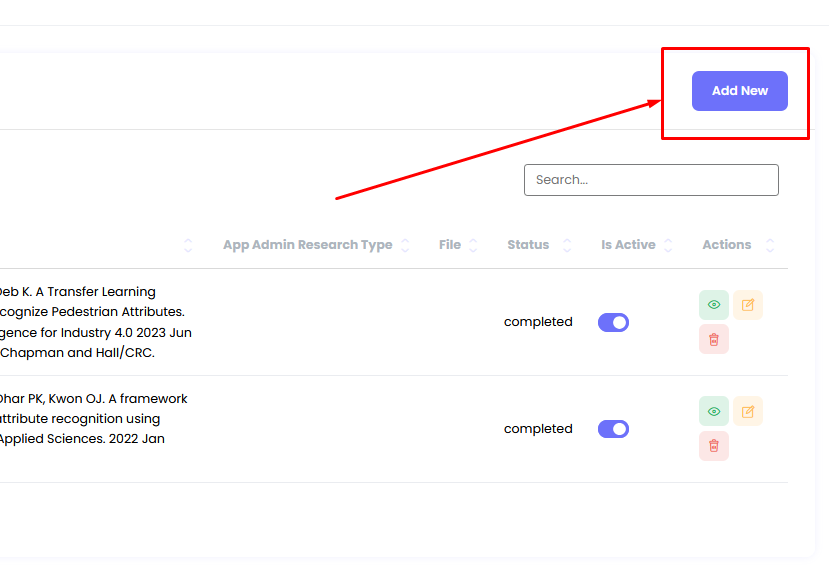
In the research form, you can add the following details:
- Title: Enter the title of the research project.
- App Admin Research Type: Select the research type from the provided dropdown (e.g., Journal, Conference, Thesis).
- URL: Provide the URL to the research publication or relevant resource.
- File: Upload the research document or any relevant file.
- Date: Enter the publication or completion date of the research.
- Status: Specify the research status (e.g., Ongoing, Published, Completed).
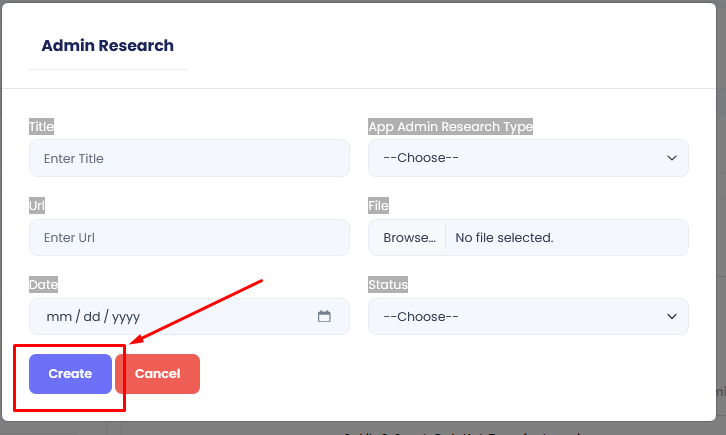
Once you've filled in all required fields, click the Create button to save your research details. The information will be stored and displayed on your profile as per the system's access permissions.
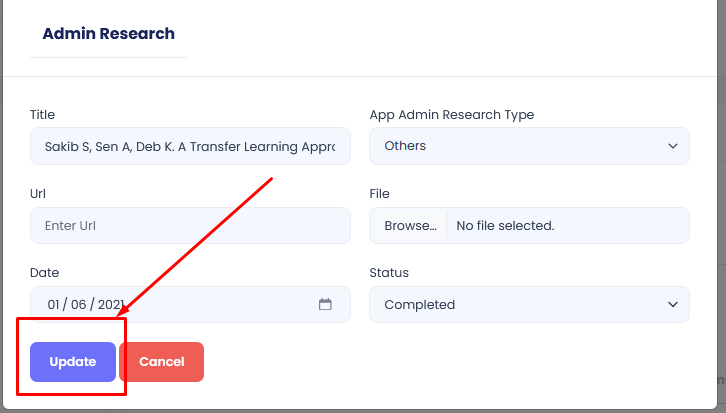
Editing Research Details
If you need to make changes to your research details:
- Step 1: Navigate to the Research Profile section as mentioned above.
- Step 2: Click on the Edit button next to the research entry you want to update.
- Step 3: Modify the relevant fields (e.g., title, research type, URL, file, date, or status) and click the Save Changes button to update your research details.
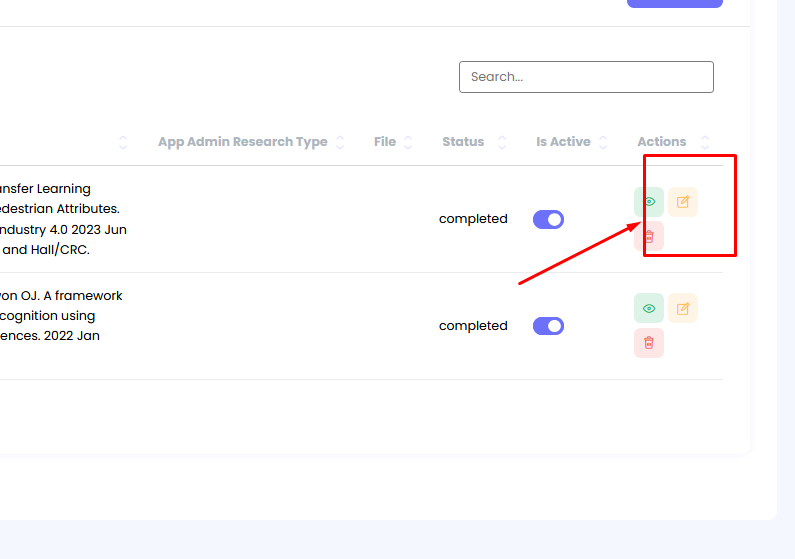
Deleting Research Details
If you want to remove a research entry from your profile:
- Step 1: Navigate to the Research Profile section as mentioned above.
- Step 2: Click on the Delete button next to the research entry you want to remove.
- Step 3: Confirm the deletion by clicking the Yes, Delete button in the confirmation prompt.
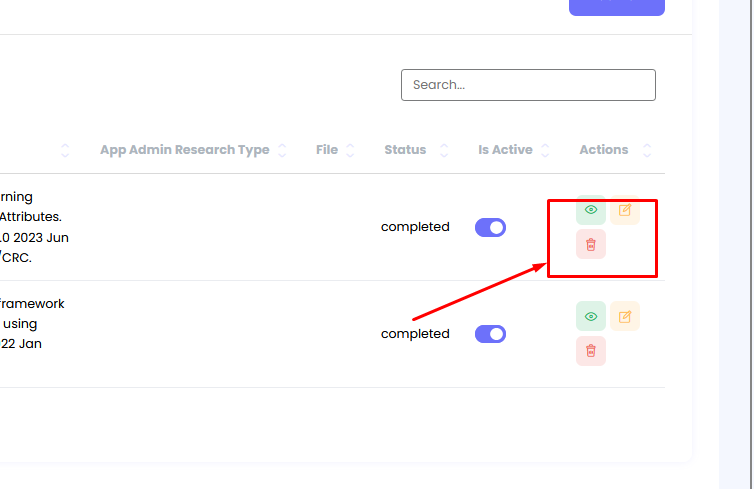
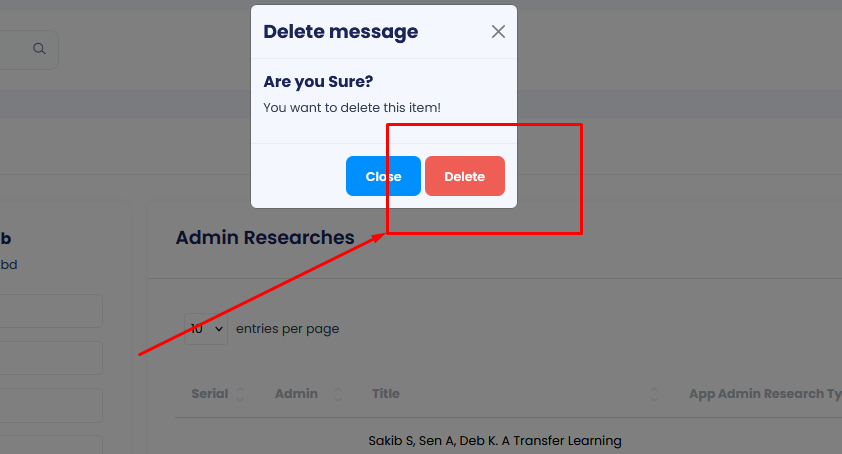
After deleting a research entry, it will no longer be visible on your profile.
Courses
The Course Profile section allows you to create, update, and delete details of courses associated with your Faculty Member Profile. Follow the steps below to manage your course information effectively.
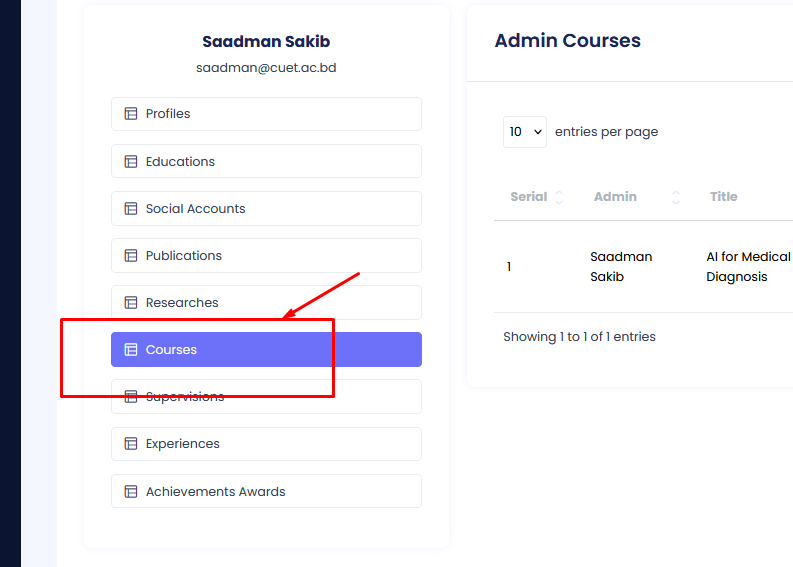
Accessing the Faculty Member Profile Menu
Step 1: Navigate to the Faculty Member Profiles section in the main menu.
Accessing the Courses Submenu
Step 2: Once in the Faculty Member Profile section, locate the submenu on the left side. Click on the menu item labeled Courses.
Adding Course Details
First, click on the Add New button.
In the course form, you can add the following details:
- Title: Enter the course title.
- URL: Provide the URL for the course page or additional resources.
- File: Upload any course-related document, syllabus, or material file.
Once you've filled in all required fields, click the Create button to save your course details. The information will be stored and displayed on your profile as per the system's access permissions.
Editing Course Details
If you need to make changes to your course details:
- Step 1: Navigate to the Course Profile section as mentioned above.
- Step 2: Click on the Edit button next to the course entry you want to update.
- Step 3: Modify the relevant fields (e.g., title, URL, or file) and click the Save Changes button to update your course details.
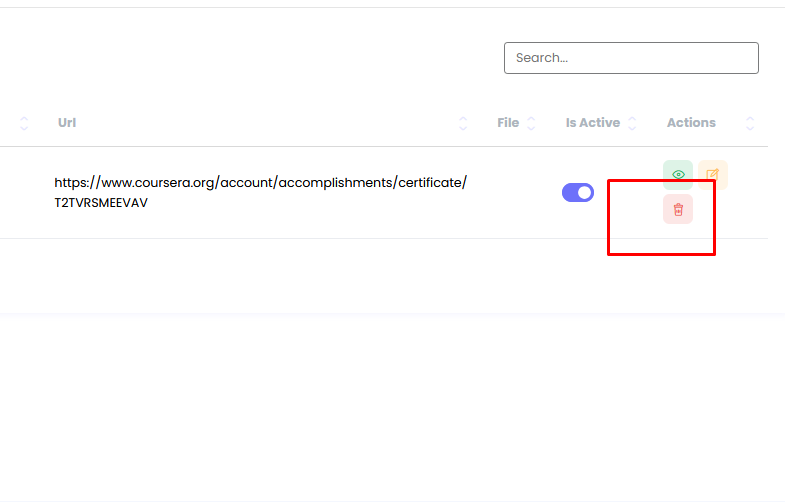
Deleting Course Details
If you want to remove a course entry from your profile:
- Step 1: Navigate to the Course Profile section as mentioned above.
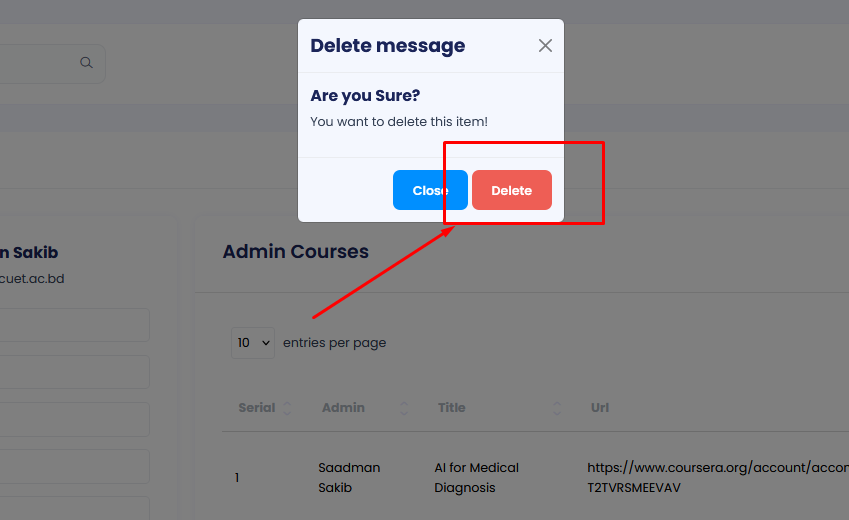
- Step 2: Click on the Delete button next to the course entry you want to remove.
- Step 3: Confirm the deletion by clicking the Yes, Delete button in the confirmation prompt.
After deleting a course entry, it will no longer be visible on your profile.
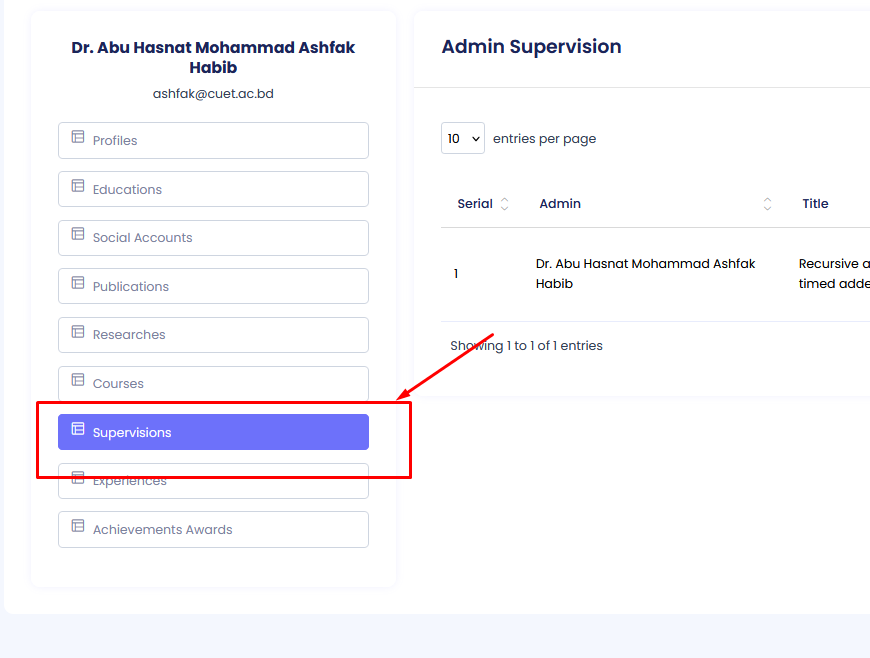
Supervision Profile Management
The Supervision Profile section allows you to manage the details of your supervision work. You can create, update, and delete supervision entries within your Faculty Member Profile. Follow the steps below to manage your supervision information.
Accessing the Faculty Member Profile Menu
Step 1: Navigate to the Faculty Member Profiles section in the main menu.
Accessing the Supervision Submenu
Step 2: Once in the Faculty Member Profile section, locate the submenu on the left side. Click on the menu item labeled Supervision.
Adding Supervision Details
First, click on the Add New button.
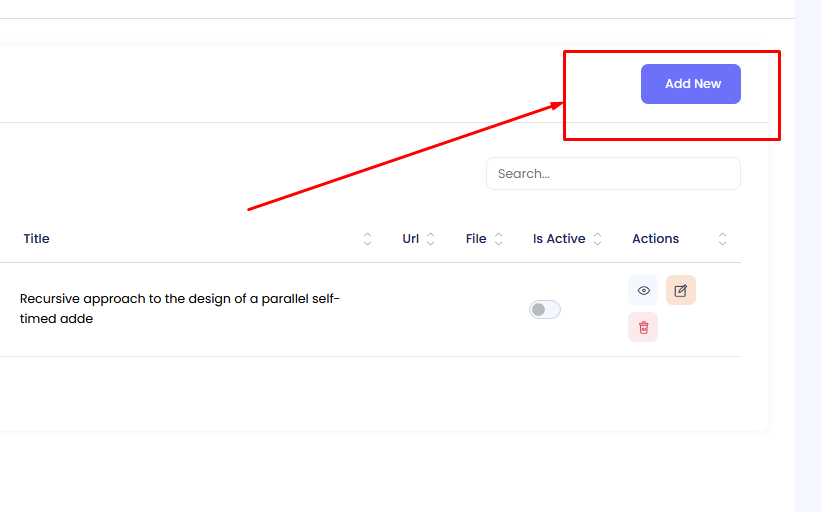
In the supervision form, you can add the following details:
- Title: Enter the title of the supervision project.
- URL: Provide the URL for the supervision project or related resources.
- File: Upload any relevant file or document related to the supervision.
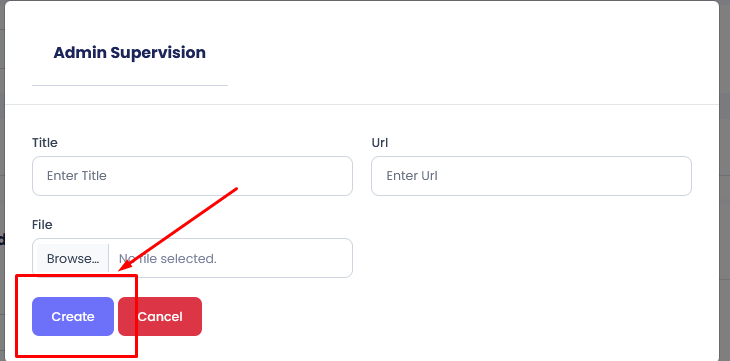
Once you've filled in all required fields, click the Create button to save your supervision details. The information will be stored and displayed on your profile as per the system's access permissions.
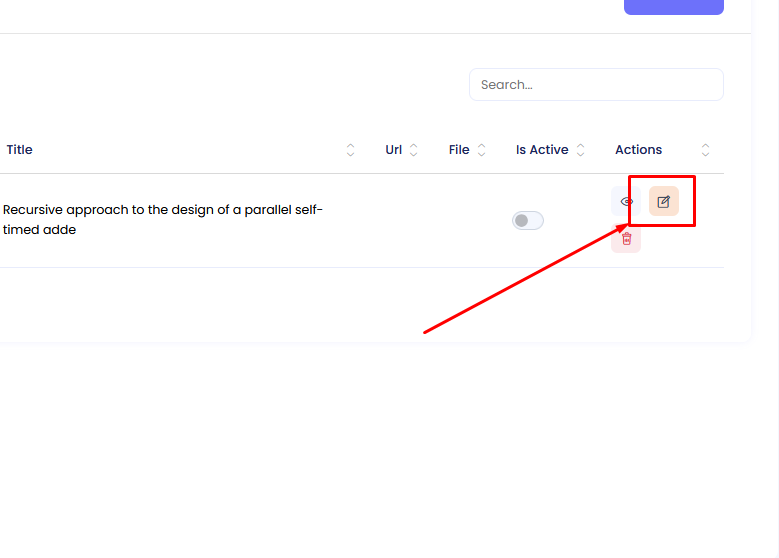
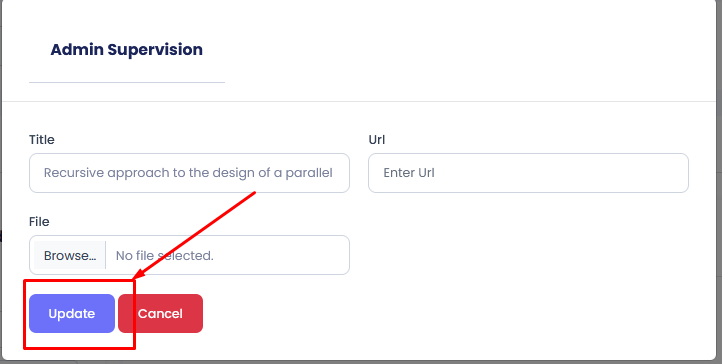
Editing Supervision Details
If you need to make changes to your supervision details:
- Step 1: Navigate to the Supervision Profile section as mentioned above.
- Step 2: Click on the Edit button next to the supervision entry you want to update.
- Step 3: Modify the relevant fields (e.g., title, URL, or file) and click the Save Changes button to update your supervision details.
Deleting Supervision Details
If you want to remove a supervision entry from your profile:
- Step 1: Navigate to the Supervision Profile section as mentioned above.
- Step 2: Click on the Delete button next to the supervision entry you want to remove.
- Step 3: Confirm the deletion by clicking the Yes, Delete button in the confirmation prompt.
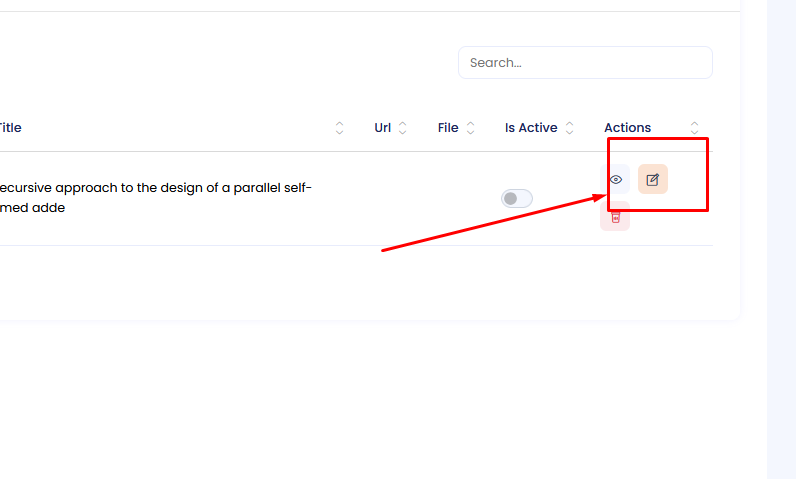
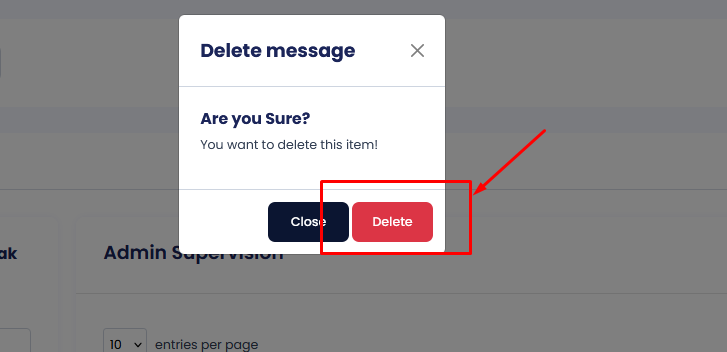
After deleting a supervision entry, it will no longer be visible on your profile.
Experience Profile Management
The Experience Profile section allows you to manage details about your professional experiences. You can add, edit, and delete entries to showcase your work history. Follow the steps below to manage your experience information.
Accessing the Faculty Member Profile Menu
Step 1: Navigate to the Faculty Member Profiles section in the main menu.
Accessing the Experience Submenu
Step 2: Once in the Faculty Member Profile section, locate the submenu on the left side. Click on the menu item labeled Experience.
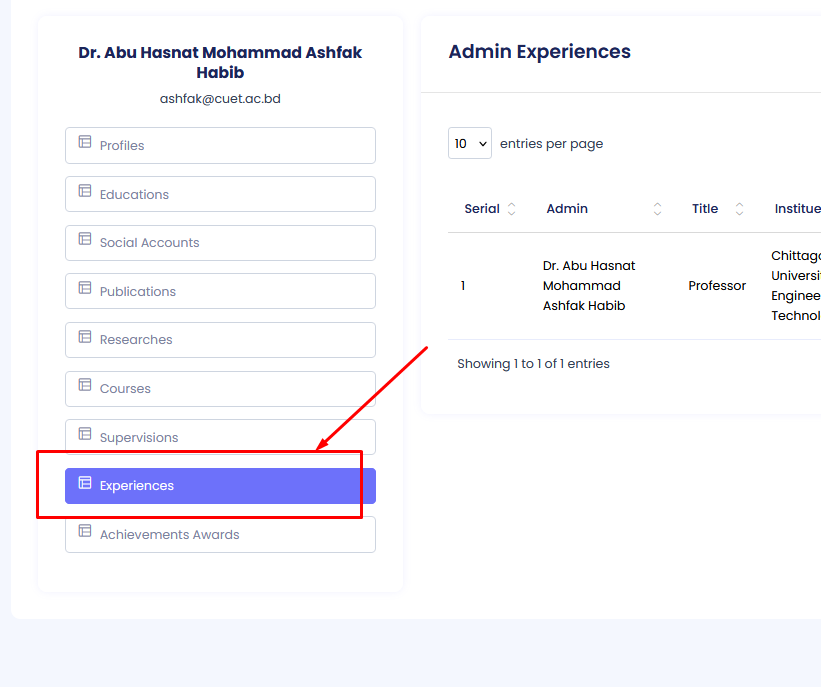
Adding Experience Details
First, click on the Add New button.
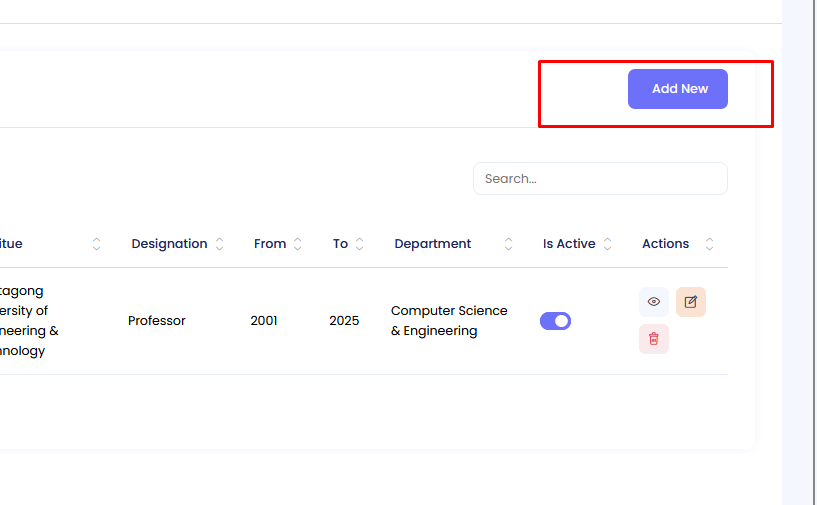
In the experience form, you can add the following details:
- Title: Enter the title of your experience (e.g., "Software Engineer").
- Institute: Provide the name of the institution or organization where you worked.
- Designation: Enter your designation or role.
- From: Select the starting date of your experience.
- To: Select the ending date of your experience (leave blank if it's ongoing).
- Department: Mention the department you worked in.
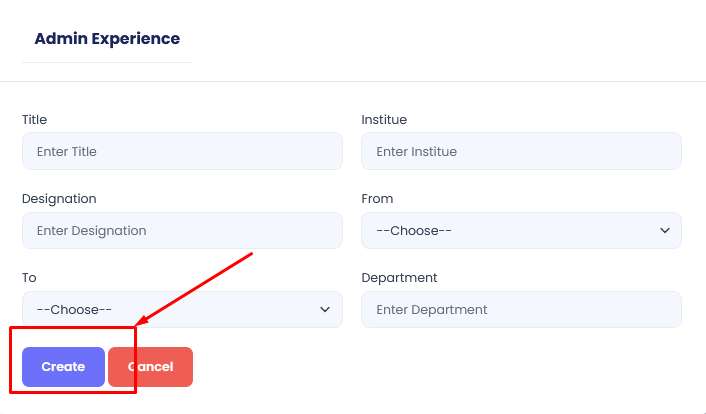
Once you've filled in all required fields, click the Create button to save your experience details. The information will be displayed on your profile under the experience section.
Editing Experience Details
If you need to make changes to your experience details:
- Step 1: Navigate to the Experience Profile section as mentioned above.
- Step 2: Click on the Edit button next to the experience entry you want to update.
- Step 3: Modify the relevant fields (e.g., title, institute, designation, dates, or department) and click the Save Changes button to update your experience details.
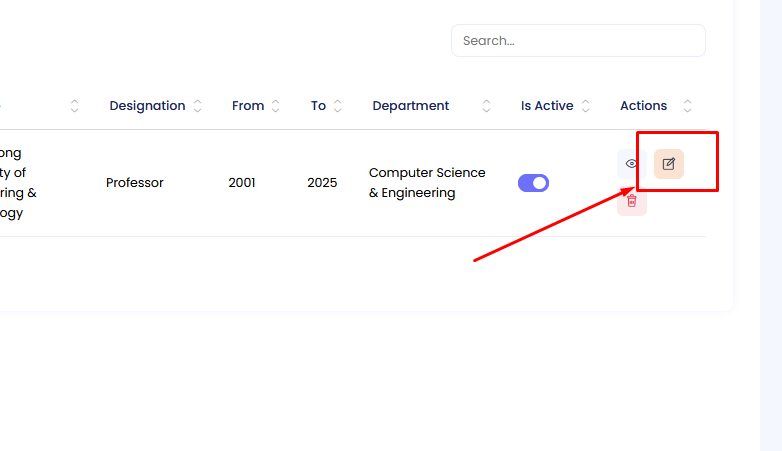
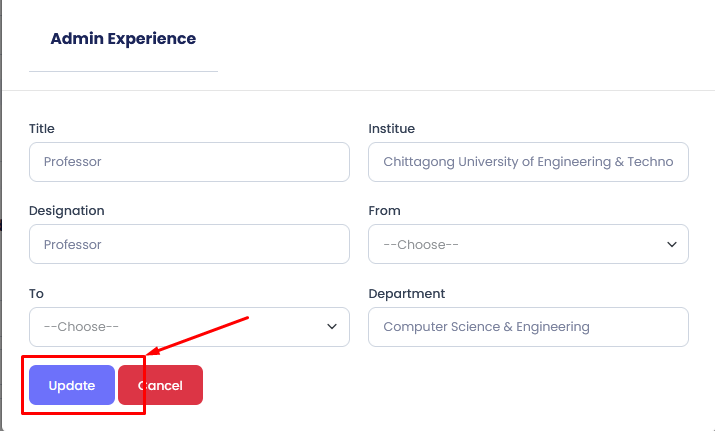
Deleting Experience Details
If you want to remove an experience entry from your profile:
- Step 1: Navigate to the Experience Profile section as mentioned above.
- Step 2: Click on the Delete button next to the experience entry you want to remove.
- Step 3: Confirm the deletion by clicking the Yes, Delete button in the confirmation prompt.
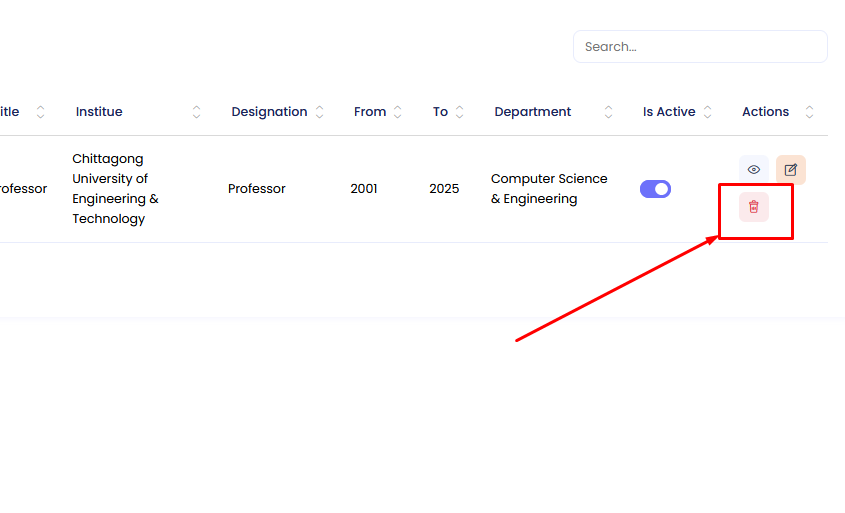
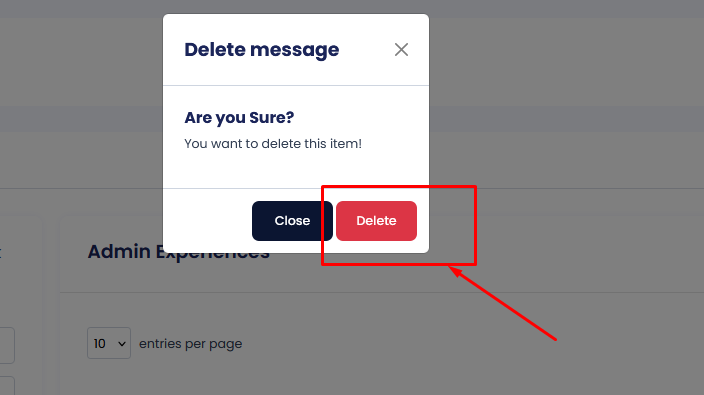
After deleting an experience entry, it will no longer be visible on your profile.
Achievement and Award Profile Management
The Achievement and Award section allows you to document and showcase your notable achievements and awards. You can add, edit, and delete entries to highlight your accomplishments. Follow the steps below to manage your achievement and award details.
Accessing the Faculty Member Profile Menu
Step 1: Navigate to the Faculty Member Profiles section in the main menu.
Accessing the Achievement and Award Submenu
Step 2: Once in the Faculty Member Profile section, locate the submenu on the left side. Click on the menu item labeled Achievements and Awards.
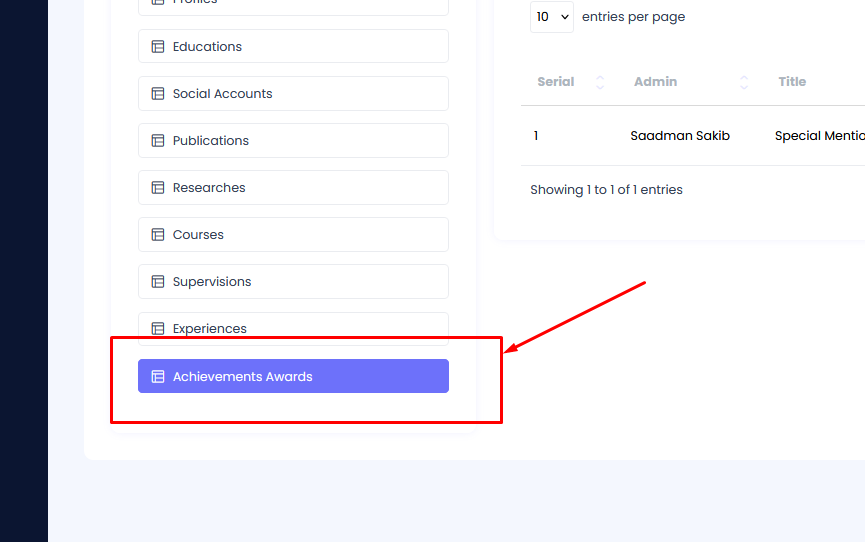
Adding Achievement and Award Details
First, click on the Add New button.
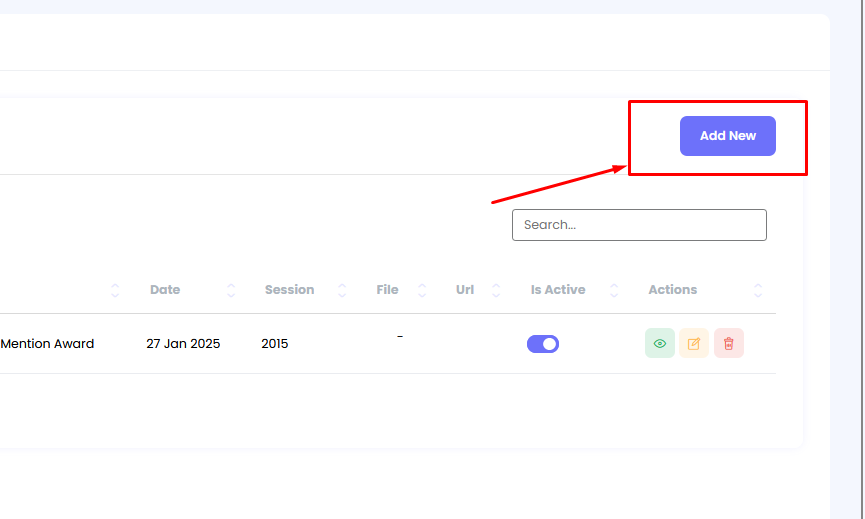
In the achievement and award form, you can add the following details:
- Title: Enter the title of your achievement or award (e.g., "Best Research Paper").
- Date: Select the date when the award or achievement was received.
- Session Year: Enter the session year associated with the achievement or award.
- File: Upload any relevant file or document related to the achievement or award.
- URL: Provide a URL linking to further information about the achievement or award, if available.
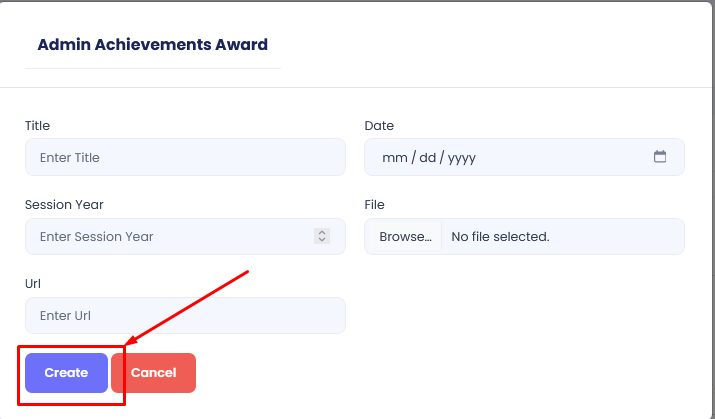
Once you've filled in all required fields, click the Create button to save your achievement or award details. The information will be displayed on your profile under the Achievements and Awards section.
Editing Achievement and Award Details
If you need to make changes to your achievement or award details:
- Step 1: Navigate to the Achievements and Awards section as mentioned above.
- Step 2: Click on the Edit button next to the entry you want to update.
- Step 3: Modify the relevant fields (e.g., title, date, session year, file, or URL) and click the Save Changes button to update your details.
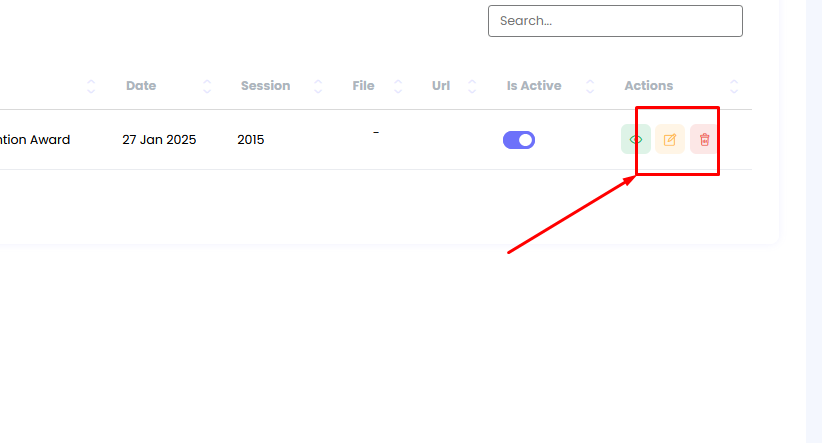
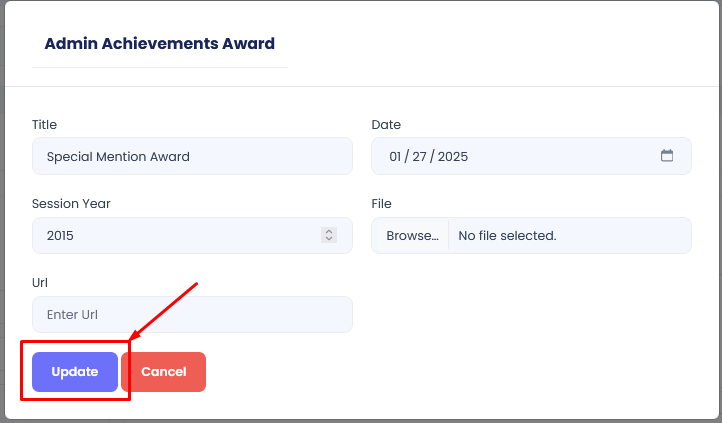
Deleting Achievement and Award Details
If you want to remove an entry from your profile:
- Step 1: Navigate to the Achievements and Awards section as mentioned above.
- Step 2: Click on the Delete button next to the entry you want to remove.
- Step 3: Confirm the deletion by clicking the Yes, Delete button in the confirmation prompt.
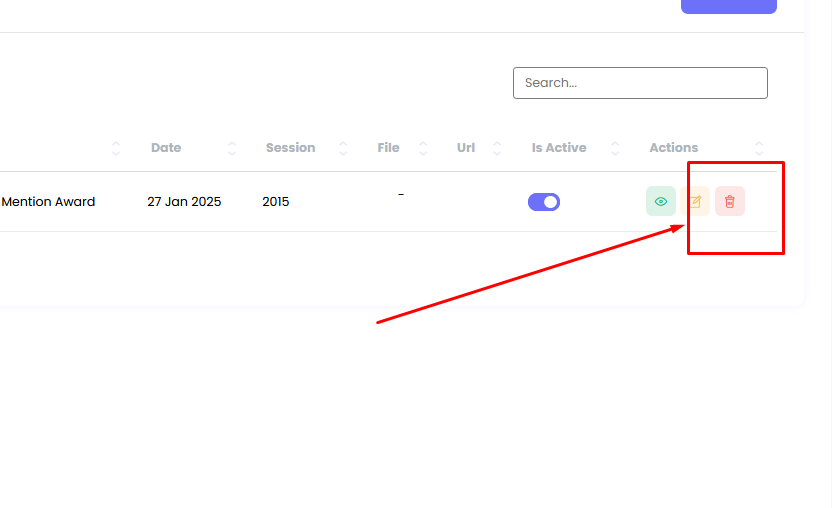
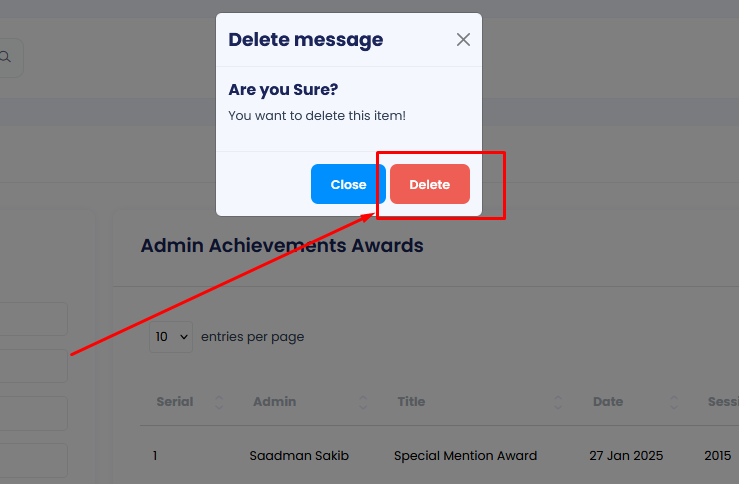
After deleting an entry, it will no longer be visible on your profile.
Administrative Department
The Administrative Department section allows users to update and manage department-related information. It provides structured access to various subcategories, ensuring seamless information organization and management.
Administrative Department Submenus
- Information
- Laboratories
- Testing Consultancies
- Academic Curriculums
- News
- Events
- Notices
Administrative Department Information Management
The Information section allows you to update department-specific details. Follow the steps below to modify the required information.
Accessing the Administrative Department Menu
Step 1: Navigate to the Administrative Department section in the main menu.
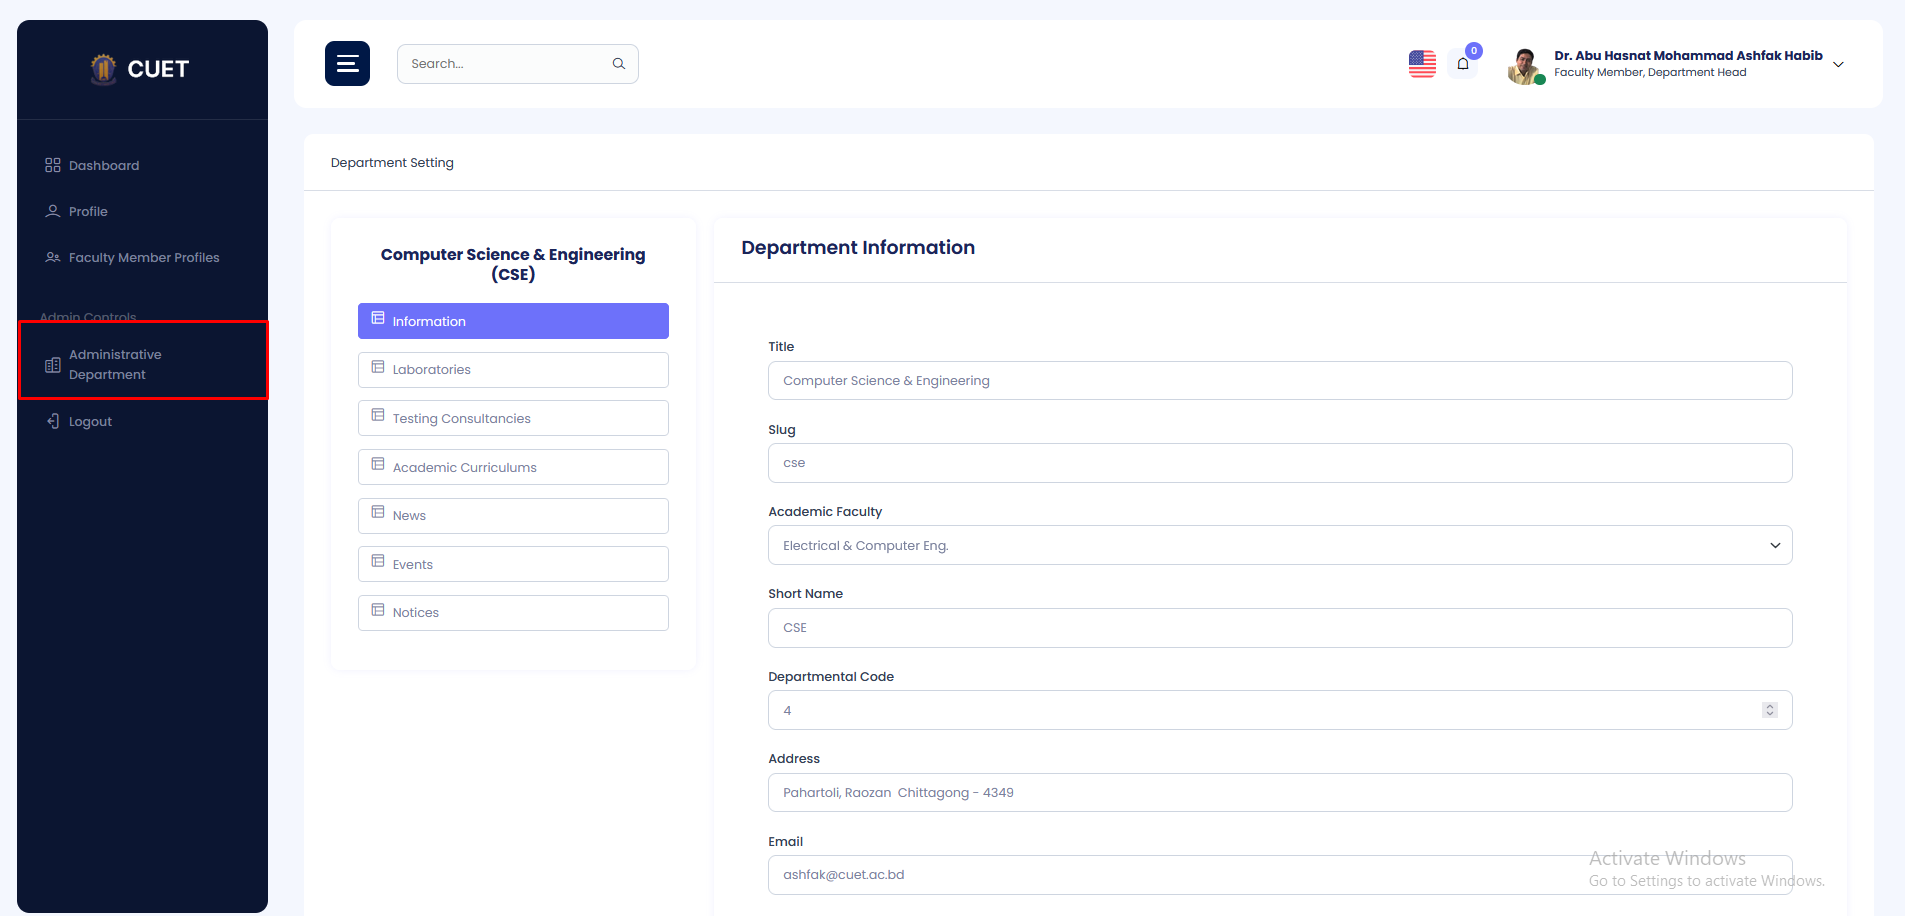
Accessing the Information Submenu
Step 2: Locate the submenu on the left side and click on Information.
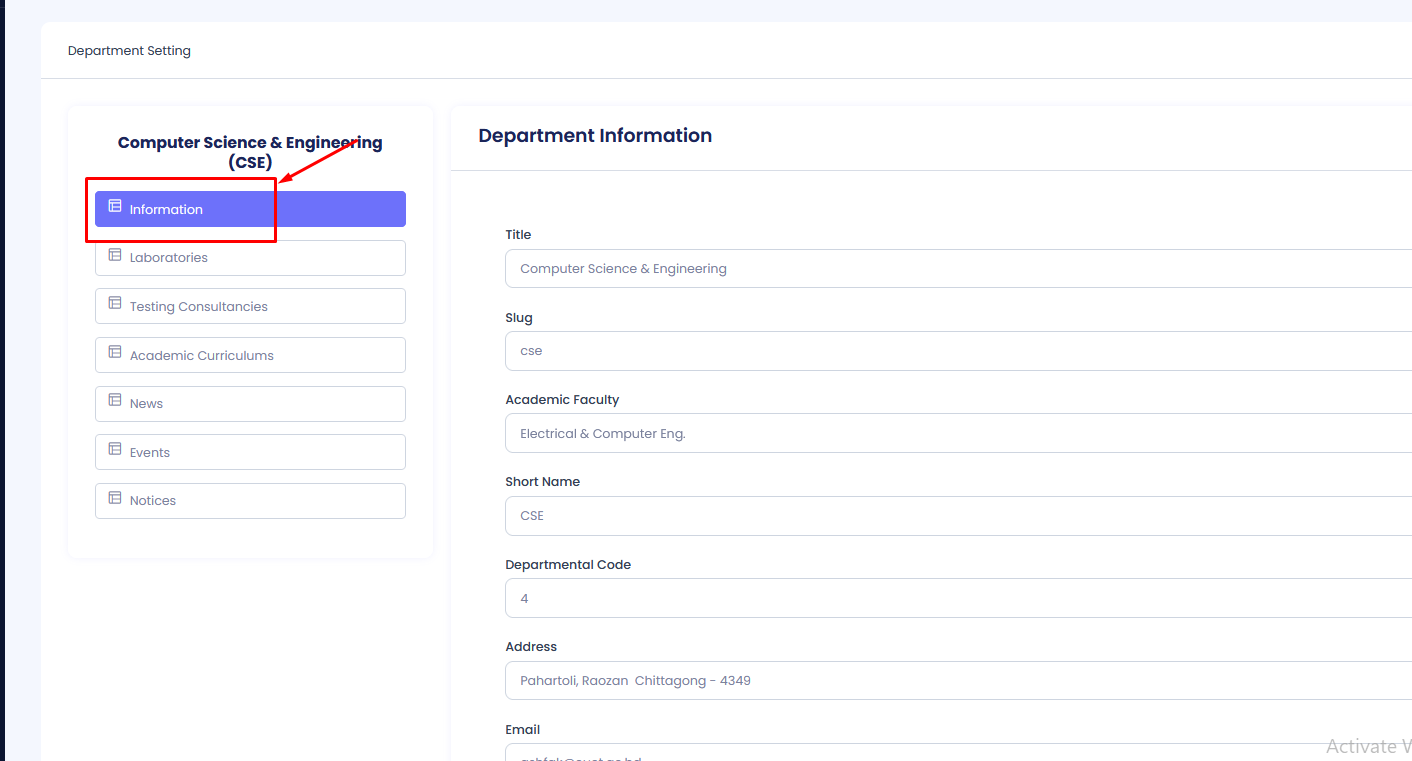
Step 3:In the information update form, you can modify the following fields:
- Title: Enter the department's full title.
- Slug: The unique identifier for the department.
- Academic Faculty: Select the faculty under which this department operates.
- Short Name: Provide an abbreviated name.
- Departmental Code: Enter the department's official code.
- Address: Update the department’s location details.
- Email: Provide a contact email.
- Phone: Enter the department’s phone number.
- About: Add or modify the department’s general description.
- Mission: Define the department’s mission statement.
- Vision: Describe the department’s vision.
- Publication Intro: Provide an introduction to departmental publications.
- Notice Intro: Add details about notices.
- Laboratories Intro: Update lab-related details.
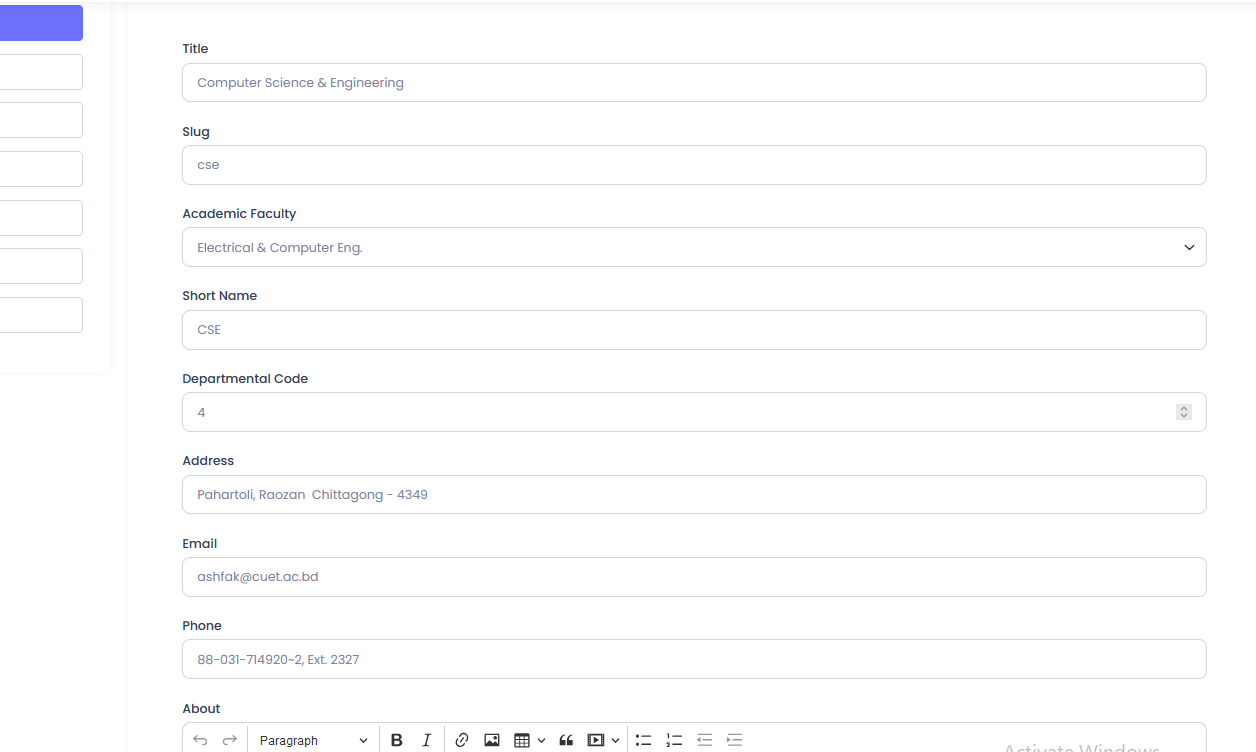
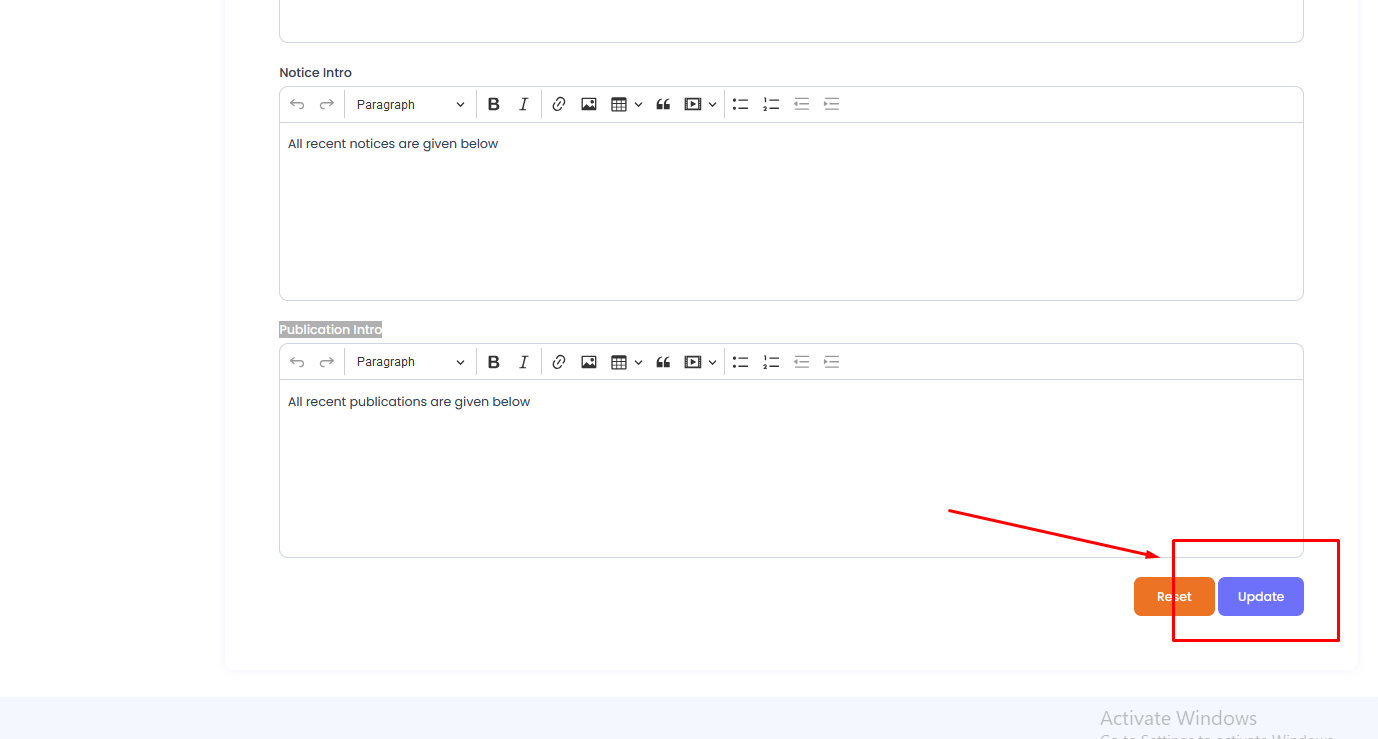
After making the necessary changes, click the Save Changes button to update the department information.
Administrative Department Laboratories Management
The Laboratories section allows you to create, update, and manage departmental laboratory information. You can add new labs, edit existing details, and remove outdated entries.
Accessing the Laboratories Menu
Step 1: Navigate to the Administrative Department section in the main menu.
Step 2: In the submenu, click on Laboratories.
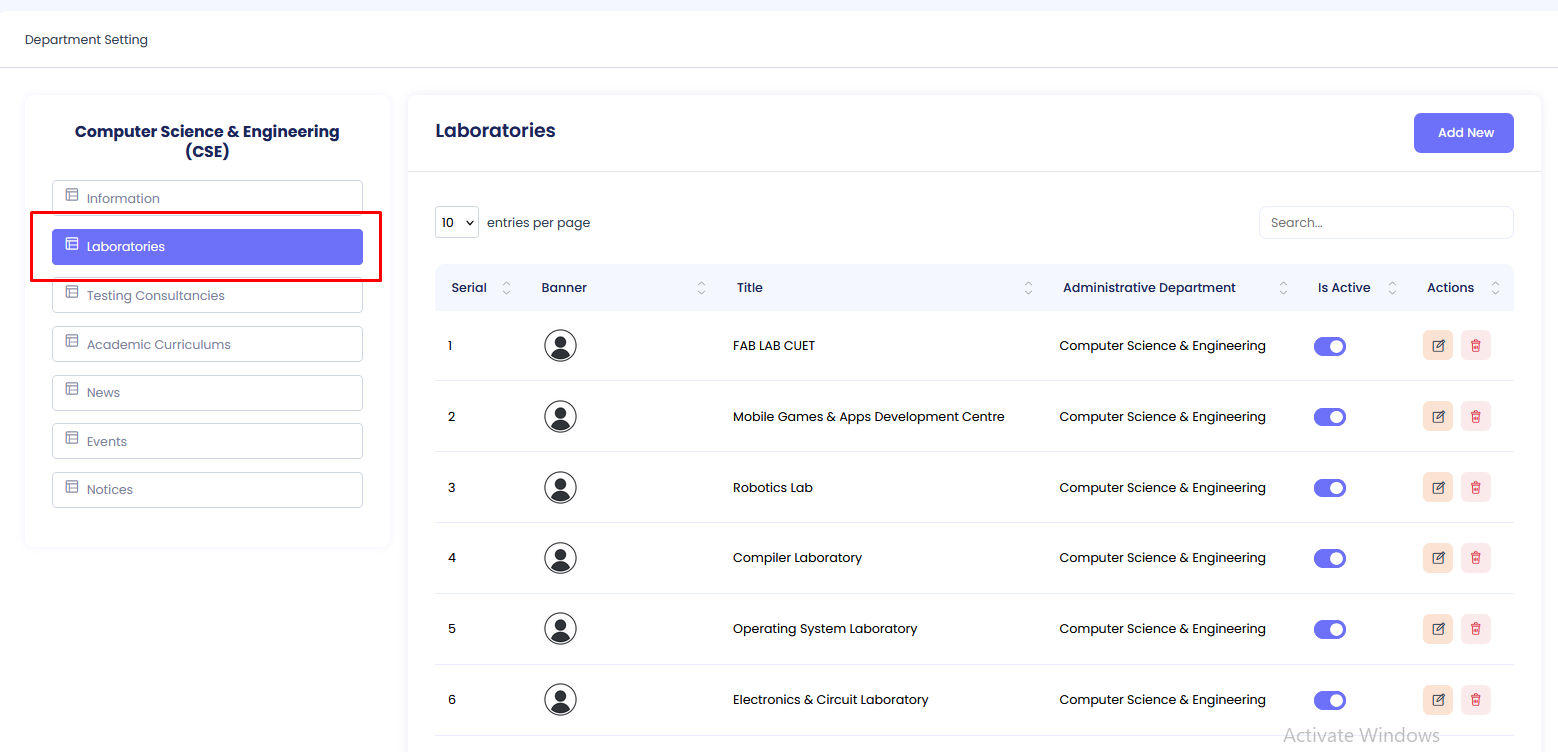
Adding a New Laboratory
Step 1: Click on the Add New button.
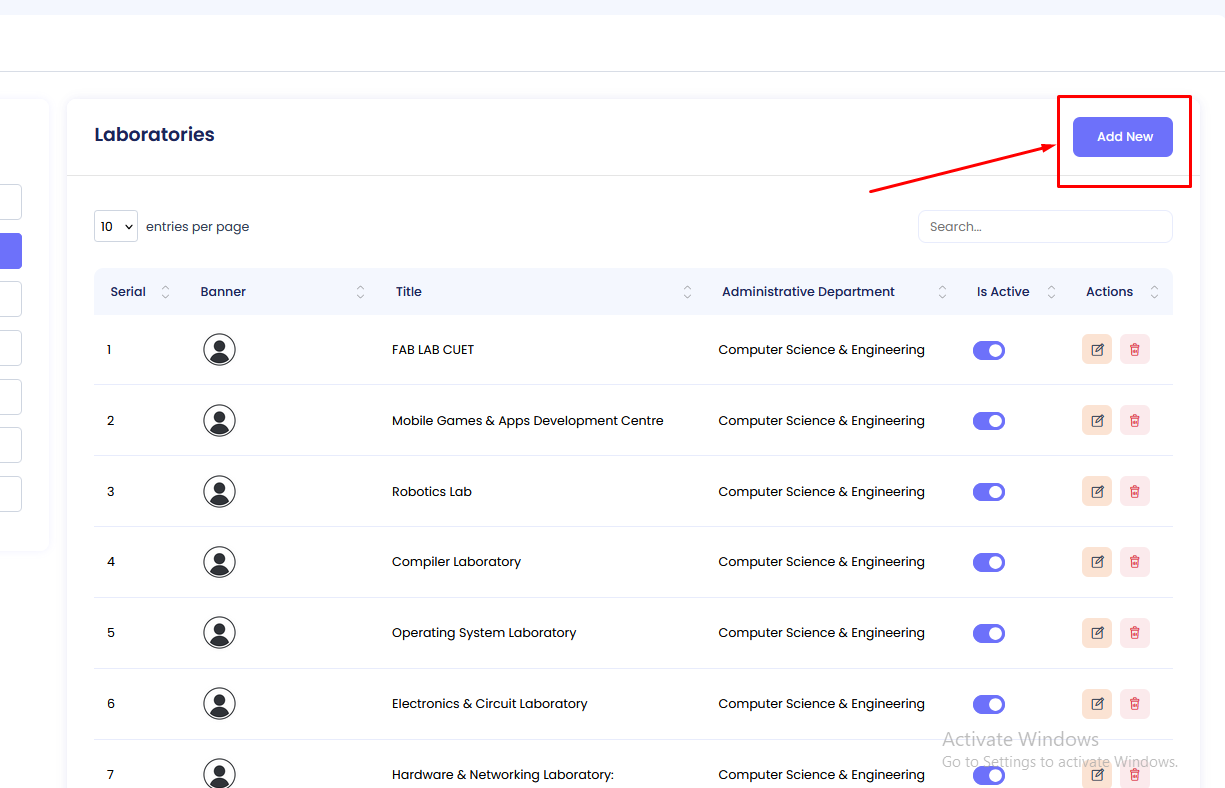
Fill in the required fields in the form:
- Banner: Upload a relevant laboratory image.
- Title: Provide a name for the laboratory.
- Description: Add details about the laboratory and its purpose.
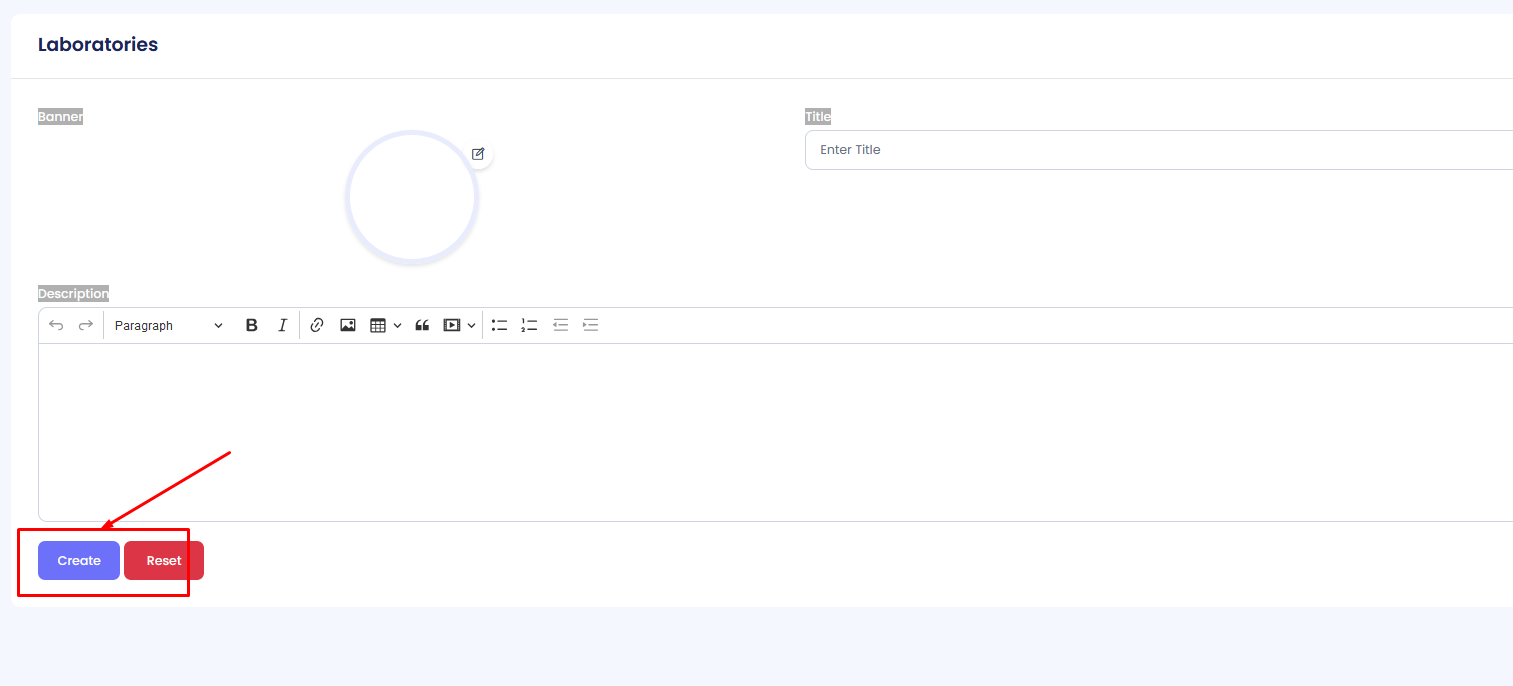
After entering the details, click Create to add the laboratory.
Viewing Laboratories
The laboratory index page displays the following columns:
- Serial: Auto-generated serial number.
- Banner: The uploaded laboratory image.
- Title: The name of the laboratory.
- Administrative Department: The associated department.
- Is Active: The status of the laboratory (Active/Inactive).
- Actions: Options to edit or delete the entry.
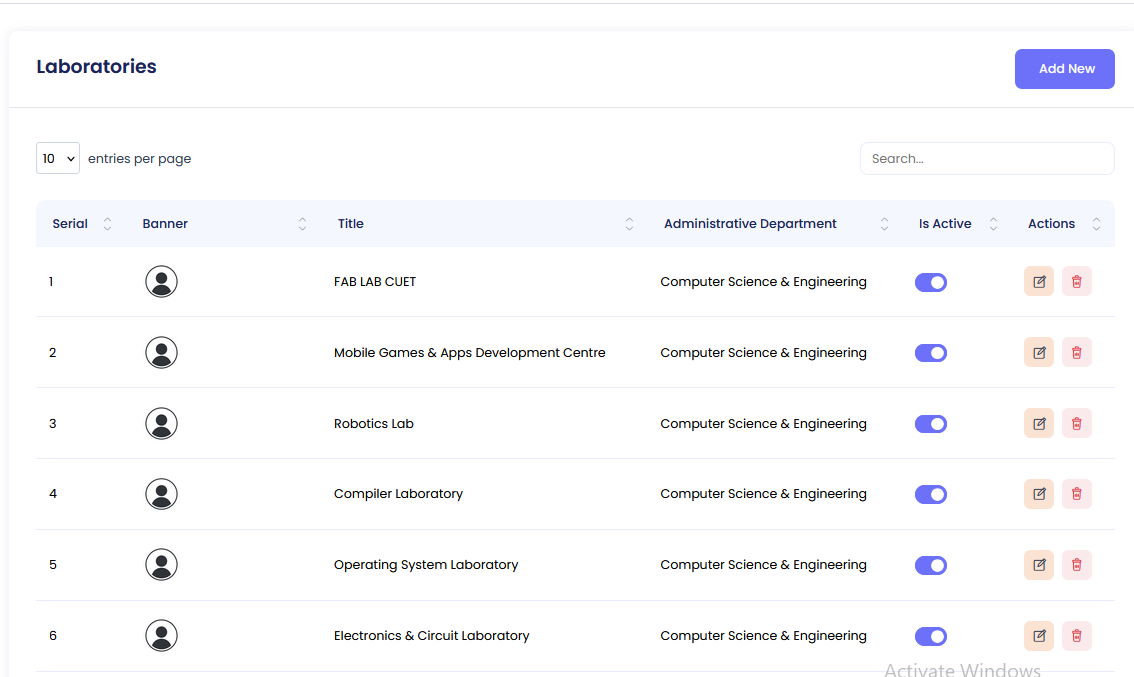
Editing a Laboratory
If you need to modify laboratory details:
- Step 1: Click the Edit button next to the desired laboratory.
- Step 2: Update the necessary fields and click Save Changes.
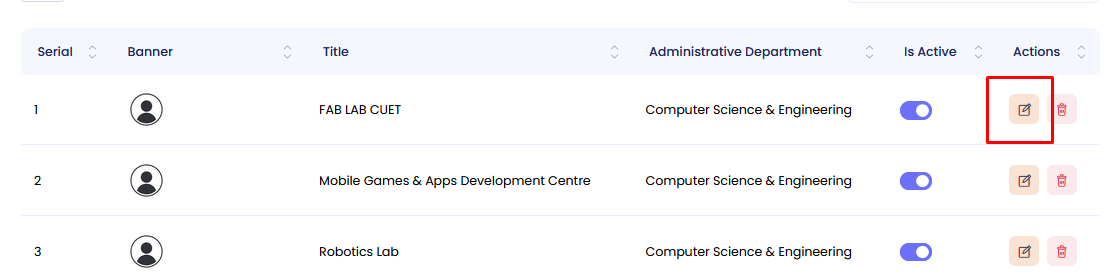
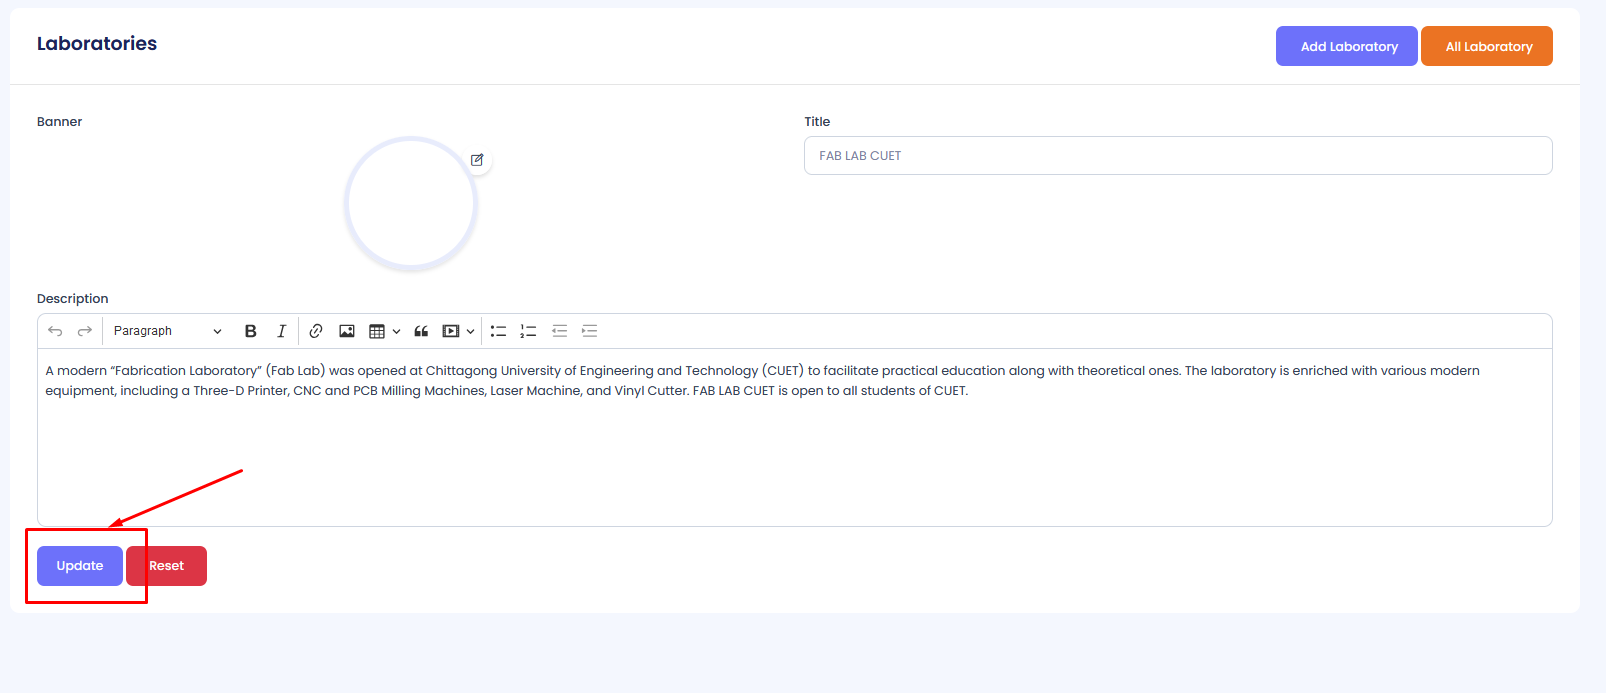
Activating/Deactivating a Laboratory
To change the activation status of a laboratory:
- Step 1: Locate the laboratory in the list.
- Step 2: Click the Activate/Deactivate toggle button in the Is Active column.
- Step 3: The status will update instantly.

Deleting a Laboratory
To remove a laboratory:
- Step 1: Click the Delete button next to the laboratory you want to remove.
- Step 2: Confirm deletion by clicking Yes, Delete.
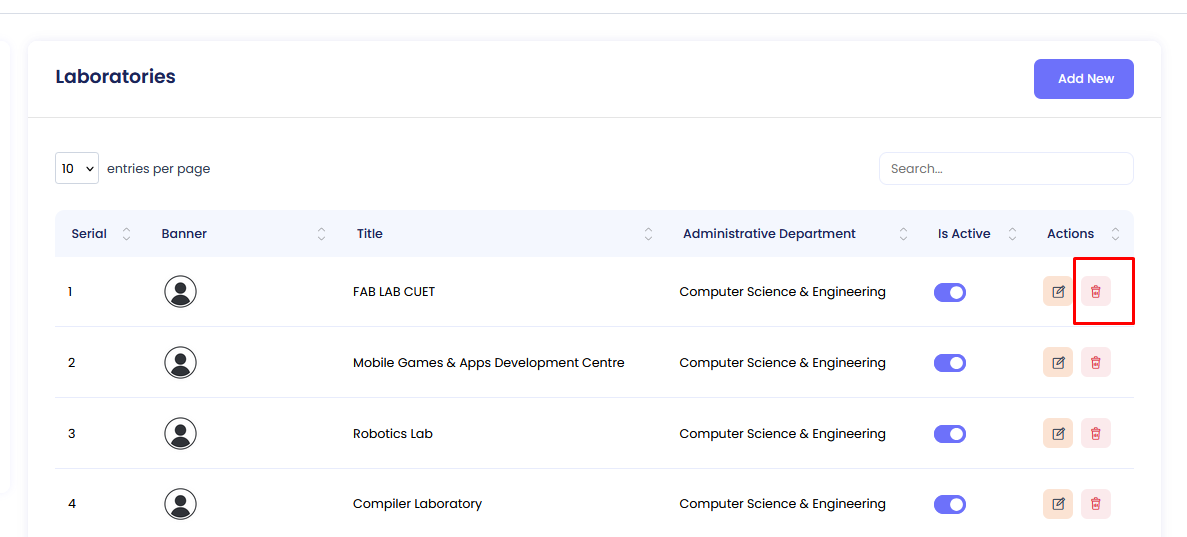
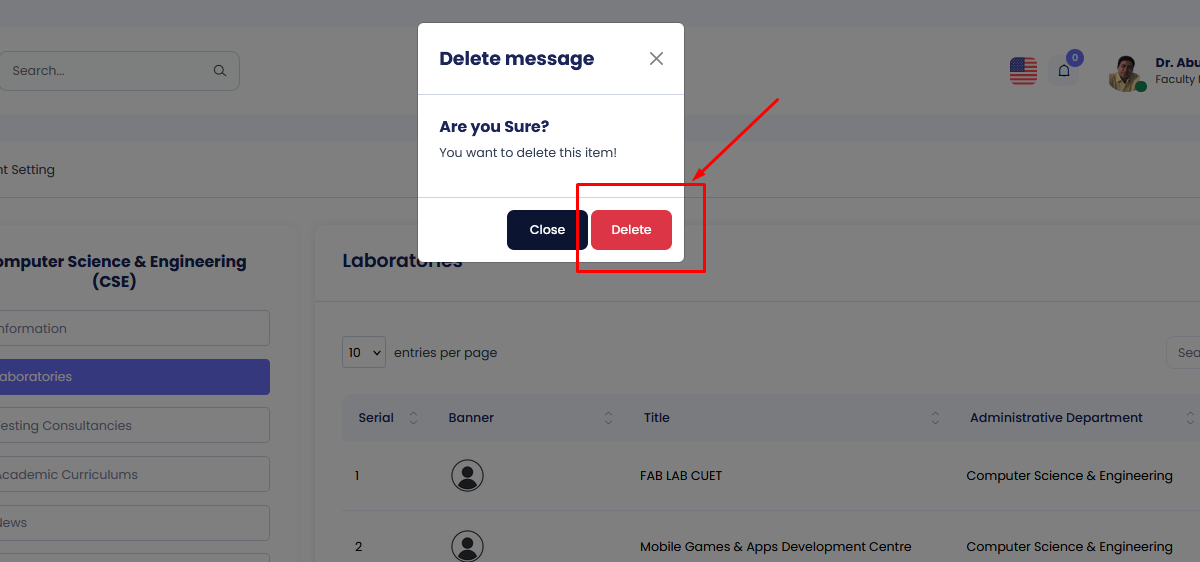
Deleted laboratories will no longer be displayed in the system.
Administrative Department Testing Consultancy Management
The Testing Consultancy section allows you to create, update, and manage testing consultancy services within the administrative department.
Accessing the Testing Consultancy Menu
Step 1: Navigate to the Administrative Department section in the main menu.
Step 2: In the submenu, click on Testing Consultancy.
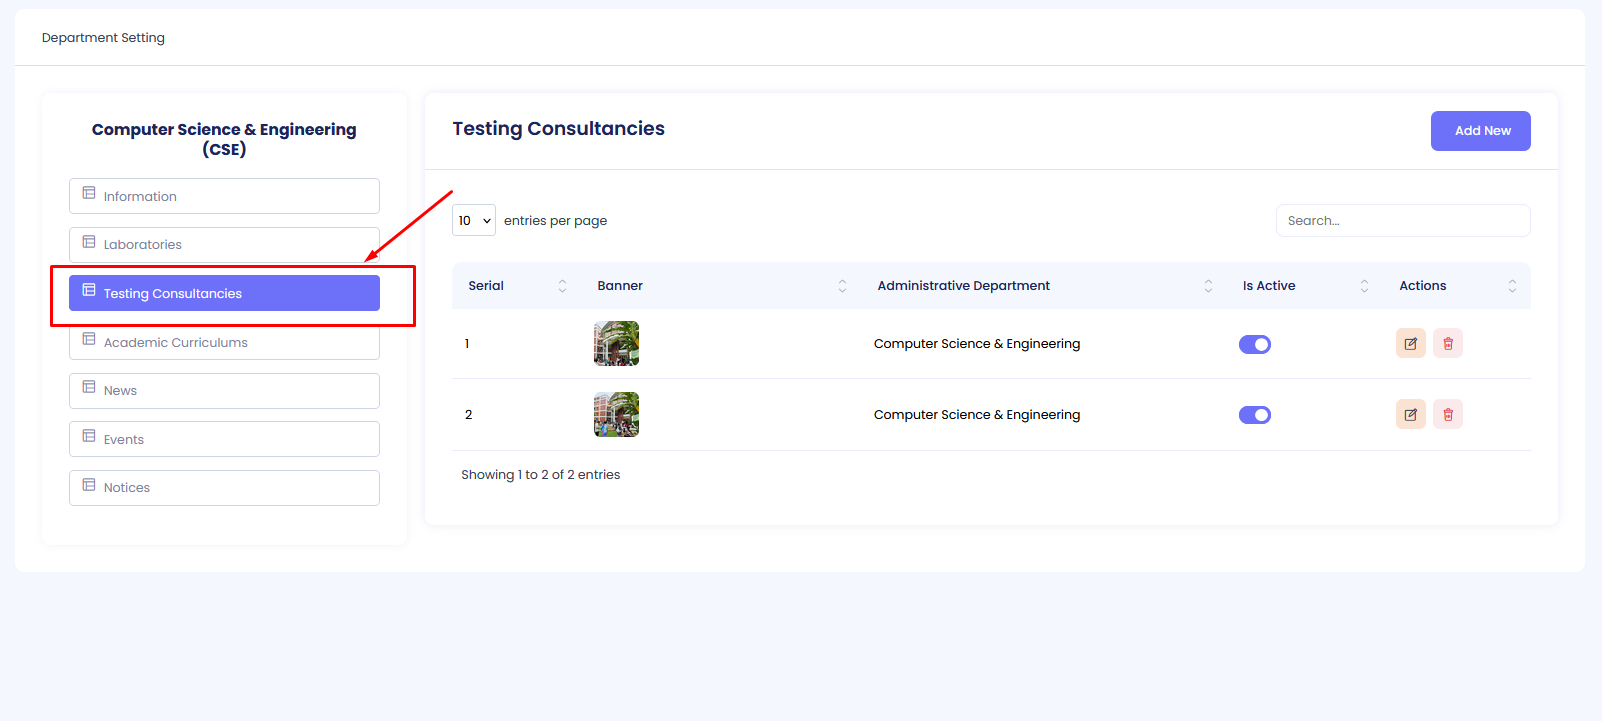
Creating a New Testing Consultancy
Step 1: Click on the Add New button.
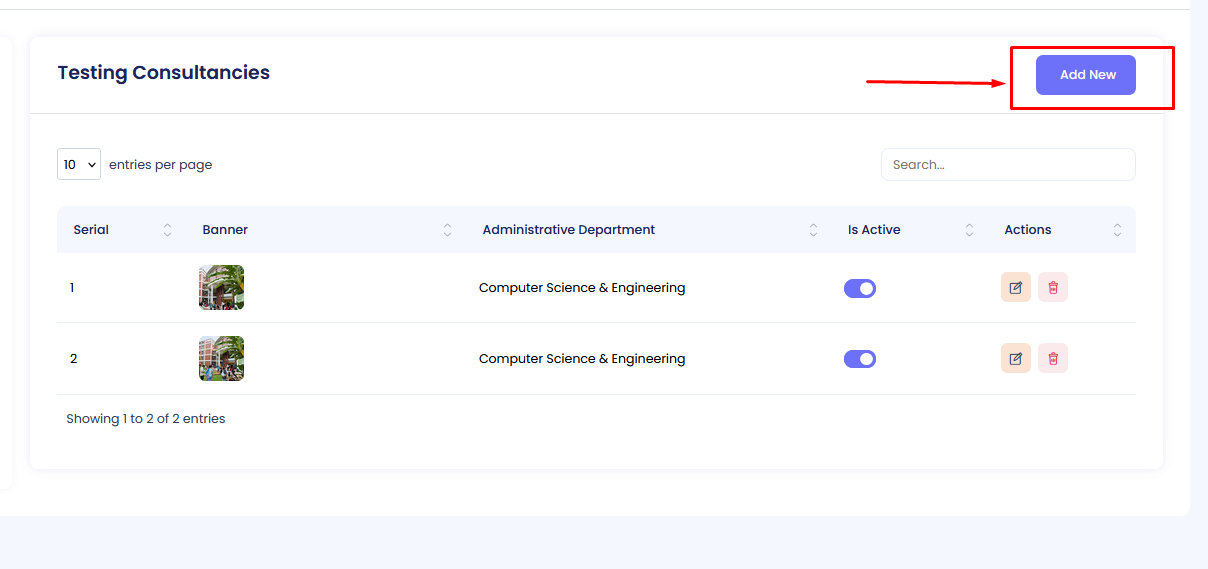
Fill in the required fields in the form:
- Banner: Upload a relevant image.
- Short Description: Provide a brief description.
- Description: Add detailed information.
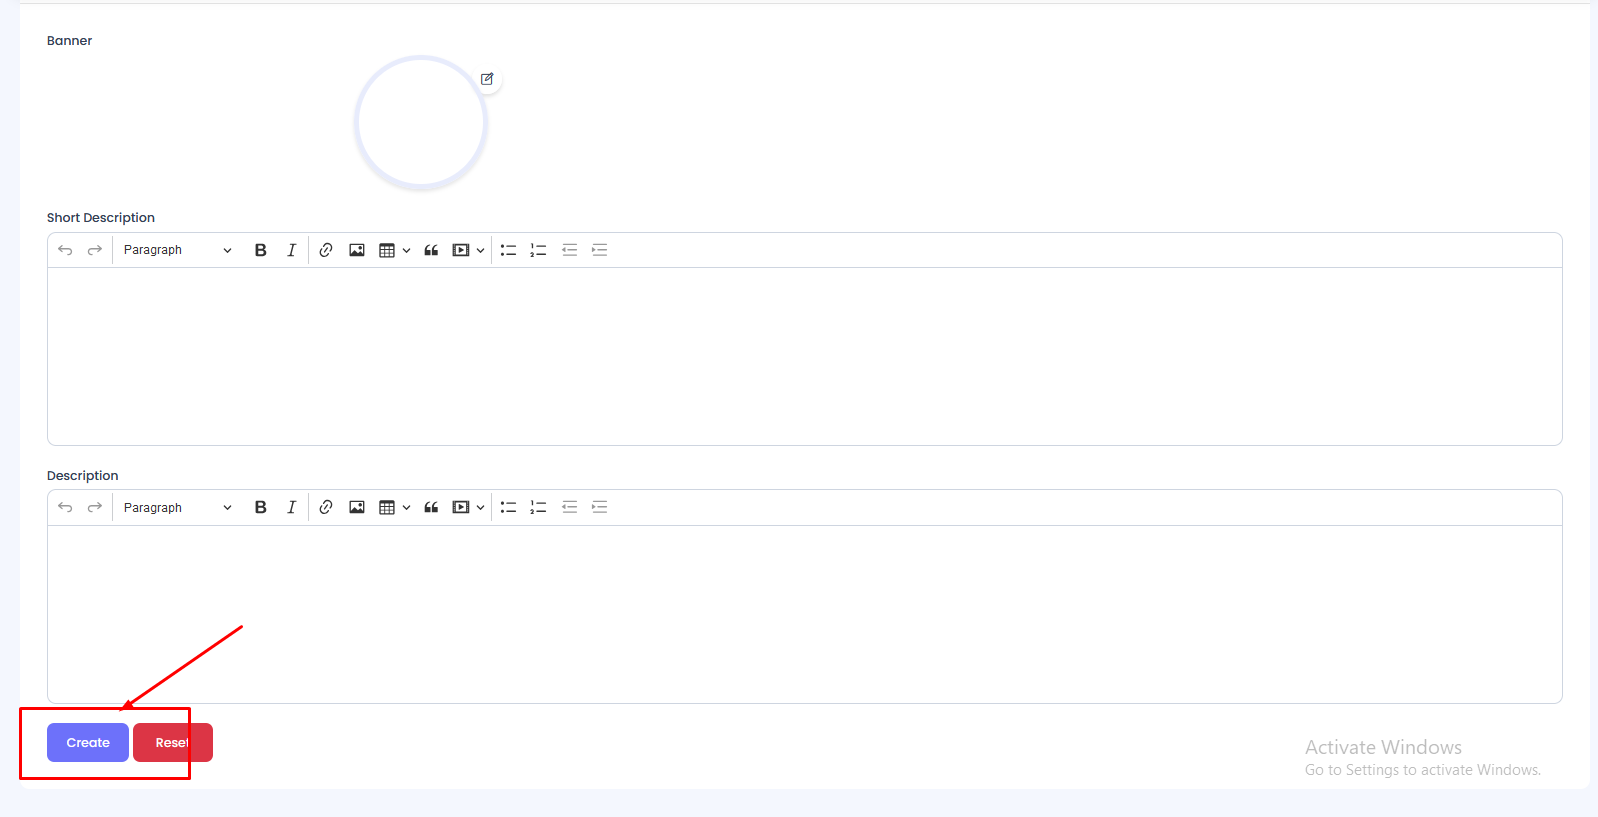
After entering the details, click Create to add the consultancy service.
Viewing Testing Consultancy
The consultancy index page displays the following columns:
- Serial: Auto-generated serial number.
- Banner: The uploaded image.
- Administrative Department: The associated department.
- Is Active: The status of the consultancy (Active/Inactive).
- Actions: Options to edit, delete, or toggle activation status.
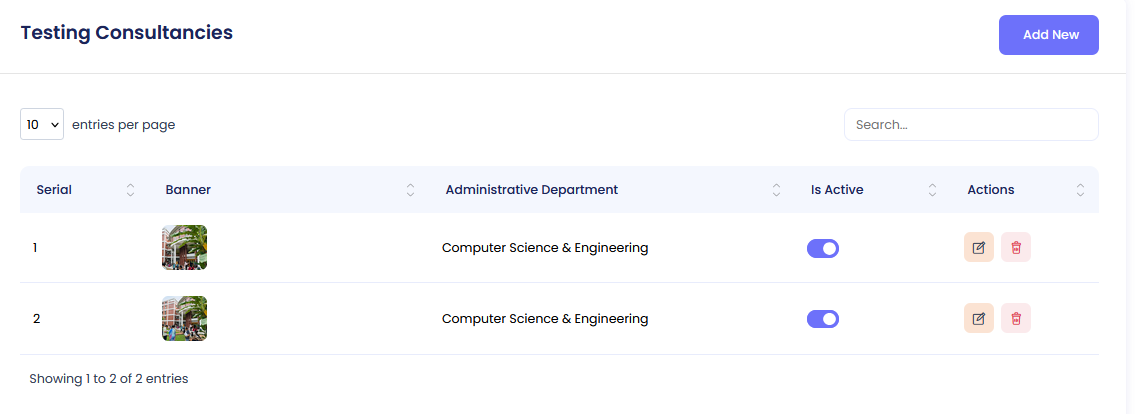
Editing a Testing Consultancy
To modify consultancy details:
- Step 1: Click the Edit button.
- Step 2: Update the necessary fields and click Save Changes.
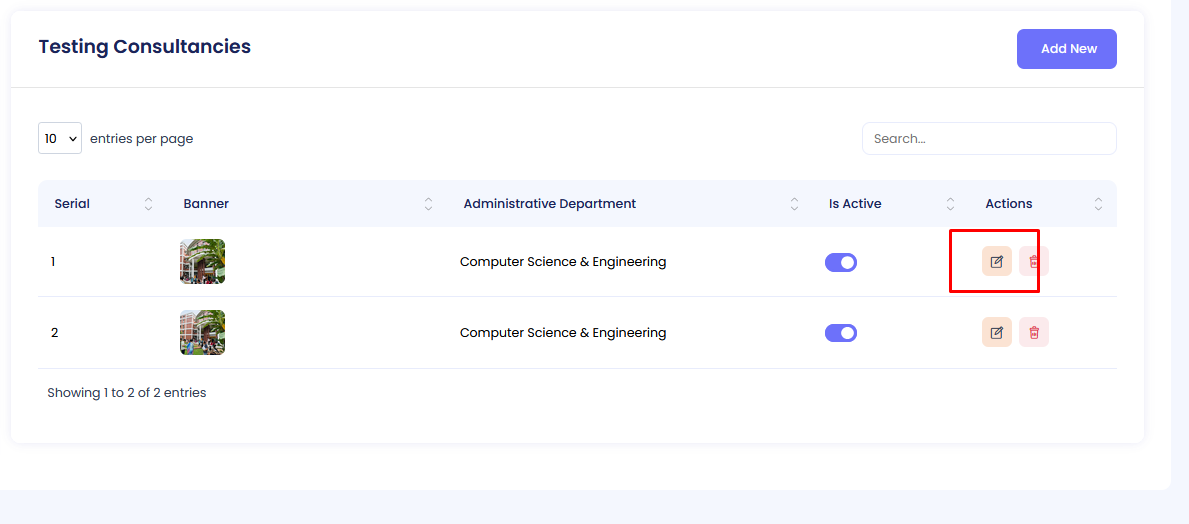
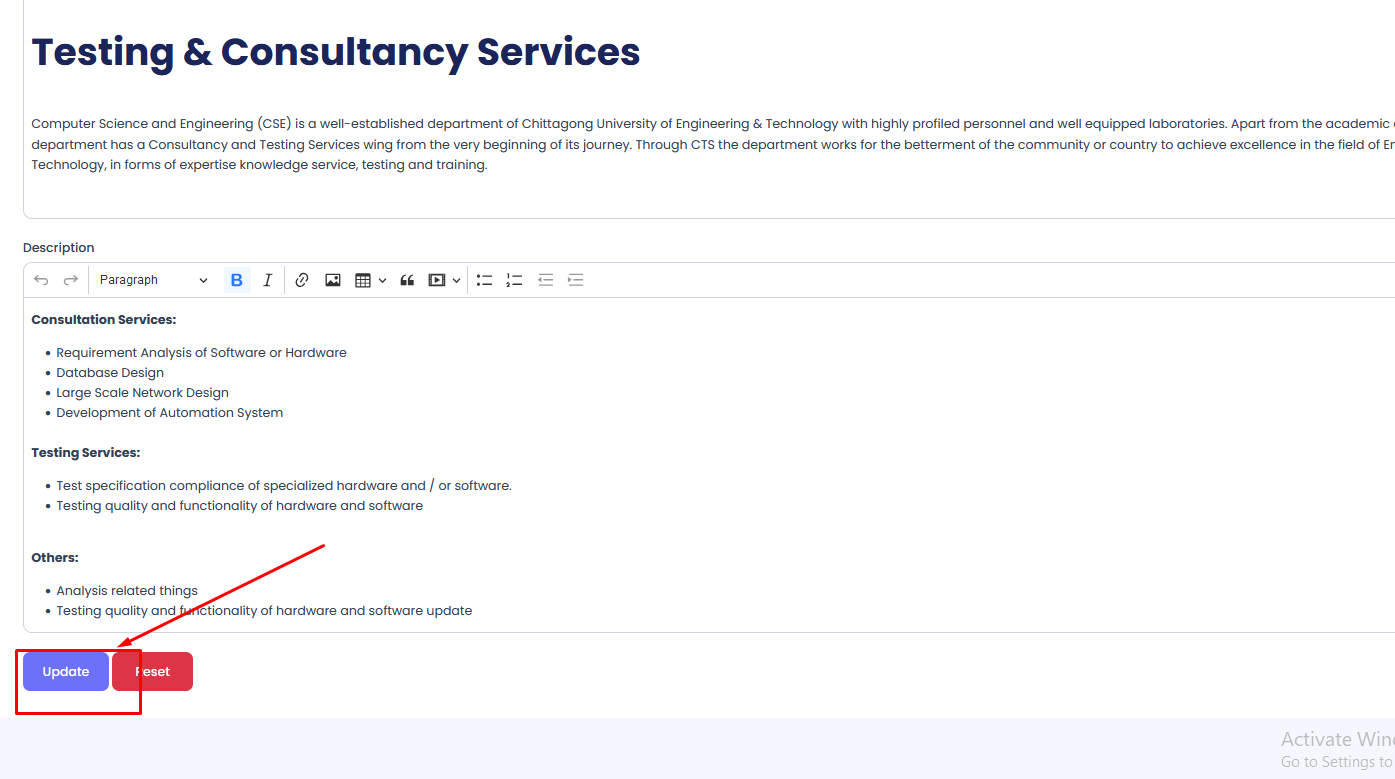
Activating/Deactivating a Testing Consultancy
To change the status of a consultancy:
- Step 1: Click the toggle switch in the "Is Active" column for the desired consultancy. .
- Step 2: The status will update automatically.
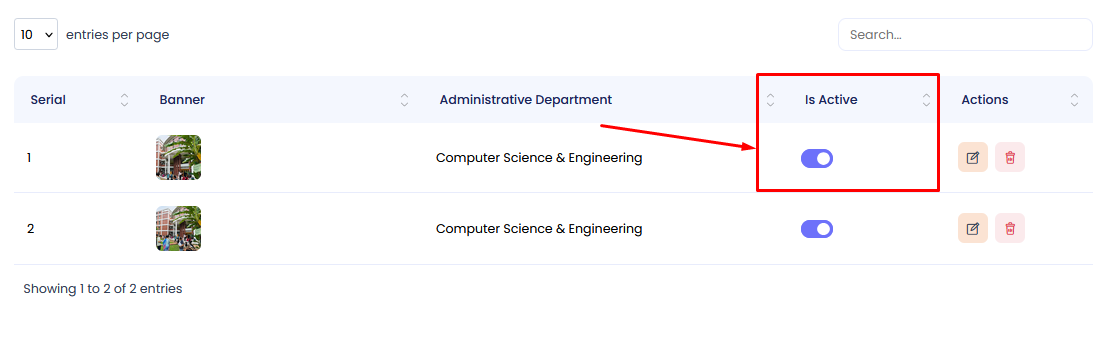
Active consultancies are visible to users, while inactive ones are hidden.
Deleting a Testing Consultancy
To remove a Testing Consultancy:
- Step 1: Click the Delete button next to the testing consultancy you want to remove.
- Step 2: Confirm deletion by clicking Yes, Delete.
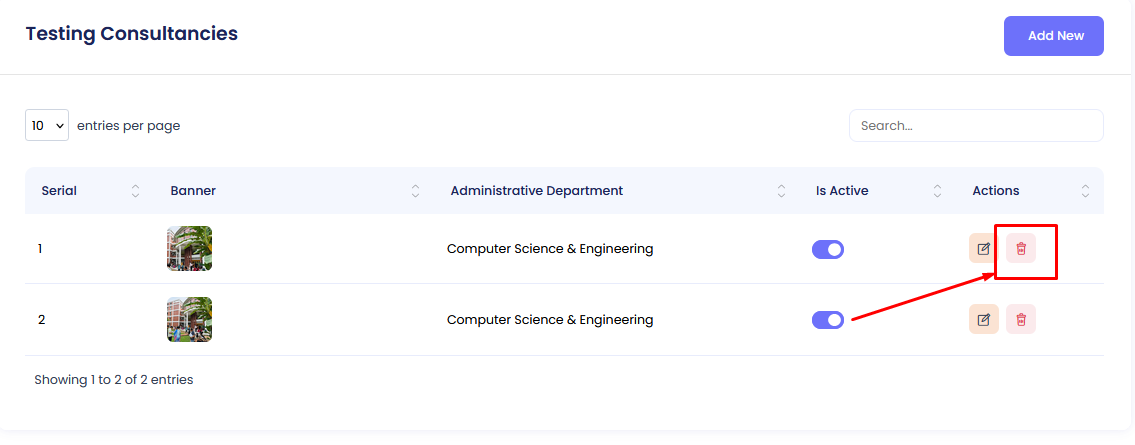
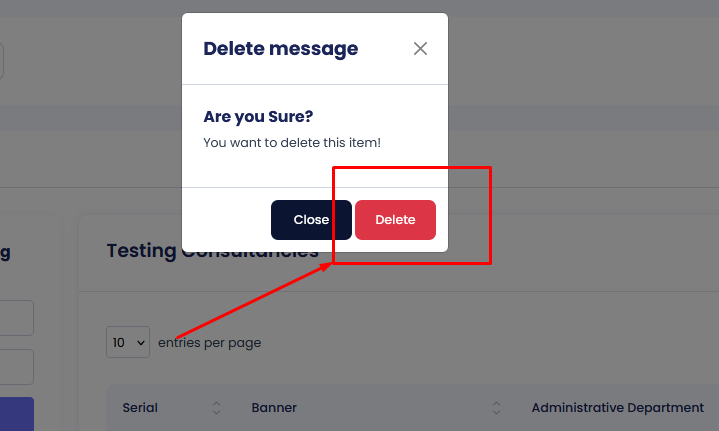
Deleted testing consultancy will no longer be displayed in the system.
Academic Curriculum Management
This section allows you to create, update, and manage academic curricula.
Accessing the Academic Curriculum Menu
Step 1: Navigate to the Administrative Department section in the main menu.
Step 2: In the submenu, click on Academic Curriculum.
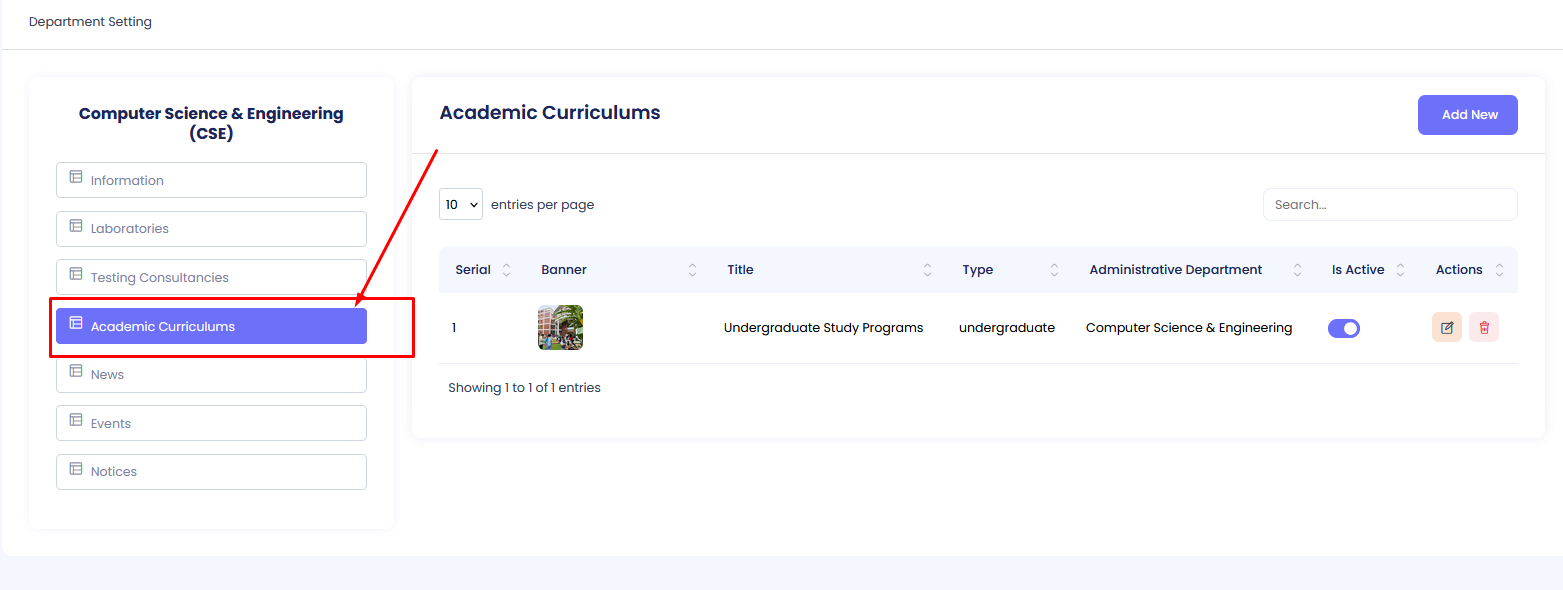
Creating a New Academic Curriculum
Step 1: Click on the Add New button.
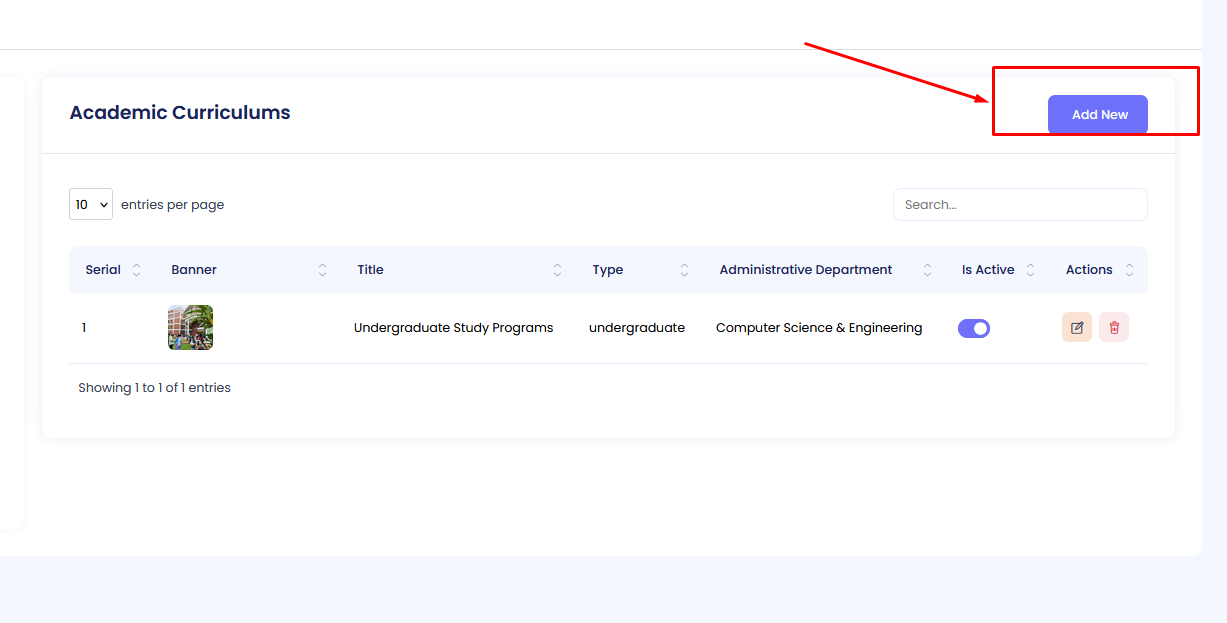
Fill in the required fields in the form:
- Banner: Upload a relevant image for the curriculum.
- Title: Enter the title of the curriculum.
- Type: Select the type of curriculum (e.g., "Undergraduate," "Postgraduate," "Diploma," etc. - *Specify the actual options*).
- Short Description: Provide a brief description of the curriculum.
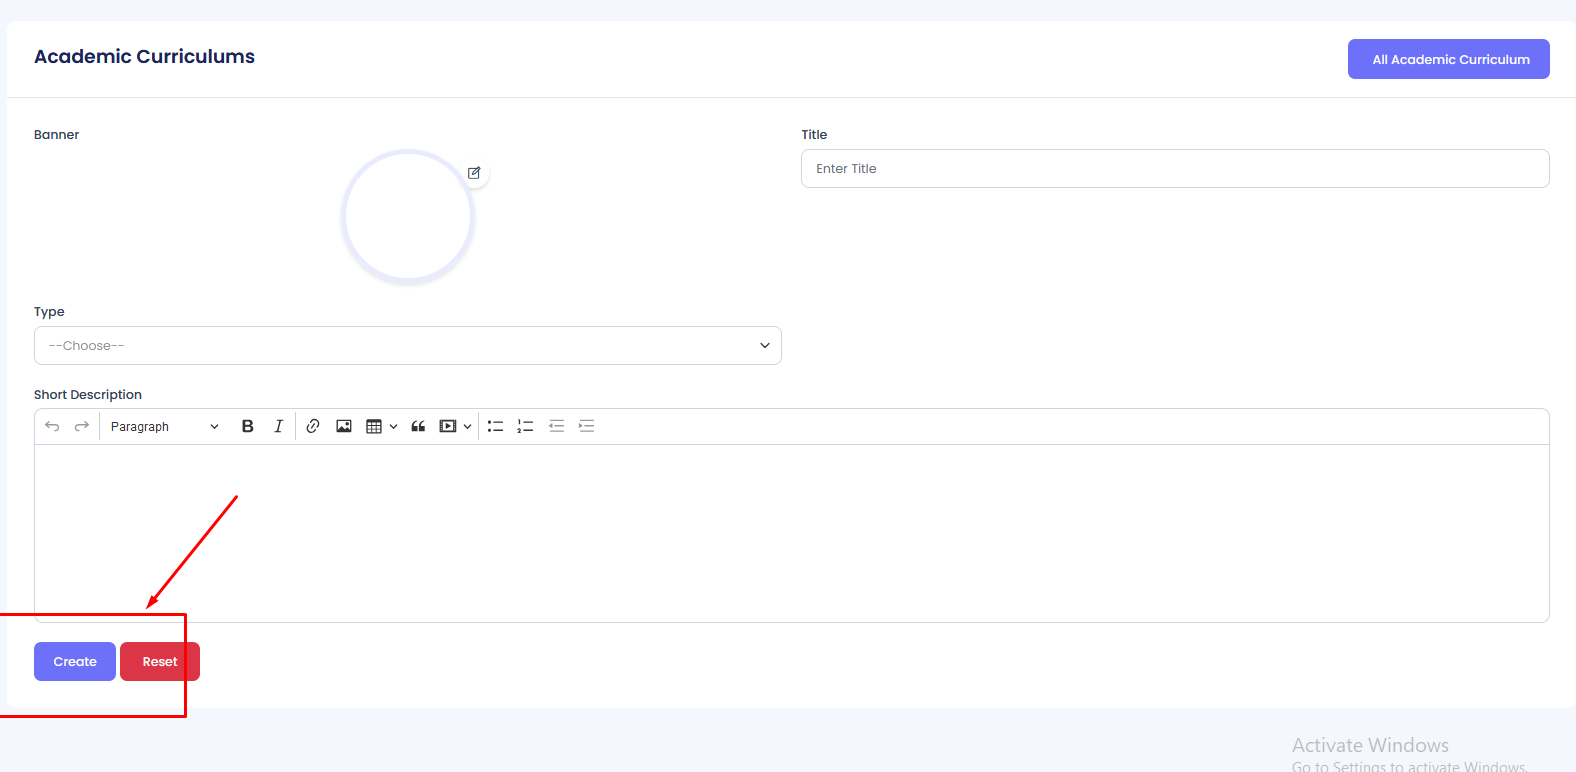
After entering the details, click Create to add the curriculum.
Viewing and Managing Academic Curricula
The curriculum index page displays the following columns:
- Serial: Auto-generated serial number.
- Banner: The uploaded image.
- Title: The title of the curriculum.
- Type: The type of curriculum.
- Administrative Department: The associated department.
- Is Active: The status of the curriculum (Active/Inactive).
- Actions: Options to edit, delete, or toggle activation status.
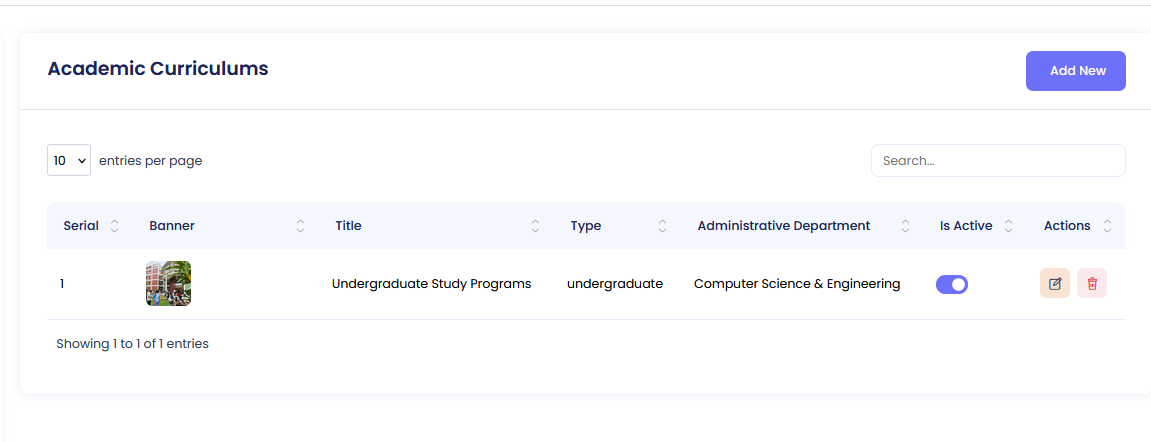
Editing an Academic Curriculum
To modify curriculum details:
- Step 1: Click the Edit button in the "Actions" column for the curriculum you wish to edit.
- Step 2: Update the necessary fields in the form.
- Step 3: Click Save Changes.
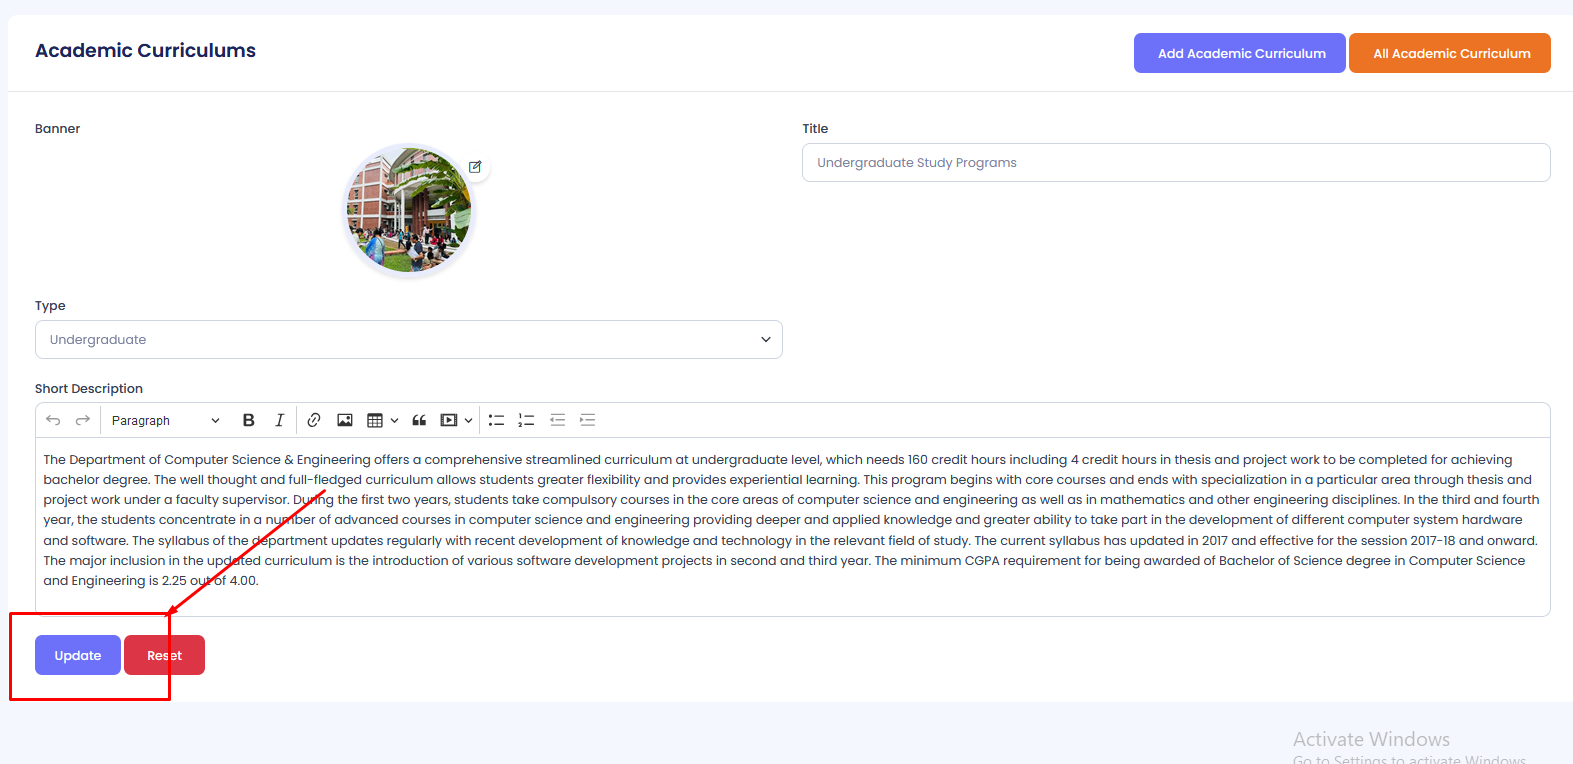
Activating/Deactivating an Academic Curriculum
To change the status of a curriculum:
- Step 1: Click the toggle switch or checkbox in the "Is Active" column for the desired curriculum.
- Step 2: The status will update automatically.
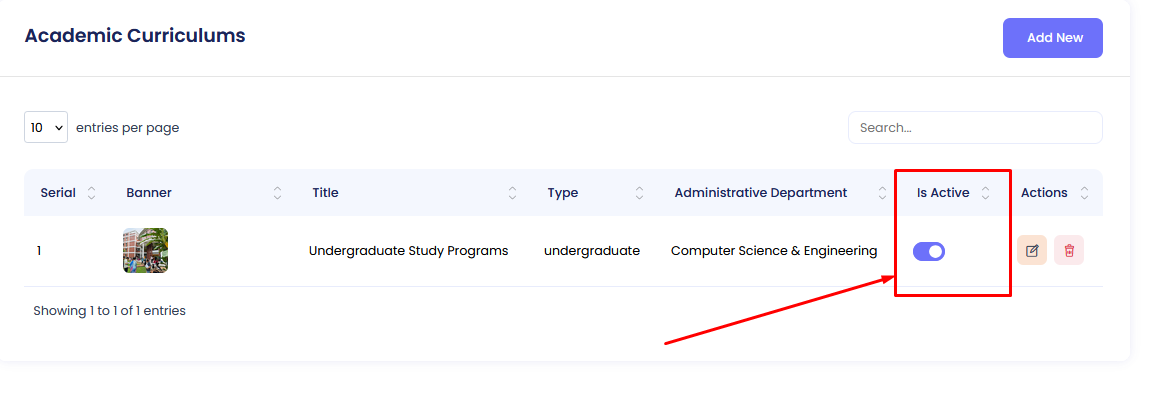
Active curricula are visible to users, while inactive ones are hidden.
Deleting an Academic Curriculum
To remove an academic curriculum:
- Step 1: Click the Delete button in the "Actions" column for the curriculum you want to remove.
- Step 2: Confirm deletion by clicking Yes, Delete in the confirmation dialog.
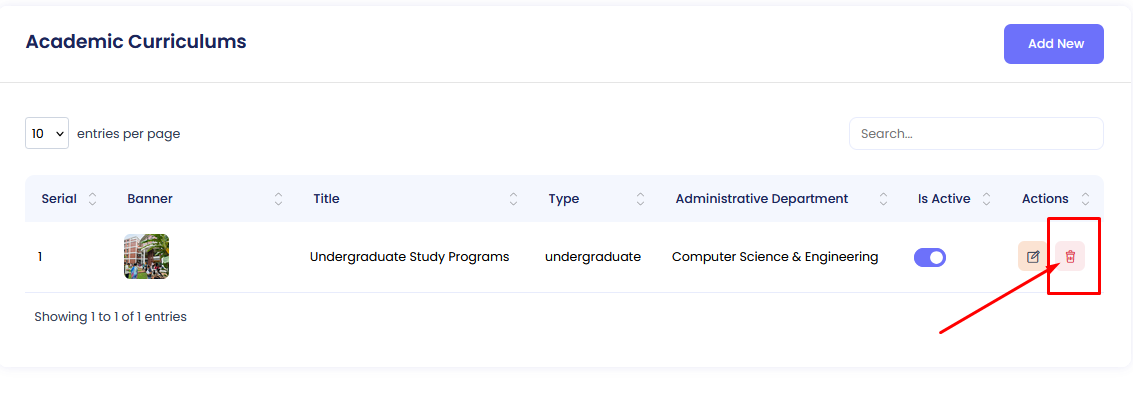
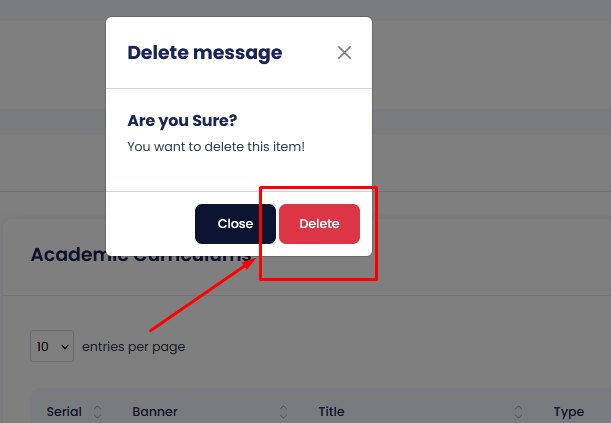
Deleted curricula will no longer be displayed in the system.
News Management
This section allows you to create, update, and manage news articles.
Accessing the News Menu
Step 1: Navigate to the Administrative Department section in the main menu.
Step 2: In the submenu, click on News.
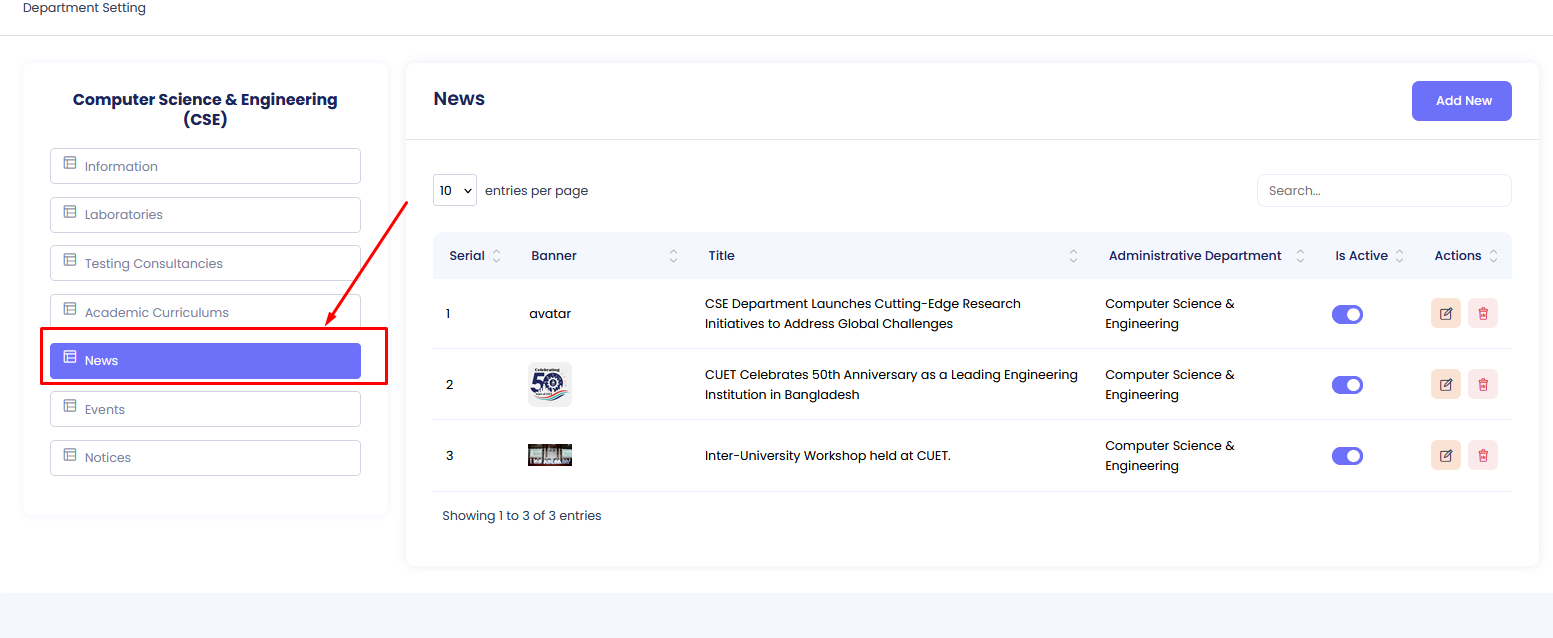
Creating a New News Article
Step 1: Click on the Add New button.
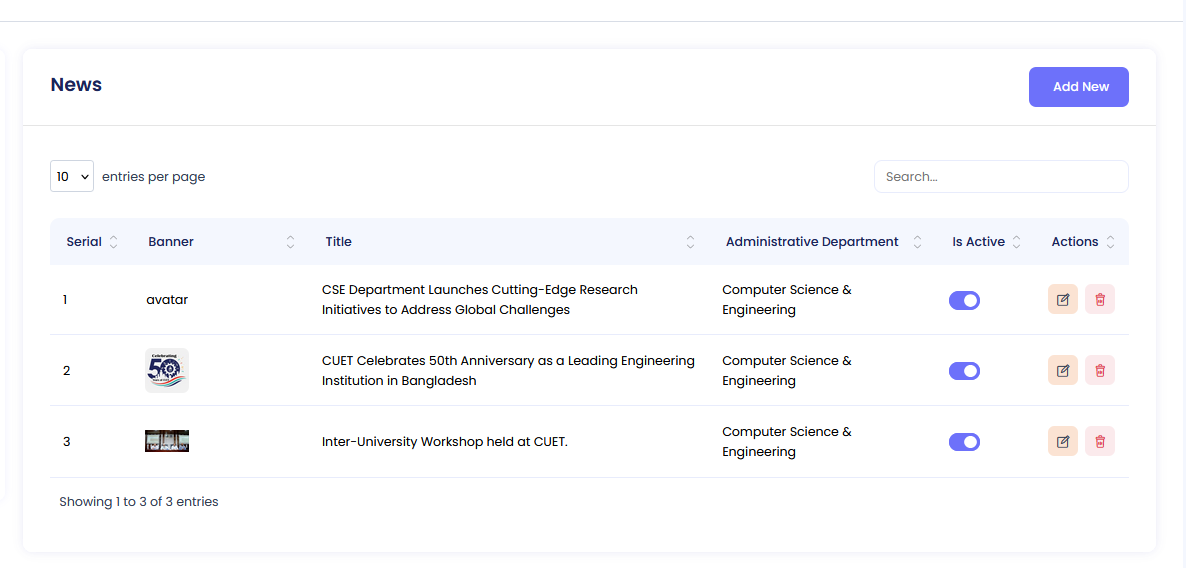
Fill in the required fields in the form:
- Banner: Upload a relevant image for the news article.
- Title: Enter the title of the news article.
- Date: Select the date of the news article.
- Description: Enter the full description or content of the news article.
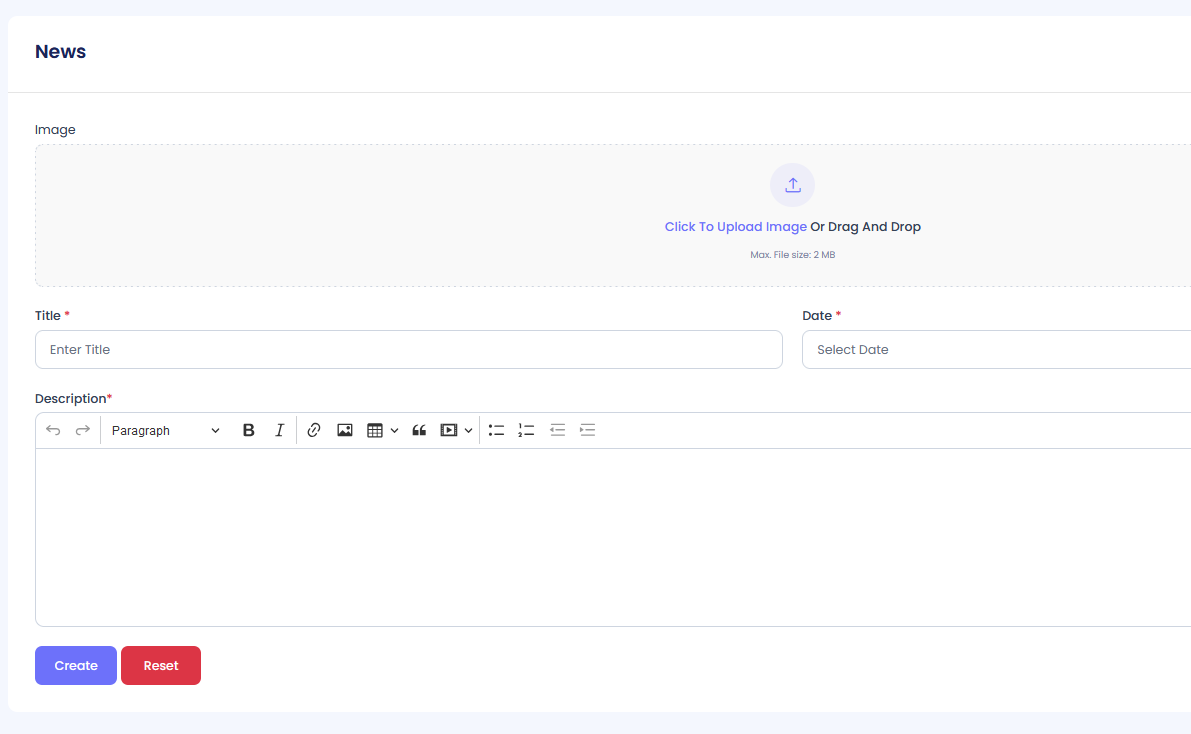
After entering the details, click Create to add the news article.
Viewing and Managing News Articles
The news index page displays the following columns:
- Banner: The uploaded image.
- Title: The title of the news article.
- Administrative Department: The associated department.
- Is Active: The status of the news article (Active/Inactive).
- Actions: Options to edit, delete, or toggle activation status.
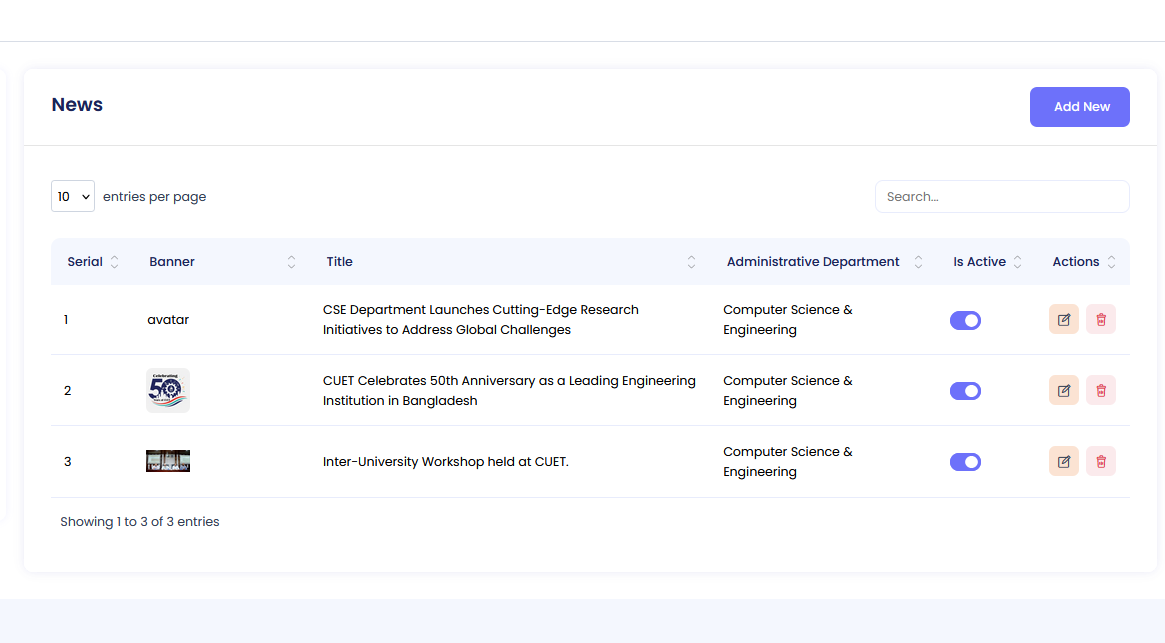
Editing a News Article
To modify news article details:
- Step 1: Click the Edit button in the "Actions" column for the news article you wish to edit.
- Step 2: Update the necessary fields in the form.
- Step 3: Click Save Changes.
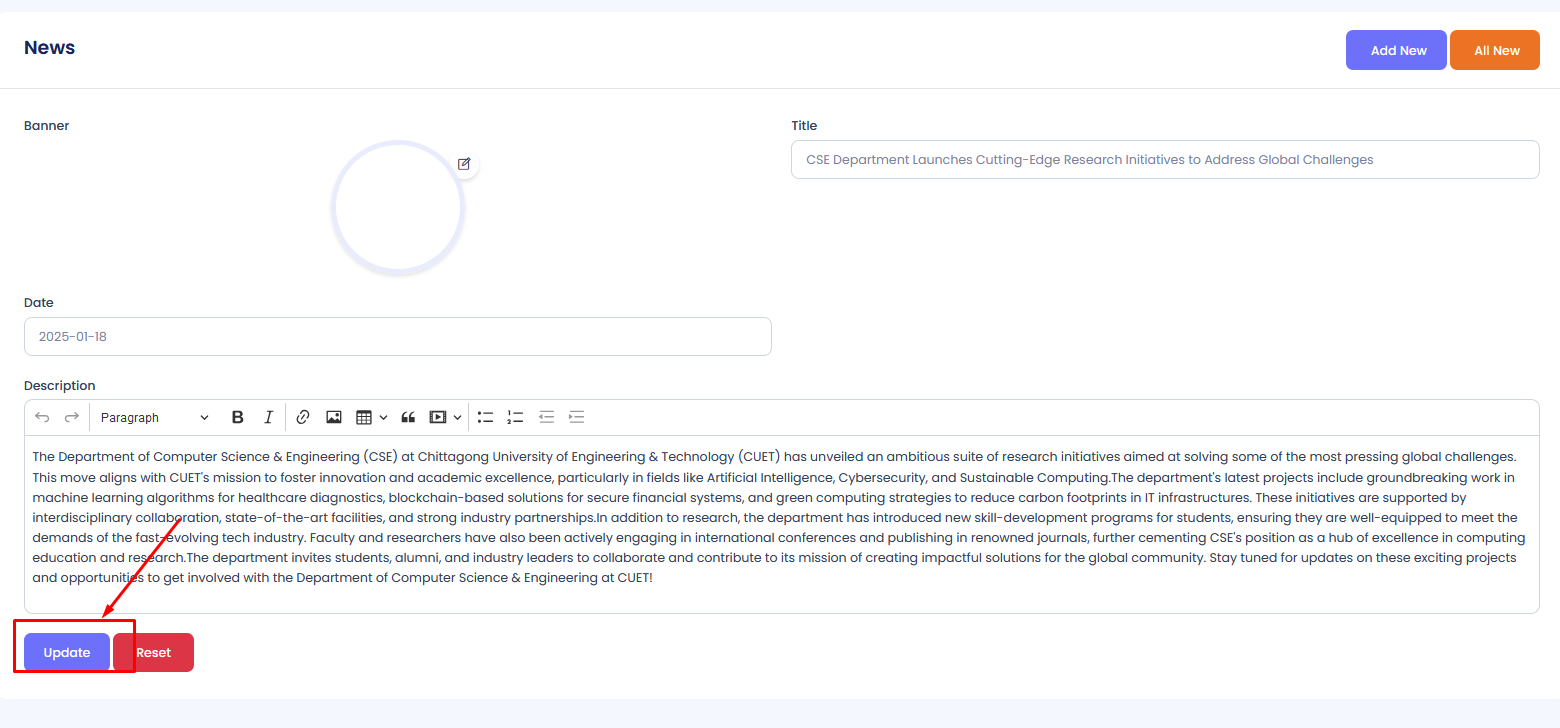
Activating/Deactivating a News Article
To change the status of a news article:
- Step 1: Click the toggle switch or checkbox in the "Is Active" column for the desired news article.
- Step 2: The status will update automatically.
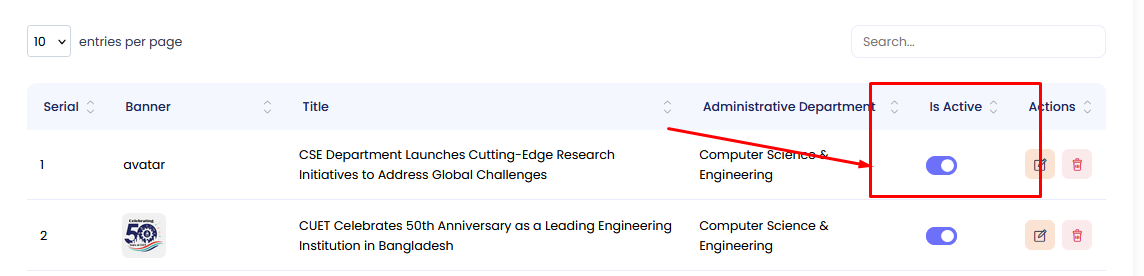
Active news articles are visible to users, while inactive ones are hidden.
Deleting a News Article
To remove a news article:
- Step 1: Click the Delete button in the "Actions" column for the news article you want to remove.
- Step 2: Confirm deletion by clicking Yes, Delete in the confirmation dialog.
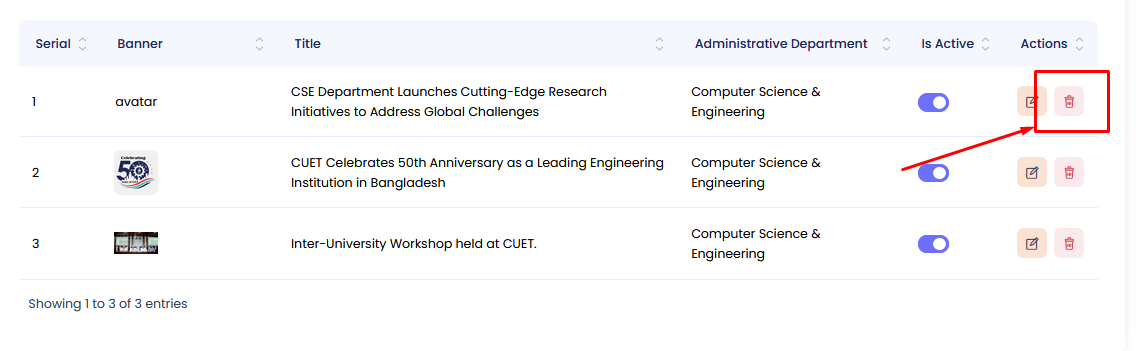
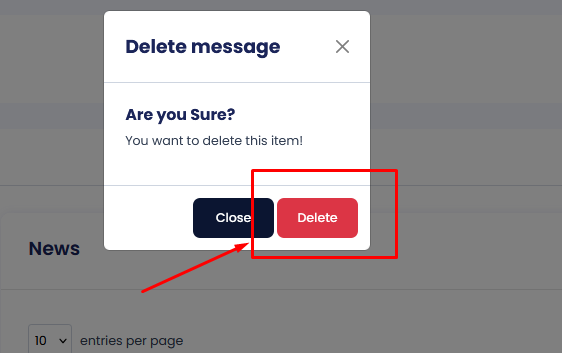
Deleted news articles will no longer be displayed in the system.
Event Management
This section allows you to create, update, and manage events.
Accessing the Event Menu
Step 1: Navigate to the Administrative Department section in the main menu.
Step 2: In the submenu, click on Events.

Creating a New Event
Step 1: Click on the Add New button.

Fill in the required fields in the form:
- Banner: Upload a relevant image for the event.
- Title: Enter the title of the event.
- Event Type: Select the type of event (e.g., "Conference," "Workshop," "Seminar," etc. - *Specify the actual options*).
- From: Select the start date of the event.
- To: Select the end date of the event.
- Start Time: Enter the start time of the event.
- End Time: Enter the end time of the event.
- Total Slot: Enter the total number of available slots for the event.
- Link: If applicable, enter a link related to the event (e.g., registration link).
- Location: Enter the location of the event.
- Description: Enter the full description or details of the event.

After entering the details, click Create to add the event.
Viewing and Managing Events
The event index page displays the following columns:
- Serial: Auto-generated serial number.
- Title: The title of the event.
- Administrative Department: The associated department.
- Event Type: The type of event.
- From: The start date of the event.
- To: The end date of the event.
- Is Active: The status of the event (Active/Inactive).
- Actions: Options to edit, delete, or toggle activation status.

Editing an Event
To modify event details:
- Step 1: Click the Edit button in the "Actions" column for the event you wish to edit.
- Step 2: Update the necessary fields in the form.
- Step 3: Click Save Changes.

Activating/Deactivating an Event
To change the status of an event:
- Step 1: Click the toggle switch or checkbox in the "Is Active" column for the desired event.
- Step 2: The status will update automatically.

Active events are visible to users, while inactive ones are hidden.
Deleting an Event
To remove an event:
- Step 1: Click the Delete button in the "Actions" column for the event you want to remove.
- Step 2: Confirm deletion by clicking Yes, Delete in the confirmation dialog.


Deleted events will no longer be displayed in the system.
Notice Management
This section allows you to create, update, and manage notices.
Accessing the Notice Menu
Step 1: Navigate to the Administrative Department section in the main menu.
Step 2: In the submenu, click on Notices.

Creating a New Notice
Step 1: Click on the Add New button.

Fill in the required fields in the form:
- Title: Enter the title of the notice.
- Notice Type: Select the type of notice (e.g., "General," "Academic," "Event," etc. - *Specify the actual options*).
- PDF: Upload the notice PDF file.
- Publish Date: Select the publish date for the notice.
- External Link: If applicable, enter an external link related to the notice.
- Description: Enter the full description or content of the notice.

After entering the details, click Create to add the notice.
Viewing and Managing Notices
The notice index page displays the following columns:
- Serial: Auto-generated serial number.
- Title: The title of the notice.
- Administrative Department: The associated department.
- Notice Type: The type of notice.
- PDF: The uploaded PDF file (may display a link or icon).
- Publish Date: The publish date of the notice.
- Is Active: The status of the notice (Active/Inactive).
- Actions: Options to edit, delete, or toggle activation status.

Editing a Notice
To modify notice details:
- Step 1: Click the Edit button in the "Actions" column for the notice you wish to edit.
- Step 2: Update the necessary fields in the form.
- Step 3: Click Save Changes.

Activating/Deactivating a Notice
To change the status of a notice:
- Step 1: Click the toggle switch or checkbox in the "Is Active" column for the desired notice.
- Step 2: The status will update automatically.

Active notices are visible to users, while inactive ones are hidden.
Deleting a Notice
To remove a notice:
- Step 1: Click the Delete button in the "Actions" column for the notice you want to remove.
- Step 2: Confirm deletion by clicking Yes, Delete in the confirmation dialog.


Deleted notices will no longer be displayed in the system.
CUET Profile Creation Module - Documentation
- Item Name : CUET Profile Creation Module
- Created: 22 December 2024
- Author : TheTork
- Support Mail: Support Mail
This documentation is designed to assist you with each step of customization. Please read it carefully to understand how this module is structured and how to edit it effectively.

System Requirements
To use CUET, make sure your hosting provider is running the following software:
- Backend: Laravel 10
- Frontend: Next.js 14
- Server: Apache, nginx, or another compatible web server
- Database: MySQL Database server
- PHP Version: PHP 8 or higher
- Node.js Version: Node.js 18 or higher
- Memory: Minimum 4GB RAM (8GB recommended)
- Storage: Minimum 20GB disk space
Required PHP Extensions
- PDO PHP extension
- OpenSSL PHP extension
- mbstring PHP extension
- exif PHP extension
- fileinfo PHP extension
- xml PHP extension
- Ctype PHP extension
- JSON PHP extension
- Tokenizer PHP extension
- cURL PHP extension
- zip PHP extension
- iconv PHP extension
- Ensure the
mod_rewriteApache module is enabled
Recommended PHP Limits
Many issues that you may run into such as: white screen, demo content fails when importing, empty page content and other similar issues are all related to low PHP configuration limits. The solution is to increase the PHP limits. You can do this on your own, or contact your web host and ask them to increase those limits to a minimum as follows:
max_execution_time 300memory_limit 256Mpost_max_size 64Mupload_max_filesize 32Mmax_input_time = 60max_input_vars = 3000
On this project, we're using the Laravel 10.x. Please go to Laravel documentation page for more information. Also consider upgrading your PHP version to the latest stable.
Installation Process
Laravel 10 Installation
- Ensure you have Composer installed. If not, download it from Composer's official website.
- Run the following command to create a new Laravel project:
composer create-project laravel/laravel project-name - Navigate to the project directory:
cd project-name - Set the application key:
php artisan key:generate - Configure your environment variables in the
.envfile for database and other settings. - Run the Laravel development server:
php artisan serve - Access the application at http://localhost:8000.
Additional Notes
- Ensure you have a working environment with PHP 8.2 and Node.js 18 or higher.
- Use a code editor like Visual Studio Code for better development experience.
- Check the official documentation of Laravel for advanced configurations.
Update Profile
Faculty members, officers and others can easily update their profile information by following a simple process. After logging in, clicking on the profile button will open a form where you can update your details, including Name, Email, Phone Number, New Password, and Confirm Password.
Steps to Update Profile
Step 1: Click on the Profile button located at the top-right corner of the dashboard.
Step 2: A form will appear containing the following fields:
- Name: Your current name will be pre-filled. Edit it if needed.
- Email: Your registered email address will be shown. Update it if necessary.
- Phone Number: Your contact number will be pre-filled. Modify it as required.
- New Password: Enter a new password if you wish to change it.
- Confirm Password: Re-enter the new password to confirm.
Step 3: Once all changes are made, click on the Submit button to save the updates.
Upon successful submission, your profile will be updated, and any changes to your email or password will take immediate effect. If required, a confirmation email may be sent to verify the updated email address.
Faculty Member Profile Creation
The Faculty Member Profile section allows faculty members to create and update their profiles with detailed information. Follow the steps below to access and manage your profile details.
In the Faculty Member Profile menu there are several sub menus. Those are
- Profiles
- Educations
- Social Accounts
- Publications
- Researches
- Courses
- Supervisions
- Experiences
- Achievements Awards
Accessing the Profile Menu
Step 1: Navigate to the Faculty Member Profiles section in the main menu.
Step 2: From the submenu on the right, click on the first menu item labeled Profile.
Step 3: Click on Edit button positioned on the top right of the page.
Updating Profile Details
In the profile form, you can update the following fields:
- Slug: A unique identifier for your profile. Ensure it is descriptive and unique.
- Email: Update your email address as required. This will be your contact email.
- Address: Add or update your physical address.
- Personal Website: Provide a link to your personal or professional website, if available.
- Introduction: Write a brief introduction about yourself, including your background and achievements.
- Research Interest: Specify your areas of research interest to showcase your expertise.
- Education Introduction: Add a summary of your educational background.
- Other Description: Include any additional details or descriptions that you want to share.
After updating all necessary fields, click the Update button to save your profile details. The changes will be reflected immediately and visible to others based on the system's access permissions.
Education Profile Creation
The Education Profile section allows you to create, update, and delete your education details. Follow the steps below to manage your education information within your Faculty Member Profile.
Accessing the Faculty Member Profile Menu
Step 1: Navigate to the Faculty Member Profiles section in the main menu.
Accessing the Education Submenu
Step 3: Once in the Faculty Member Profile section, you will find a submenu on the left side. Click on the menu item labeled Education.
Creating Education Details
In the education form, you can add the following details:
First you have to hit the add new button
- Institute: Enter the name of the educational institution you attended.
- From: Specify the start date of your education at this institution.
- To: Specify the end date of your education at this institution.
- Description: Provide a brief description of your studies, key subjects, or achievements during your time at the institution.
- Education Type: Choose the type of education (e.g., Bachelor's, Master's, Ph.D., etc.) you pursued at the institute.
Once you've filled in all required fields, click the Submit button to save your education details. The information will be stored and displayed on your profile as per the system's access permissions.
Editing Education Details
If you need to make changes to your education details:
- Step 1: Navigate to the Education Profile section as mentioned above.
- Step 2: Click on the Edit button next to the education entry you want to update.
- Step 3: Modify the relevant fields and click the Save Changes button to update your education details.
Deleting Education Details
If you want to remove an education entry from your profile:
- Step 1: Navigate to the Education Profile section as mentioned above.
- Step 2: Click on the Delete button next to the education entry you want to remove.
- Step 3: Confirm the deletion by clicking the Yes, Delete button in the confirmation prompt.
After deleting an education entry, it will no longer be visible on your profile.
Add Publication
The Publication Profile section allows you to create, update, and delete details about your publications. Follow the steps below to manage your publication information within your Faculty Member Profile.
Accessing the Faculty Member Profile Menu
Step 1: Navigate to the Faculty Member Profiles section in the main menu.
Accessing the Publications Submenu
Step 2: Once in the Faculty Member Profile section, you will find a submenu on the left side. Click on the menu item labeled Publications.
Creating Publication Details
First, you have to hit the Add New button.
In the publication form, you can add the following details:
- Title: Enter the name of the publication (e.g., "Research on Quantum Computing").
- URL: Provide the link to the online version of the publication (if applicable).
- File: Upload the publication file (e.g., PDF, DOCX, etc.).
- Date: Enter the date of publication (e.g., 2025-01-26).
Once you've filled in all required fields, click the Create button to save your publication details. The information will be stored and displayed on your profile as per the system's access permissions.
Editing Publication Details
If you need to make changes to your publication details:
- Step 1: Navigate to the Publications Profile section as mentioned above.
- Step 2: Click on the Edit button next to the publication you want to update.
- Step 3: Modify the relevant fields (e.g., title, URL, file, or date) and click the Save Changes button to update your publication details.
Deleting Publication Details
If you want to remove a publication entry from your profile:
- Step 1: Navigate to the Publications Profile section as mentioned above.
- Step 2: Click on the Delete button next to the publication you want to remove.
- Step 3: Confirm the deletion by clicking the Yes, Delete button in the confirmation prompt.
After deleting a publication entry, it will no longer be visible on your profile.
Add Research
The Research Profile section allows you to create, update, and delete details of your research projects. Follow the steps below to manage your research information within your Faculty Member Profile.
Accessing the Faculty Member Profile Menu
Step 1: Navigate to the Faculty Member Profiles section in the main menu.
Accessing the Research Submenu
Step 2: Once in the Faculty Member Profile section, you will find a submenu on the left side. Click on the menu item labeled Research.
Creating Research Details
First, you have to hit the add new button.
In the research form, you can add the following details:
- Title: Enter the title of the research project.
- App Admin Research Type: Select the research type from the provided dropdown (e.g., Journal, Conference, Thesis).
- URL: Provide the URL to the research publication or relevant resource.
- File: Upload the research document or any relevant file.
- Date: Enter the publication or completion date of the research.
- Status: Specify the research status (e.g., Ongoing, Published, Completed).
Once you've filled in all required fields, click the Create button to save your research details. The information will be stored and displayed on your profile as per the system's access permissions.
Editing Research Details
If you need to make changes to your research details:
- Step 1: Navigate to the Research Profile section as mentioned above.
- Step 2: Click on the Edit button next to the research entry you want to update.
- Step 3: Modify the relevant fields (e.g., title, research type, URL, file, date, or status) and click the Save Changes button to update your research details.
Deleting Research Details
If you want to remove a research entry from your profile:
- Step 1: Navigate to the Research Profile section as mentioned above.
- Step 2: Click on the Delete button next to the research entry you want to remove.
- Step 3: Confirm the deletion by clicking the Yes, Delete button in the confirmation prompt.
After deleting a research entry, it will no longer be visible on your profile.
Courses
The Course Profile section allows you to create, update, and delete details of courses associated with your Faculty Member Profile. Follow the steps below to manage your course information effectively.
Accessing the Faculty Member Profile Menu
Step 1: Navigate to the Faculty Member Profiles section in the main menu.
Accessing the Courses Submenu
Step 2: Once in the Faculty Member Profile section, locate the submenu on the left side. Click on the menu item labeled Courses.
Adding Course Details
First, click on the Add New button.
In the course form, you can add the following details:
- Title: Enter the course title.
- URL: Provide the URL for the course page or additional resources.
- File: Upload any course-related document, syllabus, or material file.
Once you've filled in all required fields, click the Create button to save your course details. The information will be stored and displayed on your profile as per the system's access permissions.
Editing Course Details
If you need to make changes to your course details:
- Step 1: Navigate to the Course Profile section as mentioned above.
- Step 2: Click on the Edit button next to the course entry you want to update.
- Step 3: Modify the relevant fields (e.g., title, URL, or file) and click the Save Changes button to update your course details.
Deleting Course Details
If you want to remove a course entry from your profile:
- Step 1: Navigate to the Course Profile section as mentioned above.
- Step 2: Click on the Delete button next to the course entry you want to remove.
- Step 3: Confirm the deletion by clicking the Yes, Delete button in the confirmation prompt.
After deleting a course entry, it will no longer be visible on your profile.
Supervision Profile Management
The Supervision Profile section allows you to manage the details of your supervision work. You can create, update, and delete supervision entries within your Faculty Member Profile. Follow the steps below to manage your supervision information.
Accessing the Faculty Member Profile Menu
Step 1: Navigate to the Faculty Member Profiles section in the main menu.
Accessing the Supervision Submenu
Step 2: Once in the Faculty Member Profile section, locate the submenu on the left side. Click on the menu item labeled Supervision.
Adding Supervision Details
First, click on the Add New button.
In the supervision form, you can add the following details:
- Title: Enter the title of the supervision project.
- URL: Provide the URL for the supervision project or related resources.
- File: Upload any relevant file or document related to the supervision.
Once you've filled in all required fields, click the Create button to save your supervision details. The information will be stored and displayed on your profile as per the system's access permissions.
Editing Supervision Details
If you need to make changes to your supervision details:
- Step 1: Navigate to the Supervision Profile section as mentioned above.
- Step 2: Click on the Edit button next to the supervision entry you want to update.
- Step 3: Modify the relevant fields (e.g., title, URL, or file) and click the Save Changes button to update your supervision details.
Deleting Supervision Details
If you want to remove a supervision entry from your profile:
- Step 1: Navigate to the Supervision Profile section as mentioned above.
- Step 2: Click on the Delete button next to the supervision entry you want to remove.
- Step 3: Confirm the deletion by clicking the Yes, Delete button in the confirmation prompt.
After deleting a supervision entry, it will no longer be visible on your profile.
Experience Profile Management
The Experience Profile section allows you to manage details about your professional experiences. You can add, edit, and delete entries to showcase your work history. Follow the steps below to manage your experience information.
Accessing the Faculty Member Profile Menu
Step 1: Navigate to the Faculty Member Profiles section in the main menu.
Accessing the Experience Submenu
Step 2: Once in the Faculty Member Profile section, locate the submenu on the left side. Click on the menu item labeled Experience.
Adding Experience Details
First, click on the Add New button.
In the experience form, you can add the following details:
- Title: Enter the title of your experience (e.g., "Software Engineer").
- Institute: Provide the name of the institution or organization where you worked.
- Designation: Enter your designation or role.
- From: Select the starting date of your experience.
- To: Select the ending date of your experience (leave blank if it's ongoing).
- Department: Mention the department you worked in.
Once you've filled in all required fields, click the Create button to save your experience details. The information will be displayed on your profile under the experience section.
Editing Experience Details
If you need to make changes to your experience details:
- Step 1: Navigate to the Experience Profile section as mentioned above.
- Step 2: Click on the Edit button next to the experience entry you want to update.
- Step 3: Modify the relevant fields (e.g., title, institute, designation, dates, or department) and click the Save Changes button to update your experience details.
Deleting Experience Details
If you want to remove an experience entry from your profile:
- Step 1: Navigate to the Experience Profile section as mentioned above.
- Step 2: Click on the Delete button next to the experience entry you want to remove.
- Step 3: Confirm the deletion by clicking the Yes, Delete button in the confirmation prompt.
After deleting an experience entry, it will no longer be visible on your profile.
Achievement and Award Profile Management
The Achievement and Award section allows you to document and showcase your notable achievements and awards. You can add, edit, and delete entries to highlight your accomplishments. Follow the steps below to manage your achievement and award details.
Accessing the Faculty Member Profile Menu
Step 1: Navigate to the Faculty Member Profiles section in the main menu.
Accessing the Achievement and Award Submenu
Step 2: Once in the Faculty Member Profile section, locate the submenu on the left side. Click on the menu item labeled Achievements and Awards.
Adding Achievement and Award Details
First, click on the Add New button.
In the achievement and award form, you can add the following details:
- Title: Enter the title of your achievement or award (e.g., "Best Research Paper").
- Date: Select the date when the award or achievement was received.
- Session Year: Enter the session year associated with the achievement or award.
- File: Upload any relevant file or document related to the achievement or award.
- URL: Provide a URL linking to further information about the achievement or award, if available.
Once you've filled in all required fields, click the Create button to save your achievement or award details. The information will be displayed on your profile under the Achievements and Awards section.
Editing Achievement and Award Details
If you need to make changes to your achievement or award details:
- Step 1: Navigate to the Achievements and Awards section as mentioned above.
- Step 2: Click on the Edit button next to the entry you want to update.
- Step 3: Modify the relevant fields (e.g., title, date, session year, file, or URL) and click the Save Changes button to update your details.
Deleting Achievement and Award Details
If you want to remove an entry from your profile:
- Step 1: Navigate to the Achievements and Awards section as mentioned above.
- Step 2: Click on the Delete button next to the entry you want to remove.
- Step 3: Confirm the deletion by clicking the Yes, Delete button in the confirmation prompt.
After deleting an entry, it will no longer be visible on your profile.
CUET Admin Module - Documentation
- Item Name : CUET Admin Module
- Created: 22 December 2024
- Author : TheTork
- Support Mail: Support Mail
This documentation is designed to assist you with each step of customization. Please read it carefully to understand how this module is structured and how to edit it effectively.
System Requirements
To use CUET, make sure your hosting provider is running the following software:
- Backend: Laravel 10
- Frontend: Next.js 14
- Server: Apache, nginx, or another compatible web server
- Database: MySQL Database server
- PHP Version: PHP 8 or higher
- Node.js Version: Node.js 18 or higher
- Memory: Minimum 4GB RAM (8GB recommended)
- Storage: Minimum 20GB disk space
Required PHP Extensions
- PDO PHP extension
- OpenSSL PHP extension
- mbstring PHP extension
- exif PHP extension
- fileinfo PHP extension
- xml PHP extension
- Ctype PHP extension
- JSON PHP extension
- Tokenizer PHP extension
- cURL PHP extension
- zip PHP extension
- iconv PHP extension
- Ensure the
mod_rewriteApache module is enabled
Recommended PHP Limits
Many issues that you may run into such as: white screen, demo content fails when importing, empty page content and other similar issues are all related to low PHP configuration limits. The solution is to increase the PHP limits. You can do this on your own, or contact your web host and ask them to increase those limits to a minimum as follows:
max_execution_time 300memory_limit 256Mpost_max_size 64Mupload_max_filesize 32Mmax_input_time = 60max_input_vars = 3000
On this project, we're using the Laravel 10.x. Please go to Laravel documentation page for more information. Also consider upgrading your PHP version to the latest stable.
Installation Process
Laravel 10 Installation
- Ensure you have Composer installed. If not, download it from Composer's official website.
- Run the following command to create a new Laravel project:
composer create-project laravel/laravel project-name - Navigate to the project directory:
cd project-name - Set the application key:
php artisan key:generate - Configure your environment variables in the
.envfile for database and other settings. - Run the Laravel development server:
php artisan serve - Access the application at http://localhost:8000.
Additional Notes
Admin Menu
The Admin Menu feature allows administrators to manage and customize the navigation menus of the platform effectively. From this section, you can reorder the menu items, edit their titles, and enable/disable them based on your preferences. All changes will take effect after pressing the Sync Menus button.
Key Features
- Change Menu Orientation: Drag and drop menu items to reorder them as needed.
- Edit Menu Titles: Modify the titles of menu items to match the desired labels.
- Toggle Active/Inactive: Enable or disable menu items using the status toggle.
- Sync Menus: After making changes, click on the Sync Menus button to apply updates and ensure functionality.
How to Use the Admin Menu
Step 1: Navigate to the Admin Menu section in the admin panel.
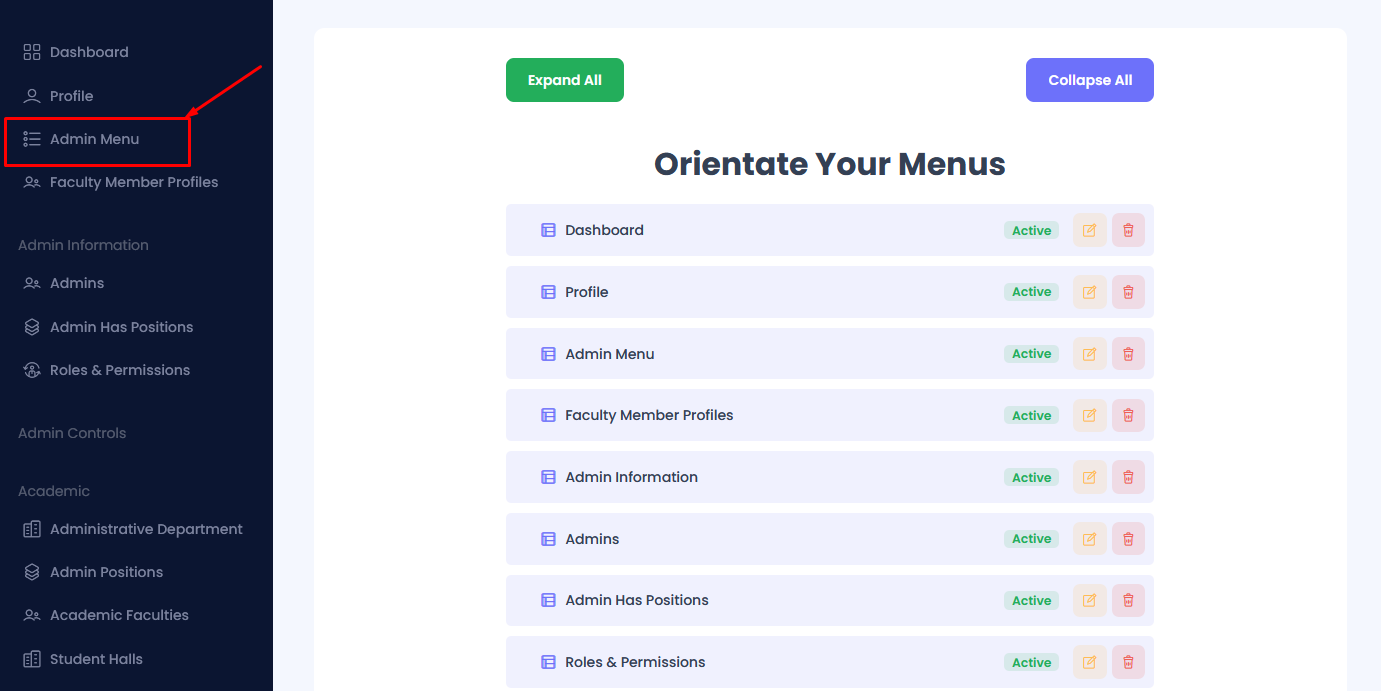
Step 2: Reorder menus by dragging and dropping them to the desired position.
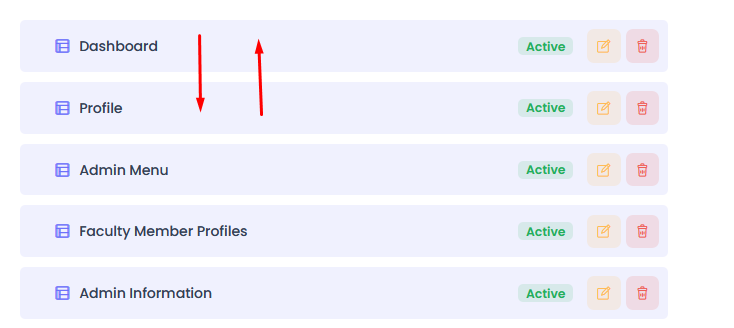
Step 3: To edit a menu title, click the Edit button, update the name, and save the changes.
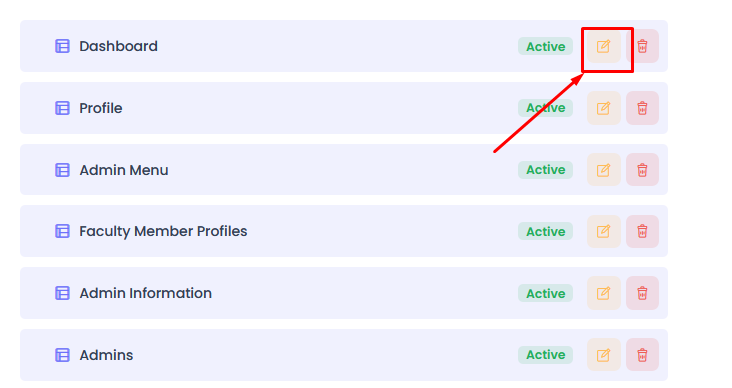
Step 4: Once all modifications are made, click on the Sync Menus button to save and apply all changes.
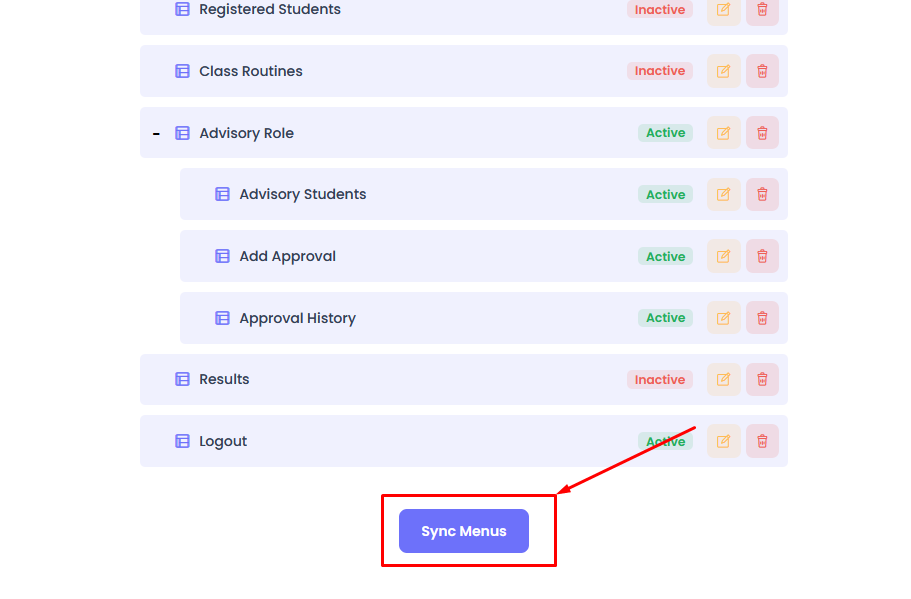
Profile
In this section you can update your profile
Step 1: Navigate to Profile in your admin sidebar and click.
Step 2: Change the name, email or phone number, etc. Then hit submit button.
Faculty Member Profile
The Faculty Member Profile module allows administrators to manage faculty member details, including their administrative roles, personal contact information, and activity status. You can view, add, edit, activate/deactivate, and manage faculty member profiles as needed.
Add a Faculty Member
Step 1: Navigate to Faculty Member Profiles in your admin sidebar and click.
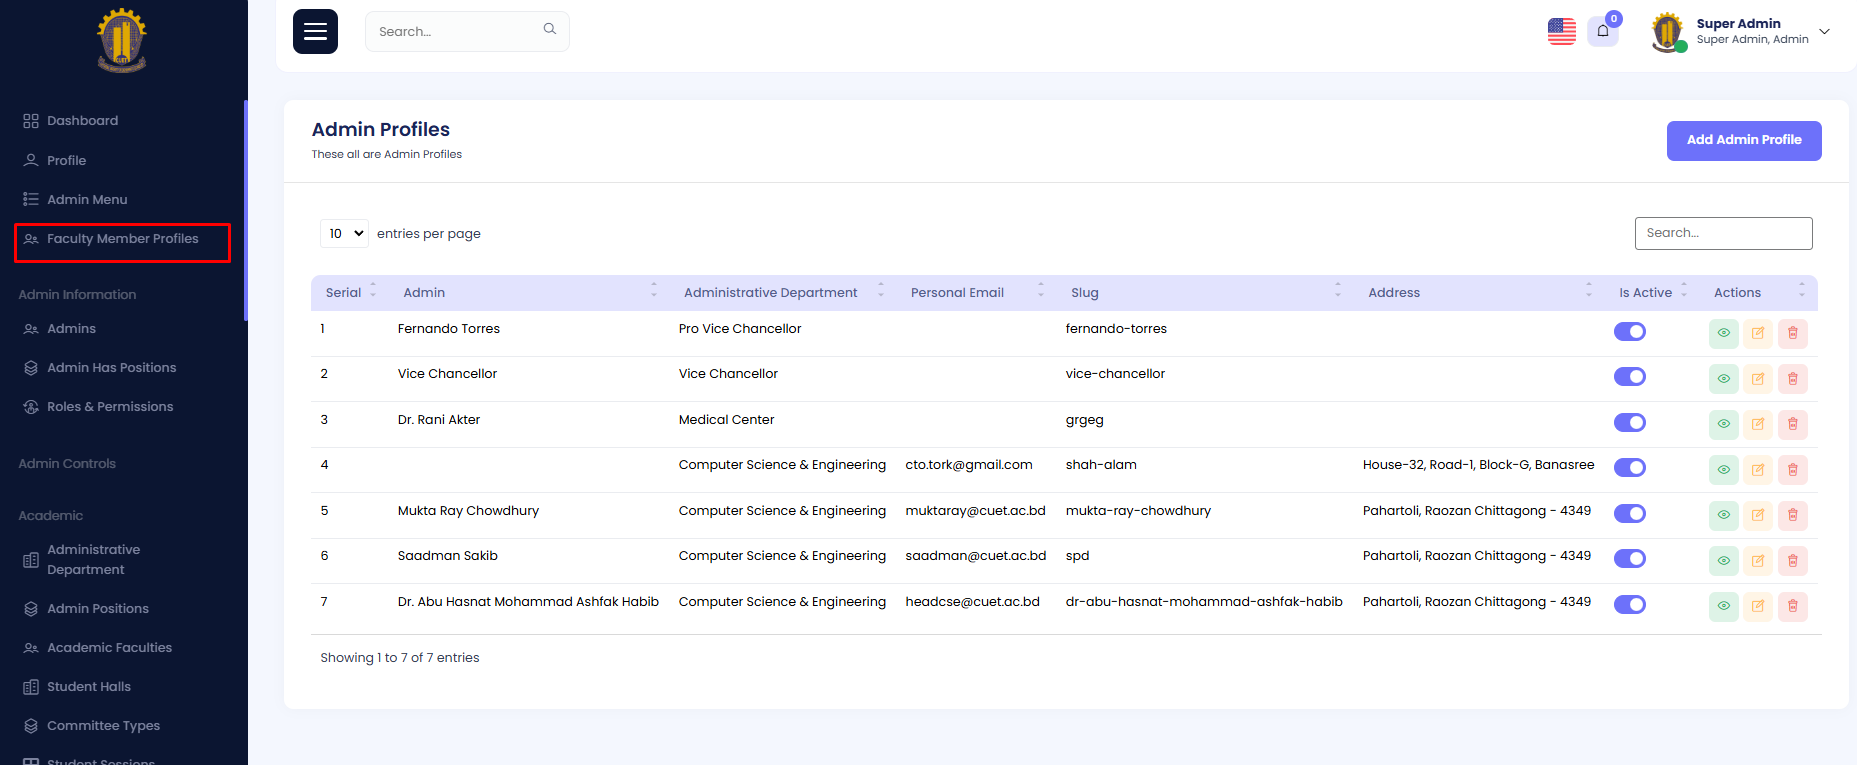
Step 2: Click on Add Faculty Member.
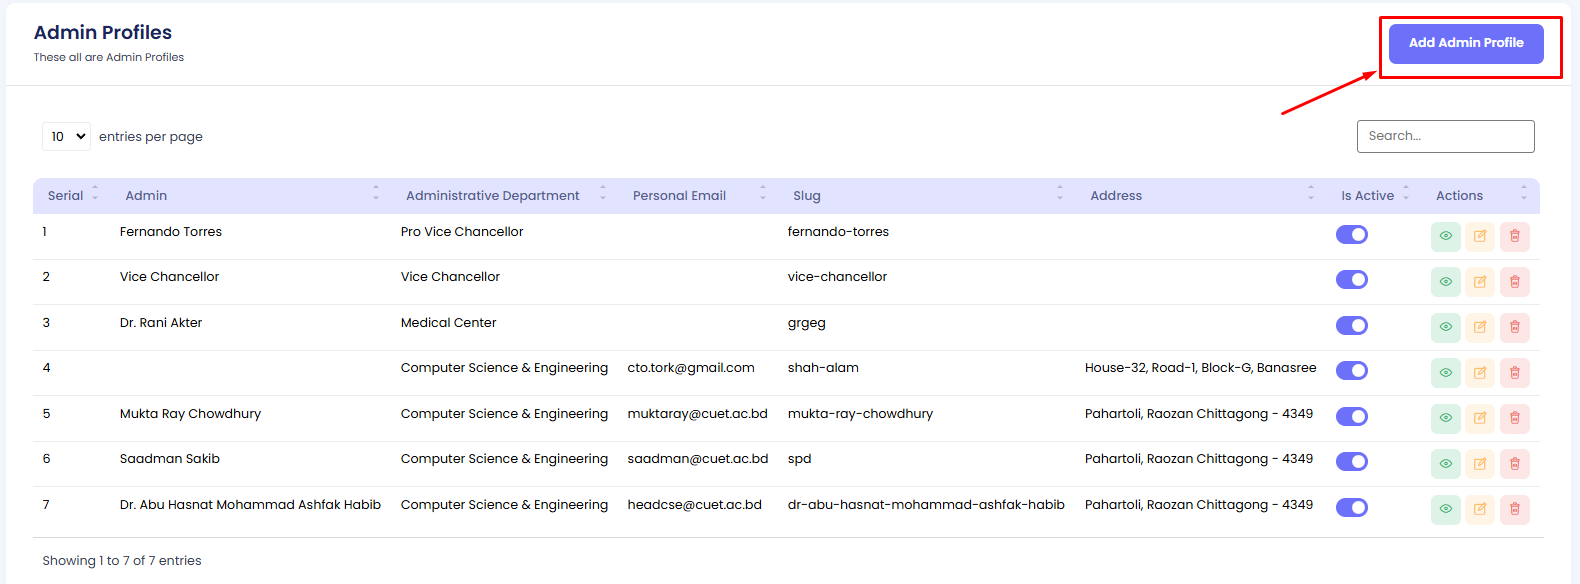
Step 3: Fill in the form with the required details, such as:
Once all required fields are completed, click the Create button to save the faculty member profile.
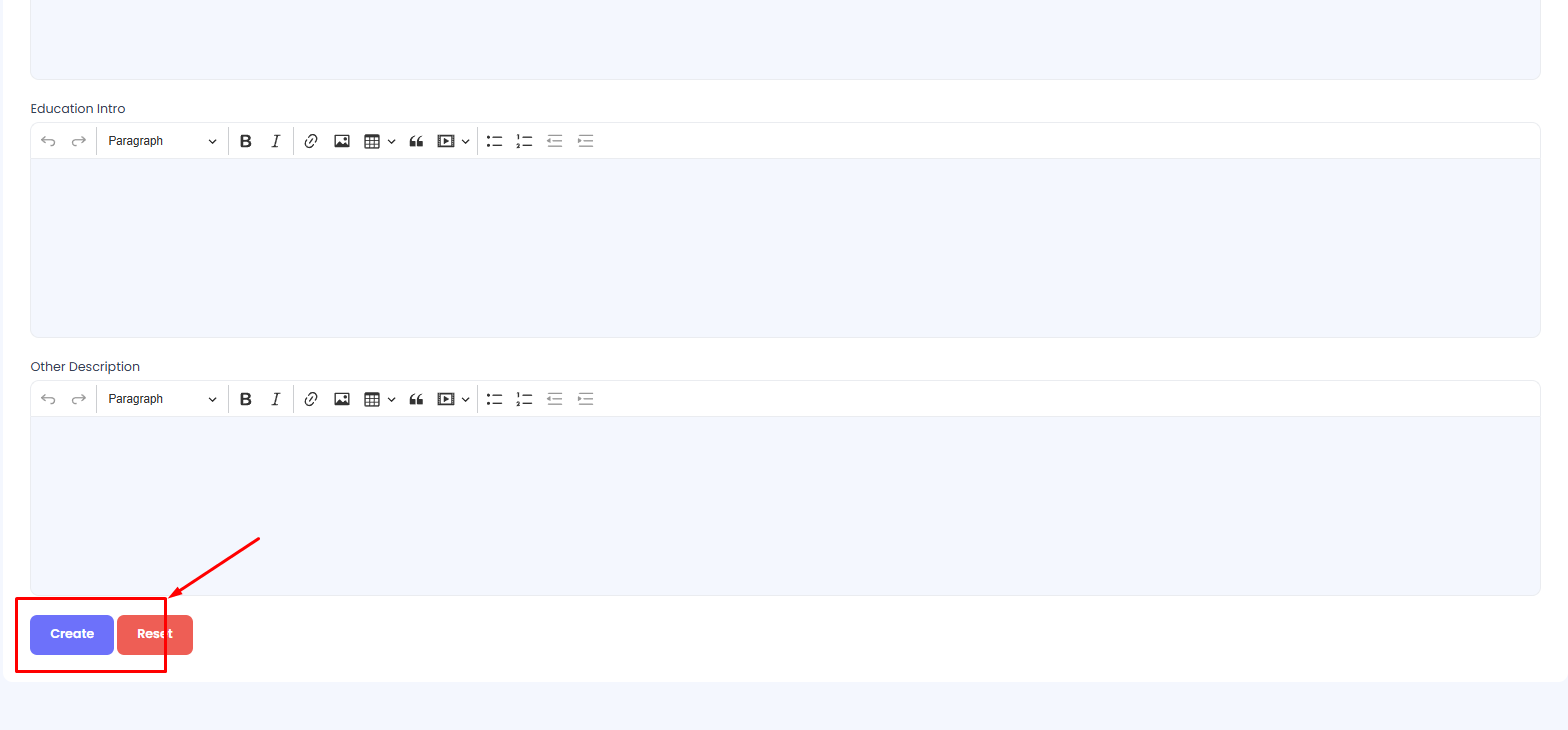
Edit Faculty Member
Step 1: Navigate to Faculty Member Profiles in your admin sidebar and click.
Step 2: Click the Edit button next to the faculty member you want to modify.
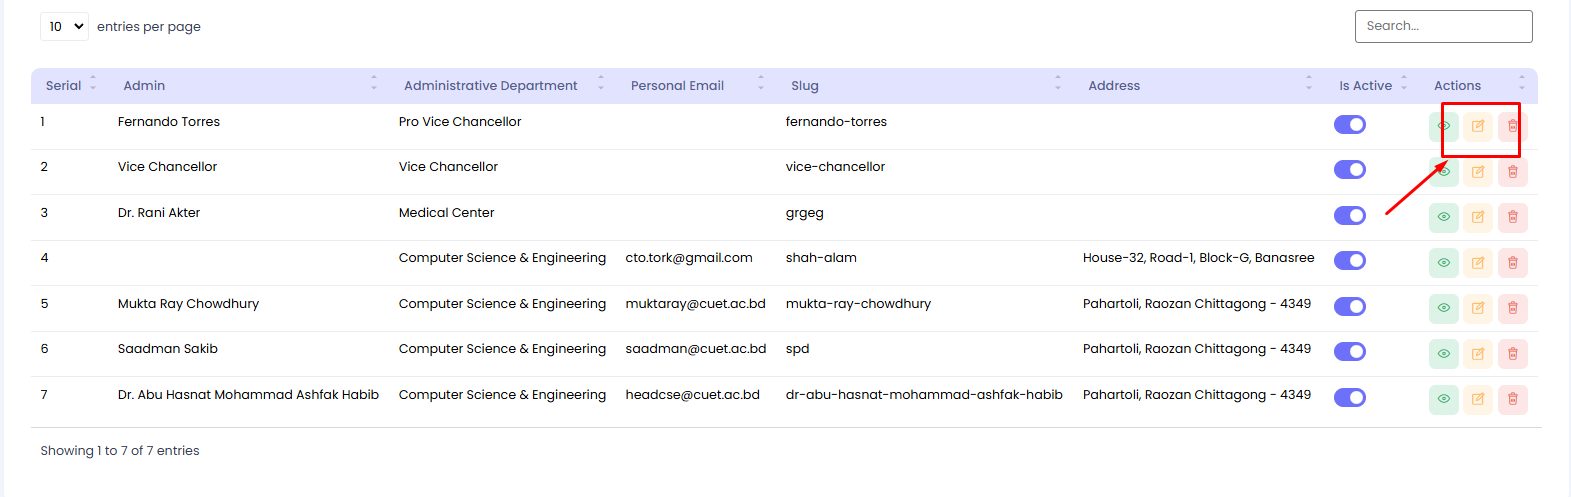
Edit the necessary fields, such as Admin, Administrative Department, Personal Email, Slug, or Address. Once all changes are made, click the Update button to save your changes.
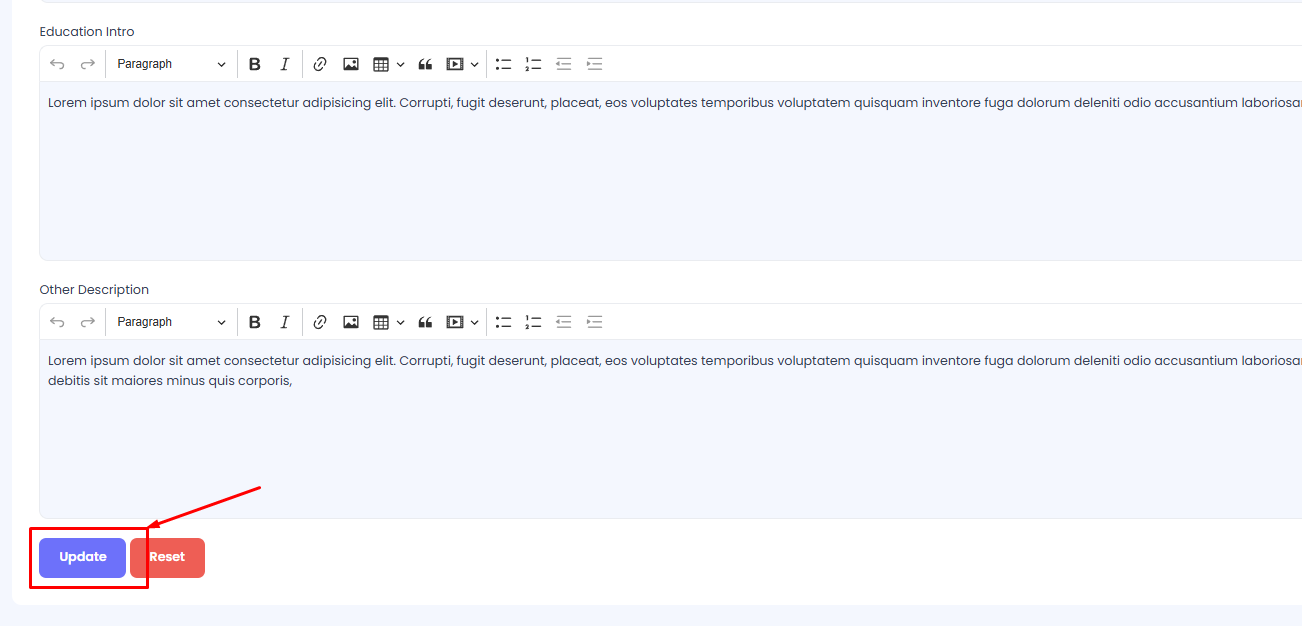
Activate/Deactivate Faculty Member
Step 1: Navigate to Faculty Member Profiles in your admin sidebar and click.
Step 2: Locate the target Faculty Member in the list.
Step 3: Use the toggle button under the "Is Active" column to activate or deactivate the faculty member as required.

Admins Module
The Admins Module enables administrators to manage other admins within the system. This includes adding, editing, deleting, viewing, and activating/deactivating admin profiles, as well as categorizing them by roles and departments.
Add an Admin
Step 1: Navigate to the Admins section in the admin sidebar and click.
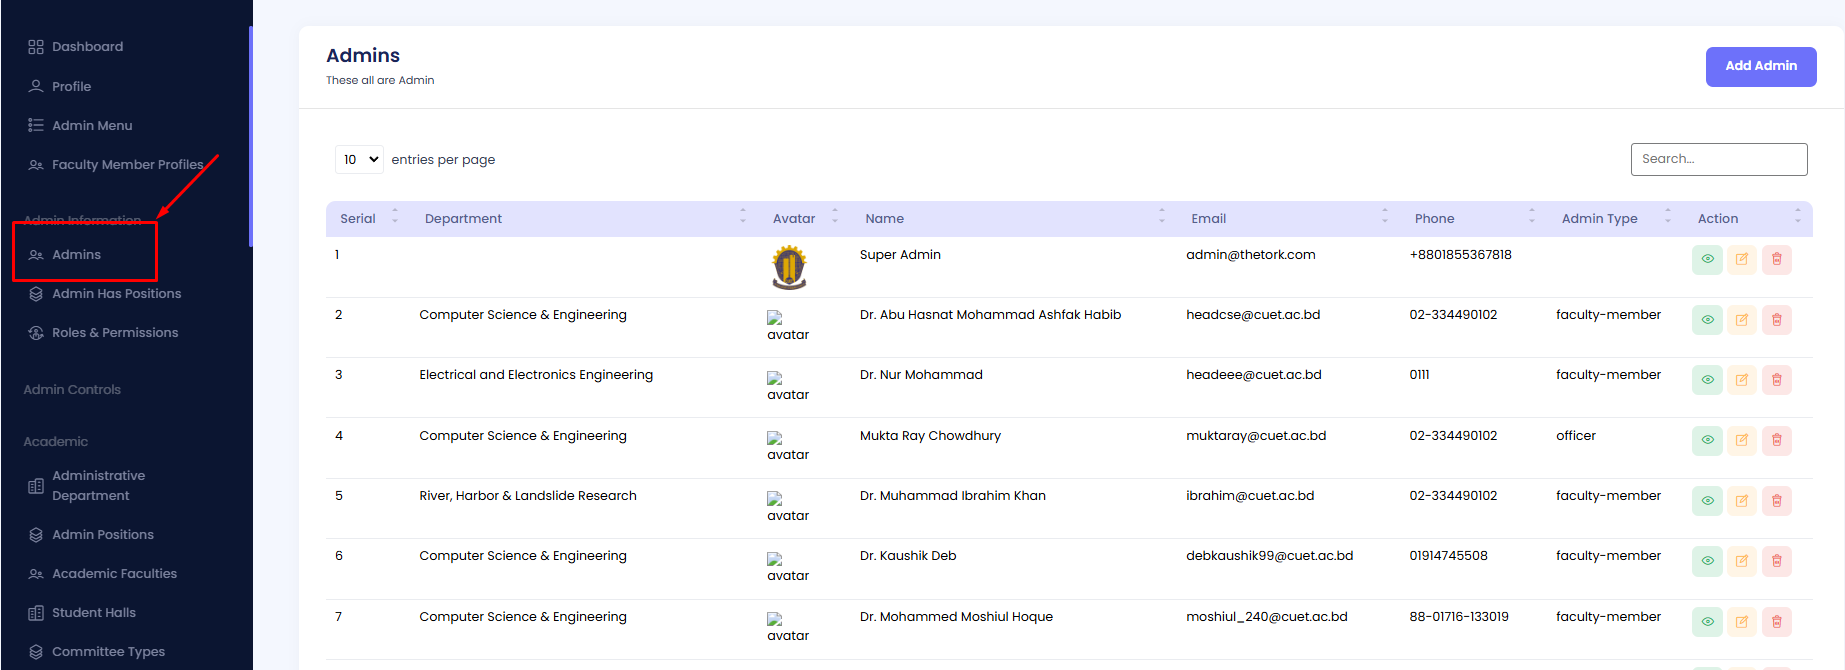
Step 2: Click the Add Admin button.
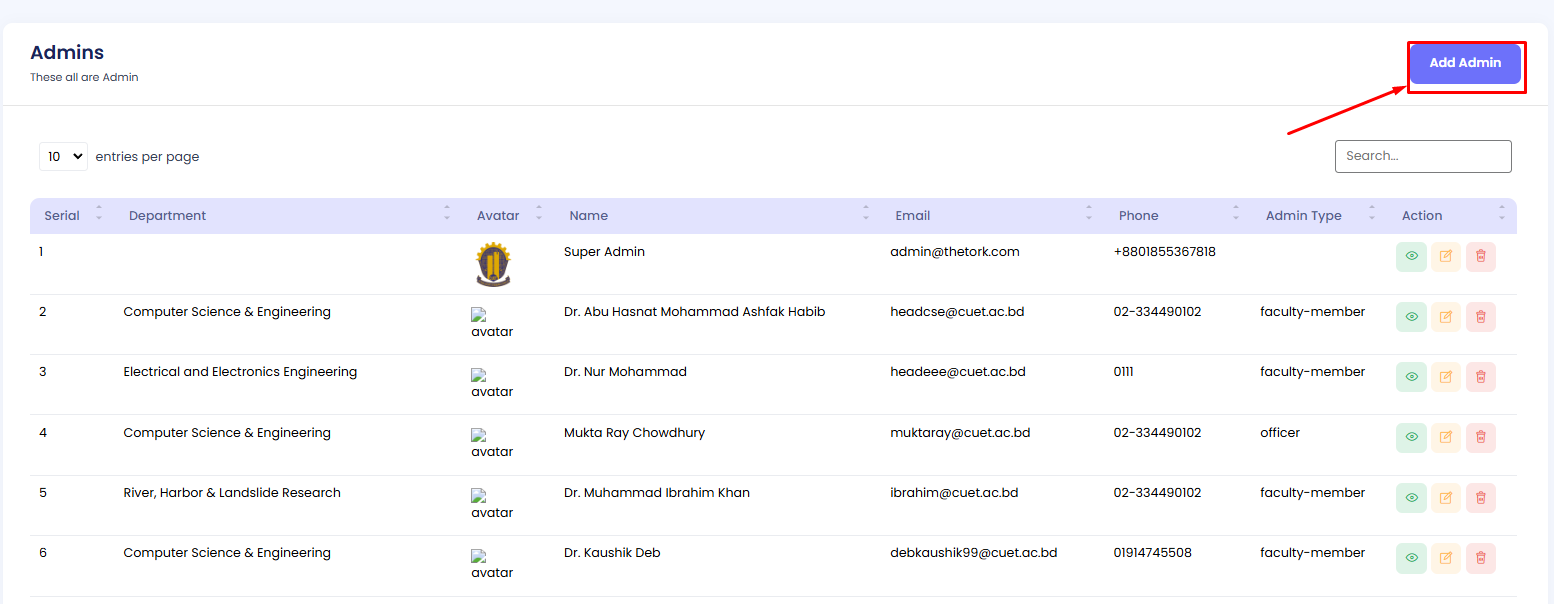
Step 3: Fill out the form with the required details, such as Name, Email, Phone Number, Department, and Admin Type. Optionally, upload an avatar for the admin.
Once all the necessary details are completed, click the Create button to save the admin profile.
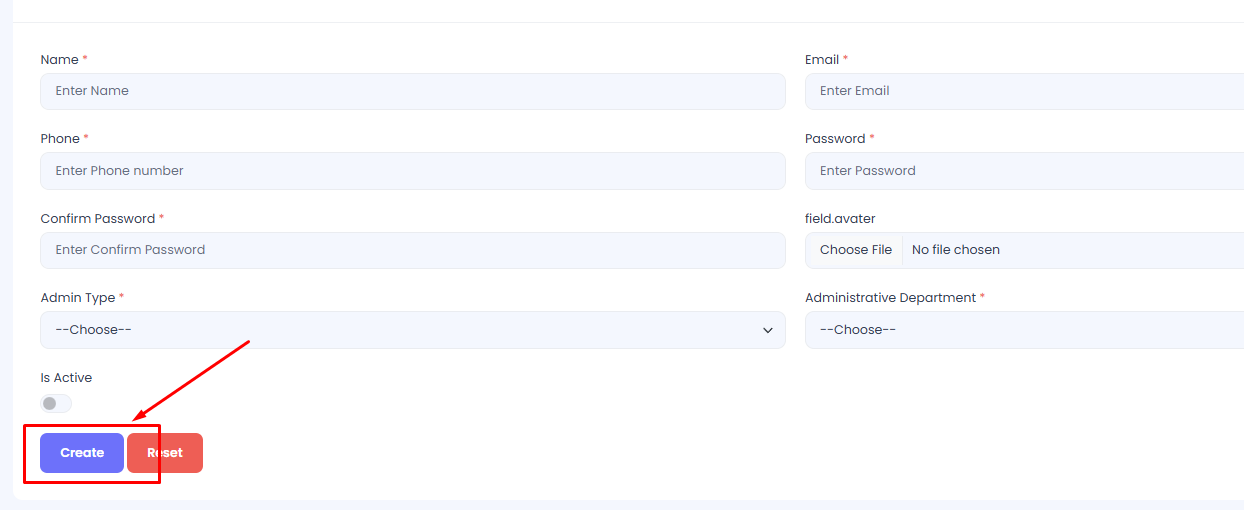
Edit an Admin
Step 1: Navigate to the Admins section in the admin sidebar and click.
Step 2: Click the Edit button next to the admin profile you want to modify.
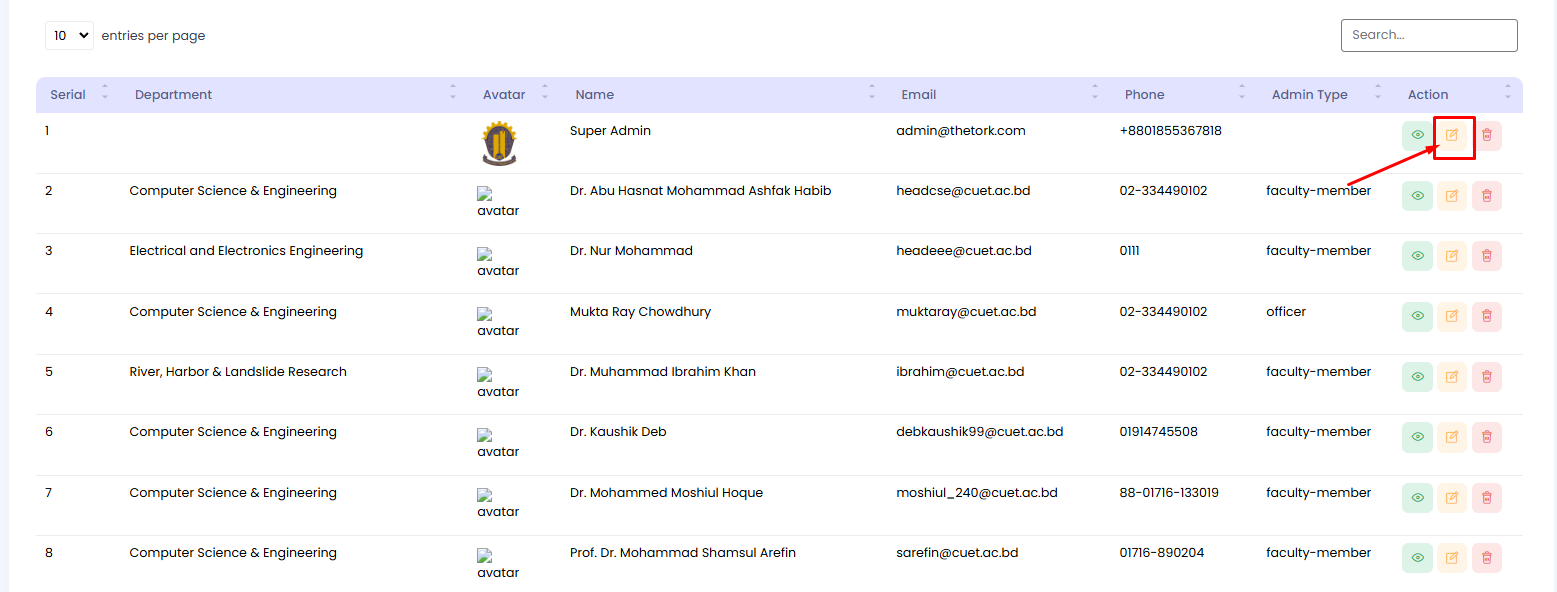
Edit the necessary details, such as Name, Email, Phone Number, Department, or Admin Type. Once done, click the Update button to save your changes.
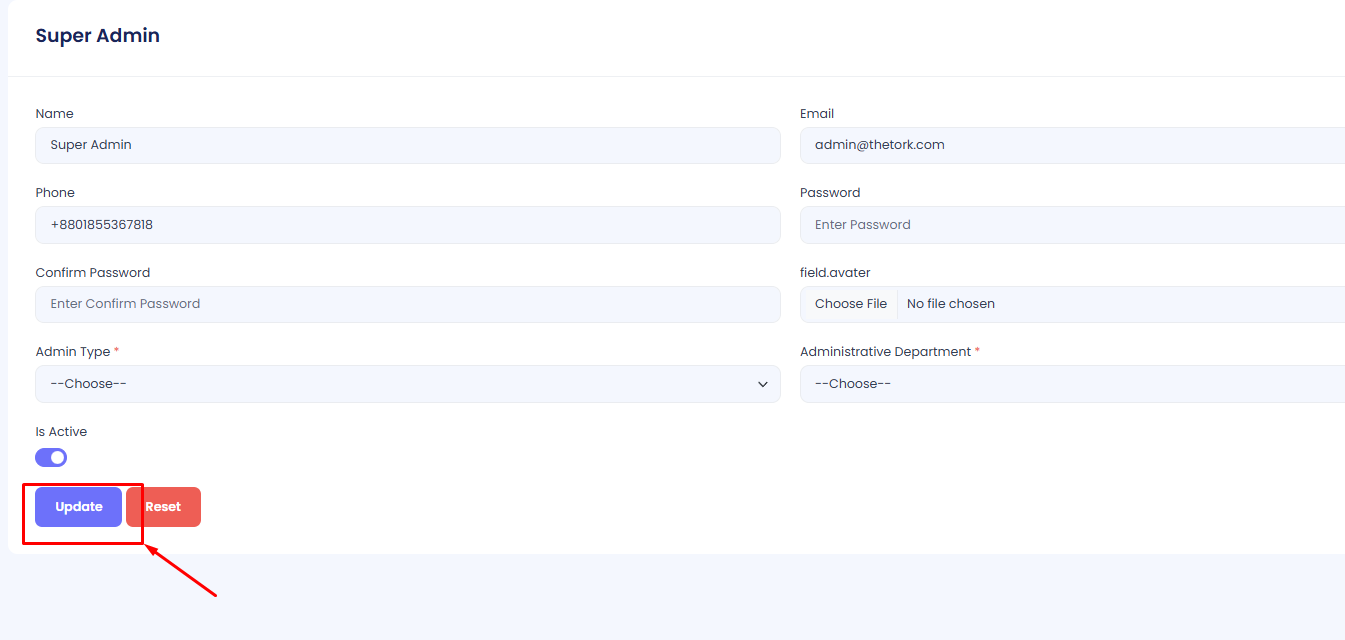
Delete an Admin
Step 1: Navigate to the Admins section in the admin sidebar and click.
Step 2: Locate the admin you want to delete, and click the Delete button in the Actions column.
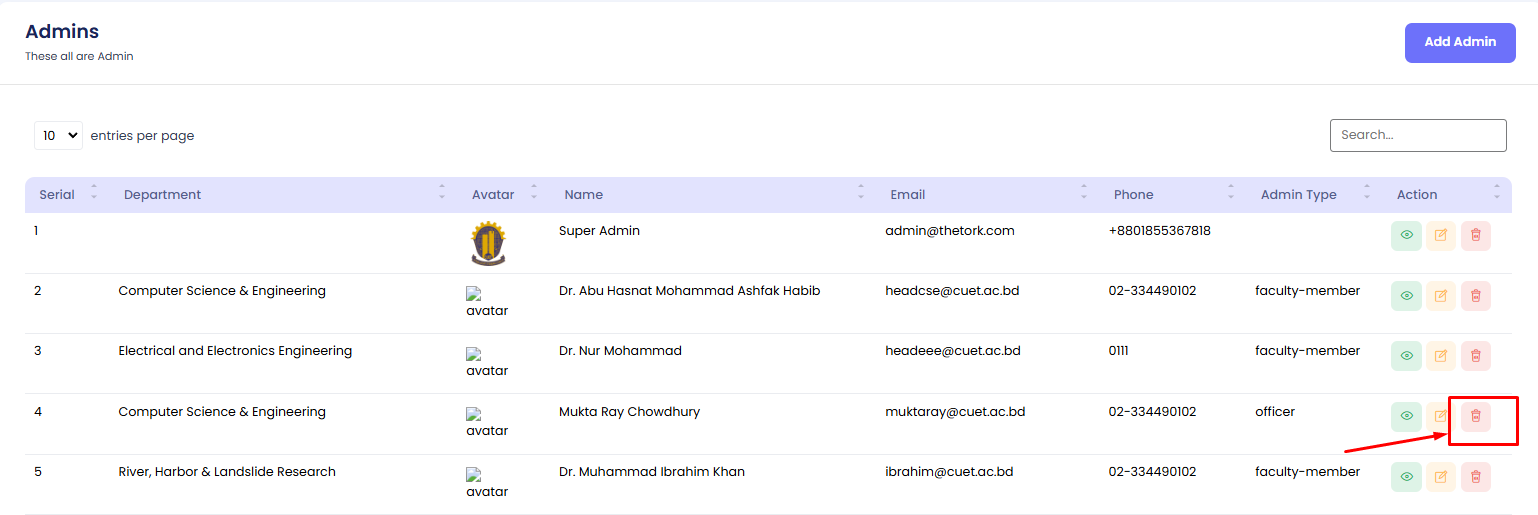
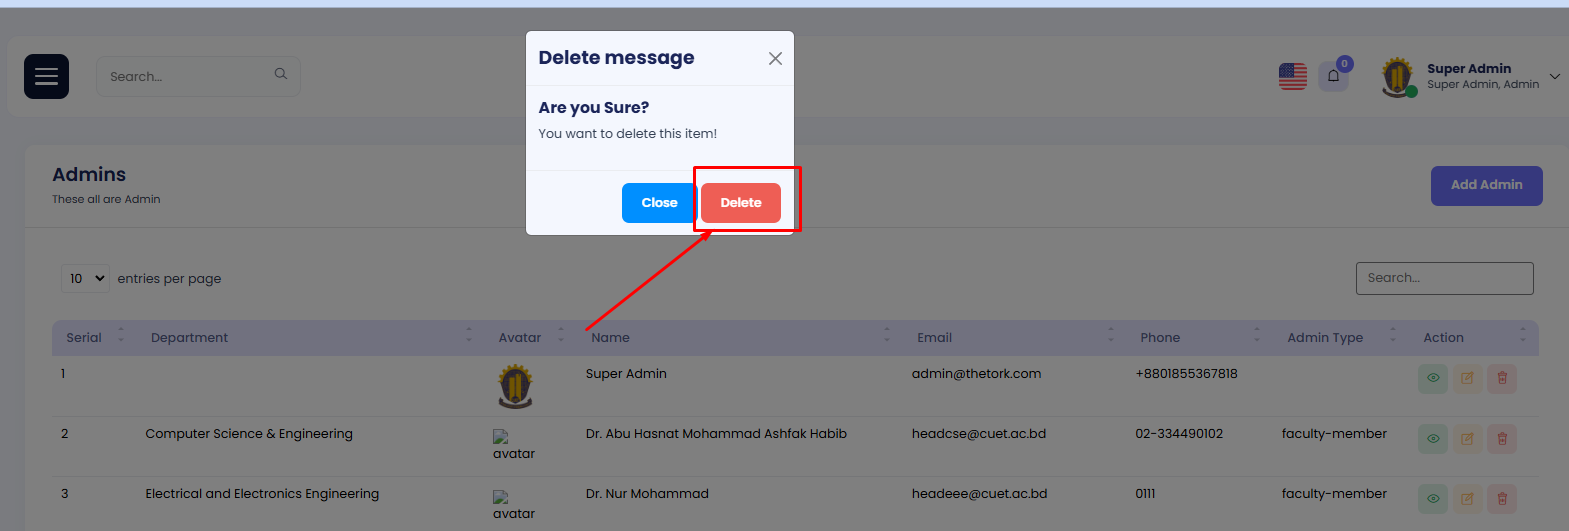
Confirm the deletion in the dialog box that appears to permanently remove the admin profile.
View an Admin
Step 1: Navigate to the Admins section in the admin sidebar and click.
Step 2: Locate the admin you want to view, and click the View button in the Actions column.
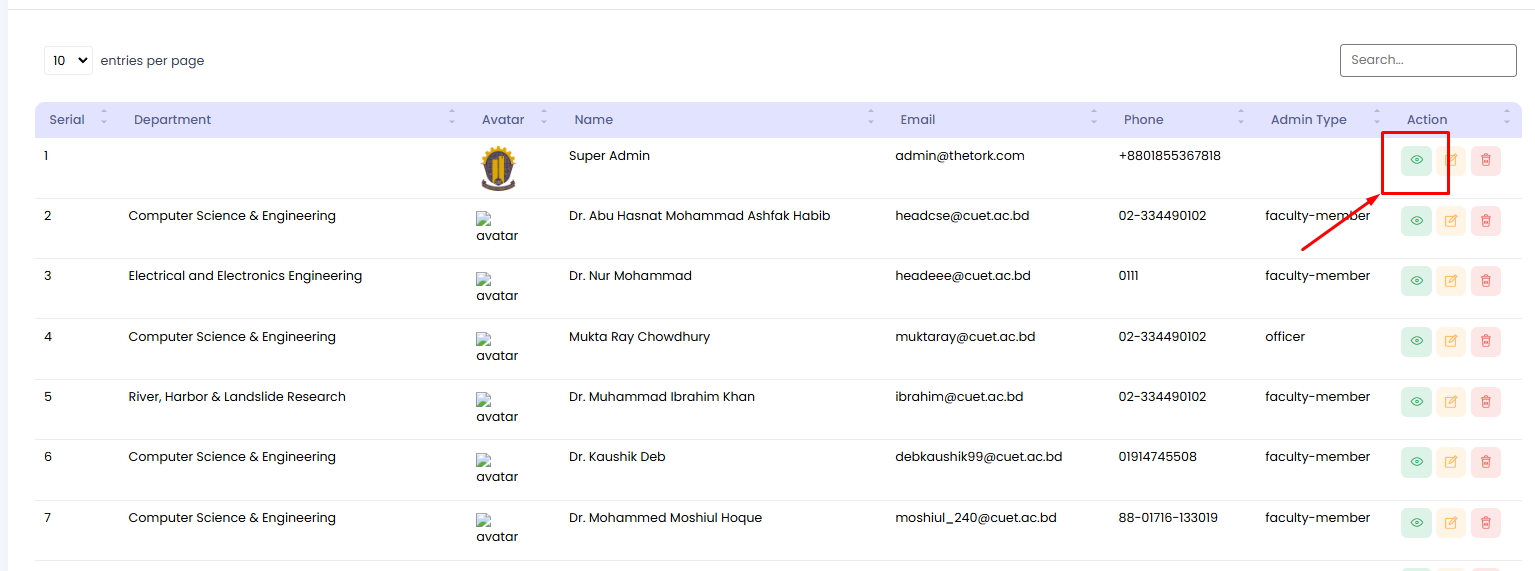
This will display the admin's detailed profile, including Name, Email, Phone Number, Department, Admin Type, and their Avatar.
Admin Has Positions
The Admin Has Positions module allows administrators to manage and assign positions for admins within their respective departments. This module tracks the administrative department, the admin's position or designation within the department, their tenure (start and end dates), and their current activity status. You can view, add, edit, and manage these details as needed.
The data table contains the following columns:
- Serial: A unique identifier for each entry.
- Administrative Department: The department where the admin works.
- Admin: The name of the admin.
- Admin Position: The admin's role or designation in the department (e.g., Manager, Coordinator).
- From: The starting date of their position.
- To: The ending date, if applicable.
- Is Active: Indicates whether the admin is currently active in their role.
- Actions: Options to view, edit, or delete the position details.
Add an Admin Position
Step 1: Navigate to the Admin Has Positions section in the admin sidebar and click Add Position.
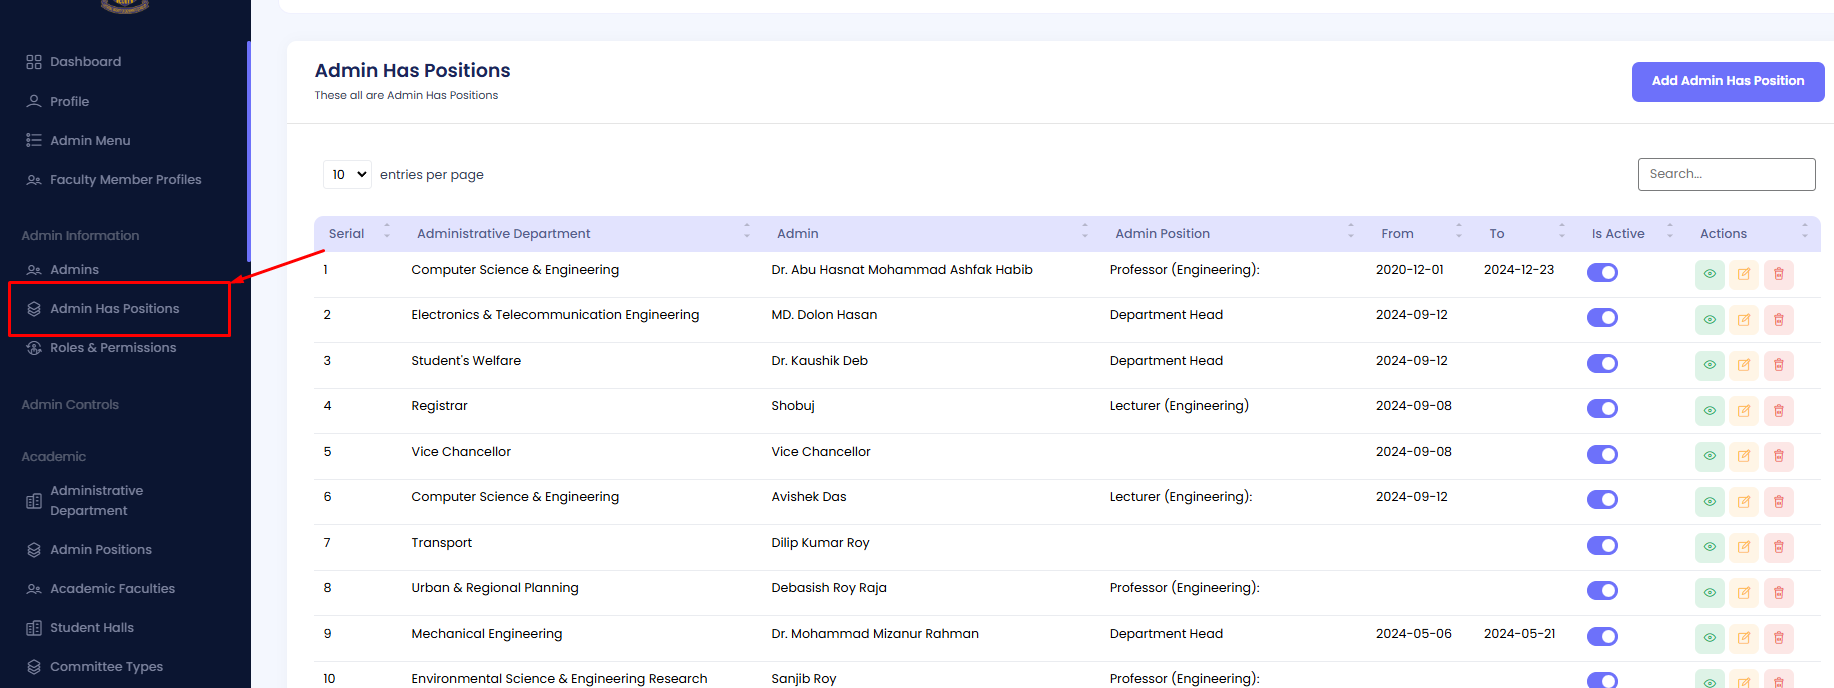
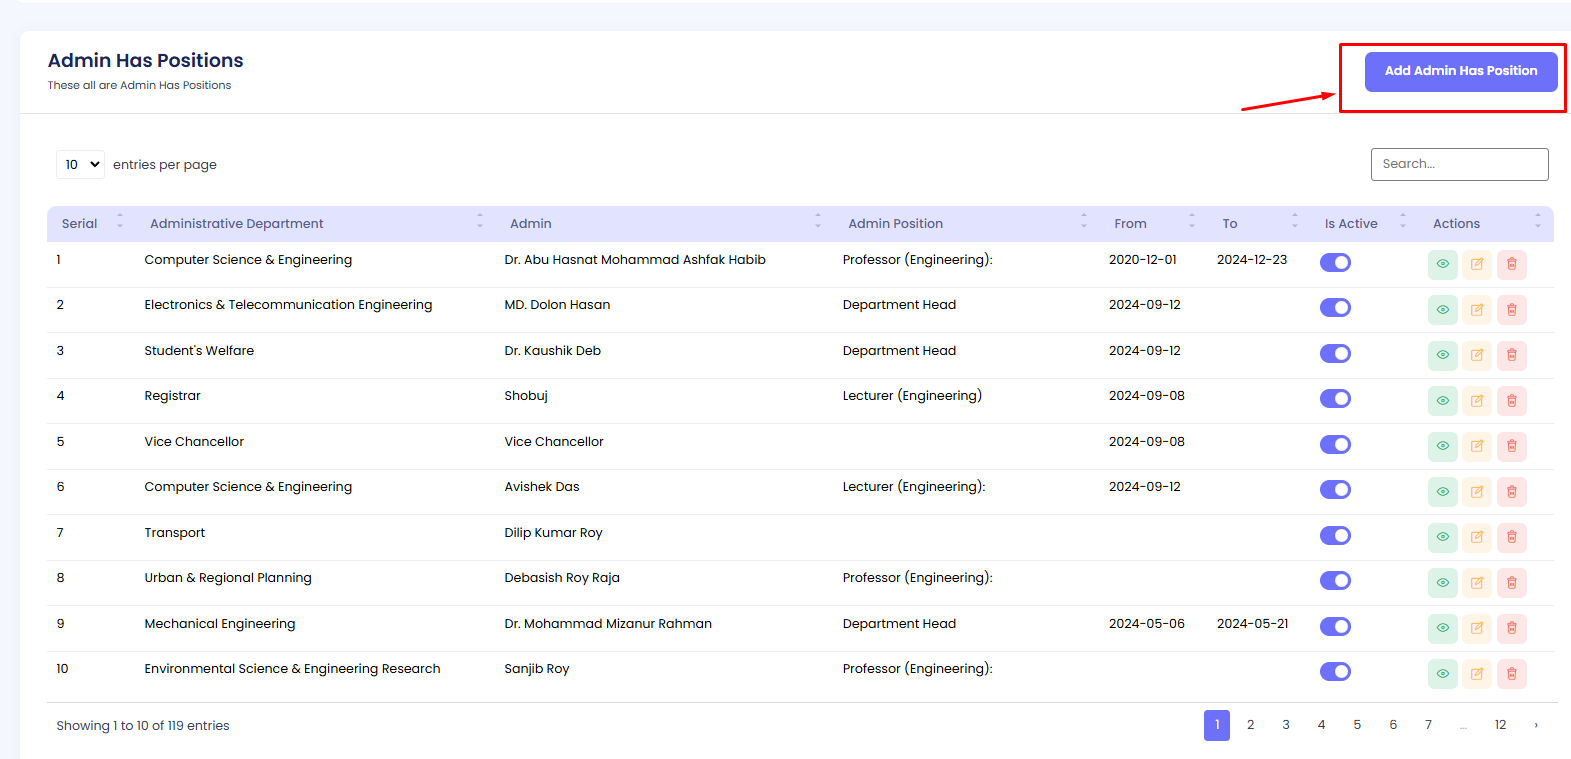
Step 2: Fill in the form with the required details, such as:
- Administrative Department
- Admin Name
- Position/Designation
- Start Date
- End Date (optional)
Step 3: Once completed, click the Create button to save the record.
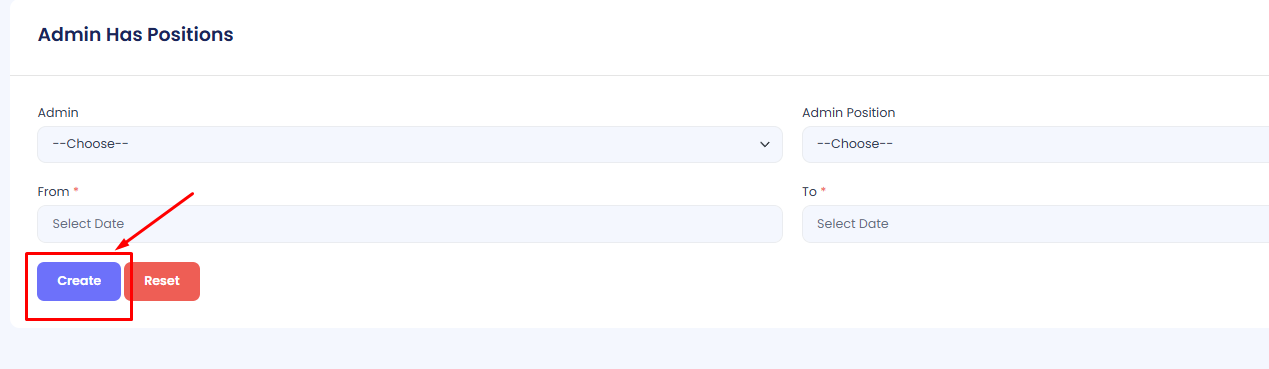
Edit an Admin Position
Step 1: Navigate to the Admin Has Positions section in the admin sidebar.
Step 2: Locate the record you want to update and click the Edit button in the Actions column.
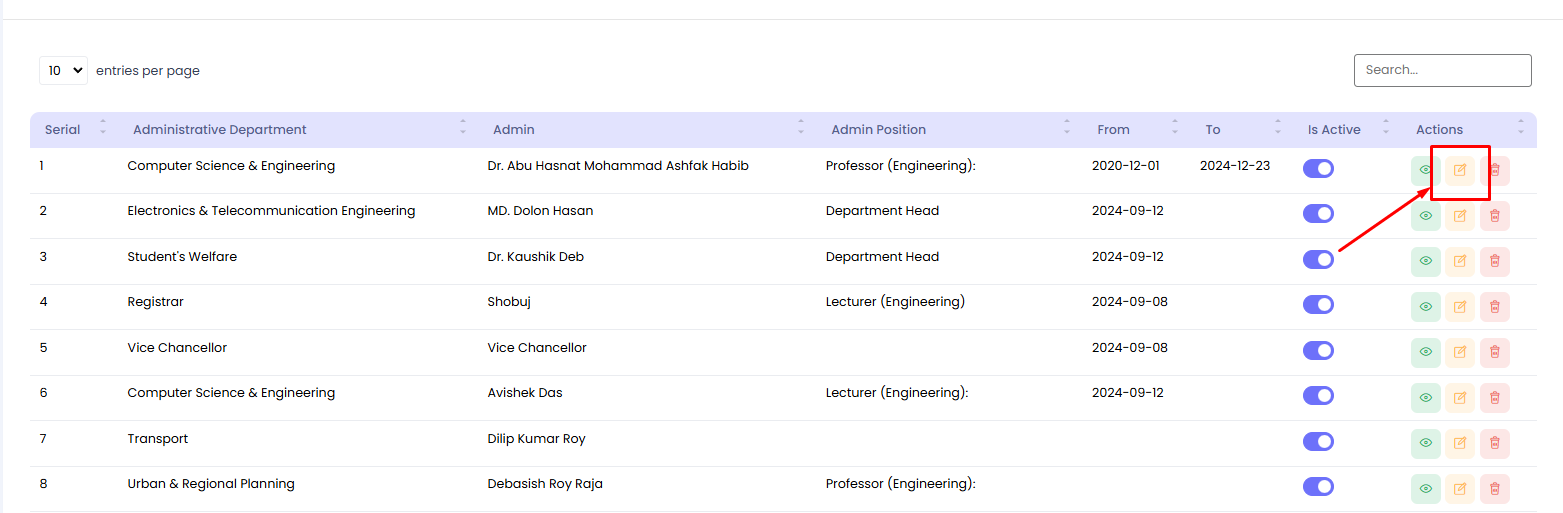
Step 3: Update the required fields, such as:
- Administrative Department
- Admin Position
- Tenure Dates (Start/End Date)
Step 4: Click Update to save your changes.

Delete an Admin Position
Step 1: Navigate to the Admin Has Positions section in the admin sidebar.
Step 2: Locate the position you want to remove and click the Delete button in the Actions column.

Step 3: Confirm the deletion in the dialog box to permanently remove the record.
View an Admin Position
Step 1: Navigate to the Admin Has Positions section in the admin sidebar.
Step 2: Locate the desired entry and click the View button in the Actions column.
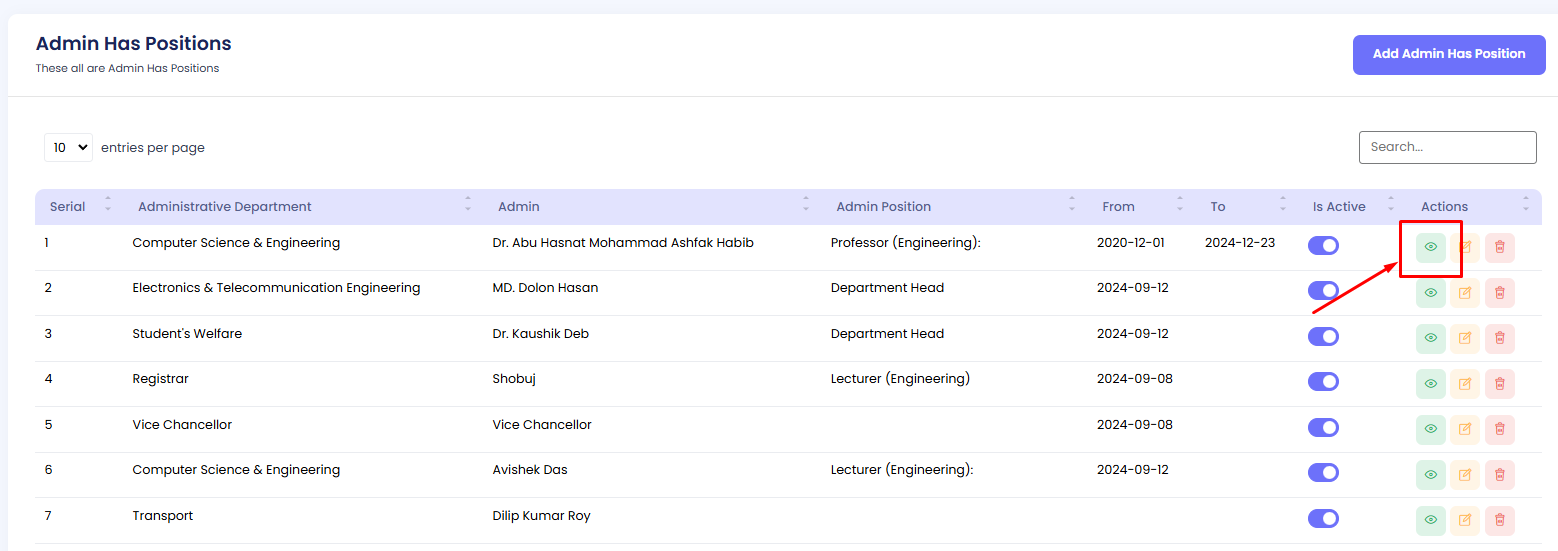
This will display details such as:
- Admin Name
- Department
- Position
- Start/End Dates
- Activity Status
Activate/Deactivate an Admin Position
Step 1: Navigate to the Admin Has Positions section in the admin sidebar.
Step 2: Locate the target entry and toggle the button in the "Is Active" column to change the status as needed.
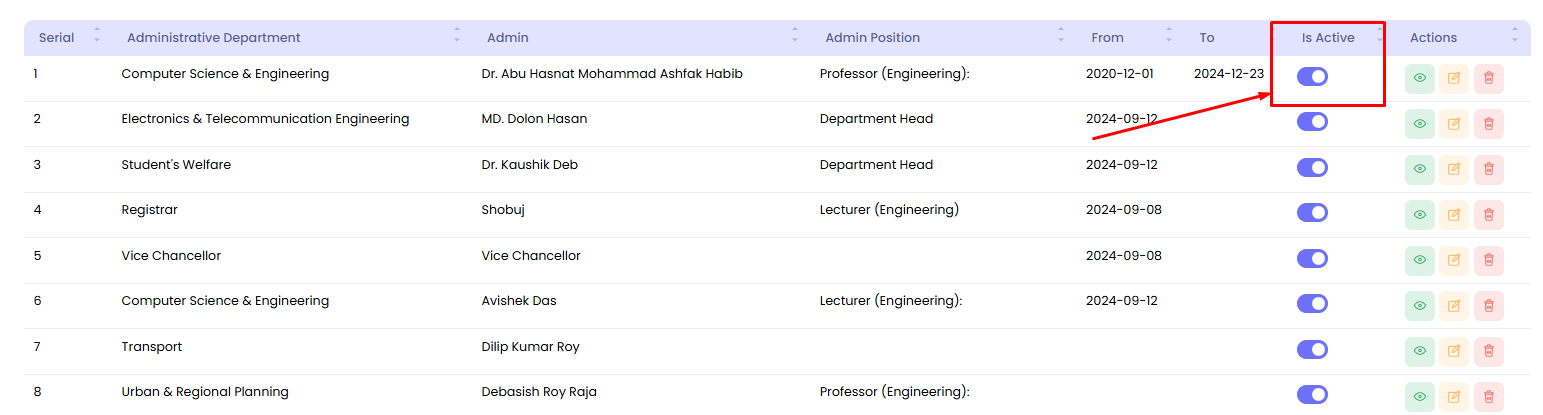
Roles and Permissions Module
The Roles and Permissions module allows administrators to manage user roles and their associated permissions. This module provides functionality to assign roles to admins, define role-specific permissions, and manage the activity status of roles. Administrators can also view which admins belong to each role and update or delete roles as required.
The module includes the following sections:
Roles
The Roles section lists all available roles in the system. Each role is assigned to a specific Guard Name (e.g., `admin`) and has an activity status (active/inactive). Administrators can add, edit, activate/deactivate, or delete roles as required. The table displays columns such as:
Serial: A unique identifier for each role. Name: The name of the role (e.g., Research and Extension, Tester Tork). Guard Name: Specifies the guard associated with the role (e.g., `admin`). Is Active: Indicates whether the role is currently active. Action: Provides options to edit or delete the role.
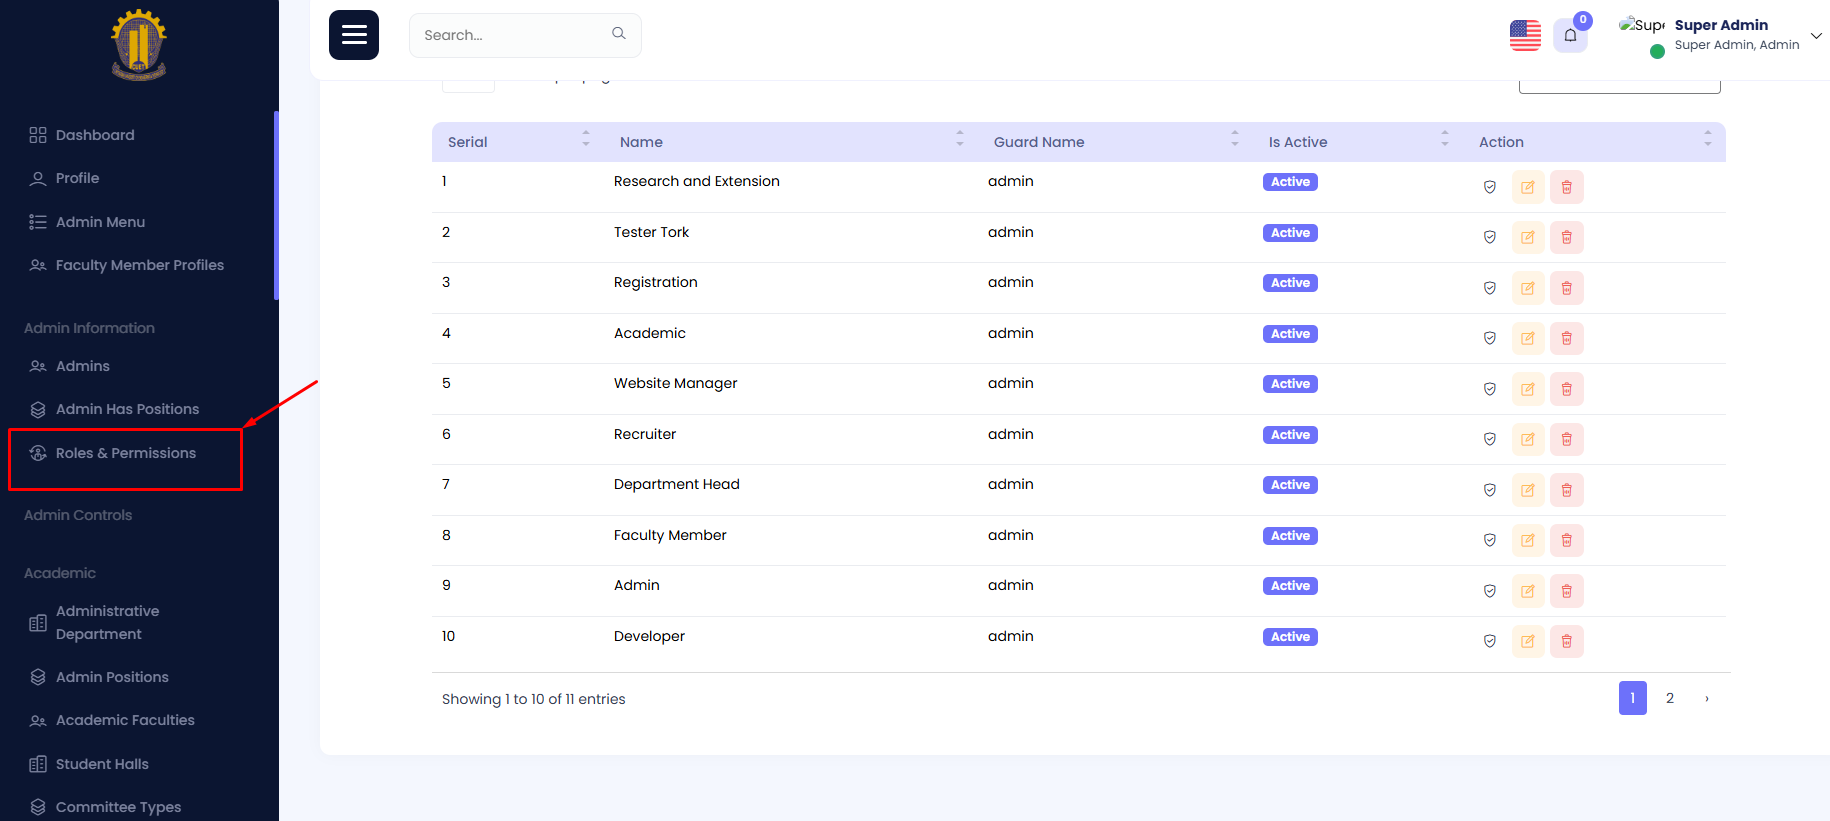
Permissions By Role
The Permissions By Role section allows administrators to view and manage permissions assigned to each role. This ensures that each role has the necessary permissions to perform its functions. To update permissions, select a role, review its current permissions, and make changes as required. Permissions can be added or removed to customize access for each role.
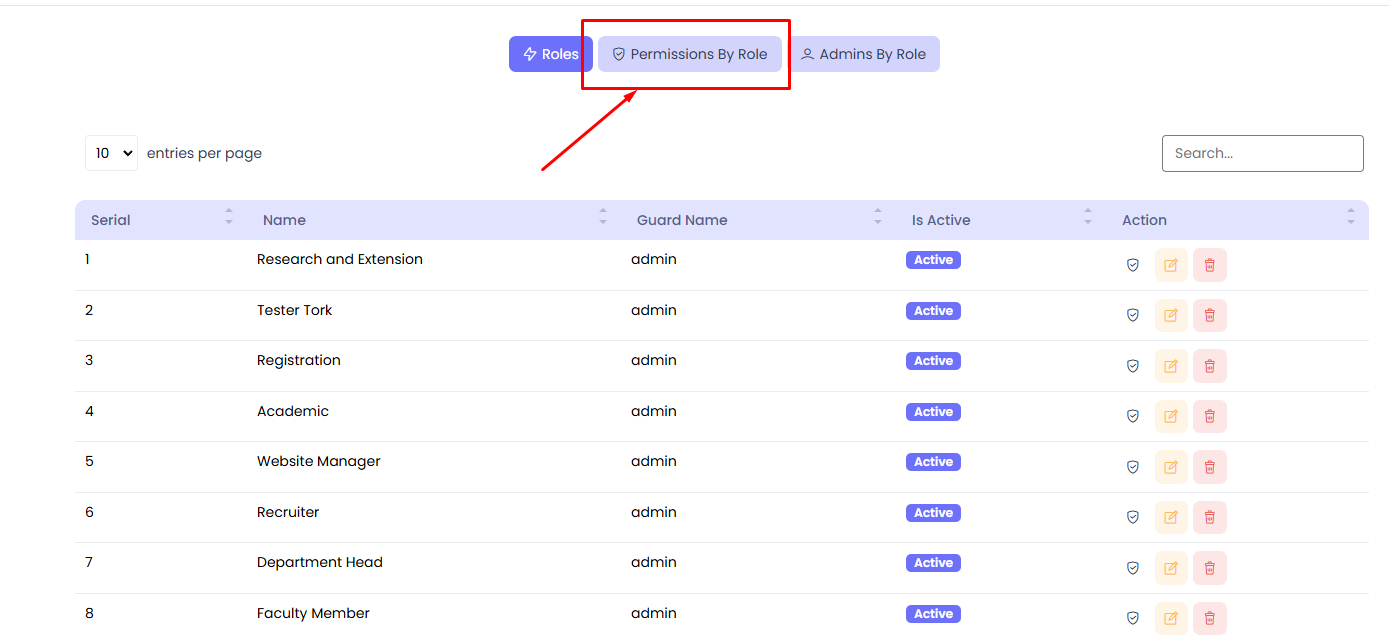
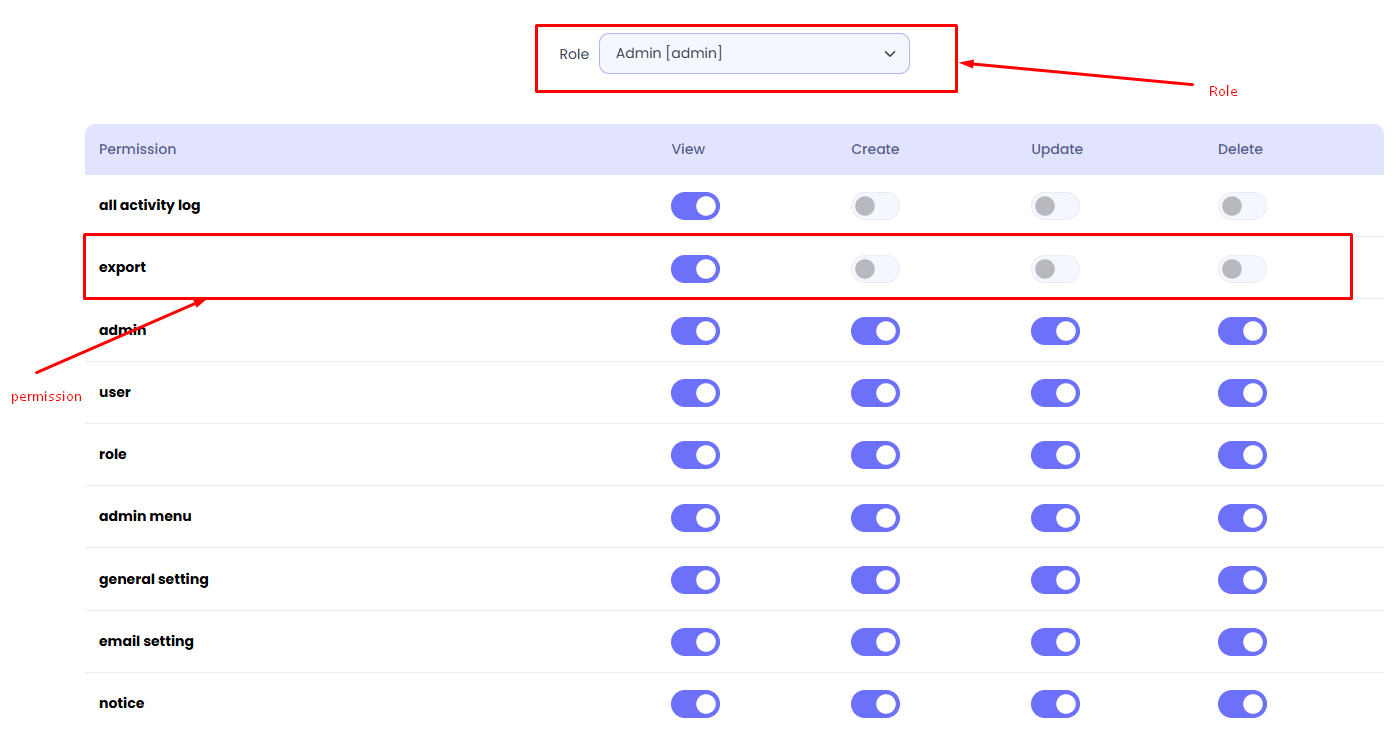
Admins By Role
The Admins By Role section displays a list of all admins assigned to a specific role. This provides an overview of which admins are associated with each role, making it easy to track assignments. To view the admins for a role, select the role, and the system will display a list of admins, including their names and other details.
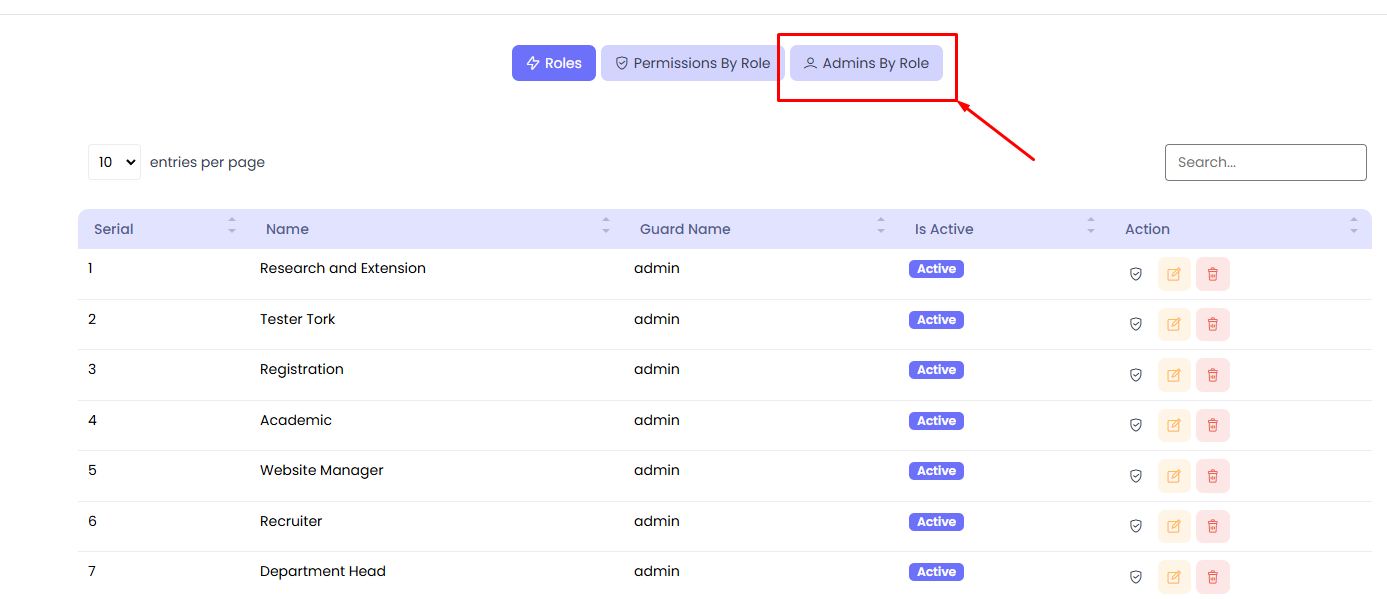
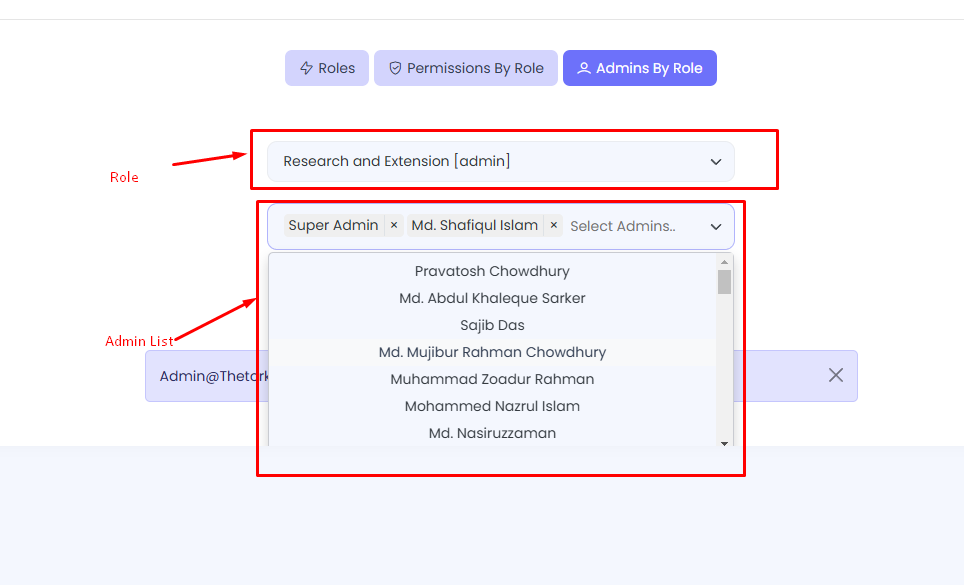
Add a Role
To add a new role, navigate to the Roles section and click Add Role. Provide the role name, guard name, and set its activity status. Once all details are entered, click the Create button to save the role.
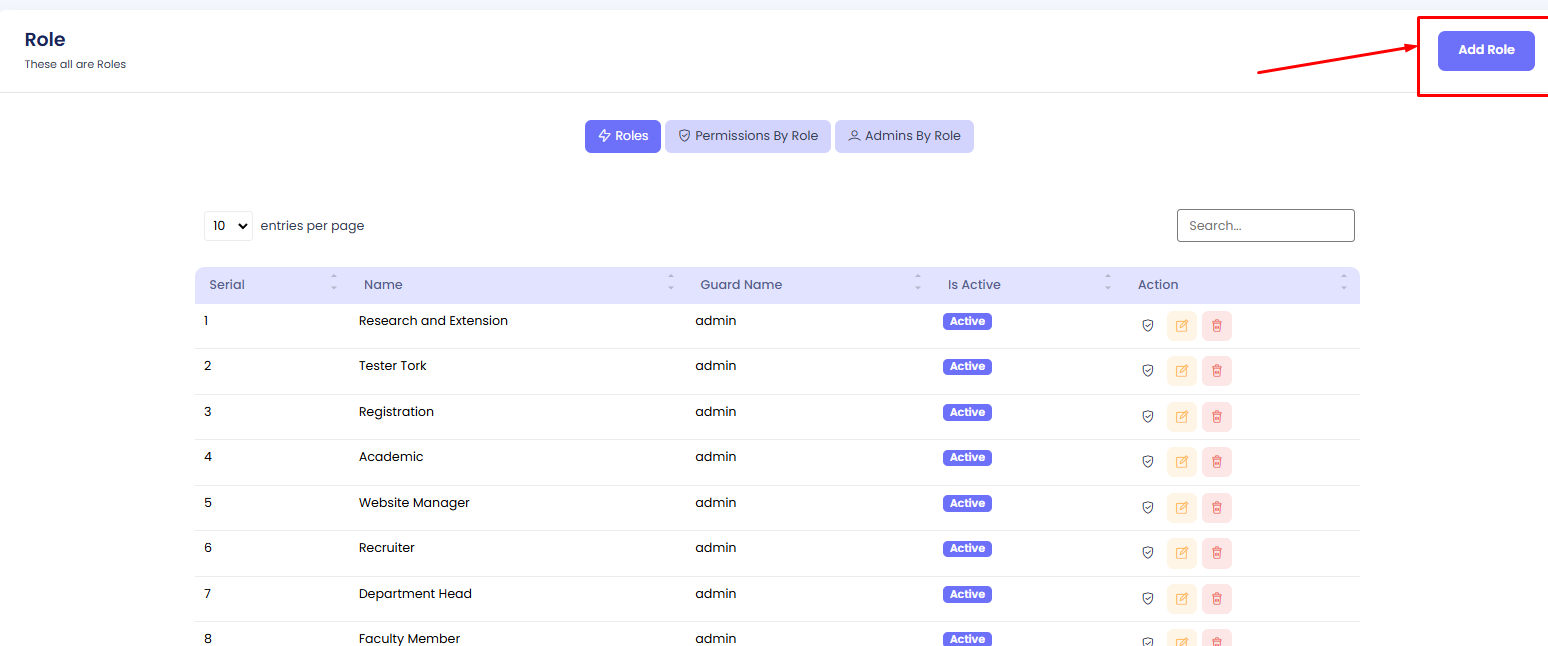

Edit a Role
To modify an existing role, navigate to the Roles section, locate the role you wish to edit, and click the Edit button. Update the role name, guard name, or activity status as needed, and click Update to save your changes.
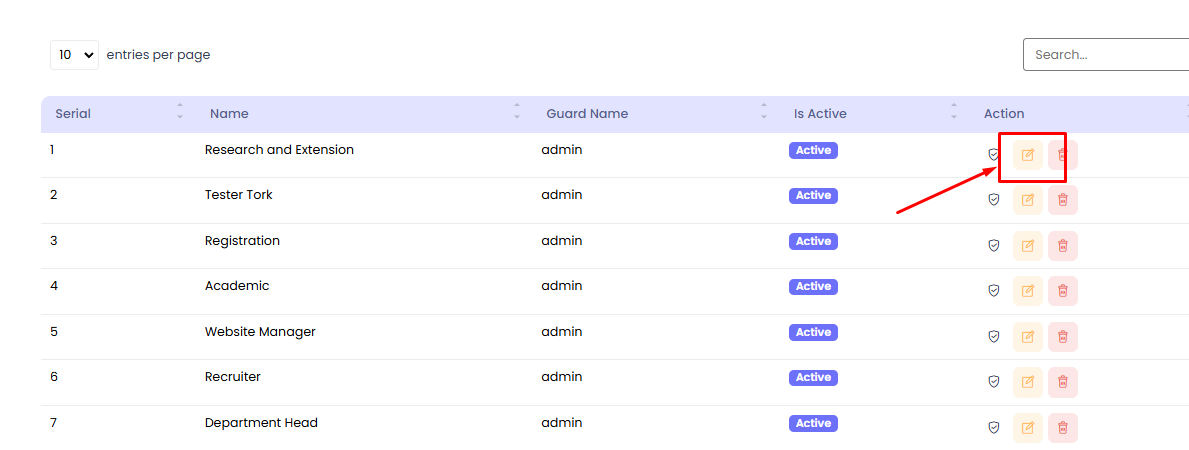
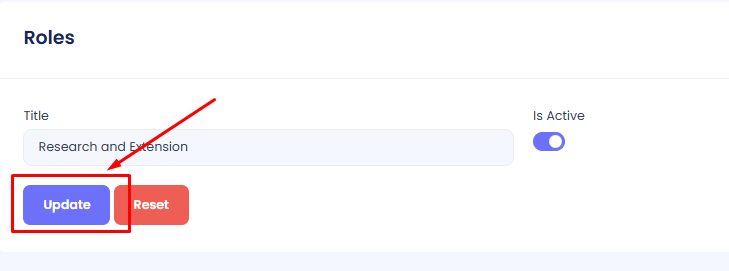
Administrative Departments Module
The Administrative Departments Module allows administrators to efficiently manage departmental information, including banners, titles, unique codes, and faculty affiliations. It provides functionality to add, edit, activate/deactivate, and delete departments through an intuitive interface.
Add a New Administrative Department
Step 1: Navigate to Administrative Departments in your admin sidebar and click.
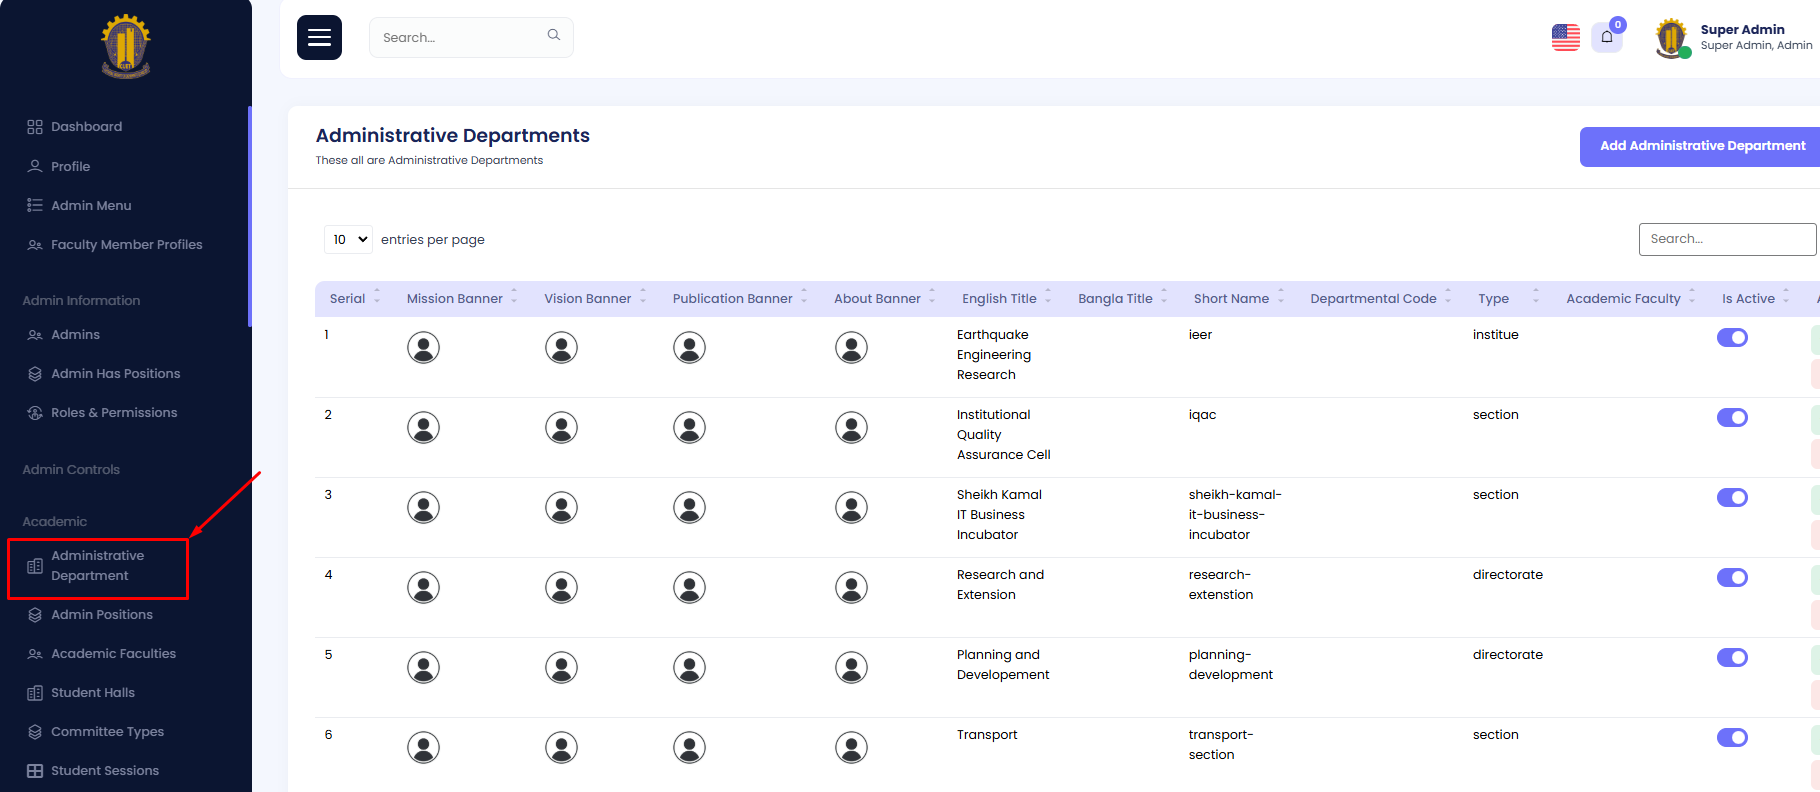
Step 2: Click on Add Department.
Step 3: Fill in the form with the required details, such as:
- Banners: Mission, Vision, Publication, and About banners.
- Titles: English and Bangla titles.
- Code: A unique departmental code.
- Type: Select whether it is an academic or administrative department.
- Faculty: Specify faculty affiliation (if applicable).
Once all required fields are completed, click the Create button to save the department profile.
Edit an Existing Administrative Department
Step 1: Navigate to Administrative Departments in your admin sidebar and click.
Step 2: Click the Edit button next to the department you want to modify.
Edit the necessary fields, such as:
- Titles (English/Bangla)
- Banners
- Code or Faculty Information
Once all changes are made, click the Update button to save your changes.
Delete an Administrative Department
To delete an admin position, go to the Administrative Department section, find the position you want to remove, and click the Delete button in the Actions column. Confirm the deletion in the dialog box to permanently remove the record.

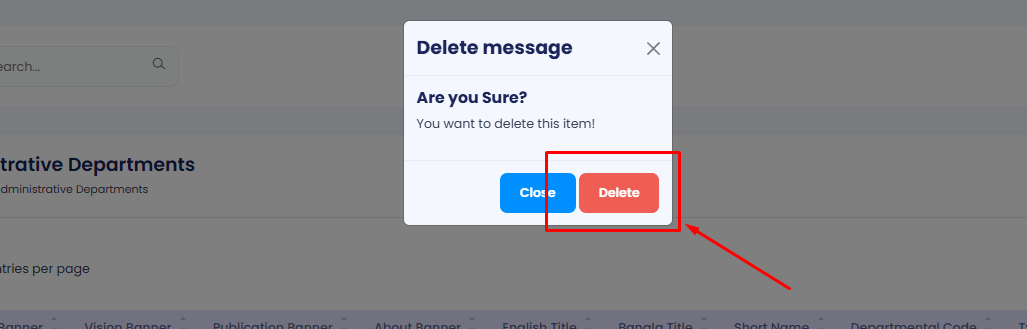
View an Administrative Department
To view detailed information about an admin's position, navigate to the Administrative Department section, locate the desired entry, and click the View button in the Actions column. This will departmental information, including banners, titles, unique codes, and faculty affiliations.
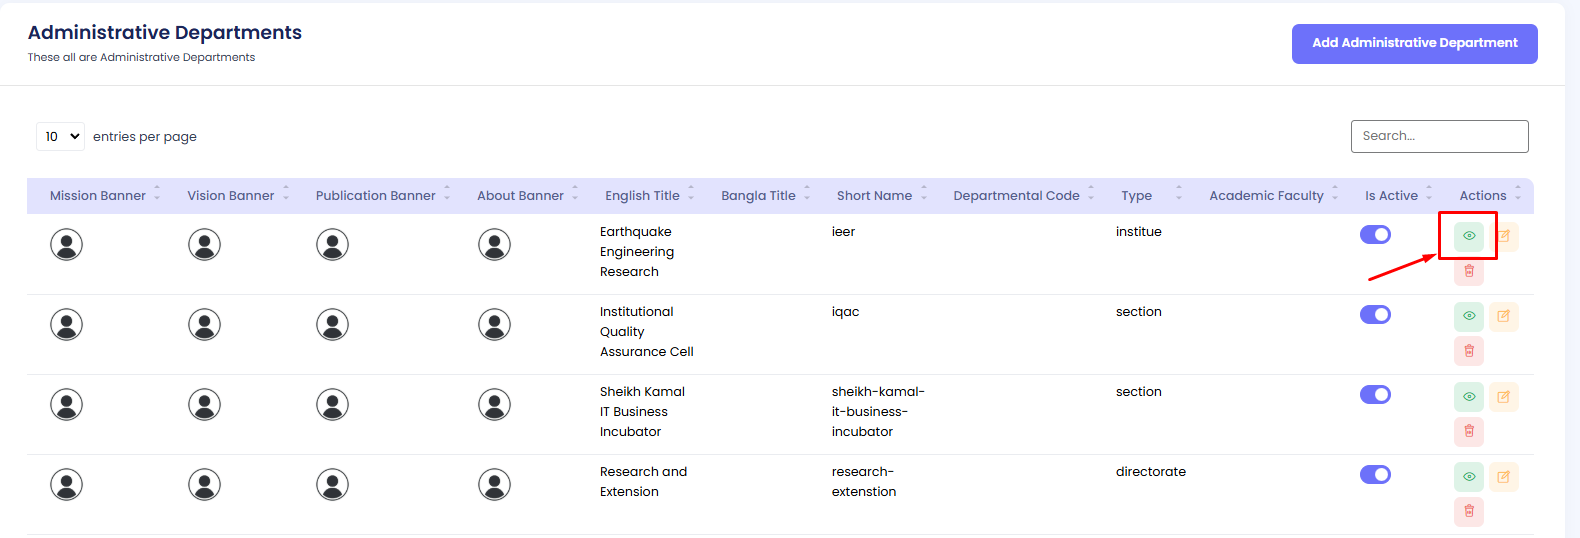
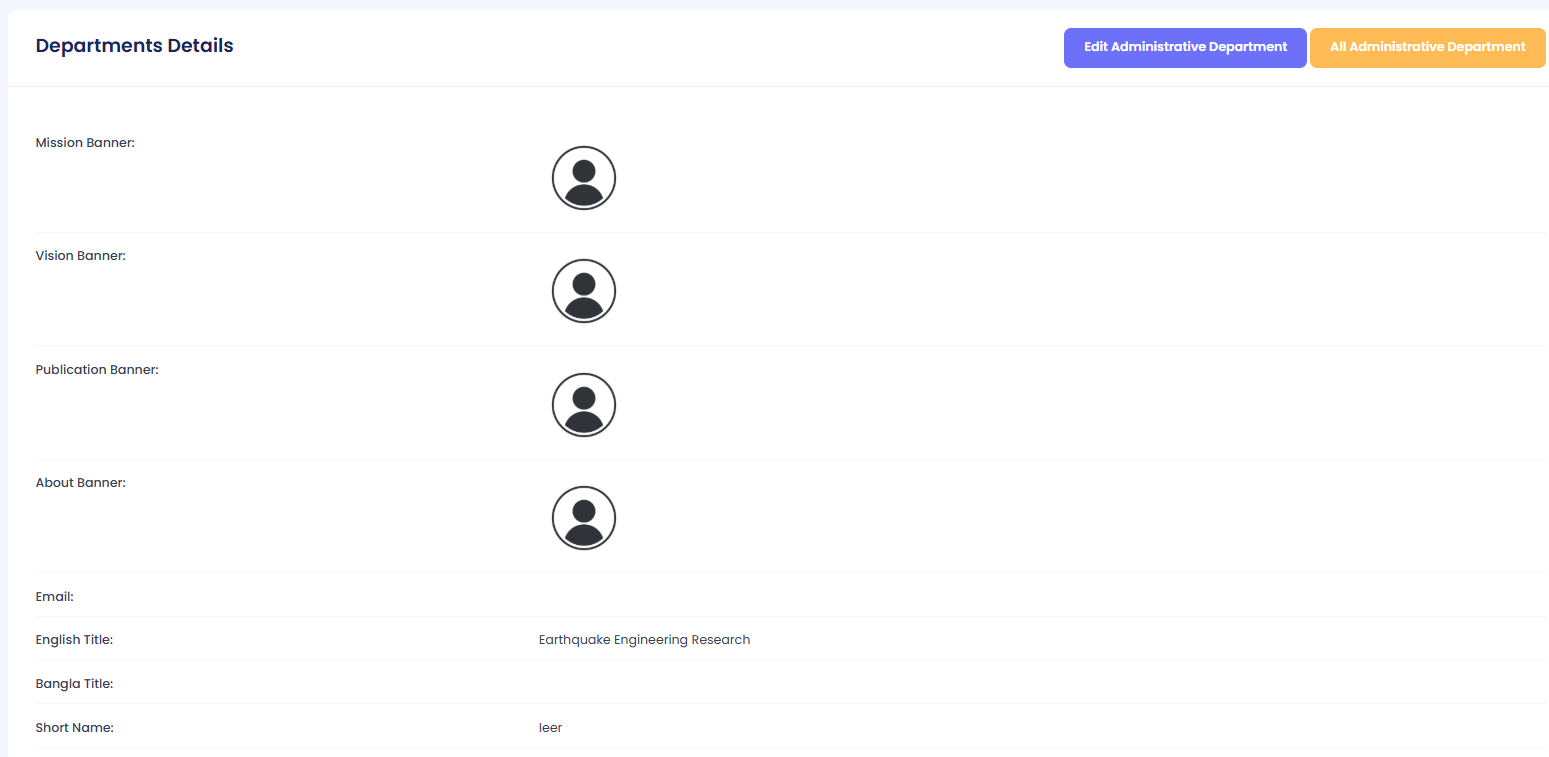
Activate/Deactivate a Department
Step 1: Navigate to Administrative Departments in your admin sidebar and click.
Step 2: Locate the target department in the list.
Step 3: Use the toggle button under the "Is Active" column to activate or deactivate the department as required.
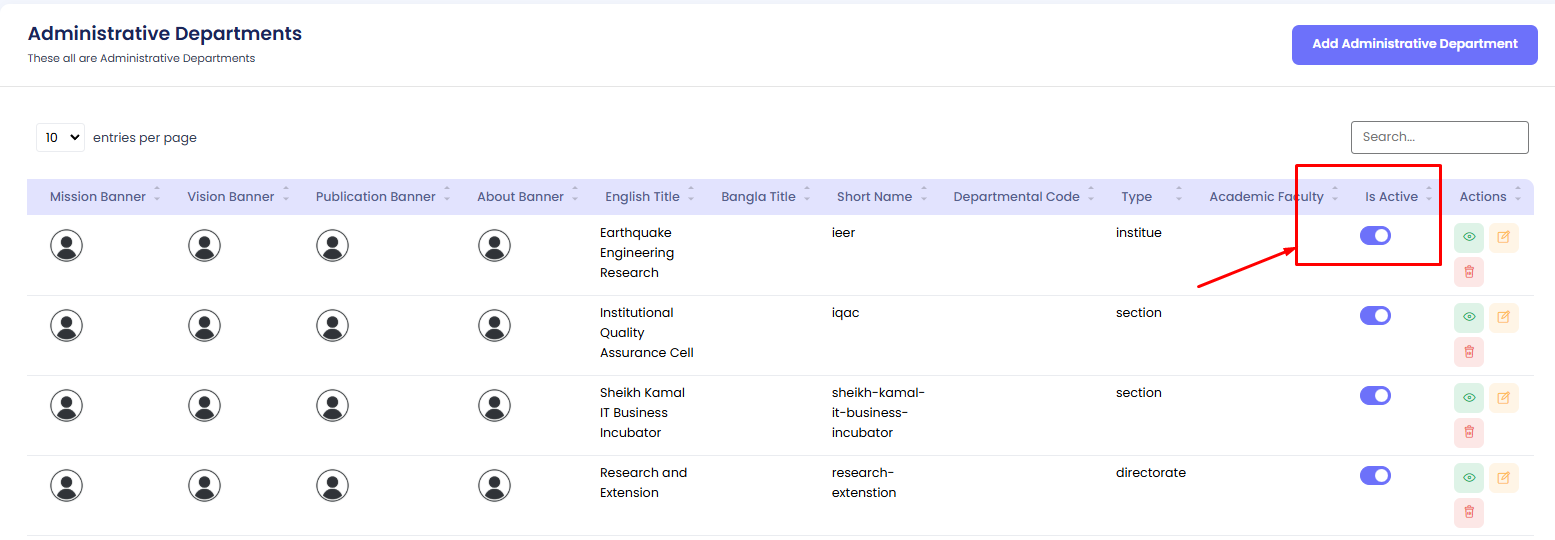
Admin Positions
The list of different Admin Positions can be viewed here, with columns such as Serial, Title, Admin Type, Administrative Department, Is Active, and Available Actions. You can add, edit, activate/deactivate, and manage admin positions as needed.
Add an Admin Position
Step 1: Navigate to Admin Positions in your admin sidebar and click.
Step 2: Click on Add Admin Position.
Step 3: Fill in the form with the required details, including Title, Admin Type, and Administrative Department. Then hit the Create button.
Edit Admin Position
Step 1: Navigate to Admin Positions in your admin sidebar and click.
Step 2: Press the Edit button to modify an existing admin position.
Edit the necessary fields such as Title, Admin Type, and Administrative Department. Then press the Update button.
Activate/Deactivate Admin Position
Step 1: Navigate to Admin Positions in your admin sidebar and click.
Step 2: Locate the target Admin Position in the list.
Step 3: Use the toggle button under the "Is Active" column to activate or deactivate the admin position as required.
Academic Faculties
The list of different Academic Faculties can be viewed here, with columns such as Serial, Title, Slug, Is Active, and Available Actions. You can add, edit, activate/deactivate, and manage academic faculties as needed.
Add an Academic Faculty
Step 1: Navigate to Academic Faculties in your admin sidebar and click.
Step 2: Click on Add Academic Faculty.
Step 3: Fill in the form with the required details, including Title and Slug. Then hit the Create button.
Edit Academic Faculty
Step 1: Navigate to Academic Faculties in your admin sidebar and click.
Step 2: Press the Edit button to modify an existing academic faculty.
Edit the necessary fields such as Title and Slug. Then press the Update button.
Activate/Deactivate Academic Faculty
Step 1: Navigate to Academic Faculties in your admin sidebar and click.
Step 2: Locate the target Academic Faculty in the list.
Step 3: Use the toggle button under the "Is Active" column to activate or deactivate the academic faculty as required.
Student Halls
The list of different Student Halls can be viewed here, with columns such as Serial, Image, Title, Type (Girls/Boys), Is Active, and Available Actions. You can add, edit, activate/deactivate, and manage student halls as needed.
Add a Student Hall
Step 1: Navigate to Student Halls in your admin sidebar and click.
Step 2: Click on Add Student Hall.
Step 3: Fill in the form with the required details, including Title, Type (Girls/Boys), and upload an Image. Then hit the Create button.
Edit Student Hall
Step 1: Navigate to Student Halls in your admin sidebar and click.
Step 2: Press the Edit button to modify an existing student hall.
Edit the necessary fields such as Title, Type, and Image. Then press the Update button.
Activate/Deactivate Student Hall
Step 1: Navigate to Student Halls in your admin sidebar and click.
Step 2: Locate the target Student Hall in the list.
Step 3: Use the toggle button under the "Is Active" column to activate or deactivate the student hall as required.
Committee Types
The list of different Committee Types can be viewed here, with columns such as Serial, Title, Slug, Is Active, and Available Actions. You can add, edit, activate/deactivate, and manage committee types as needed.
Add a Committee Type
Step 1: Navigate to Committee Types in your admin sidebar and click.
Step 2: Click on Add Committee Type.
Step 3: Fill in the form with the required details, including Title and Slug. Then hit the Create button.
Edit Committee Type
Step 1: Navigate to Committee Types in your admin sidebar and click.
Step 2: Press the Edit button to modify an existing committee type.
Edit the necessary fields such as Title and Slug. Then press the Update button.
Activate/Deactivate Committee Type
Step 1: Navigate to Committee Types in your admin sidebar and click.
Step 2: Locate the target Committee Type in the list.
Step 3: Use the toggle button under the "Is Active" column to activate or deactivate the committee type as required.
Student Sessions
The list of different Student Sessions can be viewed here, with columns such as Serial, Title, HSC Batch, Is Active, and Available Actions. You can add, edit, activate/deactivate, and manage student sessions as needed.
Add a Student Session
Step 1: Navigate to Student Sessions in your admin sidebar and click.
Step 2: Click on Add Student Session.
Step 3: Fill in the form with the required details, including Title and HSC Batch. Then hit the Create button.
Edit Student Session
Step 1: Navigate to Student Sessions in your admin sidebar and click.
Step 2: Press the Edit button to modify an existing student session.
Edit the necessary fields such as Title and HSC Batch. Then press the Update button.
Activate/Deactivate Student Session
Step 1: Navigate to Student Sessions in your admin sidebar and click.
Step 2: Locate the target Student Session in the list.
Step 3: Use the toggle button under the "Is Active" column to activate or deactivate the student session as required.
Courses
The list of different Courses can be viewed and managed here, with columns such as Serial, Administrative Department, Title, Course Code, Course Credit, Course Type, Syllabus Pdf, Is Optional, Is Active, and Available Actions. You can add, edit, activate/deactivate, and manage courses as needed.
Add a Course
Step 1: Navigate to Courses in your admin sidebar and click.
Step 2: Click on Add Course.
Step 3: Fill in the form with the required details, including Administrative Department, Title, Course Code, Course Credit, Course Type, Syllabus Pdf, Is Optional, and Is Active. Then hit the Create button.
Edit a Course
Step 1: Navigate to Courses in your admin sidebar and click.
Step 2: Press the Edit button to modify an existing course.
Edit the necessary fields such as Administrative Department, Title, Course Code, Course Credit, Course Type, Syllabus Pdf, Is Optional, and Is Active. Then press the Update button.
Activate/Deactivate Course
Step 1: Navigate to Courses in your admin sidebar and click.
Step 2: Locate the target Course in the list.
Step 3: Use the toggle button under the "Is Active" column to activate or deactivate the course as required.
Mark Course as Optional
Step 1: Navigate to Courses in your admin sidebar and click.
Step 2: Locate the target Course in the list.
Step 3: Use the toggle button under the "Is Optional" column to mark the course as optional or required as per your needs.
Session Has Courses
The details of Session Has Courses can be viewed and managed here. This section links courses to specific student sessions along with additional details like the level, term, and optional status. The table includes the following columns:
Add a Course to a Session
Step 1: Navigate to the Session Has Courses section in your admin sidebar and click.
Step 2: Click on the Add Course button.
Step 3: Fill in the form with the required details:
- Department: Select the department offering the course.
- Course: Choose the course to associate with the session.
- Student Session: Select the student session for the course.
- Level: Specify the academic level.
- Term: Choose the term within the level.
- Is Optional: Mark whether the course is optional or mandatory.
Once all fields are completed, click on the Create button to save.
Edit a Course in a Session
Step 1: Navigate to the Session Has Courses section in your admin sidebar and click.
Step 2: Press the Edit button beside the target course entry to modify it.
Edit the necessary fields such as Department, Course, Session, Level, Term, or Is Optional. Then click on the Update button to save changes.
Mark Course as Optional
Step 1: Navigate to the Session Has Courses section in your admin sidebar and click.
Step 3: Use the toggle button under the "Is Optional" column to mark the course as optional or required as per your needs.
Division
The list of Divisions can be viewed and managed here. The table includes the following columns:
- Serial: A unique identifier for each division entry.
- Name: The name of the division in English.
- Bangla Name: The name of the division in Bangla.
- Is Active: Indicates whether the division is active or inactive.
- Actions: Options to edit or delete a division.
Add a Division
Step 1: Navigate to Division in your admin sidebar and click.
Step 2: Click on Add Division.
Step 3: Fill in the form with the required details, including:
- Name: Provide the name of the division in English.
- Bangla Name: Provide the name of the division in Bangla.
- Is Active: Specify whether the division should be active or inactive.
Then click the Create button to save the new division.
Edit a Division
Step 1: Navigate to Division in your admin sidebar and click.
Step 2: Locate the division you want to edit and click the Edit button under the "Actions" column.
Edit the necessary fields, such as Name, Bangla Name, or Is Active. Then press the Update button to save your changes.
Activate/Deactivate a Division
Step 1: Navigate to Division in your admin sidebar and click.
Step 2: Locate the target division in the list.
Step 3: Use the toggle button under the "Is Active" column to activate or deactivate the division as needed.
Districts
The list of Districts can be viewed and managed here. The table includes the following columns:
Add a District
Step 1: Navigate to Districts in your admin sidebar and click.

Step 2: Click on Add District.
Step 3: Fill in the form with the required details, including:
- Name: Provide the name of the district in English.
- Bangla Name: Provide the name of the district in Bangla.
- Division: Select the division to which the district belongs.
- Is Active: Specify whether the district should be active or inactive.
Then click the Create button to save the new district.
Edit a District
Step 1: Navigate to Districts in your admin sidebar and click.
Step 2: Locate the district you want to edit and click the Edit button under the "Actions" column.
Edit the necessary fields, such as Name, Bangla Name, Division, or Is Active. Then press the Update button to save your changes.
Activate/Deactivate a District
Step 1: Navigate to Districts in your admin sidebar and click.
Step 2: Locate the target district in the list.
Step 3: Use the toggle button under the "Is Active" column to activate or deactivate the district as needed.
Upazilas
The list of Upazilas (sub-districts) can be managed in this section. The table includes the following columns:
- Serial: A unique identifier for each Upazila entry.
- Name: The name of the Upazila in English.
- Bn Name: The name of the Upazila in Bangla.
- District: The district under which the Upazila is located.
- Is Active: Indicates whether the Upazila is active or inactive.
- Actions: Options to edit or delete an Upazila.
Add an Upazila
Step 1: Navigate to Upazilas in your admin sidebar and click.
Step 2: Click on Add Upazila.
Step 3: Fill in the form with the required details, including:
- Name: Provide the name of the Upazila in English.
- Bn Name: Provide the name of the Upazila in Bangla.
- District: Select the district to which the Upazila belongs.
- Is Active: Specify whether the Upazila should be active or inactive.
Then click the Create button to save the new Upazila.
Edit an Upazila
Step 1: Navigate to Upazilas in your admin sidebar and click.
Step 2: Locate the Upazila you want to edit and click the Edit button under the "Actions" column.
Edit the necessary fields, such as Name, Bn Name, District, or Is Active. Then press the Update button to save your changes.
Activate/Deactivate an Upazila
Step 1: Navigate to Upazilas in your admin sidebar and click.
Step 2: Locate the target Upazila in the list.
Step 3: Use the toggle button under the "Is Active" column to activate or deactivate the Upazila as needed.
Students
Details of Students can be viewed and managed here. The table includes columns like Serial, Image, Student ID, Email, First Name, Last Name, Phone, Gender, Department Short Name, Registration Period, Student Session, Student Hall, Is Discontinue, Is Cancel, and Actions. You can add, edit, and manage student information as needed.
Add a Student
Step 1: Navigate to Students in your admin sidebar and click.
Step 2: Click on Add Student.
Step 3: Fill in the form with the required details, including Student ID, First Name, Last Name, Email, Phone, Gender, Department, Session, and Hall. Then hit the Create button.
Edit a Student
Step 1: Navigate to Students in your admin sidebar and click.
Step 2: Locate the target student in the list and press the Edit button.
Edit the necessary fields such as First Name, Email, or Department. Then press the Update button.
Discontinue or Cancel a Student
Step 1: Navigate to Students in your admin sidebar and click.
Step 2: Locate the target student in the list.
Step 3: Use the toggle buttons under the "Is Discontinue" or "Is Cancel" column to change the status of the student as required.
Student Addresses
The Student Addresses section manages information about student locations, including Division, District, Upazila, Post Office, and Address details. The table includes columns for Serial, Student, Division, District, Upazila, Post Office, Address, Address Type, and Actions. You can add, edit, or delete address records as required.
Add a Student Address
Step 1: Navigate to the Student Addresses section in the admin panel.
Step 2: Click on Add Address.
Step 3: Fill in the required details:
Once all details are filled in, click on the Save button to create the address.
Edit a Student Address
Step 1: Navigate to the Student Addresses section in the admin panel.
Step 2: Locate the target address in the list and click the Edit button under the Actions column.
Step 3: Modify the necessary fields (e.g., Division, District, or Address) and click Update to save the changes.
Registration Periods
The Registration Periods section manages information about various registration periods, including details like Title, Fee, From, To, Department Short Name, Registration Type, Level, Term, Student Session, Course Coordinator, and status indicators for Is Result Published and Is Active. The table includes columns for Serial, Overview PDF, Title, Fee, From, To, Department Short Name, Registration Type, Level, Term, Student Session, Course Coordinator, Is Result Published, Is Active, and Actions. You can add, edit, or delete registration period records as required.
Add a Registration Period
Step 1: Navigate to the Registration Periods section in the admin panel.
Step 2: Click on Add Registration Period.
Step 3: Fill in the required details such as Title, Fee, Dates (From & To), Department, Level, Term, etc.
Once all details are filled in, click on the Save button to create the registration period.
Edit a Registration Period
Step 1: Navigate to the Registration Periods section in the admin panel.
Step 2: Locate the target registration period in the list and click the Edit button under the Actions column.
Step 3: Modify the necessary fields (e.g., Title, Fee, or Dates) and click Update to save the changes.
Toggle Button Procedure
Is Result Published: This toggle button allows you to set whether the registration results are published. Simply click the toggle to change the status between Published and Not Published.
Is Active: This toggle button allows you to activate or deactivate the registration period. Click the toggle to set the status to Active or Inactive.
Registration Period Has Courses
The Registration Period Has Courses section allows you to manage courses within specific registration periods. The table includes columns for Serial, Registration Period, Course, Course Teacher, Exam Date, Exam Time, and Actions. You can assign courses to registration periods, modify the course details, and delete records as required.
Add a Course to Registration Period
Step 1: Navigate to the Registration Period Has Courses section in the admin panel.
Step 2: Click on Add Course to Registration Period.
Step 3: Select the desired registration period and assign the corresponding course. You will also need to fill in the course teacher, exam date, and exam time.
- Course: Select the course to be added to the registration period.
- Course Teacher: Assign the instructor for the course.
- Exam Date: Set the date of the exam.
- Exam Time: Specify the time of the exam.
Once all details are filled in, click on the Save button to create the course registration entry.
Edit a Course in Registration Period
Step 1: Navigate to the Registration Period Has Courses section in the admin panel.
Step 2: Locate the target course within the registration period and click the Edit button under the Actions column.
Step 3: Modify the necessary fields (e.g., Course, Course Teacher, Exam Date, or Exam Time) and click Update to save the changes.
Student Has Courses
The Student Has Courses section allows you to manage which courses are assigned to students. The table includes columns for Serial, Student, Course, Level, Term, Syllabus PDF, Is Locked, Is Optional, and Actions. You can assign courses to students, modify course details, and delete records as needed. The Is Locked and Is Optional are toggle switches to indicate the status of the course for the student.
Add a Course to Student
Step 1: Navigate to the Student Has Courses section in the admin panel.
Step 2: Click on Add Course to Student.
Step 3: Select the student and assign the corresponding course. You will also need to provide the level, term, and syllabus PDF. Additionally, set the status for the toggle switches:
- Is Locked: Use this toggle to lock or unlock the course for the student. Locked courses cannot be modified by the student.
- Is Optional: Use this toggle to set the course as optional for the student. Optional courses are not mandatory.
Once all details are filled in, click on the Save button to assign the course to the student.
Edit a Course for Student
Step 1: Navigate to the Student Has Courses section in the admin panel.
Step 2: Locate the target course assigned to the student and click the Edit button under the Actions column.
Step 3: Modify the necessary fields (e.g., Course, Level, Term, Syllabus, Is Locked, or Is Optional) and click Update to save the changes.
Toggle Button Procedure
Is Locked: This toggle button allows you to lock or unlock a course for the student. If set to Locked, the student will not be able to modify or access the course freely. If set to Unlocked, the student can modify or access the course content as required.
Is Optional: This toggle button allows you to mark the course as optional or mandatory. If set to Optional, the student may choose whether to take the course. If set to Mandatory, the student is required to complete the course.
Student Registered Courses
The Student Registered Courses section allows you to manage the courses that students have registered for during a specific registration period. The table includes columns for Serial, Student, Course, Registration Period, Quiz Mark, Viva Mark, Report Mark, Point, Can Attempt Exam, Is Backlog, Is Self-study, Grade, and Actions. You can modify the registration details, assign marks, and change the course status as required.
Register a Course for Student
Step 1: Navigate to the Student Registered Courses section in the admin panel.
Step 2: Click on Register Course for Student.
Step 3: Select the student and assign the corresponding course along with the registration period. You will also need to provide the marks for the quiz, viva, and report, along with the following additional details:
Once all details are filled in, click on the Save button to complete the registration process for the student.
Edit a Registered Course for Student
Step 1: Navigate to the Student Registered Courses section in the admin panel.
Step 2: Locate the target course registration for the student and click the Edit button under the Actions column.
Step 3: Modify the necessary fields (e.g., Course, Marks, Backlog status, Self-study status, Grade) and click Update to save the changes.
Toggle Button Procedure
Can Attempt Exam: This toggle button indicates whether the student is allowed to attempt the exam for the course. If set to Enabled, the student can attempt the exam. If set to Disabled, the student is restricted from attempting the exam.
Is Backlog: This toggle button indicates whether the student has a backlog for the course. If set to Yes, it indicates the student has failed the course and needs to clear it. If set to No, it indicates that the student has passed or is not failing the course.
Is Self-study: This toggle button indicates whether the course is a self-study course. If set to Yes, the course is taken independently by the student. If set to No, the course is part of the regular curriculum.
Complain on Students
The Complain on Students section allows you to manage complaints filed against students, track fines, and monitor whether the student can continue registration, take exams, or clear fines.
Register a Complaint Against a Student
Step 1: Navigate to the Complain on Students section in the admin panel.
Step 2: Click on Register Complaint.
Step 3: Fill in the required complaint details:
- Student: Select the student against whom the complaint is being filed.
- Complain By: Enter the name of the person filing the complaint.
- Fine: Specify the fine imposed on the student.
- Payment Method: Select the payment method used for the fine.
- Payment Status: Indicate the payment status (e.g., Paid, Pending).
- Can Take Exam (toggle button): Set the status of whether the student can take the exam.
- Can Continue Registration (toggle button): Set the status of whether the student can continue registration.
- Can Clear by Fine (toggle button): Set the status of whether the fine can be cleared.
- Is Cleared (toggle button): Set the status of whether the fine has been cleared.
Once all details are filled in, click Save.
Edit a Complaint Against a Student
Step 1: Navigate to the Complain on Students section in the admin panel.
Step 2: Locate the complaint and click Edit.
Step 3: Modify the necessary fields and click Update.
Toggle Button Procedure
Can Take Exam: Toggle to enable or disable the student's ability to take the exam.
Can Continue Registration: Toggle to allow or restrict the student's ability to continue registration.
Can Clear by Fine: Toggle to mark if the fine can be cleared by the student.
Is Cleared: Toggle to mark whether the fine has been cleared or not.
Academic Curriculam
The degree offered by a department are added in this section. In example we are breifing about computer science & engineering department.
This title and description are coming from the admin panel of web manager.
Add a Academice Curriculam
Step 1: Navigate to Academice Curriculam in your admin sidebar and click.
Step 2: Click on Add Academice Curriculam
Step 3: Write the title, description, and select images and type of degree.
Step 4: Hit the create button. The details of degree is been created.
Edit Academic Curriculam
Step 1: Navigate to Academice Curriculam in your admin sidebar and click.
Step 2: Press edit button to edit academic curriculam.
Edit the data as needed. Then press on update button
Academic Curriculam active/deactive
Step 1: Navigate to Academice Curriculam in your admin sidebar and click.
Step 2: Find your target Academic Curriculam from the list.
Step 3: Press the toggle button under the title is_active and active/deactive the Academic Curriculam.
Committees
The available committees can be viewed here.
There are several member posted in the committes
Add a Committee Member
Step 1: Navigate to Committees in your admin sidebar and click.
Step 2: Click on Add Committee
Step 3: Select the Admin, Designation and Type of Committee . Then Hit the create button.
Edit Committee
Step 1: Navigate to Committees in your admin sidebar and click.
Step 2: Press edit button to edit committee.
Edit the data as needed. Then press on update button
Downloads
In this section, the admin can add important files for users to download.
Add Downloads
Step 1: Navigate to Downloads in your admin sidebar and click. Here you will see a list of dowloads entries.
Step 2: Click on Add Job Downloads
Step 3:Fillup the form with correct title, attach file and hit create button.
E-Resources Type
The available E-Resources type can be viewed here.
Add a E-Resources Type
Step 1: Navigate to E-Resources Type in your admin sidebar and click.
Step 2: Click on Add E-Resources Type
Step 3: Enter the baner, title and slug in the form. Then Hit the create button.
Edit E-Resources Type
Step 1: Navigate to E-Resources Type in your admin sidebar and click.
Step 2: Press edit button to edit committee.
Edit the data as needed. Then press on update button
E-Resources
The available E-Resources can be viewed here.
Add a E-Resources
Step 1: Navigate to E-Resources in your admin sidebar and click.
Step 2: Click on Add E-Resources
Step 3: Enter the baner, title and type in the form. Then Hit the create button.
Edit E-Resources
Step 1: Navigate to E-Resources in your admin sidebar and click.
Step 2: Press edit button to edit committee.
Edit the data as needed. Then press on update button
Event Types Type
The available Event Types type can be viewed here.
Add a Event Types Type
Step 1: Navigate to Event Types Type in your admin sidebar and click.
Step 2: Click on Add Event Types Type
Step 3: Enter the baner, title and slug in the form. Then Hit the create button.
Edit Event Types Type
Step 1: Navigate to Event Types Type in your admin sidebar and click.
Step 2: Press edit button to edit committee.
Edit the data as needed. Then press on update button
Event
The available Event can be viewed here.
Add a Event
Step 1: Navigate to Event in your admin sidebar and click.
Step 2: Click on Add Event
Step 3: Enter the baner, title and type in the form. Then Hit the create button.
Edit Event
Step 1: Navigate to Event in your admin sidebar and click.
Step 2: Press edit button to edit committee.
Edit the data as needed. Then press on update button
Is Home
It is similar to active/deactive. It allows a event to view in the home page.
Step 1: Navigate to Event in your admin sidebar and click.
Step 2: Find your target Academic Event from the list.
Step 3: Press the toggle button under the title is_home and active/deactive the Academic Curriculam.
Financial Aid
The available Financial Aids can be viewed here.
Add Financial Aid
Step 1: Navigate to Financial Aid in your admin sidebar and click.
Step 2: Click on Add Financial Aid.
Step 3: Enter the required details (e.g., Department, Student ID, Gender, Name, Contact Number, CGPA, etc.) in the form. Then hit the Create button.
Edit Financial Aid
Step 1: Navigate to Financial Aid in your admin sidebar and click.
Step 2: Press the Edit button to modify an existing record.
Edit the data as needed. Then press the Update button.
Activate/Deactivate Financial Aid
Step 1: Navigate to Financial Aid in your admin sidebar and click.
Step 2: Find the target Financial Aid record in the list.
Step 3: Use the toggle button under the "Is Active" column to activate or deactivate the record as needed.
General Settings
The General Settings section allows administrators to manage key details about the platform. These include updating the title, primary contact phone number, logo, and social media links. Additionally, descriptions such as "About CUET," "Campus Life," and the institution's "Mission & Vision" can be edited to reflect current and accurate information.
How to Update General Settings
Step 1: Navigate to the General Settings section in the admin panel.
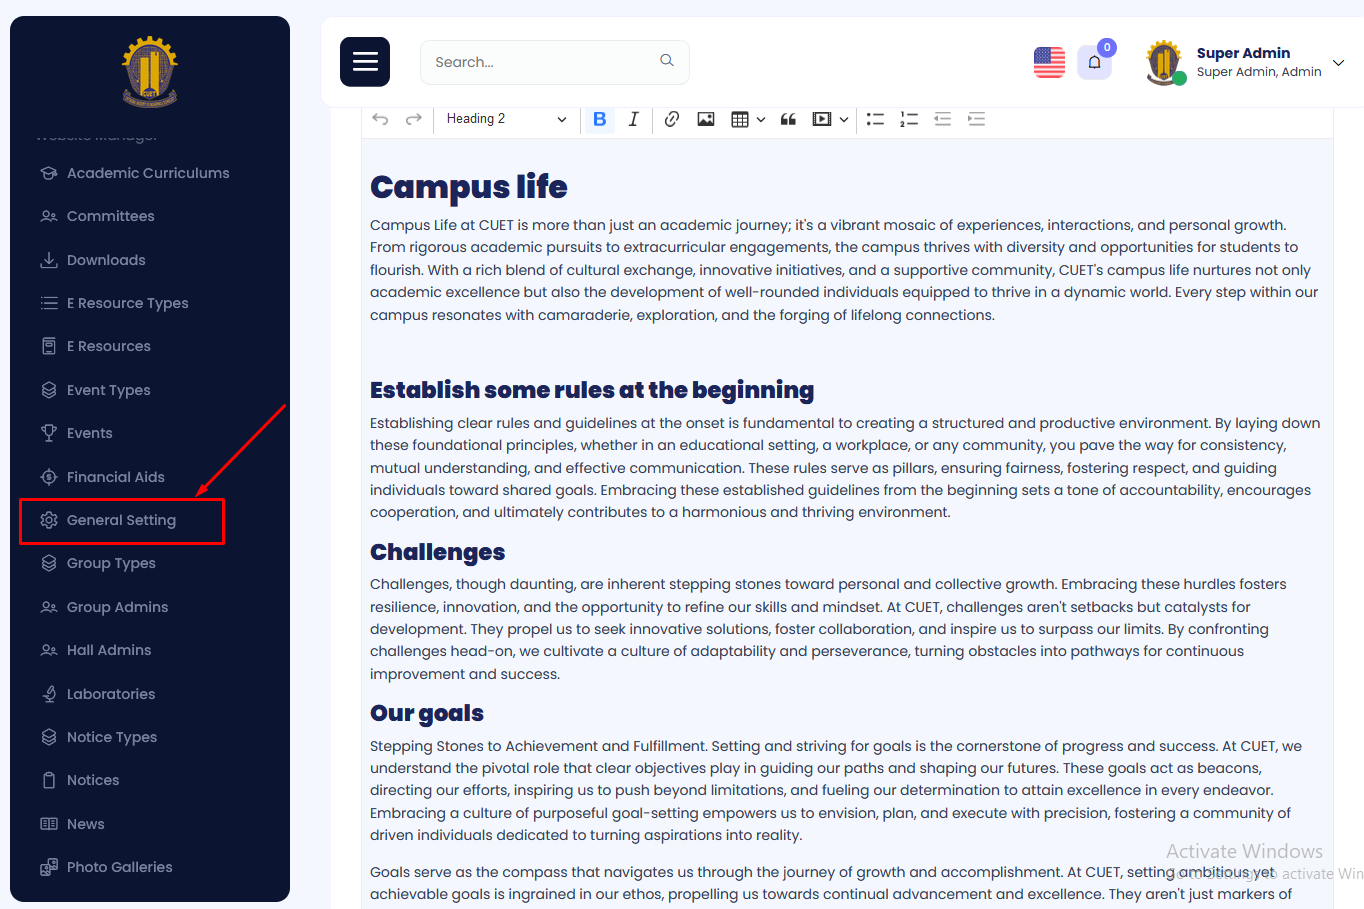
Step 2: Edit the desired fields, such as title, logo, or descriptions, according to your requirements.
Step 3: Once all updates are made, click on the Save or Update button to apply the changes.
Group Types
The available Group Types can be viewed here.
Add a Group Type
Step 1: Navigate to Group Types in your admin sidebar and click.
Step 2: Click on Add Group Type.
Step 3: Enter the banner, title, slug, and type in the form. Then hit the Create button.
Edit Group Type
Step 1: Navigate to Group Types in your admin sidebar and click.
Step 2: Press the Edit button to modify an existing group type.
Edit the data as needed. Then press the Update button.
Activate/Deactivate Group Type
Step 1: Navigate to Group Types in your admin sidebar and click.
Step 2: Locate the target Group Type in the list.
Step 3: Use the toggle button under the "Is Active" column to activate or deactivate the group type as needed.
Group Admins
The list of different Group Admins can be viewed here, with columns such as Serial, Group Type, Admin ID, Active Status, and Available Actions.
Add a Group Admin
Step 1: Navigate to Group Admins in your admin sidebar and click.
Step 2: Click on Add Group Admin.
Step 3: Fill in the form with the required details, including Group Type and Admin ID. Then hit the Create button.
Edit Group Admin
Step 1: Navigate to Group Admins in your admin sidebar and click.
Step 2: Press the Edit button to modify an existing group admin.
Edit the necessary fields such as Group Type and Admin ID. Then press the Update button.
Activate/Deactivate Group Admin
Step 1: Navigate to Group Admins in your admin sidebar and click.
Step 2: Locate the target Group Admin in the list.
Step 3: Use the toggle button under the "Is Active" column to activate or deactivate the group admin as required.
Hall Admins
The name of Hall Admins can be viewed here, with details such as serial, admin name, student hall name, designation, start date, end date, active status, and available actions.
Add a Hall Admin
Step 1: Navigate to Hall Admins in your admin sidebar and click.
Step 2: Click on Add Hall Admin.
Step 3: Fill in the form with the required details, including Admin Name, Student Hall Name, Designation, Start Date, and End Date. Then hit the Create button.
Edit Hall Admin
Step 1: Navigate to Hall Admins in your admin sidebar and click.
Step 2: Press the Edit button to modify an existing hall admin.
Edit the necessary fields such as Admin Name, Designation, Start Date, and End Date. Then press the Update button.
Activate/Deactivate Hall Admin
Step 1: Navigate to Hall Admins in your admin sidebar and click.
Step 2: Locate the target Hall Admin in the list.
Step 3: Use the toggle button under the "Is Active" column to activate or deactivate the hall admin as required.
Laboratories
The details of Laboratories can be viewed here, with columns such as Serial, Banner, Title, Active Status, and Available Actions.
Add a Laboratory
Step 1: Navigate to Laboratories in your admin sidebar and click.
Step 2: Click on Add Laboratory.
Step 3: Fill in the form with the required details, including Banner (upload an image) and Title. Then hit the Create button.
Edit Laboratory
Step 1: Navigate to Laboratories in your admin sidebar and click.
Step 2: Press the Edit button to modify an existing laboratory.
Edit the necessary fields such as Banner (upload a new image) and Title. Then press the Update button.
Activate/Deactivate Laboratory
Step 1: Navigate to Laboratories in your admin sidebar and click.
Step 2: Locate the target Laboratory in the list.
Step 3: Use the toggle button under the "Is Active" column to activate or deactivate the laboratory as required.
Notices
The details of Notices can be viewed here, with columns such as Serial, Title, Notice Type, PDF, Publish Date, Active Status, and Available Actions.
Add a Notice
Step 1: Navigate to Notices in your admin sidebar and click.
Step 2: Click on Add Notice.
Step 3: Fill in the form with the required details, including Title, Notice Type (select the category), and PDF (upload a file). Set the Publish Date, then click the Create button.
Edit Notice
Step 1: Navigate to Notices in your admin sidebar and click.
Step 2: Press the Edit button to modify an existing notice.
Edit the necessary fields such as Title, Notice Type, PDF (upload a new file), or Publish Date. Then click the Update button.
View Notice
Step 1: Navigate to Notices in your admin sidebar and click.
Step 2: Press the View button to see the full details of the notice.
The notice details, including the Title, Notice Type, PDF, Publish Date, and Active Status, will be displayed in a new window or a modal.
Activate/Deactivate Notice
Step 1: Navigate to Notices in your admin sidebar and click.
Step 2: Locate the target Notice in the list.
Step 3: Use the toggle button under the "Is Active" column to activate or deactivate the notice as required.
News
The details of News can be viewed and managed here. The table includes columns like Serial, Banner, Title, Is Home, Is Active, and Actions. You can add, edit, activate/deactivate, and display news on the homepage as needed.
Add News
Step 1: Navigate to News in your admin sidebar and click.
Step 2: Click on the Add New button in the top-right corner.
Step 3: Fill in the required details in the form, including:
- Title: The headline of the news.
- Banner: Upload an image to represent the news.
- Description: Provide the content of the news.
Once completed, click the Create button to save the news.
Edit News
Step 1: Navigate to the News section in your admin sidebar and click.
Step 2: Locate the news item you want to edit and click the Edit button (pencil icon) in the Actions column.
Modify the fields as needed (Title, Banner, Description, Is Home, Is Active) and click the Update button to save changes.
Activate/Deactivate News
Step 1: Navigate to the News section in your admin sidebar and click.
Step 2: Locate the Is Active column for the target news item.
Step 3: Use the toggle switch to activate or deactivate the news. Blue indicates active, while gray indicates inactive.
Display News on Homepage
Step 1: Navigate to the News section in your admin sidebar and click.
Step 2: Locate the Is Home column for the target news item.
Step 3: Use the toggle switch to display the news on the homepage. Blue indicates the news is displayed on the homepage, while gray indicates it is not.
Search and Filter News
Use the search bar at the top-right corner to find specific news items. You can also adjust the number of entries displayed per page using the dropdown menu at the top-left corner of the table.
Photo Gallery
The details of Photo Gallery can be viewed and managed here. The table includes columns like Serial, Image, Title, Is Home, Is Active, and Actions. You can add, edit, activate/deactivate, and display photos on the homepage as needed.
Add Photo
Step 1: Navigate to Photo Gallery in your admin sidebar and click.
Step 2: Click on the Add New button in the top-right corner.
Step 3: Fill in the required details in the form, including:
- Title: The title of the photo.
- Image: Upload the image to be displayed in the gallery.
- Description: Provide a description of the photo (optional).
- Is Home: Select whether to display this photo on the homepage.
- Is Active: Set the active status to enable or disable the photo.
Once completed, click the Create button to save the photo.
Edit Photo
Step 1: Navigate to the Photo Gallery section in your admin sidebar and click.
Step 2: Locate the photo you want to edit and click the Edit button (pencil icon) in the Actions column.
Modify the fields as needed (Title, Image, Description, Is Home, Is Active) and click the Update button to save changes.
Activate/Deactivate Photo
Step 1: Navigate to the Photo Gallery section in your admin sidebar and click.
Step 2: Locate the Is Active column for the target photo.
Step 3: Use the toggle switch to activate or deactivate the photo. Blue indicates active, while gray indicates inactive.
Display Photo on Homepage
Step 1: Navigate to the Photo Gallery section in your admin sidebar and click.
Step 2: Locate the Is Home column for the target photo.
Step 3: Use the toggle switch to display the photo on the homepage. Blue indicates the photo is displayed on the homepage, while gray indicates it is not.
Slider
The details of the Slider can be viewed and managed here. The table includes columns like Serial, Banner, Title, Type, Is Active, and Actions. You can add, edit, activate/deactivate, and display banners in the slider as needed. The slider allows you to feature images or banners with specific content and links that can be displayed on your website's homepage or in specific sections based on the type of slider.
Add Slider
Step 1: Navigate to Slider in your admin sidebar and click.
Step 2: Click on the Add New button in the top-right corner.
Step 3: Fill in the required details in the form, including:
- Title: The title of the slider banner.
- Banner: Upload the banner image to be displayed in the slider.
- Banner Url: Add a URL to redirect when the banner is clicked.
- Button Text: The text to be displayed on the button associated with the banner.
- Button Url: Add a URL to redirect when the button is clicked.
- Type: Select the type of slider (e.g., department, home, promotional, etc.).
Once completed, click the Create button to save the slider.
Edit Slider
Step 1: Navigate to the Slider section in your admin sidebar and click.
Step 2: Locate the slider you want to edit and click the Edit button (pencil icon) in the Actions column.
Modify the fields as needed (Title, Banner, Type, Is Active) and click the Update button to save changes.
Activate/Deactivate Slider
Step 1: Navigate to the Slider section in your admin sidebar and click.
Step 2: Locate the Is Active column for the target slider.
Step 3: Use the toggle switch to activate or deactivate the slider. Blue indicates active, while gray indicates inactive.
Display Slider on Homepage
Step 1: Navigate to the Slider section in your admin sidebar and click.
Step 2: Locate the Is Active column for the target slider.
Step 3: Use the toggle switch to display the slider on the homepage. Blue indicates the slider is displayed on the homepage, while gray indicates it is not.
Social Account Profile Creation
The Social Account Profile section allows you to create, update, and delete your social media account details. Follow the steps below to manage your social account information within your Faculty Member Profile.
Accessing the Faculty Member Profile Menu
Step 1: Navigate to the Faculty Member Profiles section in the main menu.
Accessing the Social Accounts Submenu
Step 2: Once in the Faculty Member Profile section, you will find a submenu on the left side. Click on the menu item labeled Social Accounts.
Creating Social Account Details
First you have to hit the add new button
In the social account form, you can add the following details:
Once you've filled in all required fields, click the Create button to save your social account details. The information will be stored and displayed on your profile as per the system's access permissions.
Editing Social Account Details
If you need to make changes to your social account details:
Deleting Social Account Details
If you want to remove a social account entry from your profile:
After deleting a social account entry, it will no longer be visible on your profile.